background image


F 15   S U M M A RY

Summary of Contents for F15

Page 1: ...W W W P A C I F I C H E L M E T S C O M S A L E S P A C I F I C H E L M E T S C O M USE R INFOR MATION ...

Page 2: ...Pacific Helmets NZ Ltd P O Box 866 315 Heads Road Wanganui 4501 New Zealand Phone 64 6 344 5019 Fax 64 6 344 5376 Email sales pacifichelmets com Website www pacifichelmets com ...

Page 3: ...ing Doffing Recommended Storage Practices 31 Care Maintenance 32 Details of Inspections 33 Care and Maintenance Instructions Cleaning and Disinfection Precautions Routine Cleaning and Disinfection Optional Machine Washing of Selected Components Decontamination 37 Repair Replace and Obsolescence Instructions 39 Warranty 40 Warranty Information 42 Technical Information 43 Certification And Distribut...

Page 4: ...PLE ASE RE AD BEFORE USE ...

Page 5: ...onfigured ensemble This guide provides information and instructions related to the selection use care and maintenance of your helmet However this guide does not tell you when and under what circumstances you should wear your helmet Rather it suggests how to properly wear your helmet and provides an understanding of the limitations of your helmet in how it may or may not protect you The responsibil...

Page 6: ...nment in which the helmet is used and stored Recommendations on this topic should be sought from the manufacturer The safety intended to be provided by the helmet can only be ensured when it is properly assembled and correctly fitted and that removable parts shall not be worn separately When fitted with another item of personal protective equipment or with an accessory other than those supplied by...

Page 7: ...l Firefighting and Proximity Firefighting and applicable national state provincial and local regulations pertinent to emergency operations ii For NFPA users your use of this protective helmet is consistent with NFPA1500 Standard on Fire Department Occupational Safety and Health and Wellness Program Title 29 Code of Federal Regulations Part 1910 132 and General Requirements of Subpart I Personal Pr...

Page 8: ...oyment of your neck protector and the proper attachment and adjustment of your chinstrap for securing the helmet on your head viii Limitations of protection You have been trained and understand that not all helmets provide heat and or flame resistance or protection from all hazards and you have been trained and understand how to select and properly use the appropriate helmet to meet the expected e...

Page 9: ...azards Heavy falling objects or impact with hard surfaces involve forces that can be fatal or severely injure you Do not use your protective helmet if it is contaminated cut punctured worn cracked abraded or altered from its original conditions xiii The need for complete ensemble This helmet is effective only when it is properly worn provides a proper interface with your garment hood and SCBA and ...

Page 10: ...been approved by Pacific Helmets For identification purposes you may mark your protective helmet on the interior using an indelible marker if permitted by your department or organization Do not write over or obscure information on the product label xviii Testing and assessment of performance Your protective helmet has been evaluated for a number of performance properties that are based on the resp...

Page 11: ...F 15 SUMMARY ...

Page 12: ...Pivot Headband 8 Front Plinth 9 Eye Protector 10 Dual Pivot Face Shield 11 Polyurethane Impact Liner 12 Micro Flex Hinge 13 Hands Free Comms Bracket 14 6 Point Ribbon Suspension System with Padded Air Mesh 15 4 Point Nomex Chinstrap 16 Quick Release Buckle TECHNICAL DATA Helmet Size One Size Fits All Ratchet adjustable headband for head sizes between 52 64cm Downsize padding available for smaller ...

Page 13: ...W W W PA C I F I C H E L M E T S C O M 13 3 4 6 5 7 2 9 15 16 14 13 10 11 8 1 12 ...

Page 14: ...0 Trim Range 3M8887 Trim Range Custom reflector shapes available by request Reflector options are standard dependent Adapter Plates Easi On Off Base SCBA Easi On Off Base Combo Liner PU Liner Headband Air Mesh Headband and Air Mesh Only Liner Retainer Set Chinstrap 4 point Nomex Chinstrap Screw Set for Chinstrap Eye Protector OTEP V3 Eye Protector OTEP Hinge Kit Face Shield Clear Face Shield Gold ...

Page 15: ... UK3AAA eLED Vizion I Lamp F15 Vizion Plinth Comms System Titan Comms Bracket Titan Comms with Push to Talk PTT Option Sizing Downsize Padding for 50 56cm Including but not limited to subject to change Some options are standard dependent Spare parts and accessories may not be compatible with your exact build of F15 please contact your distributor for more information NOTE it is important to consul...

Page 16: ...SE T TING UP YOUR HELME T ...

Page 17: ...nds upon the proper fit of your helmet and proper use of all features and components All adjustments are independent of how far your head goes into the helmet and do not affect the length of the overhead suspension ribbons REMOVE PACKAGING Remove the vinyl protective film from the face shield and or eye protector and remove user information from inside helmet before use Protective films can be dis...

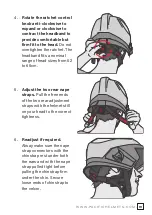
Page 18: ...osen the two rear adjustment straps by lifting the rear ladder lock and pulling on the webbing strap with the other hand 2 Undo the chinstrap and loosen the under chin strap Hold the fixed end of the under chin strap and pull on the buckle to loosen the under chin strap 3 Put the Helmet on and do up the buckle Pull the free end of the strap under your chin until secure This should be fitted firmly...

Page 19: ...ts a nominal range of head sizes from 52 to 65cm 5 Adjust the two rear nape straps Pull the free ends of the two rear adjustment straps with the helmet still on your head to the correct tightness 6 Readjust if required Alway make sure the nape strap connectors with the chinstrap rest under both the ears and with the nape strap pulled tight before pulling the chinstrap firm under the chin Secure lo...

Page 20: ...from Liner A Remove the cradle hanger from the liner slot by pulling upwards on the ribbon C 2 Detach Headband D from Cradle Hanger B Disengage the headband boss by bending the cradle hanger to enable the boss to pop free 3 Reattach Headband D to Cradle Hanger B Reattach the boss on the required level by sliding the boss into the cradle hanger on one edge with the cradle hanger bending then slide ...

Page 21: ... pushing when the same clicking sound is heard again The eye protector is now locked in place WARNING DO NOT PULL THE EYE PROTECTOR This may break the mechanism causing the eye protector to stay deployed This damage is not covered by the warranty ADJUST WEARING HEIGHT Turn the screw using the hex key provided to adjust the resting position of the eye protector on the nose bridge LOCK OTEP Safety l...

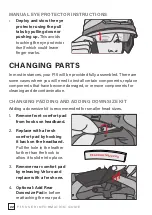
Page 22: ...in components replace components that have become damaged or remove components for cleaning and decontamination CHANGING PADDING AND ADDING DOWNSIZE KIT Adding a downsize kit is recommended for smaller head sizes 1 Remove front comfort pad from hooks on headband 2 Replace with a fresh comfort pad by hooking it back on the headband Pull the hole in the leather further than the hook to allow it to s...

Page 23: ... attached 1 The neck protector attaches at 4 points around the edge of the Chassis 2 The tabs pull out towards the inside of the helmet Hold on to the first tab and pull it down 3 Repeat for the remaining 3 tabs Reverse the process to reattach the neck protector REPLACING THE EYE PROTECTOR Please see our website www pacifichelmets com for an instruction video on how to replace the eye protector 1 ...

Page 24: ...a flat head screw driver to pop the rivet out There are 2 on each side 2 Unscrew the two screws holding the Rear T Bracket to the Chassis 3 Unscrew the center screw holding the Rear T Bracket to the Liner Pull the chinstrap out for cleaning or replacement 4 Reattach the new cleaned chinstrap fastening all screws and rivets to their original positions ...

Page 25: ...s and bosses aside 3 Detach the old face shield 4 Place the new face shield in the helmet Align the bottom of the face shield Make sure the pin on each side goes into the rail 5 Attach new face shield Slide the top of the face shield into place so the rails on the face shield align with the screw holes On each side reattach the two bosses and fasten the two screws ...

Page 26: ...w for use with different accessories 1 Unfasten the screw from the inside of the Micro Flex Hinge 2 Detach the Side Plate from the rear first then lever it off the slot at the side of the helmet chassis 3 Attach the new Side Plate by sliding the tab into the chassis slot and then clipping it into place 4 Fasten the screw on the inside of the helmet ...

Page 27: ... Off Base tightly 3 Swivel the Clip to check the fit is secure ATTACHING TITAN COMMS BOOM MIC AND SPEAKER 1 Secure the mic bracket onto the liner using the screw supplied with a screw driver 2 Secure the comms mic by pushing its tip into the bracket slot until you hear it clicks 3 Adjust the boom mic shaft into position for optimum performance 2 3 1 2 3 ...

Page 28: ...en in use with the SCBA EOB combo plate to improve the seal of your mask 1 The slide adjuster can be adjusted to improve the seal on your BA mask 2 Unfasten the screw from the slide adjuster for the BA mask attachment 3 Move the slide adjuster up or down the rail as required 4 Fasten the screw on slide adjuster when at the desired height ...

Page 29: ... your neck protector completely to ensure overlap between your jacket collar hood and SCBA face piece If provided and when needed ensure that your face shield or goggles are correctly deployed Always check to make sure that your protective helmet hood jacket collar do not interfere with the seal of the SCBA full face piece on your face DOFFING If your protective helmet is not contaminated Remove t...

Page 30: ...eck protectors are wet will promote growth of mildew fungus bacteria or other harmful substances that can lead to skin irritation rashes and potential diseases or illnesses Keep helmets away from potential contaminants such as oils greases or other chemical substances Store your helmet in a clean well ventilated area away from direct sunlight and away from tools or other sharp objects Do not store...

Page 31: ...CARE MAINTENANCE ...

Page 32: ...ysical damage such as rips tears cuts loss of seam integrity broken missing stitches and thermal damage such as charring burn holes and melting Suspension and retention systems damaged broken or missing components Face shield eye protector damaged broken or missing components blisters discoloration deep scratches to the face shield eye protector that limit visibility Reflective trims damaged charr...

Page 33: ...and thoroughly dried CLEANING AND DISINFECTION PRECAUTIONS HELMET Use only mild detergents with a pH range of not less than 6 0 pH and not greater than 10 5 pH as indicated on the product material safety data sheet MSDS or original product container Do not use detergents or cleaning agents that are not approved by Pacific Helmets Please contact us if in doubt Never use solvents or chlorine bleach ...

Page 34: ...r helmet with or without the neck protector comfort padding and chinstrap However it is advisable to remove them before cleaning the protective helmet Use the following procedures for routine cleaning by hand in a utility sink 1 Choose a utility sink that is specifically used for cleaning protective gear do not use a kitchen sink or other sink that is employed for personal products 2 Optionally re...

Page 35: ...onents are dry reinstall the neck protector and comfort padding according to instructions in previous section of this guide 12 Rinse the utility sink following routine cleaning procedure OPTIONAL MACHINE WASHING OF SELECTED COMPONENTS Washing machines and dryers may be used only for the neck protector chinstrap and comfort padding Do not wash your helmet components with other PPE like firefighting...

Page 36: ...ve helmet has become contaminated with blood or body fluid immediately isolate the helmet and inform your supervisor department or organization Before reuse of your protective helmet it must be subjected to specialized cleaning procedures that have been proven to remove contaminated fluids If your protective helmet has become contaminated with chemicals or other hazardous substances immediately is...

Page 37: ...ep indentations from contact with falling objects or major crushing It can also be seen as a whitening of laminate in impact area when the inside of the shell is inspected The brim area has long or large crack lines or flexes abnormally The helmet has obviously suffered excess heat or burning This includes any charring of the paint or helmet substrate Charring is described as an actual burnt area ...

Page 38: ...n bring this matter to the attention of your supervisor department or organization immediately Protective helmets that are no longer deemed serviceable for reasons of damage contamination or other unsafe condition must be disposed of in a fashion whereby the helmet cannot be reused One example is drilling holes in the shell removing the chinstrap and suspension system and damaging the tabs for att...

Page 39: ...WARR ANT Y ...

Page 40: ...tor up to 2 year warranty Internal plastic components and comfort padding up to 1 year warranty PLEASE NOTE Damage caused to the helmet and or components in the course of normal use is not covered by warranty Many firefighting or rescue operations including training can result in damage to this helmet which is not covered by this warranty Damage resulting from careless use e g dropping of helmet a...

Page 41: ...roximity firefighting or training must wear their helmets with aluminized hoods over the shells when engaged in these activities Follow instructions in the User Information regarding regular checks on this helmet and when making repair replace decisions Components are available as spare parts ...

Page 42: ...TECHNICAL INFORMATION ...

Page 43: ...tandard you want your helmet certified to when putting in a purchase order CERTIFICATION Certification for our helmets is completed by the following certification bodies Contact your Pacific Helmets distributor for a copy of the certificate 0194 AS NZS and NFPA BSI Group ANZ Pty Ltd Suite 2 123 Whitehorse Road Balwyn VIC 3103 AUSTRALIA CE mark BTTG Testing Certification Ltd NB number 0338 Unit 14 ...

Page 44: ...djusted and secured to the head with all components in place to provide the designed level of protection For maximum retention the helmet must fit firmly on the head and all retention straps must be securely fastened No attachments should be added nor any alterations made to the helmet except those recommended by the helmet manufacturer If replacement of any components of the harness is necessary ...

Page 45: ... servicing please see Care and Maintenance Information section Storage and transportation store helmet in dry ambient conditions when not in use For marine use keep the helmet dry and away from moisture or liquid like seawater that may deteriorate the components prematurely Always keep the helmet in its carry bag Obsolescence the helmet can be expected to remain in service for up to 25 years when ...

Page 46: ... Heptane NFPA1971 2018 AND NFPA1951 2013 Structural and proximity firefighting NFPA1971 2018 edition Technical rescue incidents NFPA1951 2013 edition SAFETY CONSIDERATIONS No helmet can protect the wearer against all possible types of impacts The capacity of the helmets designed level of protection could be exceeded in some foreseeable perilous emergency services incidents For maximum protection t...

Page 47: ...ld not be abused They should be kept free from abrasions nicks and should not be dropped sat on thrown or used as supports This applied especially to helmets that are intended to afford protection against electrical hazards Proper use consistent with NFPA1500 Standard on Fire Department Occupational Safety Health and Wellness Program and 29 CFR 1910 132 Personal Protection Equipment should be adhe...

Page 48: ...these instructions could result in death or serious injury PAC I F I C H E LM E T S N Z LTD P O B OX 8 6 6 3 15 H E A D S R OA D WA N G A N U I 4 5 0 1 N E W Z E A L A N D PH O N E 6 4 6 3 4 4 5 0 1 9 FA X 6 4 6 3 4 4 5 3 7 6 S A L E S PAC I F I C H E L M E T S C O M W W W PAC I F I C H E L M E T S C O M F 1 5 A U G 2 0 1 8 E N G L I S H E D I T I O N A1 2 2 0 0 6 ...

Reviews: