


45
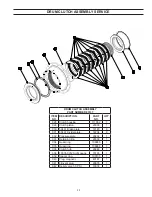
WINCH ASSEMBLY
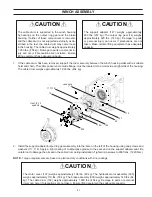
24. Install the horizontal fairlead shaft and roller assembly into the winch housing. Insert the shaft in to the housing from
the left, or gear side. Make certain spacer washers are installed at both ends of the fairlead roller. Install the clip,
cap screws, and washers. Tighten cap screws to 212 ft-lbs. (287 N-m).
25. Install the vertical fairlead rollers and shaft assemblies. Insert the shafts from the top of the housing. Make cer-
tain the spacer washers are installed at both ends of the fairlead roller. Install the clips, cap screws, and washers.
Tighten cap screws to 212 ft.-lbs. (287 N-m).
26.
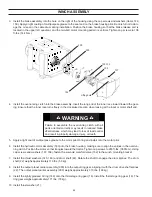
Grease the fairlead rollers as specified in the Preventive Maintenance section of this manual.
27.
Install winch to winch mounting brackets. It is highly recommended to use new capscrews and flat, hardened
washers. The hex head capscrews are 1-1/4 inch UNC-2A, Grade 8 steel, zinc plated. The capscrews should be
inspected for correct threads per inch with a gauge or an identical size and grade nut. Depending on your applica-
tion, the length of capscrew will differ. Measure the length of the capscrew to determine your application needs. It is
also recommended that you clean and inspect the threads in the mounting bracket for correct threads per inch and
any damage. Use a new capscrew of identical size as listed above to check each thread for proper fit.
If assembled “dry,” tighten capscrews to 1,360 ft-lbf. Anaerobic thread-locking compound or antiseize compound is
permitted on capscrews per customer preference. If antiseize compound is used, the torque specifications above must
be reduced as directed by the antiseize compound manufacturer’s specification. Use only antiseize compounds that
provide specific guidance on torque reduction.
205
207
206
204
203
204
207
205
201
206
205
207
202


