


21
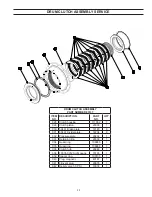
WINCH REMOVAL AND INSTALLATION
Cleanliness around all hydraulic components is of utmost
importance. Before starting any repair procedures, thor-
oughly clean the parts to be removed, as well as adjacent
areas of the tractor, to avoid entry of dirt into the winch and
winch control system. Do not leave any ports or access
openings exposed to the weather. Seal or cap the open-
ings to prevent entry of dust, moisture or other foreign ma-
terial. Cap or plug all exposed hydraulic ports and fittings.
During disassembly, be careful not to damage seals and
O-rings to be reused. Replace any damaged or defective
parts. Certain O-rings and seals specified in the replace
-
ment instructions must not be reused. In general, seals and
O-rings that work under operating hydraulic pressures, or
that require extensive disassembly to replace, should be
replaced with new parts at the time of reassembly.
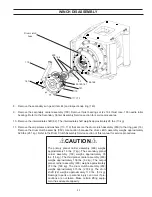
WINCH REMOVAL
Place the tractor and winch in a level position and drain
the oil from the winch into a suitable container. Install the
drain plug securely after oil has drained completely.
NOTE:
Due to the configuration of the cable drum, a small
amount of oil will remain within the drum cavity.
Remove the winch motor hoses from the motor and brake
valve. Remove the motor shift hose from the motor X port.
Remove the motor drain hose from the motor. Remove the
drum clutch hose from the elbow on the right of the winch
case.
Support the winch with a suitable hoist or platform and
remove the nuts and bolts securing the winch to the tractor
adapters, and move the winch away from the tractor.
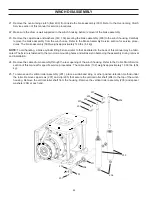
WINCH INSTALLATION
For first-time installation, contact PACCAR Winch Engi
-
neering for your specific tractor. A detailed scope of work
is put forth in this document and describes all tractor modi-
fications and adaptation.
Remove dirt, paint and rust from the mounting surfaces of
the winch and tractor adapters.
Align the winch-mounting holes with the adapter mounting
holes, and install and tighten all fasteners to the recom-
mended torque.
Fill the hydraulic motor case, through the motor case drain
port, with tractor hydraulic oil. Attach the winch control
hoses to the motor, as defined in the parts and installation
manual.
Fill the winch to the proper level with the recommended oil.
Allow five minutes for the oil to flow through the gear train
and fill the drum cavity before checking the oil level.
Start the tractor engine and operate the engine at low
RPM. Alternately, place the winch control in the reel-in,
then the reel-out position until the winch motor hydraulic
circuit is filled with oil and the winch operates smoothly.
Check the tractor hydraulic oil reservoir and fill to the prop
-
er level as required.
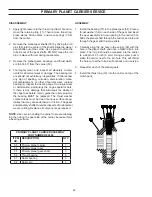
Winch weighs approximately 7,040 lbs. (3,193 kg)
without oil, cable and tractor adapters. Make cer-
tain the lifting equipment has adequate capacity. At-
tempting to lift the winch with inadequate equipment
may result in personal injury and product or property
damage.
!
WARNING
!
Hot oil may cause injury. Make certain the oil has
cooled to a safe temperature (less than 110ºF or
43ºC) before servicing winch.
!
WARNING
!
Before servicing, make sure any trapped oil pressure
in the tractor hydraulic system has been relieved.
Personal injury may result from a sudden release of
oil pressure. Relieve trapped pressure by cycling the
blade and winch control levers several times after
turning off the tractor engine. Relieve any trapped oil
pressure in the hydraulic reservoir by opening the fill
cap. Be sure to activate the winch or tractor hydrau-
lic system lock-out toggle switch(es) or as directed in
the tractor service manual.
!
WARNING
!
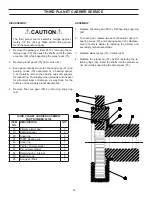
Failure to fill the motor case with hydraulic oil before
operating the winch may result in serious damage to
the motor.
CAUTION
!
!


