Oxford Instruments X-MET8000 Series Operator'S Manual Download Page 15

2.

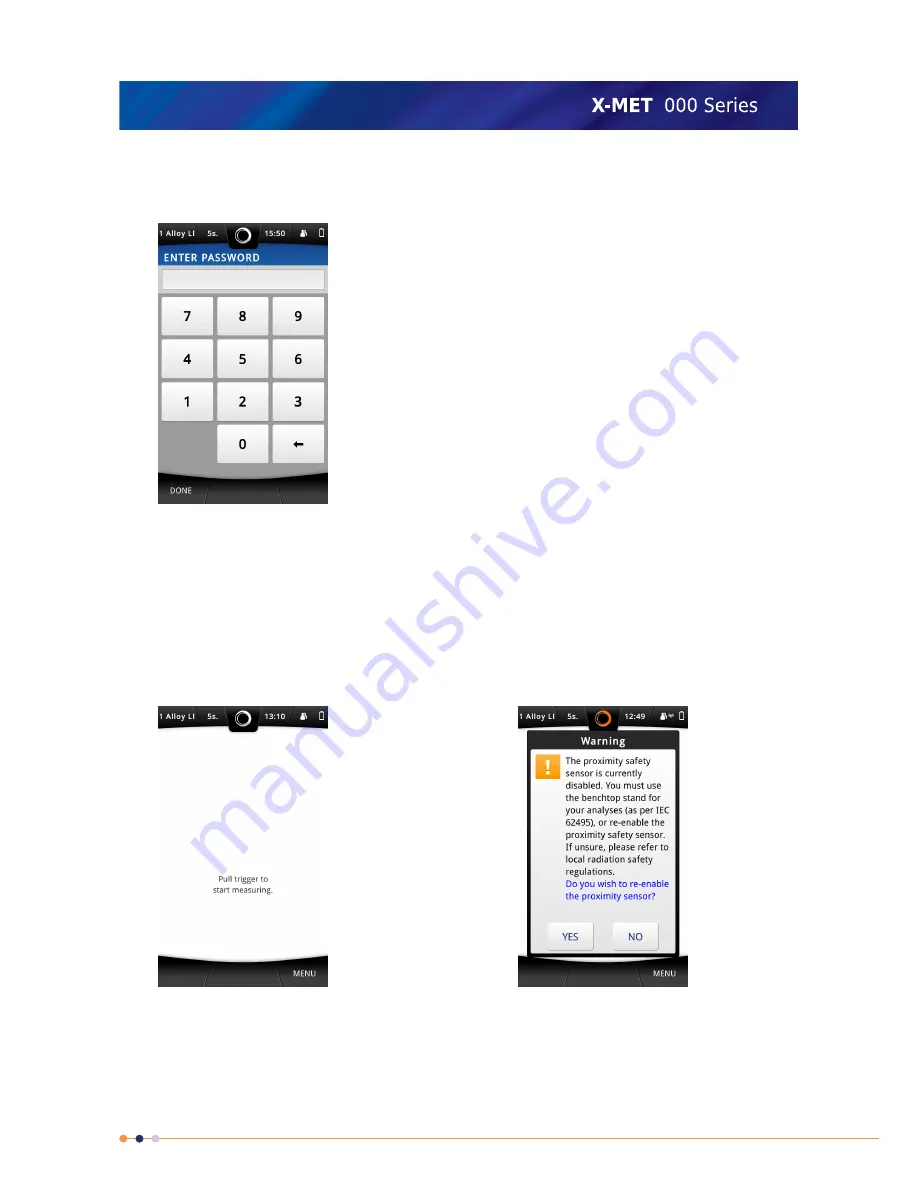
Tap Login in the bottom left of the Safety screen.

The Login screen appears, with the numeric keypad.

3.

Tap the numbers to type the password.

The factory settings are:

Operator: 1111

The supervisor should change the passwords. Refer to the X-MET8000 Series Supervisor’s Manual.

4.

Tap Done.

The main screen appears. If the Proximity Safety Sensor has been disabled a warning message is
shown. The Proximity Safety Sensor can be re-enabled by tapping Yes.

If it is necessary to set the date, time or language, refer to:

X-MET8000 Series Settings

on page

97.

15

X-MET8000 Series Operator’s Manual

8

Summary of Contents for X-MET8000 Series

Page 1: ...X MET8000 Series Operator s Manual...

Page 2: ...ake A Measurement 18 The Results Screen 20 Delete A Poor Measurement 21 Print Result From Result Screen To Bluetooth Printer 21 Switch Off The X MET8000 Series 22 Advanced Measurements 23 Average A Ba...

Page 3: ...ation With A PC 86 Connect To A PC And Login 86 VNC connection to the X MET8000 series 88 Configure VNC Server Settings 89 Setup a VNC connection on a PC 89 Control the X MET8000 series using an iPad...

Page 4: ...8000 Series Is Damaged 117 Recertification 117 End Of Life 117 Resale Loss Or Theft 117 Disposal Of The X MET8000 Series 117 Technical Specifications 118 Technical Specifications X MET8000 Series 118...

Page 5: ...light radiation shield 3 Slot for optional background plate 4 Battery Charger 5 Power Supply and adapters 6 Battery x2 7 Cutout for USB stick Check sample s and optional radiation shield 8 USB cable...

Page 6: ...e external connections Check both batteries before use Refer to Battery Maintenance on page 111 X MET8000 Series Software Features Some features of the X MET8000 series depend on the selected variant...

Page 7: ...neric devices to the extension connector The extension connector is designed only for X MET8000 series accessories like the bench top stand and is not compatible with any generic consumer devices rega...

Page 8: ...Caution X Rays This symbol is a warning about X ray generation Caution X Rays Ca This symbol is a warning about X ray generation for use in Canada Caution Toxic Material This symbol is a warning about...

Page 9: ...as a safety lanyard for work at height because of the risk of a fall This can result in serious personal injury The anchor for the lanyard on the underside of the X MET8000 series is applicable for us...

Page 10: ...X MET8000 series to generate an X ray beam Safety Feature The X Ray On indicators blink red when the X MET8000 series generates an X ray beam Safety Feature If one of the X Ray On indicators fails the...

Page 11: ...ton to immediately leave the current screen and cancel an operation Home button The symbol on the Home button is lit white when the X MET8000 series is on Press and hold the Power button for 5 seconds...

Page 12: ...rrows on either side of the text box to move the cursor to the left or right The Menu Screen Tap Menu in the bottom right of the screen and the Menu screen appears This gives access to the main functi...

Page 13: ...ime 3 Proximity indicator 4 Time 5 User level 6 Bluetooth and Wi Fi 7 Battery level The user level is shown as Operator two people Supervisor one person The Tools Menu When available Tools appears in...

Page 14: ...asurements With The X MET8000 Series manual contains important safety information as well as guidance for accurate measurements Switch On The X MET8000 Series Take the X MET8000 series out of the tran...

Page 15: ...or should change the passwords Refer to the X MET8000 Series Supervisor s Manual 4 Tap Done The main screen appears If the Proximity Safety Sensor has been disabled a warning message is shown The Prox...

Page 16: ...le Name The Sample Information screen appears 2 Tap Set Sample Name The Set Sample Name screen appears with the virtual keyboard 3 Use the virtual keyboard to type the Sample Name and then tap Done 4...

Page 17: ...for the sample 1 To select an application tap Menu and then tap Method The Operator user is presented with a list of available applications The Select Application screen appears 2 Tap on a applicatio...

Page 18: ...the proximity and measurement windows are covered Do not press the X MET8000 series into the sample The proximity indicators on the X MET8000 series body lights up orange and the proximity indicator...

Page 19: ...end of the measurement time the X MET8000 series makes a ping sound Release the trigger to stop the measurement The measurement stops and the X MET8000 series displays the result It is possible to re...

Page 20: ...best match is always shown first The number of potential matches Tap on any of the column headers to sort the result by that parameter Column headers The chemical symbol If an element has a red backgr...

Page 21: ...lts screen 1 Tap Tools when a result is visible The Results screen Tools menu appears 2 Tap Delete Measurement A Warning dialog box appears 3 Do one of the following Tap OK to delete the measurement T...

Page 22: ...esult for the printing In few seconds result is printed at the Bluetooth Printer Switch Off The X MET8000 Series Press and hold the Power button until the screen switches off The X MET8000 series powe...

Page 23: ...me and uses a separate name for a batch of measurements For example Sample Batch could include Sample 1 Sample 2 Sample 3 and so on Which Method The application defines how the X MET8000 series analys...

Page 24: ...steps happen automatically and can make life very easy for an operator Alloy application Empirical For Stainless Steel These steps show how the Alloy application uses an empirical calibration to anal...

Page 25: ...to identify the sample 2 It compares the identification spectrum with all the empirical calibrations to obtain a match 3 It does not find a match with any empirical calibration all shown in red 4 It s...

Page 26: ...urement times for example 15 seconds or more Complex alloys also require longer measurement times to analyze all the trace elements Longer measurements will always give more precise results However th...

Page 27: ...easurement time It is possible to set the measurement time to zero There is no ping sound and the operator must decide when to stop the measurement If Timed Assay is off the operator pulls the trigger...

Page 28: ...d slide the list to scroll it up or down 3 To enable or disable Light Elements tap Edit pencil next to the application The Light Elements Analysis screen appears 4 Tap Light Elements Analysis ON or OF...

Page 29: ...say OFF according to how you want to analyze the samples Make sure that a tick appears in the correct Timed Assay tick box 3 Tap Measurement Time The Set Measurement Time screen appears with the numer...

Page 30: ...correct 1 Tap the status bar to access the Method and Measurement Time The Status Bar screen appears 2 Do one of the following If it is necessary to change one or the other tap Method or Measurement...

Page 31: ...ber of measurements 1 Tap Menu and then tap Settings The Settings screen appears 2 Tap Result View Settings The Result View Settings screen appears 3 Tap Average and make sure that the tick appears in...

Page 32: ...ber of potential matches 7 Elements list 8 Measurement unit 9 Average 1 0 Statistical measurement error 10 9 8 7 6 5 4 3 2 1 This is defined in Add The Sample And Batch Names on page 27 Sample name Th...

Page 33: ...ater the precision Search The Results History The X MET8000 series has a search facility to find results with a specific name date or method Follow these steps to search and manage the results history...

Page 34: ...Time is selected 4 Use the virtual keyboard to type the item to search for and then tap Go The History screen appears with search results 5 Tap a measurement in the list to display the results The Hi...

Page 35: ...End Time The Set Time screen appears with the numeric keypad 1 2 Use the numeric keypad to type the correct hour or use the up or down arrows on the right of the time to increase or decrease the hour...

Page 36: ...ls menu options Filter Results By Mark All Mark between selected rows Time range When Time range is selected the Set Date Range screen appears Enter the values into Set Start Date Set End Date Set Sta...

Page 37: ...h the display to access the external connections Plug a USB memory device into the USB A connector 2 Tap Menu and then tap History The History screen appears 3 Tap Tools to select Generate Report opti...

Page 38: ...nerator screen 7 Select the measurement results for the report by tapping on each result row on the Report Generator screen or tap Tools and select results using following options Filter by Sort by Ma...

Page 39: ...he device to the same Wi Fi network as the one to which the network printer is connected Please refer to the Supervisor manual to set this up Follow the steps below to generate a report to a printer 1...

Page 40: ...or screen 5 Select the measurement results for the report by tapping on each result row in Report Generator screen or tap Tools and select results using following options Filter by Sort by Mark All Ma...

Page 41: ...ed network and must connect the device to the same Wi Fi network as the one to which the server hosting the network share is connected Please refer to the Supervisor manual to set this up Follow the s...

Page 42: ...Generator screen 5 Select the measurement results for the report by tapping on each result row in the Report Generator screen or tap Tools and select the results using the following options Filter by...

Page 43: ...is feature Tap Tools Network Share The device starts generating the report to the network share after every measurement Once the report is generated to the network share the Report Generator screen ap...

Page 44: ...brary If the result is similar to the stored spectrum or the grade in the grade library then a Pass message is displayed If not a Fail message is displayed Set Pass Fail Mode to Match Grade Follow the...

Page 45: ...encil next to the Match Grade The Grade Match Settings screen appears 4 Tap on the Select Grade The Grade Library screen appears 5 Select the applicable grade and then tap Done to return to the Grade...

Page 46: ...le as a guide to adjust the Match limit settings Harder to match Easier to match Typical Setting Value Decrease Increase 0 2 Good match Decrease Increase 1 0 Possible match 8 Tap Done 4 times to retur...

Page 47: ...a The Spectra Match Settings screen appears 4 Pull the trigger to measure new reference spectra of the sample A Measuring dialog box appears The Spectra Match Settings screen appears at the end of the...

Page 48: ...a the similarity limit value must be 0 998 A Pass result is displayed when the spectrum similarity value is greater or equal to the limit set A Fail result is displayed when the spectrum similarity va...

Page 49: ...for the sample The best match is always shown first The number of potential matches The chemical symbol If an element has a red background it is because it is outside the required limits for that grad...

Page 50: ...tored within the X MET8000 series and has detailed information about how to install a USB Driver on different Windows versions Save The X MET8000 Series User Manual and USB Driver Follow these steps t...

Page 51: ...save the X MET8000 Series User Manual 7 Tap Save USB Driver to save the USB driver and its installation instructions to the USB memory device 8 Tap Done to return to the Settings screen 9 Tap Done ag...

Page 52: ...The standard URL to connect to the X MET8000 series is http 10 0 0 1 Please contact the local Oxford Instruments representative if it is necessary to change the URL Connect To A PC And Login Follow th...

Page 53: ...3 Open the Internet browser on the PC and type the URL http 10 0 0 1 The PC Login screen appears 53 X MET8000 Series Operator s Manual 8...

Page 54: ...not available in operator level The template can include company information with the logo a report header the date and page number and the X MET8000 series serial number as applicable To create a rep...

Page 55: ...de 7 GPS Position 8 Additional Information 9 Camera Image 1 0 Spectra 1 1 Operator information 1 2 Margin logo 1 3 Margin date and page number 1 12 11 10 9 8 7 6 5 4 3 2 13 The margins can include Mar...

Page 56: ...ue The report can include the grade information Grade Pass Fail result can be included in PDF and CSV reports Pass Fail Type standards information from the results can be displayed in the PDF reports...

Page 57: ...It is necessary to have a report template to create a report Follow these steps to create a report 1 From the PC main screen click Report Generator The Reports screen appears 57 X MET8000 Series Oper...

Page 58: ...2 Click New Report The Reports screen has a new report 58 X MET8000 Series Operator s Manual 8...

Page 59: ...3 Click Load Results The Measurements dialog box appears 59 X MET8000 Series Operator s Manual 8...

Page 60: ...and use the calendar to choose a date Click the End Date tick box and use the calendar to choose a date Click the Sample Name tick box and type all or part of the sample name Click the Method tick box...

Page 61: ...for the report 8 Select the required template for the report from the Report Template drop down list 9 Click Download to download a PDF file The File Download dialog box appears 1 0 Click Save to save...

Page 62: ...ies using a WEB browser running on a PC and through a VNC connection from a PC and an iPad WEB browsers on mobile devices may not be fully compatible with the X MET8000 series web interface some featu...

Page 63: ...Many mobile devices use web browsers optimized for mobile web browsing these might not include all features required by the X MET8000 series web GUI Multiple X MET8000 series devices running different...

Page 64: ...topology In managed networks existing infrastructure like routers and switches connect the clients to the network shared resources are accessible from all network connected clients 64 X MET8000 Serie...

Page 65: ...thentication or you are unable to connect to the network using the following steps please contact your local network administrator for support Add A Broadcast Wi Fi Connection Follow these steps to co...

Page 66: ...3 Tap the ON tick box The Wi Fi Settings screen changes 4 Tap View Connections The Wi Fi Connections screen appears 66 X MET8000 Series Operator s Manual 8...

Page 67: ...rch is complete the screen shows the available Wi Fi networks The list is ordered with the strongest signals at the top 6 If necessary tap Tools Scan Again Another search for Wi Fi networks begins and...

Page 68: ...tions screen This shows the active Wi Fi connection 1 0 Tap Done to return to the Wi Fi Settings screen Wait until the Network Information IP address and Mask update in the Wi Fi Settings screen The u...

Page 69: ...Wi Fi network Managed networks can use either WPA or WPA2 Personal encryption and ad hoc networks can use WPA None encryption 1 Navigate Status Bar Wireless The Wireless screen appears 2 Tap Wi Fi Th...

Page 70: ...he Wi Fi Settings screen changes 4 Tap View Connections The Wi Fi Connections screen appears 5 Tap Tools Connect To Network The Connect To Hidden Network screen appears 6 Tap Set SSID 70 X MET8000 Ser...

Page 71: ...the SSID and then tap Done to return to the Connect To Hidden Network screen 8 Do one of the following Tap Managed Tap Ad Hoc 9 Tap Set Authentication The Set Authentication Method screen appears 71 X...

Page 72: ...p WPA WPA2 Personal For an ad hoc network the second choice is WPA None 1 1 Tap Done to return to the Connect To Hidden Network screen The Connect To Hidden Network screen changes 1 2 Tap Set Passkey...

Page 73: ...e to return to the Wi Fi Settings screen Wait until the Network Information IP address and Mask update in the Wi Fi Settings screen The updated IP address can be used to access the X MET8000 series fr...

Page 74: ...ollowing instructions Configure A Printer It is necessary to connect the X MET8000 series device to a Wi Fi network before configuring a printer Follow the steps below to configure a printer The super...

Page 75: ...ting Tools Scan Again 4 Tap either on the found Network Printers or Add Other Printer to input the printer information manually The Add Edit Printer screen appears 5 Do the following Tap Name The Prin...

Page 76: ...driver from a USB memory device then tap Model The Printer Model screen appears 8 Tap Maker to select the applicable maker Tap Done to return to the Printer model screen The Printer Model screen upda...

Page 77: ...er and tap Tools Maintenance Selected The Printer Maintenance screen appears 3 Tap Print Test Page The Information dialog box appears 4 Tap OK to return to the Printer Maintenance screen 5 If the prin...

Page 78: ...d Please refer to the Supervisor manual to set this up Follow the steps below to generate a report to a printer 1 Tap Menu and then tap History The History screen appears 2 Tap Tools Generate Report T...

Page 79: ...elect results using following options Filter by Sort by Mark All Mark between selected rows 6 Tap Tools Printer after selecting results The device starts generating the report and sending it to the pr...

Page 80: ...ings screen appears 2 Do all of the following Set Server Set Server is the IP address of the server hosting the network share Set Share Name Set Share name is the name of the network share Set Directo...

Page 81: ...times to return to the main screen Write Test File To Network It is necessary to configure the Network Share Settings before writing a test file to the network Follow these steps to write a test file...

Page 82: ...Please refer to the Supervisor manual to set this up Follow the steps below to generate a report to a Network Share 1 Tap Menu and then tap History The History screen appears 2 Tap Tools Generate Rep...

Page 83: ...ed rows 6 Tap Tools Network Share after selecting the results The device starts generating the report to the network share Once completed the Report Generator screen appears 7 Results can be automatic...

Page 84: ...guration Network Share The Network Share Settings screen appears 2 If not yet completed set up a network share as described in Configure Network Share Settings on page 80 3 Tap Send Reports ON To disa...

Page 85: ...the appropriate Report Template 6 To select the output format Tap Tools The select output format screen appears 7 Select the output format Tap PDF Tap CSV 8 Tap Done to return to the Network Share Set...

Page 86: ...8000 series is http 10 0 0 1 Please contact the local Oxford Instruments representative if it is necessary to change the URL When connecting to the X MET8000 series over Wi Fi the URL depends on the I...

Page 87: ...3 Open an Internet browser on the PC and type the IP from the previous step in the address field in the browser and hit ENTER The PC Login screen appears 87 X MET8000 Series Operator s Manual 8...

Page 88: ...series shows the Safety screen with a Warning dialog box VNC connection to the X MET8000 series The X MET8000 series can be used trough VNC over a Wi Fi connection Setup a VNC connection using the fo...

Page 89: ...eight before setting VNC Server ON Set VNC Screen Width Set VNC Screen Height 5 Use the virtual keyboard to type the new value and tap Done to return to the VNC Server Settings 6 To reset the VNC scre...

Page 90: ...remote connection If the VNC client is unable to connect to the X MET8000 series it might be necessary to disable and restart the Wi Fi on the X MET8000 series from the Wi Fi settings tap OFF and the...

Page 91: ...and started on the X MET8000 series before a VNC connection can be established 1 On the iPad purchase and install a VNC client of choice These instructions are for Mocha VNC client and can also be us...

Page 92: ...MET8000 series other default settings in Mocha VNC should be adequate Table 1 Configuration table Value VNC Server X MET8000 series IP address VNC server address 5900 VNC server port OFF Mac OS X Lion...

Page 93: ...ylus pen ON Zoom to screen height 4 Follow the steps in the next chapter to connect and control the X MET8000 series using the iPad Control the X MET8000 series using an iPad Follow these steps to con...

Page 94: ...the upper left corner to switch between Connect and Configure If no connections exist for the correct IP address add a new server or modify an existing connection to match the X MET8000 series curren...

Page 95: ...MET8000 series screen appears on the iPad Log in to the X MET8000 series as usual the X MET8000 series can now be controlled using the iPad 3 To end the VNC connection tap Menu Symbol at the bottom o...

Page 96: ...4 Tap Disconnect to end the VNC session The VNC session ends 96 X MET8000 Series Operator s Manual 8...

Page 97: ...ime and language for the X MET8000 series Set The Date And Time Follow these steps to set the date and time 1 Tap Menu and then tap Settings The Settings screen appears 2 Tap Set Date Time The Date An...

Page 98: ...me The Set Time screen appears with the numeric keypad 7 Use the numeric keypad to type the correct hour or use the up or down arrows on the right of the time to increase or decrease the hour 8 Slide...

Page 99: ...screen appears 2 Tap Instrument Configuration The Configuration screen appears 3 Tap Select Language The Select Language screen appears 4 Press and slide the list to scroll it up or down and then tap...

Page 100: ...through licensing some features are also available as temporary licenses for evaluation use Feature licenses can be obtained from your local Oxford Instruments representative Follow these steps to vie...

Page 101: ...d to a USB memory stick readable by the X MET8000 series 6 Insert the USB memory stick containing the license file in the USB A port and tap OK to upload the license or Cancel to abort the operation I...

Page 102: ...are available from your local Oxford Instruments representative 1 Tap Menu and then tap Settings The Settings screen appears 2 Tap About The About screen appears 3 Tap Feature Licenses The Licensed Fe...

Page 103: ...on the License File s for the feature s must be installed on the X MET8000 series 6 Tap Tools then tap Activate Selected Licenses A restricted license can be Use Count or Time restricted The Licensed...

Page 104: ...T8000 series Handle The X MET8000 Series Carefully Do Not Do Never point the X MET8000 series at another person Hold the X MET8000 series downwards when it is not in use or put it in the holster Do no...

Page 105: ...sample to measure it Always place the sample on a flat surface to measure it Ensure that the sample covers the analyser s measurement window and proximity window Do not place hands and other body par...

Page 106: ...he X MET8000 series into sharp objects Make sure that the protective film window is intact and measure sharp objects in particular metal swarf with care It is possible to puncture the protective film...

Page 107: ...plate Do Not Do Do not measure thin or low density samples against a table without the background plate and the light radiation shield as this will give poor results and may produce scattered radiatio...

Page 108: ...attered by the sample Always use the light stand and safety shield or the bench top stand when measuring small samples Never use the travel stand without the safety shield Always use the safety shield...

Page 109: ...heets etc always use the light radiation shield Battery Usage Do Not Do Do not make measurements if only one bar is lit Make sure that the battery has sufficient charge Do not remove the battery when...

Page 110: ...enance Follow these procedures on a daily basis Check The Battery Charge Levels Make sure that all batteries are fully charged Refer to Battery Maintenance on page 111 Check The Proximity Sensor Do th...

Page 111: ...e calculated charge of the battery The Charge Status indicator on the X MET8000 series display indicates when the battery is charging by an animation in the battery icon When the battery is fully char...

Page 112: ...level can also be checked at the bottom of the battery while the battery is in the device or stored separately To remove the battery from the device make sure that the X MET8000 series is switched off...

Page 113: ...he power supply to a mains power supply Make sure that the mains socket is easily accessible when the power supply is in use If the X MET8000 series is charged while powered off the power button light...

Page 114: ...y charged The charge display on the battery indicates charging by cycling the charge indicators and shows a fully charged battery when the battery is fully charged Mains Adapters For The Power Supply...

Page 115: ...use the Power Supply connector to connect anything other than the Power Supply Do not allow the Power Supply to come into contact with dust water oil grease or chemical solvents Do not cover the Power...

Page 116: ...attery in the Battery Charger to reset the protection circuit The charge indicators will light up and the battery starts charging when the battery is reset and ready for use The X MET8000 Series Canno...

Page 117: ...series reaches the end of its useful life Resale Loss Or Theft It may be necessary to register the change of ownership of the X MET8000 series with a regulatory organization Contact the local Oxford...

Page 118: ...ximum Weight 5 0 kg maximum Weight including case Technical Specifications Battery OI IA 000000 xxx Battery part number Lithium ion Battery type 7 2 V Battery voltage 6 2 Ah Battery capacity Technical...

Page 119: ...r Supply part number 12 VDC Output voltage 0 C 40 C Operating temperature range 8 RH 90 RH Operating humidity range 100 VAC 240 VAC Mains supply voltage range 0 35 A maximum Mains supply current 50 Hz...

Page 120: ...Taiwan NCC Notice 120 X MET8000 Series Operator s Manual 8...

Page 121: ...tromagnetic Compatibility Directive 2004 108 EC R TTE Directive 1999 5 EC Declare under our sole responsibility that the following equipment XMDS 2770 Is in conformity with the applicable requirements...

Reviews: