background image

45

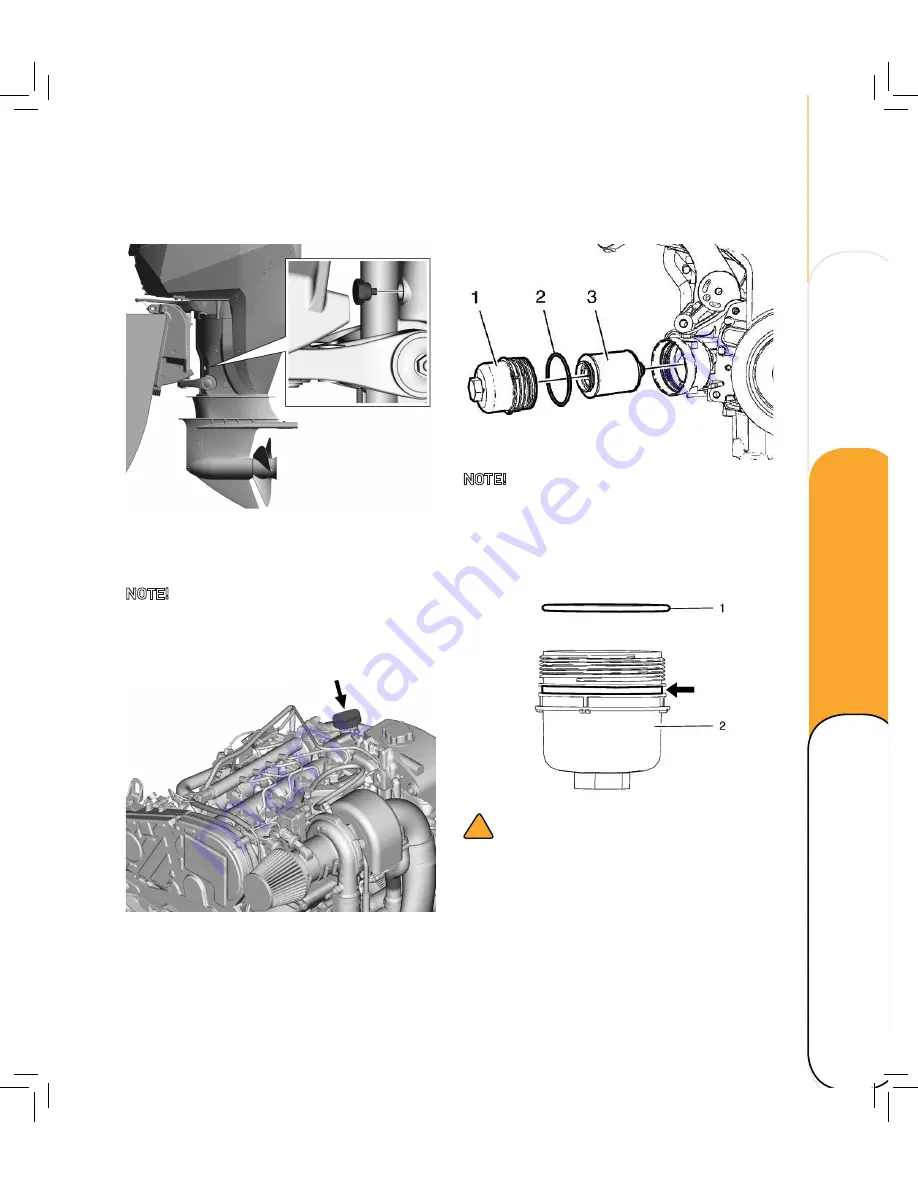
Change engine oil

1. 

Remove the oil draining plug and washer.

2. 

Drain the engine oil into a suitable 

container.

NOTE! 

Discard used oil according to local 

legislation. 

3. 

Fit a 

NEW

 washer and tighten the oil 

draining plug to 

9 Nm (6.6 ft-lb).

4. 

Fill up the engine oil through the oil filler 
neck.

5. 

Check engine oil level.

6. 

Close the filling cap and wipe clean.

Replace engine oil filter

NOTE!


DO NOT

 use an open end wrench on the 

hex on top of the oil filter cap. Use a hex socket!

1. 

Remove the oil filter cap 

(1)

.

2. 

Remove the sealing 

(2)

.

3. 

Remove the oil filter element 

(3)

.

!

 CAUTION

Lubricant must be applied to the threads of 
the oil filter cap prior to installation. Failure 
to lubricate the oil filter cap threads can 
hinder later removal and cause possible oil 
filter cap damage.

4. 

Install the 

NEW

 seal ring 

(1)

 with clean 

engine oil to the oil filter cap 

(2)

.

Te

ch

ni

ca

l d

at

a

M

ai

nt

ena

nc

e

O

per

at

in

g

O

ve

rv

ie

w

Summary of Contents for OXE-200 HP

Page 1: ...USER MANUAL OXE 200 HP ...

Page 2: ... THE OXE POWER HEAD IS A WELL PROVEN DIESEL ENGINE INHERENTLY MORE EFFICIENT THAN GASOLINE ENGINES CONTRIBUTING TO LOW FUEL CONSUMPTION ...

Page 3: ...Overview 3 INTRODUCTION Publication No ODM1005 Maintenance Operating Technical data ...

Page 4: ......

Page 5: ...de______________________11 Adjustable lever feel ________________12 Outboard Installation__________________13 Mounting the outboard_________________14 Mounting height____________________14 Engine connector___________________15 Connecting the battery_______________15 Connecting fuel line_________________16 Engine shut off cord_________________16 Breaking in the engine_________________16 Operating__...

Page 6: ...em ______________ 35 Check water intake_________________ 36 Check coolant level and mixture______ 36 Check power trim and tilt system_____ 37 Check the propeller________________ 38 Check the top cowling______________ 39 Check the cowling sealing___________ 39 Check painted surfaces _____________ 39 Inspect anodes____________________ 40 Change fluids and filters_______________ 42 Change fuel filter...

Page 7: ...rd properly Always contact your dealer if you have any questions Using and attending the engine properly will preserve its qualities for a long operating life Follow the instructions in this manual on operating this engine and carry out inspections as described on a regular basis Cimco Marine AB Metallgatan 19a SE 262 72 Ängelholm Sweden 46 0 431 371130 info oxe diesel com Technical data Maintenan...

Page 8: ...ivating the engine shut off switch the engine will stop immediately but the boat will continue to coast for some distance depending on velocity and degree of any turn at shut down Safety and operating information that is practiced along with good common sense can help prevent personal injury and product damage Symbols and signs DANGER This indicates a hazardous situation which if not avoided will ...

Page 9: ...y of its occupants and general public We strongly recommended that each operator reads and understands the entire manual before operating the outboard Be sure that at least one additional person onboard is instructed in the basics of starting and operating the outboard and boat handling in case the driver is unable to operate the boat Boat horse power capacity Exceeding the boat s maximum power ra...

Page 10: ...Electrical warning label WARNING Do not touch or remove electrical parts when starting the engine or during operation 30 0300 005 CIMCO MARINE AB Warning for electrical hazards Placed on the ECU bracket Read manual label 1 30 0300 009 CIMCO MARINE AB A reminder of the importance to read manuals prior to the initial use of equipment or machinery The manual contains information needed for proper ope...

Page 11: ... engine connector Identification label MODEL OXE 200 MODEL NR P3XL200 SERIAL NR BLOCK NR D O M MADE IN SWEDEN CIMCO MARINE AB 30 0300 001 00001 17B68420 2016 08 25 1 Placed on the starboard side of the engine just below the middle cowling 2 Placed on page 2 in the Service Book Emission label THIS OUTBOARD ENGINE COMPLIES WITH 2016 U S EPA 40CFR PART 1042 IMO 40CFR PART 43 EXHAUST REGULATIONS APPLI...

Page 12: ...6 OVERVIEW MAIN COMPONENTS Engine oil filler cap Expansion tank Intercooler Belt housing Hydraulic pump and filter Transom mount Seawater strainer Air filter Gearbox Propeller axis ...

Page 13: ...ilt and trim cylinders Seawater pump Engine connector Engine oil dip stick Engine oil filter Engine control unit ECU Fuel filter Turbo charger Water intake Anti cavitation plate Technical data Maintenance Operating Overview ...

Page 14: ...ingle or twin shift control head This description comprises a single shift control head only Also refer to Single Control Head Manual or Twin Control Head Manual 1 Engine trim control 2 Control lever 3 Lever position indicator 4 Control lamp 5 Neutral button 6 SEL button 7 Indicator lamp INSTRUMENTATION For instruments and gauges refer to corresponding Display manual 1 3 6 7 4 2 5 ...

Page 15: ...duced The system will continue to operate Indicator dimming feature When the control head is active pressing the SEL button 6 repeatedly will cycle through the available indicator brightness levels Neutral indicator lamp The neutral indicator lamp 7 has four states Fast flashing in combination with lamp 4 indicates a critical fault which may result in limited or no system performance DANGER Call f...

Page 16: ...t in order to warm up the engine at a higher rpm NOTE Maximum rpm is limited to 2400 rpm A slow flashing neutral indicator lamp 7 shows that NTW is engaged Engaging Neutral Throttle Warmup Move the control lever 2 to the Neutral position The neutral indicator lamp 7 will have a steady light Press the N button 5 The neutral indicator lamp 7 flashes to indicate that NTW is engaged It is now possible...

Page 17: ... TM the full throttle range represents 20 of normal throttle range This enables a higher resolution of the throttle maneuvering thus giving the operator a more precise control in demanding situations A very slow flashing one second on one second off neutral indicator lamp 7 indicates that TM is engaged Engaging Trolling Mode Move the control lever 2 to forward idle or reverse idle positions Press ...

Page 18: ...can be set according to operator preference Turn the throttle friction screw clockwise to increase the friction on the lever counter clockwise to reduce the friction The shift detents are ment to prevent accidental gear engagement Bear that in mind when you make adjustments Turn the shift detent screw clockwise to increase counter clockwise to decrease force ...

Page 19: ... WARNING Exceeding the boat s maximum power rating can cause serious injury or death Overpowering the boat can affect boat control and flotation characteristics or break the transom Do not install an outboard that exceeds the boat s maximum power rating Improper mounting of the outboard can result in hazardous conditions such as poor handling or loss of control Your dealer or other person experien...

Page 20: ...ted so that the anti cavitation plate is in alignment with the bottom of the boat The optimum mounting height is determined by the boat outboard combination in addition to the required use Test runs at different heights can be of assistance when choosing the optimum mounting height For further information please contact the manufacturer CAUTION Check the carrying capacity of the boat at rest and w...

Page 21: ...ck connector 1 to the upper end pin connector Make sure it clicks 2 Connect the smaller red cable red connector 2 to the center pin connector Make sure it clicks 3 Connect the larger red cable red connector 3 to the lower end pin connector Make sure it clicks Also read the Installation Manual section Power cable Installation Process to learn more details about connecting power to the outboard Tech...

Page 22: ...oving parts to wear in evenly Correct break in will help to ensure proper performance and a prolonged engine life Most diesel engines notices an increase in performance and reduction in fuel consumption after 150 hours of breaking in time CAUTION Failure in following the break in procedure can result in severe engine damage or reduced engine life NOTE Run the outboard in water and in gear with a p...

Page 23: ...he throttle shift and steering for proper operation before starting the engine The controls should work smoothly without binding or unusual free play Look for loose or damaged connections Check that the main cable and the connector are in good condition Check that the gear is in neutral Outboard Check the outboard and the outboard mounting Check for loose or damaged fasteners Check the propeller b...

Page 24: ...level is between the upper and the lower mark on the dipstick If below the lower mark fill up with engine oil If oil level is above dipstick upper mark drain appropriate amount of oil Excess oil level can cause reduced performance and oil leakage NOTE Be sure to completely insert the dipstick into the dipstick guide 4 Check for oil leaks Filling fuel 1 Remove the fuel tank cap 2 Carefully fill the...

Page 25: ... The oil colour should be red to dark red If the oil looks milky and foamy water has entered the lower housing Check for leakage and replace the oil Check hydraulic oil 1 Visually check oil quality The oil colour should be red to dark red If the oil looks milky and foamy water has entered the housing Check for leakage and replace the oil 2 Check that the oil is in level with the sightglass 3 Fill ...

Page 26: ...trim unit looses pressure WARNING Ensure that the trim and tilt rods 2 are fully extended when the plug is removed Otherwise the fluid can spray from the reservoir due to internal pressure 2 Remove the filling plug 3 and seal 4 Check the fluid level in the reservoir NOTE If the fluid is correctly levelled only a small amount of fluid should come out of the filling hole when the plug is removed 3 I...

Page 27: ... install the other clip on the engine ignition switch WARNING Attach the engine shut off cord in a secure way to your clothes floating device or wrist while operating the boat Prevent the shut off cord from entangling with nearby objects and do not attach the cord to clothing that could tear loose Avoid accidental or unintended activation of the ignition switch Unexpected loss of forward motion ca...

Page 28: ...s or is constantly lit up and the buzzer sounds Risk for severe engine damage Check the oil level and fill up if necessary If no cause for the low oil pressure warning can be found contact your dealer or the manufacturer When the engine is running a continuous flow of water from the pilot hole shows that the sea water pump is pumping water through the cooling passages Stop the engine immediately i...

Page 29: ...lever in N neutral in order to activate shifting and traction Refer to corresponding Control Head Manual Stopping the engine Let the engine cool off for a few minutes at idle or low speed before stopping the engine Stopping the engine immediately after operating at high speed is not recommended 1 Turn the key to OFF 2 Remove the key if leaving the boat unattended NOTE The engine can also be stoppe...

Page 30: ...In order to take full advantage of the trimming capability there maybe times when you choose to trim the outboard all the way in down or out up DANGER Avoid over trimming trim up or trim down the drive system as this can affect the steering of the boat severely Each boat has its own unique characteristics and will be affected in different ways by the factors involved only general advice is given h...

Page 31: ...trim angle for the boat is achieved Adjusting the boat trim A bow up attitude results in less drag greater stability and efficiency when the boat is on plane With the bow up the boat can have a tendency to steer to one side or the other requiring compensational steering adjustments To help offset this effect the trim tab can be adjusted It is easier to accelerate from a standing start onto plane w...

Page 32: ... during operation POWER TILT OPERATION If the outboard will be shut off for a longer period or if the boat is moored in shallow water the outboard should be tilted up This is to protect the propeller and lower housing from damage by collision with obstructions and also to reduce salt corrosion WARNING Make sure that the boat s occupants are clear of the outboard when adjusting the tilt angle Body ...

Page 33: ...is located on the starboard side of the bottom engine cowling Pressing the switch up trims the outboard up to a certain position and then tilts it up Pressing the button down tilts the outboard down and trims it down When the switch is released the outboard will stop and stay in its current position WARNING Only use the power trim and tilt switch located on the engine cowling when the boat is at c...

Page 34: ...28 OPERATING ...

Page 35: ...ted even if a support bar is used Severe injury could occur if the outboard accidently falls down When transporting the the boat on a trailer the outboard should be positioned in normal running position If the road clearance is insufficient in this position the outboard may be transported in tilt position using a support device such as a transom saver bar Consult your dealer for further details Ad...

Page 36: ...ve sufficient antifreeze protection see Check coolant level and mixture Also refer to Service Manual Store the outboard in a dry well ventilated place Protect from sunlight Winterization of the outboard When storing an engine for a prolonged period of time or in sub zero temperatures several important procedures should be performed to prevent engine issues For both short term and long term storage...

Page 37: ... term storage 1 Open connection 1 and place a container beneath 2 Open the lower connection for the seawater on the belt housing and place a container beneath 3 Open connection 4 and fill with coolant fluid of sufficient grade temperature wise until it exits from connection 1 4 Undo the hose on the seawater pump 3 and drain the seawater Alternative solution long term storage 1 Run the outboard wit...

Page 38: ... cowling 3 With the engine off turn on the water flush through the cooling passages for about 15 minutes Turn off the water and disconnect the garden hose adapter from the garden hose connector 4 Remove the adapter from the fitting on the bottom cowling Replace the cap and tighten securely WARNING Do not leave the garden hose connector on the bottom cowling fitting or let the hose hang free during...

Page 39: ... on the common power supply Check the intake system It is of utmost importance for the intake system to be intact Broken and leaking pipes can drastically shorten the life of the engine Check the system regularly Check hoses for fissures and damage Replace if necessary Ensure that all hose clips and clamps are tightened and fit easily Check the air filter Check the filter insert for holes or crack...

Page 40: ... before operating the boat Air could have entered the system in any of the following ways The boat ran out of fuel The fuel lines have leaking joints The filter was removed for service or replacement The fuel lines were removed or disconnected for servicing The fuel pump was removed for servicing The fuel filter water drain cock was opened while the engine was running If one or more of the above o...

Page 41: ...xpansion tank 12 Turbocharger Check the system regularly Check hoses for fissures and damage Replace if necessary Check hose clips and clamps Replace if damaged Check that the water intake is not blocked Clean if necessary Check the sea water strainer Clean if necessary Check coolant level and mixture Fill up if necessary 1 2 3 4 5 6 11 10 7 9 12 8 Technical data Maintenance Operating Overview ...

Page 42: ...1 Check the cooling level 4 cm below the fillerneck edge 2 The cooling system of the engine is to be filled with a mixture of distilled water and antifreeze based on ethylene glycol and or anticorrosion additive see Recommended fluids and grease Coolant must be added at the filler cap 1 only Do not add cold coolant to a warm engine Ensure that the mixing ratio water antifreeze is preserved ...

Page 43: ...CC position 3 Tilt up the outboard and check that the tilt rod and trim rods are extended completely Tilt and trim rods manual valve 4 Check that the tilt rod and trim rods are free from corrosion or other flaws 5 Activate the tilt down switch until the rods have retracted completely into the cylinders CAUTION The outboard can belowered by carefully turning manual valve should the electric system ...

Page 44: ...witch Loosen or tighten the propeller nut Do not use your hand to hold the propeller when loosening or tightening the propeller nut Put a wood block between the anti cavitation plate and the propeller to prevent the propeller from turning Propeller checkpoints Check each of the propeller blades for erosion or other damage Check the propeller shaft for damage Check the splines for wear or damage Ch...

Page 45: ...ealing Check that the sealing is not dry broken or worn as this will allow water to enter the engine Check the top cowling CAUTION Make sure that the top cowling is securely closed and that there are no gaps A loose or improperly fitted cover could allow water to enter the engine Check the fitting of the top cowling Reinstall if the fit is not complete Contact your dealer manufacturer if it is sti...

Page 46: ... is protected from corrosion by sacrificial anodes Inspect the external anodes 1 periodically and remove scale from the surface Replace at service intervals or when anodes are reduced to 2 3 their original size CAUTION Do not paint anodes as it would make them ineffective ...

Page 47: ...ped with sacrificial anodes to protect from corrosion Inspect the anodes 2 periodically and remove scale from the surface Replace at service intervals or when anodes are reduced to 2 3 of their original size CAUTION Ensure that anodes and threads are clean before mounting Technical data Maintenance Operating Overview ...

Page 48: ...filter and fuel lines 2 Disconnect the fuel lines 1 3 Press the clamps together 4 Remove the filter 5 Fit a new fuel filter into the holder and connect the fuel lines Ensure the flow direction marked with an arrow on top of filter NOTE Dispose of the fuel water mixture according to local environmental legislation ...

Page 49: ...he filter cap Have a cloth nearby to collect the oil in the filter 5 Install a new filter and reinstall the filter cap Tightening torque 70 Nm 51 2 ft lb 6 Clean and reinstall the oil plug and seal Tightening torque 30 Nm 6 6 ft lb NOTE Discard used oil according to local environmental legislation 7 Unscrew the oil filling plug 8 Use an oil filling device to fill up hydraulic oil through the oil f...

Page 50: ...r 1 Remove the clamp holding the filter 2 Pull off the air filter 3 Fit a new air filter 4 Reinstall the clamp Clean seawater strainer 1 Remove the lid 2 Pull out the strainer 3 Clean the strainer reinstall and close the strainer lid ...

Page 51: ...wipe clean Replace engine oil filter NOTE DO NOT use an open end wrench on the hex on top of the oil filter cap Use a hex socket 1 Remove the oil filter cap 1 2 Remove the sealing 2 3 Remove the oil filter element 3 CAUTION Lubricant must be applied to the threads of the oil filter cap prior to installation Failure to lubricate the oil filter cap threads can hinder later removal and cause possible...

Page 52: ...ing to local legislation NOTE Clean the magnetic oil plugs Install new washers 4 Reinstall and tighten oil plug 2 to 9 Nm 6 6 ft lb 5 Remove the sight glass and washer Fill up with belt oil until the oil comes out at the upper oil plug 1 Refer to Recommended fluids and grease 6 Clean the sightglass Install a new washer Tighten to 16 Nm 11 8 ft lb 1 Alternatively use an oil filling device and fill ...

Page 53: ...mmended fluids and grease Otherwise the manufacturer s warranty will become null and void Coolant must be added at the filler cap only Do not add cold coolant to a warm engine Ensure that the mixing ratio water antifreeze is preserved 6 Slowly fill up with coolant via filler neck on expansion tank until fluid level has reached just above the divider in expansion tank 7 Let engine run at a speed of...

Page 54: ... open carefully NOTE Do not open the cooling system when the engine is at operating temperature This causes a pressure loss in the cooling system If the cooling system has been opened when the engine is at operating temperature this can lead to the alarm pressure in the expansion tank when the engine is then put into operation and to a reduction in the engine output Coolant pressure in the expansi...

Page 55: ...d fluids and grease to the propeller shaft 5 Install the propeller washer and propeller on the propeller shaft NOTE Be sure to install the propeller washer before installing the propeller otherwise the lower case and propeller boss could be damaged CAUTION Be sure to use a new cotter pin and bend the ends over securely Otherwise the propeller could come off during operation and be lost NOTE We rec...

Page 56: ...7 Align the propeller nut with the propeller shaft hole Insert a new cotter pin in the hole and bend the cotter pin ends NOTE Do not reuse the cotter pin installed Otherwise the propeller can come off during operation NOTE If the propeller nut does not align with the propeller shaft hole after tightening to the specified torque tighten the nut further to align it with the hole Ensure that the prop...

Page 57: ...up with recommended grease until the grease comes out at the joints or ends of shaft Refer to Recommended fluids and grease 2 Fill the seatings with grease for smoother tilt operation Use grease according to Recommended fluids and grease Technical data Maintenance Operating Overview ...

Page 58: ...r trim x Checks before start up Sea water strainer X Change fluids and filters Upper belt tension X Service Manual Check upper belt tension Upper belt oil X Service Manual Change upper belt oil Magnetic plug and washer upper belt housing X Service Manual Change upper belt oil Lower belt tension X Service Manual Check lower belt tension Lower belt oil X Service Manual Change lower belt oil Magnetic...

Page 59: ...up engine Water oil fuel leakage Power trim function and leakage No DTCs are triggered diagnostic tool Unusual engine transmission sounds X Stop engine Engine oil and filter X X Change fluids and filters Restart engine Oil pressure Oil leakage X Display manual Technical data Maintenance Operating Overview ...

Page 60: ...heck lower belt tension Coolant level and mixture X This publication Check cooling system Crank case ventilation hoses and clamps X Check hoses and clamps Air filter X This publication Change air filter Display gauges function X Display manual Turbo charger X Service Manual Air filter replacement Exhaust tube X This publication Engine views Alternator drive belt tension X Self adjusting Seawater s...

Page 61: ...pl Gearbox magnetic plug and washer X Service Manual Hydraulic oil filter repl Upper belt oil magnetic plug washer X Service Manual Change upper belt oil Lower belt oil magnetic plug washer X This publication Change lower belt oil Painting X This publication Checking and other maintenance Inspection exhaust hose and coolant hoses X Service Manual Engine views Hoses pipes connections hose clamps X ...

Page 62: ...elt tension X Service Manual Check lower belt tension Coolant level and mixture X This publication Checking and other maintenance Crank case ventilation hoses and clamps X Check hoses and clamps Air filter X This publication Change fluids and filters Display Gauges function Display Manual Turbo charger X X Service Manual Air filter replacement Trim pistons hoses hydraulic hoses Leakage X Service M...

Page 63: ...s shafts in transom mount X Installation Manual Propeller shaft check straightness and splines condition X Service Manual Lower belt repl Alternator drive belt X Service Manual Alternator drive belt replacement Heat exchanger X Service Manual Cleaning heat exchanger Intercooler anode X This publication Checking and other maintenance Cables connectors and cable glands X Installation Manual Exhaust ...

Page 64: ...repl Upper belt seals X Service Manual Check belt pulley seals Gearbox shaft in pulleys and splines X Service Manual Lower belt repl Gearbox propeller shaft pulleys and splines wear and straightness X Service manual Lower belt replacement Gear function and wear X Service Manual Lower belt replacement Clutch mechanism perform pressure test X Service Manual Gearbox seals X Service Manual Lower belt ...

Page 65: ...ient air temperature sensor Voltage above normal or shorted to high source 25 171 4 Ambient air temperature sensor Voltage below normal or shorted to low source 26 Trim angle sensor Voltage above normal or shorted to high source 27 Trim angle sensor Voltage below normal or shorted to low source 30 Hydraulic oil pressure Voltage above normal or shorted to high source 31 Hydraulic oil pressure Volta...

Page 66: ...ource 108 1136 ECU temperature sensor Voltage above normal or shorted to high source 109 1136 ECU temperature sensor Voltage below normal or shorted to low source 112 3509 3 ECU 5V sensor supply 1 Voltage above normal or shorted to high source 113 3509 4 ECU 5V sensor supply 1 Voltage below normal or shorted to low source 114 3510 3 ECU 5V sensor supply 2 Voltage above normal or shorted to high so...

Page 67: ...75 Hydraulic oil pressure Data valid but below normal operational range 176 Hydraulic oil temperature Data valid but above normal operational range 177 DG_FNO_OIL_LEVEL_LOW 179 97 31 DG_FNO_WATER_IN_FUEL 188 110 0 DG_FNO_COOLANT_TEMPERATURE 189 1136 0 DG_FNO_ECU_TEMPERATURE 190 175 0 DG_FNO_OIL_TEMPERATURE 191 2899 12 DG_FNO_GPC_MODULE 192 5324 31 DG_FNO_GPC_MODULE 193 DG_FNO_GPC_MODULE_COM 194 24...

Page 68: ...62 MAINTENANCE TROUBLE SHOOTING Refer to Service Manual ...

Page 69: ... HP at 4100 RPM Maximum Torque at Engine Speed 415 Nm at 2500 RPM 306 lb ft at 2500 RPM Fuel Diesel Weight 340 kg 2459 lb ft Alternator output 130 A Rig length 20 25 or 30 Cooling Closed cooling circuit heat exchanger seawater Starting Electric Shift Electro hydraulic Clutch Hydraulic multi friction plate Gear ratios 1 73 1 and 2 17 1 Dimensions 25 leg LHW 100 x 188 x 68 cm 39 x 74 x 27 in Technic...

Page 70: ...ooling system coolant mixture GM Long Life Coolant Specification B040 1065 Distilled water 30 70 7 5 liters 7 9 quarts Grease DIN 51502 KP2 5K 20 ISO 6743 ISO L XBCEB2 5 Power trim and tilt unit ATF Dexron II 0 5 0 7 liters 0 52 0 73 quarts Upper belt oil Fully Synthetic Transmission Fluid ATF Dexron HP 0 33 liters 0 34 quarts Lower belt oil Fully Synthetic Transmission Fluid ATF Dexron HP 2 liter...

Page 71: ...is used NOTE The fuel must meet national and international standards OXE Diesel engines can be operated on local diesel fuel not exceeding 350 ppm sulphur Using fuel exceeding 350 ppm will increase the outboard s emission levels and cause excessive wear and shorter lifetime NOTE Large differences in composition occur in local fuel specifications This can result in higher fuel consumption higher em...

Page 72: ......

Reviews: