background image

31

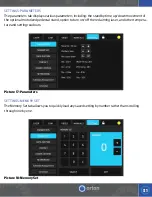
SETTINGS: PARAMETERS

The parameters tab displays various parameters including: the standby time, up/down movement of 
the optional motorized pedestal stand, option to turn on/off the red aiming laser, and other tempera-
ture and setting readouts.

Picture 17: Parameters 

SETTINGS: MEMORY SET

The Memory Set tab allows you to quickly load any saved setting by number rather than scrolling 
through one by one. 

Picture 18: Memory Set

Summary of Contents for Combo 200

Page 1: ...Orion Laser Welder User Manual Orion Combo 200 ...

Page 2: ...ks for the Eyes and the Skin 2 5 Safety General Prescriptions Chapter 3 Seals 3 1 Labels 3 2 Labels Positioning Chapter 4 Technical Data 4 1 Laser Specifications 4 2 Other Data Chapter 5 Controls Description 5 1 Machine Controls 5 2 Joystick Controls 5 3 Display Touchscreen Controls Chapter 6 Installation 6 1 Internal Controls 6 2 Joystick Controls 6 3 Display Touch Screen Controls 6 4 Additional ...

Page 3: ... How to Refill the Cooling System Chapter 8 Error Messages and Troubleshooting 8 1 Other Anomalies Chapter 9 Safety Systems 9 1 Resonator Shutter 9 2 Microscope Shutter 9 3 Microscope Infrared Filter 9 4 Weld Chamber Infrared Filter 9 5 Leather Strips Protecting the Chamber Opening QUICK LASER PARAMETERS Chapter 10 Quick Setup 10 1 COMBO 200 QUICK SETUP 10 2 LASER WELDER SAFTY BASICS ...

Page 4: ...4 ...

Page 5: ...e committed to producing quality products and ensuring complete owner satisfaction If you require assistance after reading this manual please contact us with the information provided below Orion Welders a Subsidiary of Sunstone Engineering R D Corp 1693 American Way Suite 5 Payson UT 84651 Email sales orionwelders com Voice 1 801 658 0015 Fax 866 701 1209 NOTE The information contained in this man...

Page 6: ...iation Carefully follow all instructions and warnings included in this document CONTENT GUARANTEE The information included in this manual is subject to modifications without notice Sunstone Welders and Orion Welders will not be responsible for errors included in this document nor for any incidental damages or consequences due to any erroneous interpretation of this manual INTENDED USAGE The Orion ...

Page 7: ...7 ...

Page 8: ...ntil the 2 year term is expired The guarantee is void under the following circumstances The buyer fails to report to Sunstone Welders any initial defects or issues due to shipping within seven days of recieving the product The device or its parts have been used in a way different from that which it was intended to be used The device has been entrusted for repair to an unauthorized agent or company...

Page 9: ...with their face being eye level with the weld chamber This includes children whose standing height would be level with the weld chamber It is also recommended that the weld operator use adequate and approved working gloves when using the machine FIRE WARNING This symbol shows the danger of fire when working with flammable materials are processed When there is a danger of fire it is very important ...

Page 10: ...ding gas used to weld can gradually change the air causing sickness or death Assure that the air in the room is safe to breathe Don t weld near any degreasing cleaning or vaporization areas The heat could react with the vapors to form very toxic and irritating gases Check that the metals do not have impurities that may produce fumes or gases during the weld process ELECTRIC WARNING This symbol sho...

Page 11: ... not rated for this machine Ensure that the cables are not near any heat sources Use the equipment only when in perfect conditions Immediately repair or change any damaged parts IMPORTANT WARNING This symbol shows the need to pay special attention to suggestions or warnings in cluded in this manual ...

Page 12: ...exposure of a laser beam can provoke irreversible damages to eyesight and vision To avoid permanent damage to the operator and others nearby it is necessary to follow some pre cautions Everyone in the near vicinity of the machine and who may be exposed to harmful levels of laser radia tion must be informed when the laser is active Due to the high power of the laser generated in this machine there ...

Page 13: ...e retina The wavelength of the LZR machines is 1064nm and therefore it will pass through unobstructed to the retina In regards to skin the absorption of the radiation will vary from one person to the next regardless of the wavelength Therefore seeing as the absorption may vary the exact and specific details are hard to state regarding the maximum tolerable exposure levels Picture 1 Eyeball The ext...

Page 14: ...ment potentially consisting of certified protection glasses for the laser radiation 2 3 RADIATION VISION CONDITIONS The laser beam is highly collimated and intense as it is generated and leaves the internal resonator If this collimated beam were to pass through to a person s retina this focused beam of high dense power can be very dangerous Conversely if the beam becomes divergent and spreads out ...

Page 15: ... THAN 4 CAN SUFFICIENTLY PROTECT THE SIGHT FROM THE ACCIDENTAL VIEWING OF THE HARMFUL LASER RADIATION NOTE Always use certified eye protection 2 4 RISKS FOR THE EYES AND THE SKIN The cornea and the retina can be burned and damaged possibly irreversibly if exposed to an intense laser radiation regardless of duration Also exposure to a less intense laser radiation over a long du ration can result in...

Page 16: ...unctioning procedures Operators are aware of the dangers related to the exposure to radiation and the biological effects that could result from exposure to the skin and eyes Operators understand the need to use Individual Protection Devices IPDs ...

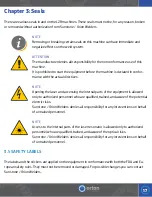
Page 17: ...g the internal parts of the equipment is allowed only to authorized personnel who are qualified trained and aware of the potential electric risks Sunstone Orion Welders denies all responsibility for any interventions on behalf of untrained personnel NOTE Access to the internal parts of the laser resonator is allowed only to authorized personnel who are qualified trained and aware of the optical ri...

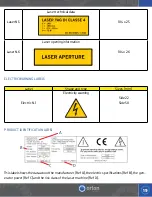
Page 18: ...ABELS Label Shape and type Sizes mm Laser N 1 Laser warning Side 22 Side 50 Laser N 2 Laser class information 104 x 52 52 x 26 Laser N 3 Radiation information 104 x 52 52 x 26 Laser N 4 Laser exposure information 56 x 40 ...

Page 19: ...IC WARNING LABELS Label Shape and type Sizes mm Electric N 1 Electricity warning Side 22 Side 50 PRODUCT IDENTIFICATION LABEL This label shows the data about the manufacturer Ref A the electric specifications Ref B the gen erator power Ref C and the risk class of the laser machine Ref D A B C D ...

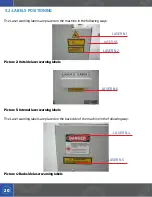
Page 20: ...e following ways Picture 2 Outside laser warning labels Picture 3 Internal laser warning labels The Laser warning labels are placed on the backside of the machine in the following way Picture 4 Backside laser warning labels LASER N 5 LASER N 1 LASER N 6 LASER N 2 LASER N 4 LASER N 3 ...

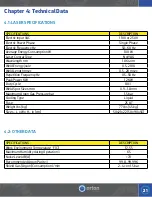
Page 21: ...Weld Length msec 0 5 20 msec Repetition Frequency Hz 0 5 30 Hz Peak Power KW 12 KW Duty Cycle 80 Weld Spot Sizes mm 0 9 1 8 mm Maximum Argon Gas Pressure bar 1 5 bar Cooling Type Liquid Fuse 25 AT Weight lbs kg 77 lbs 45 kg Sizes L x W x H in cm 30x21x22 50x90x56 4 2 OTHER DATA SPECIFICATIONS DESCRIPTION Work Environment Temperature F C 17 35 Maximum Humidity during Operation 65 Noise Level dB A 7...

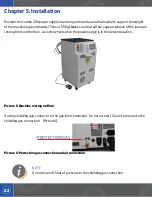
Page 22: ... laser are resting firmly on the floor Lock the wheels once the power supply is in the desired location Picture 5 Machine resting on floor If using shielding gas connect it to the gas inlet connection Do not exceed 1 5 bar of pressure to the shielding gas connection Picture 6 PROTECTION GAS Picture 6 Protection gas connection and air connection NOTE Do not exceed 1 5bar of pressure to the shieldin...

Page 23: ...bles and equipment provided with the machine Do not substitute or change any cables or plugs If needed contact Sunstone Orion Welders be fore making any changes Remove the eyepieces from their containers and fasten them to the microscope on the articulating arm Finger tighten the set screw to hold them in place For steps on aligning the crosshairs see chap ter 7 3 Picture 9 Eyepieces Mounted on Oc...

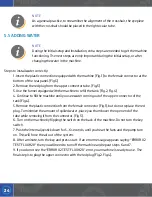
Page 24: ...ll the machine until you see water coming out of the upper connector of the tank Fig 4 5 Remove the plastic connection from the female connector Fig 1 but do not replace the red plug To minimize the amount of spilled water place you thumb over the open end of the tube while removing it from the connector Fig 3 6 Turn on the machine by flipping the switch on the back of the machine Do not turn the ...

Page 25: ...25 5 2 FIRST SWITCHING ON Ensure that the emergency stop button is disengaged and not pushed in Picture 10 Picture 10 Emergency stop button FIG 1 FIG 3 FIG 4 UPPER CONNECTOR PLUG FEMALE CONNECTOR FIG 2 ...

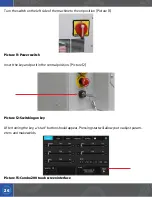
Page 26: ... 11 Picture 11 Power switch Insert the key and put it in the central position Picture 12 Picture 12 Switching on key After turning the key a start button should appear Pressing start will allow you to adjust param eters and make welds Picture 13 Combo 200 touch screen interface ...

Page 27: ...nd begin welding Load a previously saved setting and begin welding 5 3 WELDER SWITCHING OFF ATTENTION Before flipping the power switch make sure to always turn the key to the locked position This will allow the microprocessor to drain the internal capacitors Turn the key to the Locked position and wait for the screen to display the message LASER BLOCKED Picture 14 Power switch When the message app...

Page 28: ...ettings can be achieved by tapping a button or moving a slider bar In addition to the touchscreen controls the welder also has a joystick inside the weld chamber When using the joystick the selected parameter will be outlined with an orange box By moving the joystick users can cycle through the parameters and also make changes to the selected parameter 6 1 DISPLAY TOUCH SCREEN CONTROLS Picture 17 ...

Page 29: ...e frequency bar up to ensure that the welder is set to the maximum weld rate Spot Size The spot size bar is used to select the weld spot diameter The minimum setting is 0 2mm and the maximum setting is 2 0mm Gas Flow The gas flow bar is used to select the amount of time that protective shield gas argon is allowed to flow after the last weld is made A value of 0 will deacti vate the gas flow If the...

Page 30: ...ad and refer ence when using the welder Picture 15 Manuals SETTINGS The Settings screen has multiple tabs with different contents The main settings screen displays the weld counter firmware version and welder model number The system status box is also visible on this page Picture 16 Settings Tab ...

Page 31: ...ment of the optional motorized pedestal stand option to turn on off the red aiming laser and other tempera ture and setting readouts Picture 17 Parameters SETTINGS MEMORY SET The Memory Set tab allows you to quickly load any saved setting by number rather than scrolling through one by one Picture 18 Memory Set ...

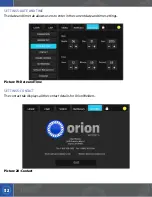
Page 32: ...AND TIME The date and time tab allows users to enter in the current date and time settings Picture 19 Date and Time SETTINGS CONTACT The contact tab displays all the contact details for Orion Welders Picture 20 Contact ...

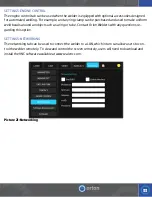
Page 33: ...uniform weld beads around an object such as a ring or tube Contact Orion Welders with any questions re garding this option SETTINGS NETWORKING The networking tab can be used to connect the welder to a LAN which in turn can allow users to con trol the welder remotely To view and control the screen remotely users will need to download and install the VNC software available at www realvnc com Picture...

Page 34: ...sed to update the welder s software Picture 22 Software Management SETTINGS LANGUAGE The language tab can be used to change the language of the interface Available languages include English Spanish Italian German French Russian Turkish and Vietnamese Picture 23 Language ...

Page 35: ...een tinted viewing glass for viewing inside the weld chamber should ever break this must be replaced only with approved spare parts Regular glass or plastic cannot be used as these do not provide safety from the laser emission Do not ever remove the filter inserted in the microscope lens Do not ever insert large mirror like surfaces mirrors aluminum sheets chrome plated items into the weld chamber...

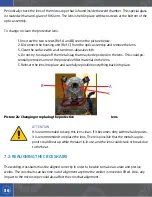
Page 36: ...ly remove some of the protective filter material on the lens 5 Reinsert the lens into place and carefully reposition everything back into place Picture 24 Changing or replacing the protective lens ATTENTION It is recommended to keep this lens clean If it becomes dirty with metal deposits it is recommended to replace the lens There is possible that the metal slag de posits could heat up while the l...

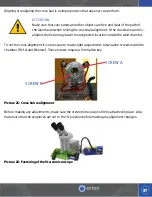
Page 37: ...expected locations inside the weld chamber To set the cross alignment it is necessary to make slight adjustments to two allen screws inside the chamber Ref A and B below These screws require a 3 mm allen key Picture 25 Cross hair realignment Before making any adjustments make sure the stereomicroscope is firmly attached in place Also make sure that the eyepieces are set to the 0 position before ma...

Page 38: ... A turn of the screw will re sult in a large change in the weld spot location Continue turning these screws until you are able to make the weld spot location fall in line with the crosshairs Picture 27 Turning Screws ATTENTION Always use small adjustments when aligning the crosshairs and ensure that the test piece you are welding on stays stationary inside the weld chamber DO NOT ever completely u...

Page 39: ... 7 5 HOW TO REFILL THE COOLING SYSTEM use de ionized water 1 Insert the plastic connection equipped with the machine Fig 1 to the female connector at the right bottom of the rear panel Fig 3 2 Remove the red plug in upper position Fig 3 3 Use the funnel equipped with the machine to refill the tank Fig 2 Fig 4 4 Continue to fill the machine until you see water coming out of the upper connector of t...

Page 40: ...back of the unit and push the Joystick down for 5 6 seconds to force start the water pump and clear any air in the system This process may need to be repeated 2 3 times C Contact Sunstone Orion Welders 03 Refrigerating Liquid High Temperature The refrigerating liquid has reached the temperature mark of 55 C Possible causes A High work cycle of the ma chines B Insufficient liquid inside the tank C ...

Page 41: ...acitor Voltage The capacitors are not charging A The generator is broken A Contact Sunstone Engineering 07 Blocked Optical Motor The motor that sets weld diameter doesn t move A Switch off the machine and switch on again In this way the machine will perform again the motor check If the error persists contact Sun stone Engineering 8 1 Other Anomalies PROBLEM RESOLUTION The machine switches on but i...

Page 42: ...on Check that the input pressure is not higher than 2 Bars Check the flux regulator insidethe weld chamber Verify that in gas tubing is not kinked or blocked I try to blow compressed air from the nozzle but no air comes out Verify that in gas tubing in not kinked or blocked Too low pressure The laser doesn t turn on Verify that the switch placed on the back is in ON position Verify that the emerge...

Page 43: ...he generation of undesired laser radiation Functioning When the power switch is turned on and key is still not turned on the reso nator shutter is engaged When the key is turned on the shutter is disen gaged When the key turned off the shutter is engaged again 9 2 MICROSCOPE SHUTTER Description The microscope shutter is a liquid crystal filter LCD that dims completely when a regulated voltage is s...

Page 44: ...urned off while the weld puddle cools and solidifies The shutter will disengage allowing the operator to see through the mi croscope again 9 3 MICROSCOPE INFRARED FILTER Description This filter is an optical glass designed to filter laser radiation of 1064nm It has a slight gray color but is perfectly transparent It is placed inside the microscope Ref A Picture 35 Purpose The purpose of this filte...

Page 45: ...transparent Operators should look through this window any time they need to view inside the weld chamber rather than looking through the leather strips Picture 29 Welding room infrared filter ATTENTION If this filter should ever break it is very important to get it replaced with a new filter To ensure safety use only original and approved spare parts from Sunstone Engineering B ...

Page 46: ...hin 1 5 0 2 1 6 6 5 SLO White Gold wire 1 7 0 4 1 7 6 5 SLO White Gold smoothing 2 3 0 8 2 1 6 5 SLO Rose Gold thin 1 6 0 2 1 9 5 SLO Rose Gold wire 1 8 0 3 2 2 5 SLO Rose Gold smoothing 3 2 0 6 3 1 6 5 SLO Silver thin 3 7 0 3 3 7 5 NORM Silver wire 4 2 0 3 4 2 5 NORM Silver smoothing 4 5 0 4 4 5 4 NORM Platinum thin 1 8 0 4 0 8 5 NORM Platinum wire 1 8 0 5 1 1 6 NORM QUICK LASER PARAMETERS ...

Page 47: ...7 1 8 7 NORM Titanium thin 1 8 0 7 1 8 7 NORM Titanium wire 1 0 2 0 2 2 5 NORM Titanium smoothing 1 0 0 2 0 2 2 5 NORM Palladium thin 1 6 0 2 1 3 5 0 NORM Palladium wire 1 8 0 5 1 6 6 5 NORM Palladium smoothing 2 4 0 7 1 8 8 NORM Nickel Silver thin 1 6 0 7 1 4 5 NORM Nickel Silver wire 1 4 0 1 4 7 0 NORM Nickel Silver smoothing 1 0 9 1 9 8 NORM ...

Page 48: ...that are on the bottom of the articulating arm base 3 Move the articulating arm and drill the traced holes out of your table 4 Run the hardware through the holes in the bottom of the articulating arm and then lower them into the holes in your table Secure the Combo 200 articulating arm to the table Be sure that it is close enough to the power supply to connect the necessary system cables 5 Connect...

Page 49: ... supply 7 Connect the blue air cable to the air port on the back of the laser head at the top of the articulating arm 1 Connect the opposite end of the blue air cable to the air port on the back of the power supply 8 Connect the foot pedal cable to the foot pedal port on the back of the power supply 9 Connect the female end of the power cable to the back of the power supply 10 Connect the male end...

Page 50: ...elder 14 Insert the key on the front of the power supply and turn it clockwise to allow the welder to function 15 Setup the microscope eyepieces 16 Touch start on the touch screen user interface 17 Set the welding parameters 18 Look through the microscope eyepieces and bring your workpiece into focus See ch 5 for eyepiece setup 19 Line up the crosshairs on your workpiece where you want to weld 20 ...

Page 51: ...lls of non see through material of some type 2 Operator of laser must be looking through the microscope eye pieces for safety 3 Anyone inside the laser operating area while laser is in use must be wearing laser safe ap proved protective goggles one pair included with new laser welder purchase contact Sunstone for purchase of more sets of laser safe eye protection ...

Page 52: ...52 ...
Reviews: