background image

PT-Link II N2-3 Interface 

       PT-Link II N2-3

®

 Technical Guide

13

PT-Link II Board LEDs

The PT-Link II N2

®

 is equipped with LEDs that can be used for trouble-

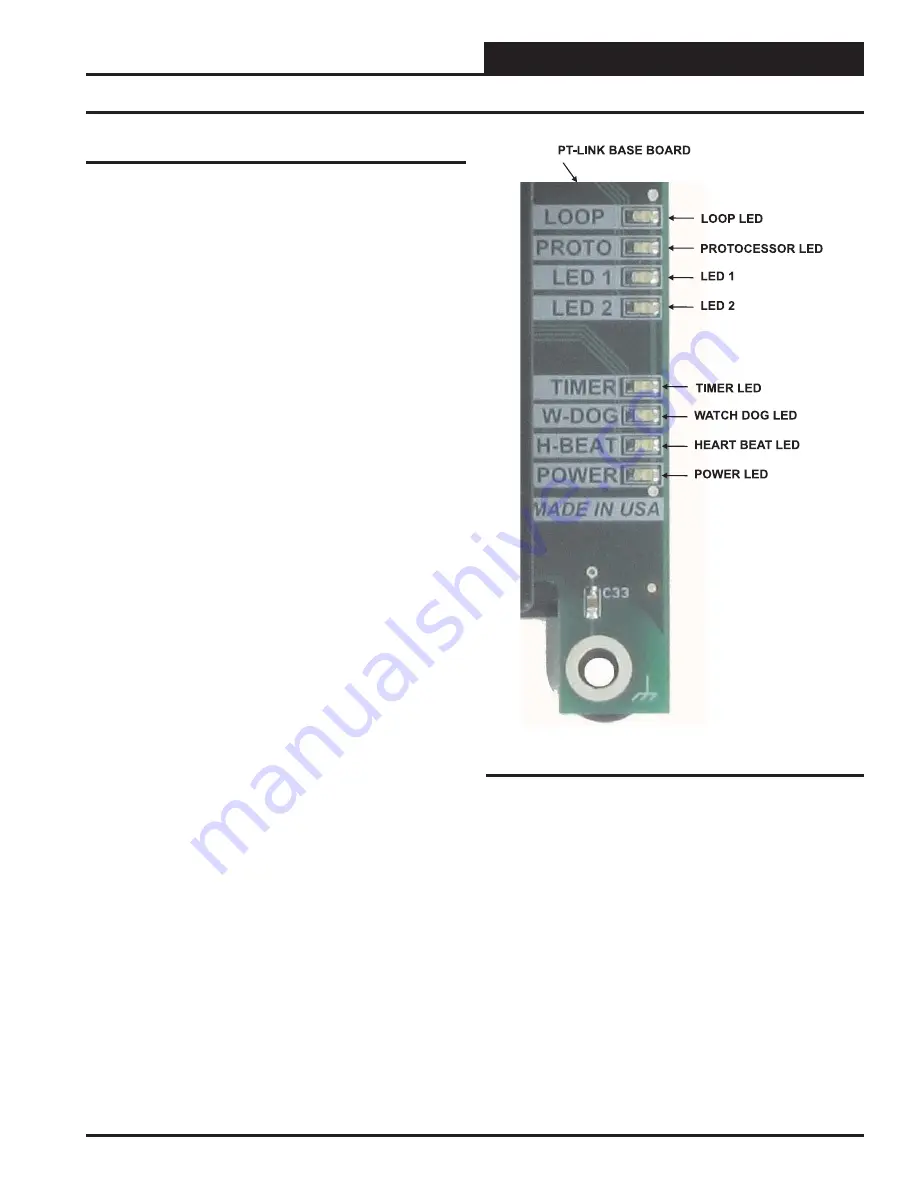
shooting. There are eight LEDs on the PT-Link II board. 

See Figure 16


for the locations of the LEDs on the PT-Link II board. The LED descrip-
tions and functions are listed in the following paragraphs.

POWER LED

When the PT-Link II N2

®

 is powered up, the “

POWER

” LED should 

light up and stay on continuously. If it does not light up, check to be sure 
that you have 24 VAC connected to the board, that the wiring connec-
tions are tight, and that they are wired for correct polarity. The 24 VAC 
power must be connected so that all ground wires remain common. If 
after making all these checks the “

POWER

” LED still does not light 

up, please contact WattMaster Controls Technical Support at our Toll 
Free number—866-918-1100—for assistance.

LOOP LED

When power is applied to the PT-Link II N2

®, 

 the “

LOOP

” LED will 

also light up. The LED should fl icker rapidly, indicating that the PT-Link 
II is trying to communicate with the controllers on the loop. A “

fl icker

” 

is defi ned as a brief moment when the LED turns off and back on. If the 

LOOP

” LED does not operate as indicated above, fi rst power down 

the unit and then reapply power. If this does not work, please contact 
WattMaster Controls Technical Support at our Toll Free number—866-
918-1100—for assistance.

LED 1

When power is fi rst applied, “

LED 1

” will be off temporarily and then 

will blink one time for each controller it is communicating with. For 
example, if you have 4 controllers on the loop connected to the PT-Link, 

LED 1

” will blink 4 times. If the amount of blinks does not match 

the number of controllers connected to the loop, it indicates there is a 
communications problem. The best way to fi nd out which board is not 
communicating is to go to each controller and look at its “

COMM

” 

LED. The “

COMM

” LED should be solid and will fl icker occasionally 

indicating communication with the PT-Link II N2

®

. If the “

COMM

” 

LED does not fl icker, there is no communication with that controller.

LED 2

When power is fi rst applied, “

LED 2

” will be off temporarily and then 

will blink slowly indicating that the PT-Link II baseboard is communicat-
ing with the Protocessor Module. If “

LED 2

” does not blink, check that 

the Protocessor Module is installed correctly on the PT-Link II baseboard 
and that the “

PWR

” LED is lit up on the Protocessor Module.

PROTO LED

When the PT-Link II is fi rst powered up, the “

PROTO

” LED should light 

up and stay on continuously. If the LED doesn’t light up, check that the 
Protocessor is installed correctly and fi rmly connected to the Base Board.  
The “

PWR

” LED should also be lit on the Protocessor Module.

TIMER LED

The “

TIMER

” is used for troubleshooting by WattMaster Controls 

Technical Support. The “

TIMER

” LED should always have a steady 

blink.

Troubleshooting the PT-Link II Controller 

Figure 16:  PT-Link II N2

® 

LED Locations

WATCH DOG LED

The “

W-DOG

” LED is used for troubleshooting by WattMaster Controls 

Technical Support. The “

W-DOG

” LED should always be on solid.

HEARTBEAT LED

The “

H-BEAT

” LED blinks to show there is communication between 

the controllers and the PT-Link. If the LED doesn’t light up, and all other 
checks have been made, please contact WattMaster Controls Technical 
Support at our Toll Free number—866-918-1100—for assistance.

Summary of Contents for PT-Link II N2-3

Page 1: ...roller Code Y200921 VCM Controller Code SS1016 Y200409 Y200616 Y200822 www orioncontrols com WattMaster Label LB102080 01 Rev 01A OE368 23N N2 3 PT LINK II PROTOCOL TRANSLATOR FOR N2 24 VAC GND LOOP L...

Page 2: ...nfiguring the PT Link II Controller 6 PT Link II Hardware Connection 6 Computer IP Address Set up for Windows NT XP 7 Computer IP Address Set up for Windows Vista 7 or 8 8 Connecting to the PT Link II...

Page 3: ...gateway to N2 devices as if the values were originating from N2 objects Allows N2 devices to modify point values on the Orion controller side of the PT Link II N2 by using standard N2 write services...

Page 4: ...g steps will get you up and running in no time 1 Familiarize yourself with the PT Link II components Figure 1 NOTE The DIP Switches should be left in their default positon which is all OFF They are no...

Page 5: ...VAC 8 VA Line Voltage Controller Controller Controller Controller 24 VAC 8 VA Line Voltage 24 VAC 8 VA SHLD T R Typical Terminal Blocks All Wiring To Be T To T SHLD G To SHLD G R To R G Wiring Notes 1...

Page 6: ...the RUN LED is blinking continuously on the ProtoCessor Board See Figure 17 page 14 for a diagram showing the location of the ProtoCessor RUN LED Ethernet Crossover Cable Connect Ethernet Crossover Ca...

Page 7: ...w will appear Figure 4 NOTE If any wireless connections are listed disable them by right clicking the connection and selecting Disable 3 In the Network Connections Window double click the Local Area C...

Page 8: ...and then click Control Panel Windows 8 2 Click on the Network and Internet icon 3 Click Network and Sharing Center 4 From the shaded box in the left side of the window select Manage Network Connection...

Page 9: ...on port 80 NOTE Computer and network firewalls must be opened for Port 80 to allow the FS GUI to function Software Requirements Mozilla Firefox 13 0 and up Microsoft Internet Explorer 8 9 Google Chrom...

Page 10: ...Device Instance Number Figure 12 The default is 1 You can obtain the Node ID from your BAS Integrator Figure 12 Client Node ID 6 Once all changes have been made to the text file while still in Notepad...

Page 11: ...be made in the Firmware Tab General Other Files Other files that can be updated include the FS GUI image and other files described in driver manuals The procedure for updating these is the same as for...

Page 12: ...mula Virtual DeviceAddress unit address address set using DIPswitches on WattMaster controls Node_ID value in the PT Link II N2 configuration file 1 Example 1 The PT Link II N2 has a Node_ID equal to...

Page 13: ...rs on the loop connected to the PT Link LED 1 will blink 4 times If the amount of blinks does not match the number of controllers connected to the loop it indicates there is a communications problem T...

Page 14: ...is being established with the desired protocol network If both LEDs are blinking then communication is working properly If not check the protocol network wiring and the baud rate in the configuration...

Page 15: ...the PT Link II Unzip the file to the directory where you saved your PT Link II software 4 Plug the USB cable into the computer s and PT Link II s USB ports 5 A message will pop up from the lower menu...

Page 16: ...PT Link II once again and within 5 seconds click on the Program HEX button shown above If suc cessful you should see the Progress Application HEX bar showing the progress percentage 16 When the bar sh...

Page 17: ...Panel 3 Double click the System Icon 4 Click the Hardware tab 5 Click the Device Manager button 6 Click on the plus sign next to Ports to see all of the common ports 7 Locate the USB Serial Port COM...

Page 18: ...that you know you are not currently using 6 Once you select the correct COM port number click OK and close any windows opened in the process of changing the port number Make note of this number becaus...

Page 19: ...HtSp 100 OaCFM EtCFM SaCFM OACfmSt OACfmRs OACfmStM MdCmp2 HdPr1 HdPr2 CdFan1 110 CdFan2 WaterTpA WaterTpB A1LSPAlm A1LktAlm A2LSPAlm A2LktAlm B1LSPAlm B1LktAlm B2LSPAlm 120 B2LktAlm LWT1Alm LWT2Alm P...

Page 20: ...ExRly2 ExRly3 ExRly4 ExRly5 ExRly6 80 ExRly7 ExRly8 ExRly9 ExRly10 ExRly11 ExRly12 ExRly13 ExRly14 ExRly15 ExRly16 90 CO2St MinEcoSt CO2Level ByPasDmp RaDmp RfPr OaDwpt CoilTp SaTpStM PreHtSp 100 OaC...

Page 21: ...s 30 VfdExPos AlmSts AlmGrp1 AlmGrp2 AlmGrp3 SaTpAlm OaTpAlm SpcTpAlm MchClAlm MchHtAlm 40 PofAlm DrtFlAlm SmokeAlm LoSaAlm HiSaAlm CtrlTpCF CtrlTpHF CtrlTp InRh InRhStM 50 DptStM MdClPos MdHtPos MdHt...

Page 22: ...setpoints by typing the new value and pressing ENTER Note that if values are being written into the array by a driver then any modifications made by grid editing will be overridden Nodes On the Nodes...

Page 23: ...twork The FieldServer s built in DHCP server can be enabled to establish easy connection for Support purposes Set the laptop or computer to automatically obtain an IP address to use this feature Note...

Page 24: ...place the FS GUI will return to the main screen Figure 28 Changing the User Password NOTE To disable password protection clear the Admin pass word by simply selecting Admin as the Account Name typing...

Page 25: ...tion Pressure Cooling Heat ing Setpoint Compressor A2 Lockout Alarm A2LktAlm BI 225 Alarm that indicates Compressor A2 is locked out Compressor B1 Low Suction Pressure Alarm B1LSPAlm BI 226 Alarm that...

Page 26: ...t Description Limits Compressor B Low Suction Pressure Alarm B1LSPAlm BI 226 Alarm that indicates Suction Pressure for Circuit B is below the Low Suction Pressure Cool ing Heating Setpoint Compressor...

Page 27: ...urrent value of the return temperature sensor Indoor Humidity InRh AI 67 Current value of the indoor humidity sensor Space Temperature SpcTp AI 72 Current value of the space temperature sensor Current...

Page 28: ...If the control tem perature rises one degree above this setpoint the control will activate the cooling demand If the control temperature is the Supply Air Sensor then the cooling demand is always act...

Page 29: ...user adjustable amount If you do not want Cooling to operate during the Unoccupied Mode use the default setting of 30 F for these setpoints 0 30 N2 Properties for the VCM X Controller Parameter Name...

Page 30: ...function has been configured REHEAT II Connected Rt2Ins BI 58 Status that indicates the MHGRV controllers is connected to the system N2 Properties for the VCM X Controller Parameter Name Object Descr...

Page 31: ...relay 14 Expansion Relay 10 ExRly10 BI 142 Current status of relay 15 Expansion Relay 11 ExRly11 BI 143 Current status of relay 16 Expansion Relay 12 ExRly12 BI 144 Current status of relay 17 Expansi...

Page 32: ...hSupplyAirTempAlarm 1 LowControlTempAlarm 2 HighControlTempAlarm 3 VcmxExternal Relays1 2Bits BIT STRING ExpansionBoard1Relay1 0 ExpansionBoard1Relay2 1 ExpansionBoard1Relay3 2 ExpansionBoard1Relay4 3...

Page 33: ...88 Current position of the VFD blower fan signal Application Software Version AppVer AI 99 Current version of the software in the unit Coil Temperature Setpoint CoilTpSt AI 107 Current Coil Temperatur...

Page 34: ...Unoccupied Mode 1 Forced On 2 Forced Off 0 2 Space Sensor Offset SpcTpOst AO 71 If the Space Temperature Sensor is reading incorrectly you can use this option to enter an offset temperature to adjust...

Page 35: ...pAlm BI 2 Alarm that indicates a failure in the supply air sensor Cooling Enabled ClEnbl BI 6 Status that indicates mechanical cooling is enabled Economizer Enabled EcoEnbl BI 15 Status that indicates...

Page 36: ...setpoint in an hour in the cooling mode This alarm is not used in 100 outside air units or supply air control Control Temperature Heat Failure CtrlTpHF BI 109 This alarm is activated if the control te...

Page 37: ...Air Temperature RaTp AI 64 Current value of the return tempera ture sensor Space Temperature SpcTp AI 72 Current value of the space tempera ture sensor Supply Air Temperature SaTp AI 83 Current value...

Page 38: ...e rises one degree above this setpoint the control will activate the cooling demand If the control temperature is the Supply Air Sensor then the cooling demand is always active 0 99 N2 Parameters for...

Page 39: ...dewpoint in the supply air approximately 10 F above this setpoint 35 70 N2 Parameters for the VCM Controller Parameter Name Object Description Limits Indoor Humidity Setpoint InRhSt AO 120 If the ind...

Page 40: ...ay 1 ExRly1 BI 133 Current status of relay 6 Expansion Relay 2 ExRly2 BI 134 Current status of relay 7 Expansion Relay 3 ExRly3 BI 135 Current status of relay 8 N2 Parameters for the VCM Controller Pa...

Page 41: ...d 3 DehumidificationMode 4 ModGasIIConnected 5 ReheatIIConnected 6 N2 Parameters for the VCM Controller Parameter Name Object Description Limits Expansion Relay 4 ExRly4 BI 136 Current status of relay...

Page 42: ...ts BIT STRING ExpansionBoard3Relay1 0 ExpansionBoard3Relay2 1 ExpansionBoard3Relay3 2 ExpansionBoard3Relay4 3 ExpansionBoard4Relay1 4 ExpansionBoard4Relay2 5 ExpansionBoard4Relay3 6 ExpansionBoard4Rel...

Page 43: ...PT Link II N2 3 Interface 43 PT Link II N2 3 Technical Guide Notes...

Page 44: ...TLNK3N2 TGD 01E Printed in the USA October 2016 All rights reserved Copyright 2016 WattMaster Controls Inc 8500 NW River Park Drive Parkville MO 64152 Phone 816 505 1100 www orioncontrols com Fax 816...

Reviews: