- 1 -
4K HDMI IP Video Wall Controller
IPVDS-500-ED
User’s Manual
Doc No. : OIPVDS-D160722 / Rev1.0
WWW.OPTICIS.COM
Page 1: ...1 4K HDMI IP Video Wall Controller IPVDS 500 ED User s Manual Doc No OIPVDS D160722 Rev1 0 WWW OPTICIS COM...
Page 2: ...ctor descriptions 7 7 LED Indication 9 8 Connection Installation 10 9 SW Factory Reset 11 10 PC Program Video Wall Control Software 11 10 1 PC program Installation and Login Logout 11 10 2 Menu items...
Page 3: ...11 Display Placement 18 Figure 12 Layout setup 18 Figure 13 Searching 19 Figure 14 Device setting 20 Figure 15 EDID setup 21 Figure 16 Display Placement page setup 22 Figure 17 Display setup 23 Figur...
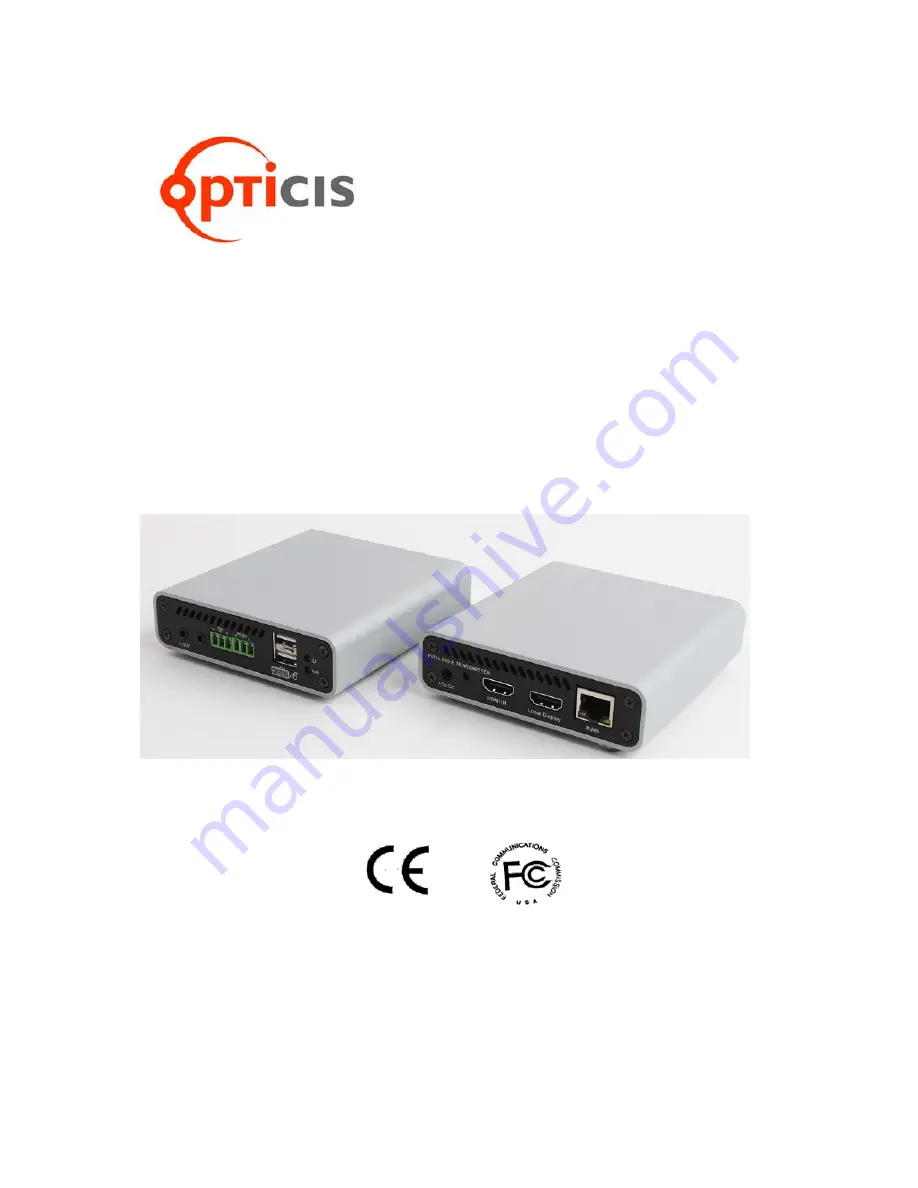
Page 4: ...e video with data and transmits it over Ethernet The receiver IPVDS 500 D Decoder connected to a display receives the encoded signal over network and decodes it to regenerate the video and data for us...
Page 5: ...DIO signals via IP Network Provides HDMI loop thru port for Local display Provides 1U rack model OPSCR 1U Optional Provides Mounting bracket model OPSCB VESA 75 100 standard Optional Video Wall Contr...
Page 6: ...l As an option RS 232 cable DB 9 male to 3Pin terminal block Mounting bracket OPSCB complying with VESA 75 100 5 Systems Requirements for Setup Hardware requirements You must have a HDMI graphic contr...
Page 7: ...on Optionally including Window XP AC DC Power Adapter Technical Advisory The IPVDS 500 ED is designed to use mainly external 5V AC DC power adaptor The internal power supplied through a HDMI pin 18 fr...
Page 8: ...r a keyboard to these connectors RS 232 TX RX Optional DIO TX RX Optional Note1 If you change a video source to another one you have to reset the power of all TXs and RXs by re plugging of the 5V powe...
Page 9: ...EDs on the front panel of IPVDS 500 ED indicate power and network status Power status LED Red The red LED will be turned on when 5V power is applied Link LED Green If the green LED turns on at TX and...
Page 10: ...Keyboard and mouse Step 6 Optional Connect Local Display port in IPVDS 500 E TX to local HDMI display by HDMI cable Step 7 Connect LAN port RJ 45 in IPVDS 50 0E TX to LAN port in Network switch with...
Page 11: ...ying it to display It has three sections 1 Menu items for device setup and system configuration 2 Layout Manager for layout and apply action 3 Display Placement for installation and display configurat...
Page 12: ...am please delete the previous PC program on the Control Panel of Window OS 3 Access to PC Program Login Logout 1 Run the PC program Video Wall Controller SW 2 Insert Password Confirm Password for admi...
Page 13: ...nu mouse right click menu 1 Ribbon menu Users configuration Host device configuration Client device configuration Client layout configuration Advanced Configuration and Firmware upgrade Figure 5 Ribbo...
Page 14: ...Please set Disable if L2 L3 network switch does not operate well with Jumbo frame Enable Figure 7 Advanced setup Firmware Upgrade Upgrade Firmware by using PC Program 1 Click Searching button to find...
Page 15: ...1 Copy IPVDS 500 bin into an USB memory stick 2 Insert the USB memory stick into any USB A ports on the selected TX or RX 3 Re plug the 5V power adapter into the power jack of selected TX or RX IPVDS...
Page 16: ...e 9 Icon menu 3 Context menu Mouse right click menu Host Device Setup Client Device Setup Display Configuration and Layout Editing for Overlay Host device setup Refer to Host Device setup Configuratio...
Page 17: ...ice section Device Searching Firstly set MxN Layout for Video Wall system and then search devices connected to IP network and check host device configuration You can preview videos connected to A V so...
Page 18: ...u can set OSD on off on Display Placement Page and check display order at OSD On mode Also you can make a replacement in unlocked mode for real display monitors on Display Replacement Page 8 Layout Ma...
Page 19: ...ividual displays in the IP Network For example if there are 7 Rxs which are connected to displays and you set 2x2 Video Wall displays 3 remaining displays are going to be on the individual displays as...
Page 20: ...host devices will be shown on the section You can preview each videos of A V sources connected to a host device Note Device searching is also available at Client Device section of Display Placement Pa...
Page 21: ...50 200Mbps or auto according to required image quality and bandwidth limitation of the network If auto bit rate IPVDS 500 EDs are in Visually lossless compression 1 Select one between 50MHz auto 2 Cl...
Page 22: ...ight you can write the default EDID data to all TXs or selected one 1 Select and check Default value either HDMI or DVI 2 Click EDID write button to all TXs all hosts recommended Reboot button Possibl...
Page 23: ...devices select one of listed devices and modify IP address gateway and subnet mask of the devices in static IP mode 3 Click Save Reboot button to save the modification in client devices RX 4 Repeat 2...
Page 24: ...h Audio Port Note Because Audio input port of a host device has more priority to Analog line in input than to HDMI input an operation with audio input port depends on whether Analog Line in is inserte...
Page 25: ...ay order in OSD On mode OSD numbering criteria is based on last 5 digit of the Serial Number which is stuck on the bottom of each client device RX and you can see information about Serial Number of cl...
Page 26: ...ange into unlocked mode 2 Replace with another client RX on Display Replacement mode of this PC Program 3 Click unlocked button to change into locked mode 4 Make sure whether display order is correct...
Page 27: ...nected to a host device on left section 3 Set Drag Drop by mouse from section to Layout section Figure 23 Stretch Layout 4 You can drag and extend a host video on layout section with mouse Layout Edit...
Page 28: ...mages to front forward back backward These overlay functions can help you to make more Layout 3 Also It is available to re start layout editing if you press Clear button on the Actions section Presets...
Page 29: ...29 6 Apply Action If you click apply button the edited Layout is applied to real displays Figure 27 Apply...
Page 30: ...scene before to apply it to real monitors Provides 99 Presets for user defined layout Save and Loading Bezel Compensation in 0 1mm units Video Interface Standard HDMI 1 4 and DVI1 0 HDCP LAN Port HDC...
Page 31: ...nother value Network connectivity issues Keyboard or Mouse doesn t work properly General case Ensure the USB cables are connected properly between Source PC and USB port of a TX Reset the power of all...
Page 32: ...TXs HDMI DVI different scan types Interlace Progressive 2D 3D Same video condition Slow in HID mouse or preview video on PC Program Set frame rate low for fast HID mouse in advanced configuration of...
Page 33: ...oducts that are replaced will become the property of Opticis Replacement products may be new or reconditioned Any replaced or repaired product or part has a ninety 90 day warranty or thereminder of th...
Page 34: ...shall be handed over to the applicable collection point for the recycling of electrical and electronic equipment By ensuring this product is disposed of correctly you will help prevent potential negat...
Page 35: ...contact techsupp opticis com Opticis Locations HQ 16Fl Kins Tower 8 Seongnam daero 331 beon gil Bundang gu Seongnam si Gyeonggi o 463 844 Rep of KOREA Tel 82 31 719 8033 Fax 82 31 719 8032 Factory 501...