


Installation Instructions EC 2-25 Lift
(Subject to technical alterations! - Status 09/2018)
This is a translation. The German original shall prevail.
Page 11 of 50
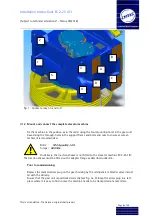
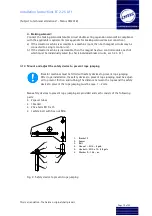
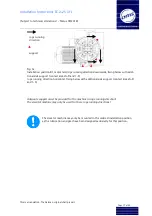
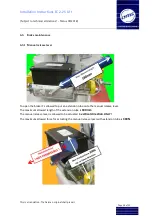
Adjustment to the installation position and rope run-through direction:
1.
Loosen the hex bolts M10 x 75 (2 per bracket).
2.
Swing the safety device to prevent the rope jumping into the required position.
3.
Bolt the bracket using the M10 x 75 bolts into the nearest boltholes in the provided bolt
circle on the gear housing.
4.
Fix the bolts e.g. using Loctite.
Torque : 100Nm
Adjustment to fit traction sheave diameter:
1.
Loosen the M16 hex nut on the securing bolt.
2.
Push the bolt along the slot into the desired position.
3.
Retighten the M16 hex nut.
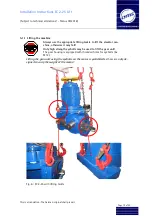
3.2
Installation and operation of the emergency release
The required
emergency instructions
,
that must be affixed and plainly visible in the vicinity of
the emergency release, are not described here. Refer to and comply with all applicable regula-
tions and requirements.
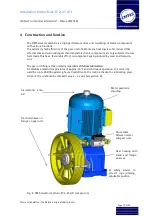
a) Accessible elevator machine
If the elevator machine is in a machine room and is easily accessible, the brake can be opened
with the central release lever of the braking solenoid. If required, the elevator car can be
moved by turning the handwheel on the motor.
b)
Remote control of the elevator machine
If the machine is positioned in an inaccessible part of the elevator shaft, a separate electrical
or mechanical remote control is required.
b1
)
Separate electrical remote control:
If an
emergency power source
is available, then
both coils of the braking solenoid and the motor must be connected in accordance with the
accompanying instructions.
Summary of Contents for Hypodrive EC 2-25 Lift
Page 2: ......


