background image

I N T R O D U C T I O N

2  

4    

 H-T40

M

-P Manual Rev.A 

 2 I

NTRODUC

T

ION

2

H-T40

M

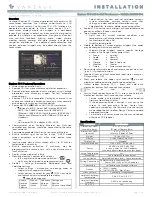
-P is a status display touchscreen with a 3.3” STN Liquid 

Crystal Display, and is water- and dust-resistant according to IP65/
NEMA 4X (indoor use only.)

H-T40

M

-P is CE-marked and is highly transient-resistant while 

in operation.

Also, its compact design makes connections with other machinery more 
flexible, thus achieving the optimal performance for machines.

 3 S

AFETY

 P

RECAUTIONS

3

Both the installer and the owner and/or operator of the status display 
touchscreen must read and understand this installation manual.

3.1. G

ENERAL

—  Only qualified personnel may install or operate the status display 
touchscreen
—  The status display touchscreen must be installed according to the 
installation instructions.
—  The status display touchscreen is designed for stationary installation on a 
plane surface, where the following conditions are fulfilled:

• no high explosive risks
• no strong magnetic fields
• no direct sunlight
• no large, sudden temperature changes
• for use in Pollution Degree 2 Environment
• for use on the flat surface of Types 1 and 4X (indoor use only)

enclosures

—  Never allow fluids, metal filings or wiring debris to enter any openings in 
the status display touchscreen. This may cause fire or electrical shock.
—  The status display touchscreen fulfills the requirements of EMC directive 
2004/108/EC.

Summary of Contents for Sti H-T40M-P

Page 1: ...H T40M P Status Display Touchscreen Installation and Operating Manual...

Page 2: ...ckage Contents page 6 Section 5 Specifications page 8 Section 6 Mounting Procedure page 10 Section 7 Grounding page 11 Section 8 Power Supply Wiring page 11 Section 9 Dip Switches page 12 Section 10 C...

Page 3: ...ion and the equipment must themselves ensure that each application is in compliance with all relevant requirements standards and legislation in respect to configuration and safety Only parts and acces...

Page 4: ...ual 3 1 GENERAL Only qualified personnel may install or operate the status display touchscreen The status display touchscreen must be installed according to the installation instructions The status di...

Page 5: ...upplier neither guarantees that the status display touchscreen is suitable for a customer s particular application nor assumes responsibility for a customer s product design installation or operation...

Page 6: ...y and surrounding front cover with a soft cloth and mild detergent Replacing the battery incorrectly may result in explosion Only use batteries recommend by supplier 3 7 DISMANTLING AND SCRAPPING The...

Page 7: ...PAC KA GE C ON TEN TS 7 OMRON STI 99885 0010 Rev A Figure 4 1 Status Display Touchscreen H T40M P Figure 4 2 Installation Fasteners Figure 4 3 Power connector...

Page 8: ...me 10 000 hours Touch screen operations 1 000 000 Active area of display W x H 58 5 x 58 5 mm Brightness cd m2 110 Processor 32 bit RISC Status LED PWR COM1 Storage temperature 10 to 60 C Relative ope...

Page 9: ...SP ECIFICA TIONS 9 OMRON STI 99885 0010 Rev A 5 2 DESCRIPTION OF THE PARTS Figure 5 1 H T40M P Mechanical Drawing 5 3 EXTERNAL AND CUT OUT DIMENSIONS Figure 5 2 External and Cut out Dimensions...

Page 10: ...status display touchscreen into the cut out Insert the fixtures to the holes on the unit and fasten the screws into the front of the panel Do not tighten the screws with too much or uneven force or it...

Page 11: ...status display touchscreen Perform the following steps to wire the power connector 1 Unplug the power connector and unscrew the screws 2 Strip approximately 7 8 mm of insulation Insert the wire all t...

Page 12: ...lt Factory Position 10 CONNECTION TO THE G9SP 10 1 Locate the included RS 232 cable with two DB9 connectors 2 Connect the HMI side of the cable to the status display touchscreen serial DB9 COM1 port 3...

Page 13: ...g on the bottom of the main page of the Status Display Touchscreen If it is not verify the G9SP is powered up has a program running and the communication cable is correctly connected No programming in...

Page 14: ...lar zone is in a run or stop mode Using the zone function with the G9SP requires the programming of the optional communication transmission output bits in the G9SP configurator software The status of...

Page 15: ...Optional Communication Transmission Data Zone 4 Table 12 1 G9SP Optional Output Transmission Data Figure 12 3 G9SP Configuration Example 12 2 SAFETY INPUT STATUS This screen page will display the curr...

Page 16: ...tail screen will display any detected errors A zero 0 indicates that there are no errors present i e normal operations If an error code is displayed click on the Code Help button for a description of...

Page 17: ...screen will display any detected errors If all zeroes 0 are displayed no errors are present i e normal operations If an error code is displayed click on the Code Help button for a description of the...

Page 18: ...is initiated If power loss or communication failure were to occur the machine would remain in a safe state Because there is a chance of this a redundant manual reset switch is recommended Figure 12 8...

Page 19: ...rcuit 13 SCREEN PROPERTIES 13 From the Screen Properties screen the contrast and brightness of the screen can be adjusted Press the up or down button and the display will change immediately Press the...

Page 20: ...nt or addition to the above warranty See http www omron247 com or contact your Omron representative for pub lished information 14 Limitation on Liability Etc OMRON COMPANIES SHALL NOT BE LIABLE FOR SP...

Page 21: ...tems Machine Automation Controllers MAC Programmable Controllers PLC Operator interfaces HMI Distributed I O Software Drives Motion Controls Servo AC Drives Motion Controllers Encoders Temperature Pro...

Reviews: