background image

10 


CHAPTER II.  QUICK TOUR OF PRINTER 


Overview: 

 
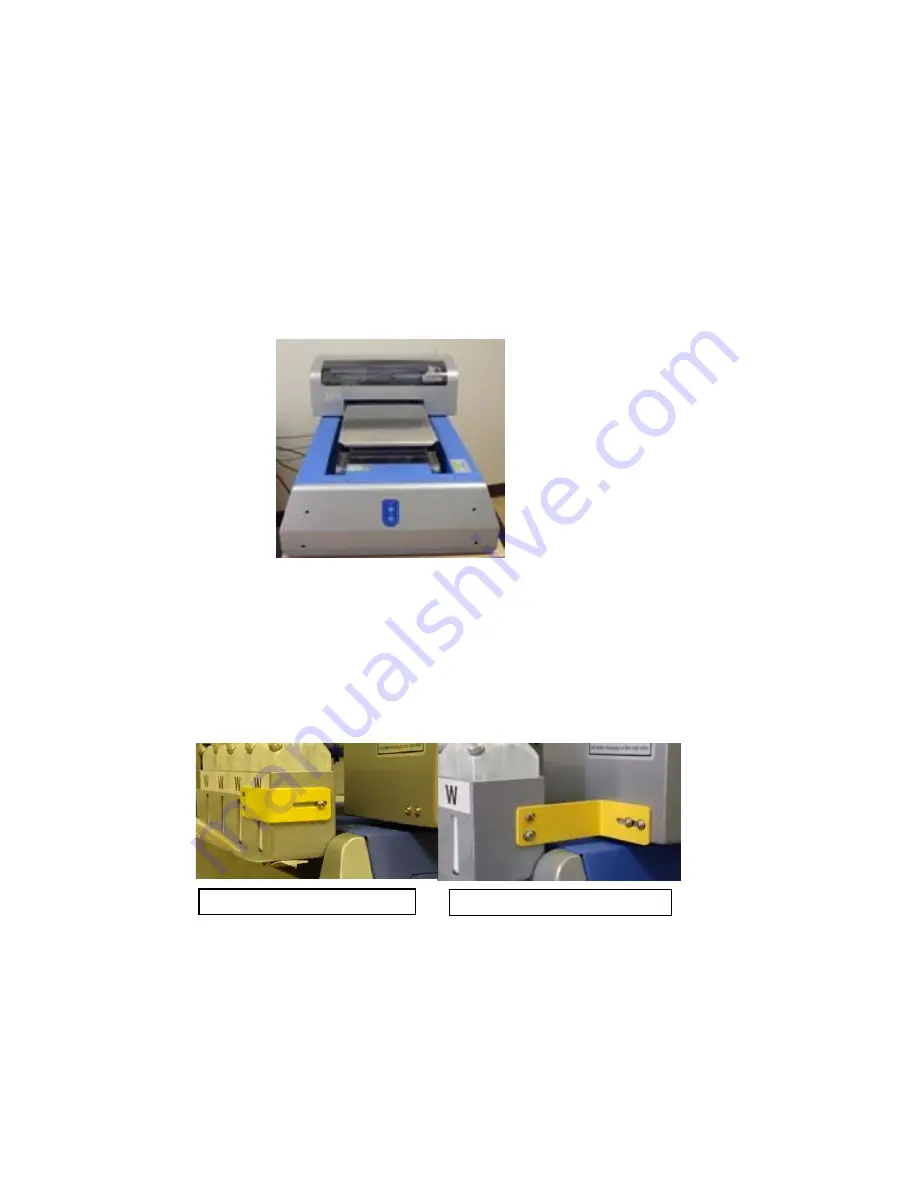
The FreeJet320TX Textile Printer is fully assembled and requires little 
mechanical set up.  The unit consists of two main parts; the Printer Box 
Assembly which houses the Epson Print Engine and the integrated Printer 
Base which has the Control Panels, Ink Supply and Maintenance System and 
the Platform to hold the ShirtBoards for the garments.  The Platform remains 
stationary (except for the vertical axis height adjustment) as the Printer Box 
moves forward and backwards over the garments during printing.  


There is a yellow “Printer Box Shipping Bracket” attached to the back left rear 
corner of the Printer Box which 

MUST

 be removed during set-up and installed 

during shipment / transport of the unit.  This shipping bracket keeps the 
Printer Box from moving during transport.  


Shipping bracket in Stored Position 

Shipping Bracket in Installed Position 

Summary of Contents for FreeJet320 TX

Page 1: ...User s Manual FreeJet320 TX Digital Direct to Garment Printer A Product of OmniPrint International Costa Mesa CA Aug 2009 Version 2880 v1 0 Authorized Dealer International Machine Group Inc Anaheim CA...

Page 2: ...gh space around the printer for proper ventilation Do not locate the printer near heat sources such as radiators or heat vents Do not locate the printer in direct sunlight Place the printer on a stabl...

Page 3: ...put your hand in the printer or touch the ink bottles while the printer is in operation DO NOT MOVE PRINT HEAD BY HAND doing so may damage the printer If you remove the ink bottles place them in indi...

Page 4: ...s manual contains the latest and most accurate information at the time of printing We reserve the right to make product changes and improvements at any time Some product Photos in this Manual may vary...

Page 5: ...on 100 cotton Printing on dark colored 50 cotton 50 polyester blends with White ink is NOT recommended because you will notice a discoloration of your image In addition when printing on 100 polyester...

Page 6: ...as far away as possible i e in separate area If you adhere to the required maintenance schedule printing with the FreeJet TX will be easy rewarding and profitable Important Support Information The Fre...

Page 7: ...oft USB drive B Install the Omniprint Direct Rip software USB HASP dongle C Installing the Epson R2400 Stylus Photo printer driver VI Initializing the FreeJet 320TX VII Nozzle Check Procedure Overview...

Page 8: ...local home repair store Since you will be handling wet ink to refill the Bulk System ink bottles you should also protect any carpet or floor covering with mats Like any Hi Tech electronic device your...

Page 9: ...e Geo Knight DK 20 16x20 with auto pop are recommended Both units sell for 1 350 and can be purchased through National UV Supply 7 Supplies Your unit comes with a set of CMYK inks 250 ml each and 500m...

Page 10: ...m to hold the ShirtBoards for the garments The Platform remains stationary except for the vertical axis height adjustment as the Printer Box moves forward and backwards over the garments during printi...

Page 11: ...er Cable Connections 3 Right Side View Main Control Panel 4 Left Side View Service Access Panels2 5 Top View Pallet Platform B Wet Cap and Printer Maintenance System 1 Waste Fluid Container 2 Manual S...

Page 12: ...head Assembly 1 Ink Lines and Ink Line Clips 2 Dampers plastic filter reservoirs 3 Ink Chip Module and Indicator Lights 4 Pump Wiper Capping Ink System Assembly D Print Head Carriage and Encoder Stri...

Page 13: ...13 E Ink Chip Reset Assembly F Infrared Laser Height Sensor...

Page 14: ...14 G Additiomal ShirtBoards Pallets for Garments available for purchase Chest ShirtBoard pallet Youth ShirtBoard pallet Sleeve ShirtBoard pallet Hat Board pallet...

Page 15: ...eeJet TX without using the original shipping carton you may void the warranty The crate may be disassembled for storage The FreeJet TX is shipped fully assembled in one large crate You MUST be very ca...

Page 16: ...Operating System must have the Epson Stylus Photo R2880 Driver the Epson USB if necessary may not be needed for visa installations Driver and the OmniPrint DirectRip software and HASP USB dongle neede...

Page 17: ...Your printer comes with 8 oz 250 ml bottles of Cyan Magenta Yellow and Black OmniPrint Ink along with 500 ml of OmniPrint Bright White You will also have 8 ink bottles 1 bottle will be used to hold e...

Page 18: ...tead fully screw the cap on THEN BACK IT OFF A TURN This allows air to enter the bottle as the fluid is pumped out The cleaner bottle will compress if its not loosened to allow air to flow in E Chargi...

Page 19: ...needed To cancel an ink charge you have already started simply press the power button by itself once and it will stop the ink charge There will be times where you might only need a small portion of an...

Page 20: ...e to different line length and other reasons As the Ink Lines completely fill CLOSE the Ink Line Clips on the filled lines Keep pulling ink into all 8 lines 8 When all lines are filled RELESE the vacu...

Page 21: ...r maintenance or other tasks you will need to re lock the print head 5 Move carriage right until its to farthest point as shown below 6 Press Function once by itself to lock the print head in place to...

Page 22: ...a standard USB printer cable that has been supplied The Epson Print Driver named Epson Stylus Photo R2880 is used to access the Epson Print Engine that is built into the FreeJet320TX for printer port...

Page 23: ...with this software It is OK to select that this software can be used by all user accounts on the computer C Install the Epson R2880 Stylus Photo printer Driver 8 Connect the computer cable to the Free...

Page 24: ...while printing The startup procedure is explained as follows 1 Bring the print carriage to the front by pressing the stand By button When the print carriage is stopped in the front position press and...

Page 25: ...nting the Nozzle Check directly on the ShirtBoard as both the 4 white ink channels and the B Black C Cyan M Magenta Y Yellow channels test print patterns will be visible on the stainless steel ShirtBo...

Page 26: ...t least two seconds the Blue DOWN Button This will move the platform pallet completely down If it is already completely down the motor will not start You can test to make sure the platform is complete...

Page 27: ...son Stylus Photo R2400 printer in Printer and Faxes folder in the Control Panel and select properties by right clicking the printer 3 Then select the Printer Preferences button located near the bottom...

Page 28: ...channels are firing and since White ink is heavier than CMYK It is OK to see some breaks in the lines they will clear out during printing c Troubleshooting Tip If some channels are missing al together...

Page 29: ...settings and Custom color and ink density settings and many more of the FreeJet320TX printer functions 1 Your software comes pre loaded with all the functions necessary to operate Once you are more f...

Page 30: ...for 15 30 seconds This will remove all wrinkles and press loose fibers down while drying the garment 1 Place garment on a smooth surface 2 Use the pretreatment sprayer to apply pretreatment solution...

Page 31: ...ottle without severely deforming the Waste Bottle f After seeing White Ink enter the Wast Bottle UNCLIP the C M Y K Ink Line Clips Depress the Sucton Pump as necessary to pull Color Ink into the Waste...

Page 32: ...latform to the completely down position b Push and Hold the Blue FRONT Button for about 2 seconds until the Printer Box moves towards the front of the Base about 4 inches and it is over the ShirtBoard...

Page 33: ...images in multiple areas of the garment This is recommended to cut down waste and control cost 1 Put Power Switch to ON position and the machine will go through different cycles and movement to get t...

Page 34: ...r printing needs 9 Press and release Function button to set the selection 5 Press red Standby button to move printer box to the front ready position 6 Click Print Printing will begin on the garment 7...

Page 35: ...veyor Lay clean sheet of silicon parchment paper over the pretreated area 9 Leave garment for 15 20 seconds at 330 degrees Remove garment when drying process is complete 3 Put Power Switch to ON posit...

Page 36: ...e sharpness of detail and color that you see in the original image Choosing a higher print resolution will slow your image print time but you will achieve brighter and sharper printed images that more...

Page 37: ...ean 11 Being sure there is no suction perform a final fill of the capping station with cleaning fluid 12 Clip the cleaning fluid line 13 Press and release the function button This will move the print...

Page 38: ...m and simply network or copy the files over to the PC workstation Graphics and RIP Software Your FreeJet 320TX includes the latest versions of OmniRIP For graphics you can continue to use Photoshop Co...

Page 39: ...create images based on shapes somewhat like a coloring book They typically have hundreds or even thousands of typefaces and many have extensive coloring book type stock clip art that you can use to cr...

Page 40: ...ed but they will also be less pixilated If you can get a higher resolution file from the client do so CorelDRAW and Adobe Illustrator have similar Image Size functions Important Point If the original...

Page 41: ...With the Magic Wand you click on the unwanted areas around the image and then delete them It s a pretty simple process IF the background color is different contrasting from any of the edges of your i...

Page 42: ...t background you can add additional elements to the image including text drop shadows glows and more You must take ownership of fixing bad artwork If the file is provided in a pixel based format like...

Page 43: ...he capping station Check under the print head for any lint or ink buildup If noticed using a clean lint free cloth carefully wipe the debris away without touching the actual head Press Function The pr...

Page 44: ...lights o Ink chip error light o Use of control panel o On o Off o Layers o Function Button o Feed Button o Up Down o Feed button for cleanings o Cleaning o Wet Capping System o Software Settings o In...

Reviews: