1
IX71/IX51
IMPORTANT
This microscope employs a UIS2/UIS (Universal Infinity System) optical design, and should be used with
modules designed for the IX2 or BX2 series (as well as some of the modules designed for the Olympus
IX or BX series).
For the applicable modules, please consult Olympus or the latest catalogues. Less than optimum per-
formance may result if inappropriate module combinations are used.
If you want to use one or more motorized modules, you should prepare the IX2-UCB control box, U-
HSTR2 hand switch, a PC and the IX2-BSW (Ver. 01.03) software (which runs on Windows 2000 or Win-
dows Me).
Configuration of Instruction Manuals
Since these microscopes are expandable to a variety of systems, separate instruction manuals are prepared
so that the user has to read only the manuals according to the user’s own system.
Manual Name
Main Contents
IX71/IX51
Observation procedures including transmitted light brightfield,
phase contrast and DIC observations
Fluorescence System for IX2
Reflected light fluorescence observation
IX2-GCP
Glass Center Plate
IX2-MLWCD
Mid-Long Working Distance Condenser
IX2-DICD
DIC Condenser
U-FWT/FWR/FWO
Motorized filter wheels (The U-FWT cannot be used with these
microscopes.)
IX2-UCB/U-HSTR2
Functions of the Control Box (incorporating the power supply)
and Hand Switch
IX2 Software for PC (CD-ROM)
IX2-BSW (Ver. 01.03 or later)
Methods of PC control of microscope functions
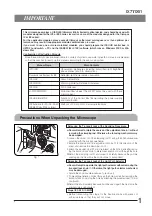
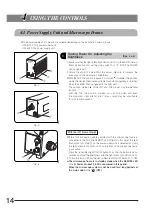
Precautions When Unpacking the Microscope
Releasing the Transport Lock of the Revolving Nosepiece
# Never attempt to rotate the coarse or fine adjustment knob @ without
removing the clamping rod. Otherwise, the focusing mechanism may
be damaged.
1. Loosen the screw ³ of the clamping rod ² using the Allen screwdriver
provided with the microscope frame.
2. Rotate the coarse and fine adjustment knobs @ in the direction of the
arrow and remove the clamping rod ².
3. Attach the provided seal (10 mm dia., black) on the hole made after remov-
ing the transport lock knob to prevent penetration of dust through the hole.
}Retain the clamping rod ² and screw ³ carefully because they will be
used again the next time the microscope is transported.
Releasing the Transport Lock of the Light Path Selector
# Never attempt to operate the light path selector without removing the
transport lock knob |. Otherwise, the light path selector mechanism
may be damaged.
· Rotate the knob counterclockwise to remove it.
· To prevent penetration of dust through the hole made after removing the
transport lock knob, stop the hole by attaching the provided seal (10 mm
dia., black).
}Retain the knob carefully because it will be used again the next time the
microscope is transported.
Stage (IX2-SFR, IX-MVR)
· Before transporting the stage, fix the flexible knobs with pieces of
adhesive tape so that they will not move.
Fig. 1
@
²
³
|


