66
10-2 Assembly procedures
1
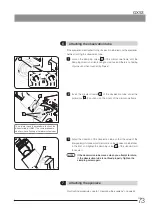
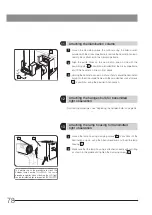
Attaching the light source
Attaching the LED light source
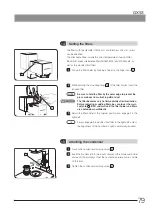
Loosen the clamping screws a (2 positions) of the microscope frame
using the Allen screwdriver.
Be careful, if the clamping screw is loosened too much, it
may come off.
Insert the light source for reflected light illumination into the light source
mounting hole until it touches the end.
Attach the reflected LED light source so that the cable
for the reflected LED light source comes to the right side
when looking from the back of the microscope frame.
Tighten the clamping screws a (2 positions) of the microscope frame
using the Allen screwdriver.
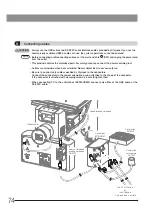
Connect the cable for the reflected LED light source to the
connector on the back of the microscope frame. For details, see
“Connecting cables" on page 74.
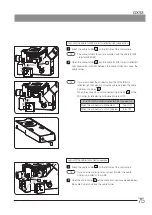
Attaching the liquid light guide or mercury lamp housing
In order to attach the liquid light guide or the mercury
lamp housing, the optional adapter (MX-HGAD) is required.
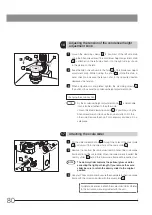
Loosen the clamping screws a (2 positions) of the microscope frame
using the Allen screwdriver.
Insert the adapter (MX-HGAD) into the light source mounting hole of the
microscope frame until it touches the end, and tighten the clamping
screws a (2 positions).
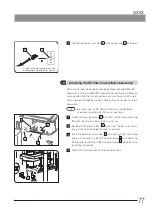
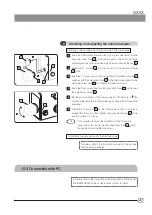
Loosen the clamping screws b (2 positions) of the adapter (MX-HGAD)
using the Allen screwdriver.
Insert the liquid light guide adapter into the adapter (MX-HGAD) until
it touches the end, and tighten the clamping screws b (2 positions).
For procedures to attach the mercury lamp housing, see “Attaching
the mercury lamp housing" on page 52. After the mercury lamp
housing is attached, perform the centering of the mercury burner.
Attaching the halogen bulb
For attaching procedures, see “Replacing the halogen bulb" on page 48.
1
NOTE
2
NOTE
3
4
NOTE
1
2
3
4
a
2
2
4
a
b
This picture shows the procedure to attach the
liquid light guide. The same procedure applies
when attaching the mercury lamp housing.


