background image

910-269-EN, Rev. B, June 2011

Managing Phased Array Image Display    267


In 

A/S Vert

 and 

A/S Horz

, the x-axis grid modes of the A-scan and S-scan are directly 

correspondent to each other.

For example, in 

A/S Vert

 screen mode with the 

Standard

 x-axis grid pattern active, 

the horizontally oriented A-scan grids from 0 to 10 connect with the grids on the 
S-scan. These horizontal lines allow you to visually correlate an A-scan indication at 
division 3 with its corresponding S-scan image, also at division 3.

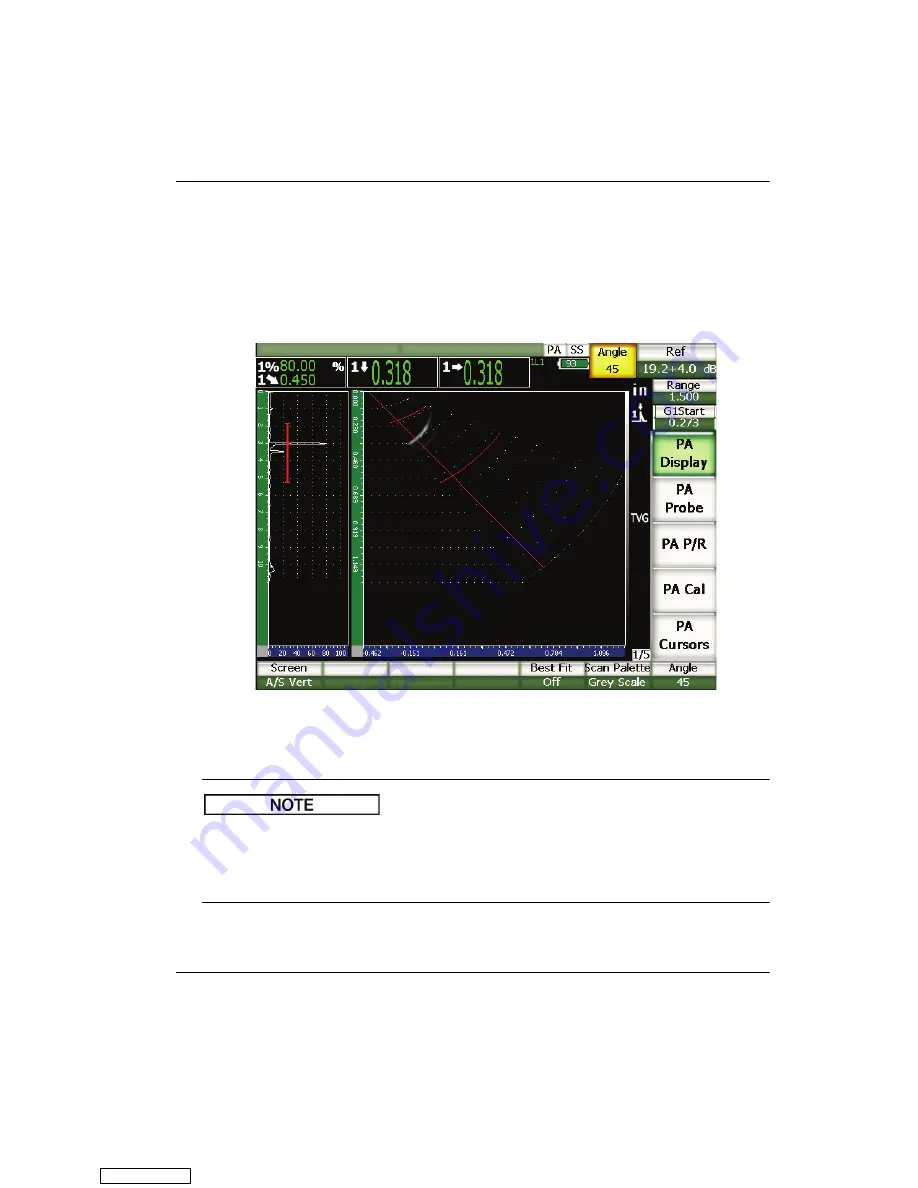
Figure 14-10  A-scan and S-scan in Grey Scale mode with indication

The A-scan display is a sound path A-scan. Therefore, indications on the A-scan 
do not line up horizontally with their corresponding indications on the S-scan. 
This requires that the grids applied to the S-scan are curved to follow a sound 
path contour (see Figure 14-10 on page 267).

Downloaded from 

ManualsNet.com

 search engine

Summary of Contents for EPOCH 1000 Series

Page 1: ...910 269 EN Revision B June 2011 EPOCH 1000 Series User s Manual Downloaded from ManualsNet com search engine ...

Page 2: ...d therein It corresponds to the version of the product manufactured prior to the date appearing on the title page There could however be some differences between the manual and the product if the product was modified thereafter The information contained in this document is subject to change without notice Part number 910 269 EN Revision B June 2011 Printed in the United States of America All brand...

Page 3: ...and Modification 6 Safety Symbols 6 Safety Signal Words 7 Notes Signal Words 8 Safety 8 Warnings 8 WEEE Directive 9 China RoHS 10 EMC Directive Compliance 10 Warranty Information 11 Technical Support 11 Preface 13 Product Description 13 EPOCH 1000 Series Models 14 About This Document 15 Audience 15 Typographical Conventions 16 If You Have Documentation Comments 16 Revision History 17 Downloaded fr...

Page 4: ... 35 1 5 1 Removable Rubber Handle 35 1 5 2 Instrument Stands 35 1 5 3 O Ring Gasket and Membrane Seals 36 1 5 4 Display Protection 36 1 6 Environmental Ratings 37 2 Powering the EPOCH 1000 Series 39 2 1 Starting the EPOCH 1000 Series 40 2 2 Using the AC Line Power 41 2 3 Using Battery Power 42 2 4 Charging the Battery 44 2 5 Replacing the Battery 46 3 EPOCH 1000 Series Software Features 49 3 1 Sof...

Page 5: ...oard 84 3 4 5 Interacting With a Dialog Box 86 3 5 Managing Data with GageView Pro Interface Program 86 4 Adjusting the Pulser Receiver Conventional UT Mode 89 4 1 Adjusting the System Sensitivity Gain 89 4 2 Using the AUTO XX Feature 90 4 3 Setting Reference Gain and Scanning Gain 91 4 4 Pulser Adjustments 92 4 4 1 Pulse Repetition Frequency PRF 92 4 4 2 Pulse Energy Voltage 93 4 4 3 Damping 94 4...

Page 6: ... 6 8 2 Zoom Applications 119 6 9 Gate Alarms 120 6 9 1 Threshold Alarms 120 6 9 2 Minimum Depth Alarm 121 6 9 3 Minimum Depth Alarm with a Single Gate 121 6 9 4 Minimum Depth Alarm with Gate Tracking 122 7 Reference Cursors 123 7 1 Cursors A and B 123 7 2 Activating and Positioning Cursors 124 7 3 Cursor Measurements 125 8 Input and Output Features 127 8 1 VGA Output 127 8 2 Analog Outputs 128 8 3...

Page 7: ...le Beam Calibration Block Diagrams 168 10 Managing the Data Logger 175 10 1 Data Logger Overview 175 10 2 Data Logger Storage Capacity 176 10 3 Files Submenu 176 10 3 1 Creating Data Files 177 10 3 2 Opening Data Files 179 10 3 3 Saving Data to Files 182 10 3 4 File Review 183 10 3 5 Quick Calibration File Recall 183 10 3 6 Data File Types 185 10 3 6 1 Calibration File 185 10 3 6 2 Incremental 186...

Page 8: ...t 228 11 4 AWS D1 1 D1 5 Weld Rating Software 229 11 4 1 Description 229 11 4 2 Option Activation 230 11 4 3 Scanning Gain 232 11 4 4 Calculating A and C Values 233 11 5 Interface Gate 234 11 5 1 Option Activation 234 11 5 2 Gate Measurements and Alarms 235 11 6 Floating Gate 235 11 6 1 Option Activation 235 11 6 2 Operating in 6 dB Mode 236 11 6 3 Operating in 14 dB Mode 237 11 6 4 Gate Alarms 23...

Page 9: ...d and Rulers 260 14 4 1 A scan Grid Mode 261 14 4 2 Image Rulers 261 14 4 3 Reject 261 14 5 Peak Memory 262 14 6 Peak Hold 262 14 7 Freeze 263 14 8 Display Grid Modes and Overlays 263 14 8 1 Probe Front Cursor 264 14 8 2 Leg Indicators 265 14 8 3 Grid Modes 266 15 Gates Phased Array Mode 269 15 1 General Gate Operation 269 15 2 Gate S Scan View 269 16 Image Sizing Cursors Phased Array Mode 271 16 ...

Page 10: ...dge Delay With an Angle Beam Transducer 294 17 4 3 Calibrating the Sensitivity Gain With an Angle Beam Transducer 299 17 5 Gate Adjustment During Calibration 303 17 6 Calibration On and Off 304 17 7 Curved Surface Correction 305 18 Maintenance Trouble Shooting 307 18 1 Instrument Cleaning 307 18 2 Verifying O Ring Gaskets and Seals 307 18 3 Protecting the Display 307 18 4 Annual Calibration 308 18...

Page 11: ...reen height ID identifier IF interface gate IIW International Institute of Welding IP ingress protection LCD liquid crystal display MEM memory NDT non destructive testing OS overshoot P R pulser receiver PA phased array PCL printer control language PK peak PN part number PRF pulse repetition frequency R receive RoHS restriction of hazardous substanc es SDH side drilled hole T R transmit receive TR...

Page 12: ...910 269 EN Rev B June 2011 xii List of Abbreviations Downloaded from ManualsNet com search engine ...

Page 13: ...with safety related labels and symbols is attached under the instrument at the location shown in the following figure If labels or symbols are missing or illegible please contact Olympus Location of rating plate label see Table 1 on page 2 Downloaded from ManualsNet com search engine ...

Page 14: ...rter or their agent responsible for compliance and for placing it on the Australian market The China RoHS mark indicates the product s Environmental Friendly Usage Period EFUP The EFUP is defined as the number of years for which listed controlled substances will not leak or chemically deteriorate while in the product The EFUP for the EPOCH 1000 Series has been determined to be 15 years Note The En...

Page 15: ...format yynnnddmm where yy Production year nnn Unit Number manufactured that day dd Production Day mm Production Month For example the 080011612 serial number indicates the first unit 001 produced on the December 16 2008 Table 1 Content of the rating plate label continued Downloaded from ManualsNet com search engine ...

Page 16: ...an electrical shock Up to 475 V can be present on the inner conductor The warning symbol between the Transmit Receive T R and the Receive R BNC connectors shown in the figure below indicates this electrical shock risk Warning symbol BNC connector inner conductor LEMO 01 also available Downloaded from ManualsNet com search engine ...

Page 17: ...ries instruments for any purpose other than their intended use In particular do not use the instruments for the inspection or examination of human or animal body parts Instruction Manual This instruction manual contains essential information on using this Olympus product safely and effectively Before use thoroughly review this instruction manual and use the product as instructed Keep this instruct...

Page 18: ... in a malfunction and or in equipment damage Repair and Modification The EPOCH 1000 Series instruments do not contain any user serviceable parts Do not disassemble modify or attempt to repair the instrument to prevent human injury and or equipment damage Safety Symbols The following safety symbols may appear on the instrument and in the instruction manual General warning symbol This symbol is used...

Page 19: ...dicated conditions are fully understood and met The WARNING signal word indicates a potentially hazardous situation It calls attention to a procedure practice or the like which if not correctly performed or adhered to could result in death or serious personal injury Do not proceed beyond a WARNING signal word until the indicated conditions are fully understood and met The CAUTION signal word indic...

Page 20: ... to a type of note that helps you apply the techniques and procedures described in the manual to your specific needs or that provides hints on how to use effectively the capabilities of the product Safety Before applying power to the EPOCH 1000 Series verify that the correct safety precautions have been taken see the following warnings In addition note the external markings on the instrument that ...

Page 21: ...rminal of the instrument to the protective conductor of the mains power cord The mains plug shall only be inserted in a socket outlet provided with a protective earth contact Never negate the protective action by using an extension cord power cable without a protective conductor grounding Whenever it is likely that the ground protection is impaired you must turn off the instrument and secure it ag...

Page 22: ...and used in accordance with the instruction manual may cause harmful interference to radio communications Operation of this equipment in a residential area is likely to cause harmful interference in which case you will be required to correct the interference at your own expense ICES 001 Canada Compliance This Class A digital apparatus complies with Canadian ICES 001 Cet appareil numérique de la cl...

Page 23: ... manual attempts to teach the proper operation of your Olympus product The information contained herein is intended solely as a teaching aid and shall not be used in any particular application without independent testing and or verification by the operator or the supervisor Such independent verification of procedures becomes more important as the criticality of the application increases For this r...

Page 24: ...910 269 EN Rev B June 2011 12 Important Information Please Read Before Use Downloaded from ManualsNet com search engine ...

Page 25: ...nal and or phased array ultrasonic transducers in indoor and outdoor environments These flaw detectors offer advanced conventional ultrasonic performance as well as basic phased array imaging capabilities The instruments feature a large dynamic range superior measurement resolution a full VGA resolution 640 x 480 pixels color liquid crystal display with transflective technology for superior visibi...

Page 26: ...ast once with your EPOCH 1000 1000iR 1000i in hand so that you can combine reading the descriptions and examples with the actual use of the instrument EPOCH 1000 Series Models The EPOCH 1000 Series offers three instrument configuration levels to suit many inspection needs EPOCH 1000 Advanced UT An advanced conventional ultrasonic flaw detector that can be upgraded with phased array imaging at an a...

Page 27: ...options Audience This document is intended for operators of the EPOCH 1000 1000iR 1000i Olympus recommends that all operators have a thorough understanding of the principles and limitations of ultrasonic non destructive testing Olympus assumes no responsibility for incorrect operational procedure or interpretation of test results We recommend that all operators seek adequate training prior to usin...

Page 28: ...el of a user interface element including menu items buttons toolbar names options and tabs BOLD Used when referring to an instrument front panel key 2ND F BOLD BOLD Used when referring to the secondary function of an instrument front panel key BOLD is the primary function of the key BOLD is the secondary function of the key appearing above the direct access keypad key The comma means to sequential...

Page 29: ...cumentation In addition the document number is also changed to reflect the revision Table 3 on page 17 shows a list of revisions for this document Table 3 Revision history Date Part number Release version June 2011 910 269 EN Revision B February 2009 910 269 EN Revision A Downloaded from ManualsNet com search engine ...

Page 30: ...910 269 EN Rev B June 2011 18 Preface Downloaded from ManualsNet com search engine ...

Page 31: ...tely new or improved compared to previous EPOCH flaw detector instruments It is important for you to be familiar with the use and maintenance of these items This section covers the following topics Hardware Overview Front Panel User Interface USB Keyboard and Mouse Control Connectors Various Hardware Features Environmental Ratings Downloaded from ManualsNet com search engine ...

Page 32: ...H 1000i hardware Protective rubber bumpers Removable rubber handle D rings 4 to attach the optional chest harness Front panel user interface Conventional UT BNC connectors AC power connector Phase array connection cover Back stand Battery compartment cover Alarms connector Computer connection compartment door Analog Out connector Membrane vent Downloaded from ManualsNet com search engine ...

Page 33: ...ect access to common inspection parameters and easy adjustment of values from either side of the instrument without obstructing the view of the display Figure 1 2 The EPOCH 1000i hardware user interface elements The direct access keypad on the left side of the front panel provides keys for direct access to software parameters that are commonly used during inspection see section 1 2 4 on page 24 fo...

Page 34: ...menu When an adjustable parameter is highlighted CHECK toggles the parameter adjustment between a coarse and a fine adjustment Coarse adjustment is active when the parameter title is underlined Fine adjustment is active when the parameter title is not underlined When a parameter button is highlighted CHECK activates that function example CAL Zero The ESCAPE key has two primary functions When in a ...

Page 35: ...button In the example of Figure 1 4 on page 23 pressing F2 chooses the PA Display software button and activates the corresponding function Figure 1 4 F n and P n keys pointing to software buttons 1 2 3 Parameter Adjustment Software parameter value adjustments such as Gain or Range can be accomplished via two primary methods Use the UP and DOWN arrow keys respectively to increase and decrease a par...

Page 36: ... configurations and provides indication of the differences for the EPOCH 1000 configuration There are two differences between the direct access keypad of conventional only versus conventional and phased array flaw detector models 1 The ANGLE key label is replaced by illustrating a focal law angle selection 2 The UT PA secondary function is added to allow easy switching between conventional and pha...

Page 37: ...ction GAIN Adjusts system sensitivity 2nd F GAIN REF dB EPOCH 1000i only Locks the reference gain level and allows the scanning gain to be used SAVE Saves to the selected File and ID 2nd F SAVE UT PA Switches back and forth between the conventional UT and the phased array PA modes FREEZE Freeze holds the displayed waveform until FREEZE is pressed again EPOCH 1000iR and EPOCH 1000i only EPOCH 1000i...

Page 38: ... that does not affect the calibrated zero offset ANGLE EPOCH 1000i only Allows adjustment of the current focal law PA mode or angle UT mode ANGLE EPOCH 1000 only Allows adjustment of current angle PEAK MEM Activates the peak memory function see section 5 2 on page 102 2nd F PEAK MEM PK HOLD Activates the peak hold function see section 5 3 on page 104 2nd F Accesses the second function identified a...

Page 39: ... USB keyboard and mouse is similar to direct function control via the methods described previously in this document Some key control notes are as follows The USB keyboard control allows direct entry of parameter values To accept a directly entered parameter press the ENTER key on the keyboard The ESC key on a USB keyboard activates the ESCAPE function The ENTER key on a USB keyboard activates the ...

Page 40: ...e EPOCH 1000 Series is illustrated with BNC connectors in this document The conventional transducer connectors are located at the top of the instrument on the left The two connectors are easily accessible from the front of the instrument see Figure 1 7 on page 28 Figure 1 7 Location of the conventional transducer connectors For single element transducers either transducer connector may be used For...

Page 41: ...R and EPOCH 1000i come standard with one phased array transducer connector located at the back of the instrument see Figure 1 8 on page 29 This connector is also used with other Olympus products including the OmniScan instruments Any phased array transducer with element count matching the capabilities of the EPOCH 1000 Series may be used with this standard connector Refer to section 19 4 on page 3...

Page 42: ...ed Array Connection Cover The phased array transducer connector is not sealed for environmental hazards When a phased array transducer is not connected proper care should be taken to protect this connector from dust dirt liquid and other potentially damaging substances For this purpose the EPOCH 1000iR and EPOCH 1000i include a protective cover to protect the phased array transducer connector when...

Page 43: ...pper right corner see Figure 1 10 on page 32 A rubber cover protects each connector The connectors provide analog outputs digital alarm outputs a digital input and encoder outputs Refer to section 19 3 on page 316 for the complete specifications of the supported I O signals Protective cover over the phased array connector Alternative location for the protective cover Thumb screws 2 Downloaded from...

Page 44: ...1000 Series battery compartment cover allows you to quickly access the battery and connections without the need for tools Four thumb screws on the battery compartment cover secure it to the instrument case and ensure the compartment is sealed The battery compartment cover also has a small hole in the bottom center area that is covered on the inside by an environmentally sealed membrane vent This v...

Page 45: ...with a 2 GB capacity Compact Flash card This card can be removed for data transfer or replacement 1 4 5 Computer Connection Compartment On the right side of the EPOCH 1000 Series instruments a door covers the instruments computer connection compartment see Figure 1 12 on page 34 This door has an integral membrane seal to keep liquids away from the unsealed connections behind the door Table 5 on pa...

Page 46: ...on 8 5 1 on page 131 USB hosts 2 Used to connect USB peripherals such as a printer a keyboard a mouse or a storage device see section 8 5 2 on page 131 VGA RS 232 1 Combination connector Used to connect an external VGA video monitor This feature is useful for presentations training and remote instrument monitoring see section 8 1 on page 127 Used to establish an RS 232 communication link see secti...

Page 47: ...rubber handle is secured to each side of the instrument with four flat head shoulder screws This rubber handle can be removed using a screwdriver if necessary 1 5 2 Instrument Stands The EPOCH 1000 Series features two articulating pipe stands for variable viewing angles see Figure 1 13 on page 36 Each stand is attached to the instrument with two hard pivot blocks and has been dipped into a high fr...

Page 48: ... seal These seals must be properly maintained to assure environmental durability Instrument seals are evaluated and replaced as needed during the instrument s annual calibration This should be performed at an authorized Olympus service center 1 5 4 Display Protection EPOCH 1000 Series instruments include a clear plastic sheet protecting the instrument s display window You are advised to leave this...

Page 49: ...es has been tested to the requirements of IP66 All instruments are designed and manufactured to meet this level of ingress protection when they leave the factory To maintain this level of protection you are responsible for the proper care of all routinely exposed membrane seals Additionally you are responsible for returning the instrument to an authorized Olympus service center each year to ensure...

Page 50: ...910 269 EN Rev B June 2011 38 Chapter 1 Downloaded from ManualsNet com search engine ...

Page 51: ...ries This chapter describes how to operate the EPOCH 1000 Series using different power supply options The topics are as follows Starting the EPOCH 1000 Series Using the AC Line Power Using Battery Power Charging the Battery Replacing the Battery Downloaded from ManualsNet com search engine ...

Page 52: ...rument then goes through a series of self tests for 45 to 60 seconds and then starts up The power indicator and the battery indicator provide basic feedback regarding the operating charging status of the instrument see Table 6 on page 40 Table 6 Power indicator status Indicator state AC line power Indicator meaning Battery indicator Green Yes Internal battery fully charged Red Yes Internal battery...

Page 53: ...ress ESCAPE to save and close the Beam setup page Figure 2 2 The Beam setup page appearing at startup when a PA probe is connected 2 2 Using the AC Line Power AC line power is supplied to the EPOCH 1000 Series instrument via the charger adaptor PN EP MCA The EP MCA has a universal AC power input so it operates with any line voltage from 100 120 VAC or 200 240 VAC and with 50 Hz to 60 Hz line frequ...

Page 54: ...er the AC adaptor port on the back of the EPOCH 1000 Series instrument 3 Connect the DC output power cable from the charger adaptor to the AC adaptor input jack see Figure 2 3 on page 42 4 Turn on the EPOCH 1000 Series by pressing the front panel power key see Figure 2 1 on page 40 The front panel power indicator activates see Figure 2 1 on page 40 2 3 Using Battery Power The EPOCH 1000 Series ope...

Page 55: ...life on the unit The battery charge indicator is accurate after 5 to 10 minutes of use Figure 2 4 The battery charge indicator Battery Operating Time Battery operating time depends on the age and manufacturer of the battery being used the instrument mode conventional or phased array and on the instrument settings To provide realistic battery operating times the EPOCH 1000 Series instruments were t...

Page 56: ...Do not attempt to power or charge other electronic equipment with the EP MCA charger adaptor as this may cause death or serious personal injury as the result of the explosion while charging a battery Do not attempt to charge other batteries with the EPXT EC standalone battery charger as this may cause death or serious personal injury as the result of the explosion while charging a battery When the...

Page 57: ...aptor when not in use Whenever possible the battery should remain connected to the EP MCA Charger Adaptor overnight or over a weekend so that it achieves 100 full charge The battery must reach full charge on a regular basis for proper capacity and cycle life maintenance Recharge discharged batteries as soon as possible after use Store batteries in a cool dry environment Avoid long term storage und...

Page 58: ...w the four thumb screws of the battery compartment cover at the back of the instrument see Figure 2 5 on page 46 3 Remove the battery compartment cover 4 Remove the battery EPXT BAR L Only use the Olympus rechargeable Li ion battery pack PN EPXT BAT L with an EPOCH 1000 Series instrument Using any other battery may cause death or serious personal injury as the result of the explosion while chargin...

Page 59: ...nto place in the battery compartment 6 Ensure that the gasket of the battery compartment cover is clean and in good condition 7 Install the battery compartment cover at the back of the instrument and then tighten the four thumb screws using your fingers Downloaded from ManualsNet com search engine ...

Page 60: ...910 269 EN Rev B June 2011 48 Chapter 2 Downloaded from ManualsNet com search engine ...

Page 61: ...EPOCH 1000 Series Software Features This chapter describes the software components Topics are as follows Software Main Display Menu Contents About Setup Pages Basic Procedures Managing Data with GageView Pro Interface Program Downloaded from ManualsNet com search engine ...

Page 62: ...intuitive menu system of the EPOCH 1000 Series consists of menus submenu buttons and parameter buttons see Figure 3 2 on page 51 The menu system includes five standard menus for both the UT and PA operation modes Other menus appear when you purchase and activate particular software options Live scan area Menu indicator Submenu buttons Measurement reading boxes Parameter buttons File name Message b...

Page 63: ...tor showing means that there are five standard available menus and that the first one is currently selected Figure 3 3 The menu indicator 1 5 Parameters 7 belonging to the Pulser submenu 2 5 3 5 4 5 5 5 1 5 Selected menu with its five submenu buttons Menu indicator Selected parameter with focus Selected submenu With the focus on one of the submenu buttons turn the adjustment knob to select one of ...

Page 64: ... 61 provides a complete and quick reference to all menus submenus and parameters available in both the UT and PA operation modes 3 1 2 About the Convention to Identify Menu Elements In this document the following convention is used to concisely refer to an element in the menu structure Menu Submenu Parameter value where Menu is replaced by the value of the menu indicator ex 3 5 Submenu is replaced...

Page 65: ...u to choose the Width parameter of the Gate 1 submenu in the second menu the following expression is used Choose 2 5 Gate 1 Width Activating an optional feature that introduces another menu increases the total number of menus shown by the menu indicator Ex 1 5 becomes 1 6 Select 3 5 Meas Setup Unit mm Downloaded from ManualsNet com search engine ...

Page 66: ...e the Range and the Basic buttons in Figure 3 5 on page 54 Figure 3 5 The focus is on the element appearing yellow 3 1 4 About Button Types Table 7 on page 54 presents the various types of buttons found in the EPOCH 1000 Series interface Table 7 Button types Type Example Description Editable value Parameter with an editable value Turn the adjustment knob or press the arrow keys to change the value...

Page 67: ... page 55 Figure 3 7 Message bar with a message example 3 1 6 About Software Indicators Software indicators appear in a area at the top of the main display screen see Figure 3 8 on page 56 Table 8 on page 56 describes the various indicators that appear or may appear in the area Selectable value Parameter with a set of predetermined selectable values Turn the adjustment knob or press the arrow keys ...

Page 68: ...er Once selected the button appears yellow see Figure 2 5 on page 46 Turn the adjustment knob or press the UP and DOWN arrow keys to edit the value Table 8 Software indicators Indicator Icon Description Operation mode Instrument in phased array mode Instrument in conventional UT mode Scan type S scan sector scan Battery charge Indication of the remaining battery charge Leg indicator Indicates leg ...

Page 69: ...ce selected the button turns yellow see Figure 3 10 on page 57 Turn the adjustment knob or press the UP and DOWN arrow keys to edit the value Figure 3 10 Example of the Range and Delay direct access parameters 3 1 9 About Measurement Reading Boxes The measurement reading boxes at the top left corner of the software main display below the message bar present the icons and digital values for up to s...

Page 70: ...sonic data graphically see Figure 3 12 on page 58 In PA operation mode different views are available refer to section 14 1 on page 253 for details Figure 3 12 Example the live scan area in A S Vert mode S scan A scan Sound path axis ruler Gate 1 True depth axis ruler Color palette p Downloaded from ManualsNet com search engine ...

Page 71: ...splaying a set of flags in a thin vertical area on the right of the live scan area see Figure 3 13 on page 59 Table 9 on page 59 provides a description of the possible flags Figure 3 13 The area displaying flags Table 9 Flag description Flag Description Length units are inches Length units are millimeters Flag area Downloaded from ManualsNet com search engine ...

Page 72: ...in first peak measurement mode Indicates that an alarm for gate 1 and or gate 2 has been triggered Flashes on and off alternating with gate measurement indicator AVG is active AWS D1 1 D1 5 is active Calibration is active Access to Gain Auto CAL PA Cal CAL Zero Velocity Angle Pulser Receiver and PA P R is locked see section 3 3 4 on page 76 Curved surface correction CSC is active DAC TVG is active...

Page 73: ...on page 116 Display FREEZE is active Overshoot PEAK MEM is active 2ND F PEAK MEM PK HOLD reference echo is active The recall freeze is active Press MEAS RESET to deactivate The recall zoom is active The zoom is active Indicates that the instrument is connected to the AC line power Access to all instrument function keys except ON OFF is locked see section 3 3 4 on page 76 Table 9 Flag description c...

Page 74: ...tandard menus in UT mode Menu 1 5 2 5 3 5 4 5 5 5 Submenu buttons Table 11 Content of the 1 5 standard menu in UT mode Submenu Parameters Basic Velocity Zero Range Delay Pulser PRF Mode PRF Energy Damp Mode Pulser Freq Receiver Filter Group Filter Rect Reject TRIG Angle Thick X Value CSC Diameter Auto Cal CAL Mode CAL Velocity CAL Zero Velocity Zero Basic Pulser Receiver TRIG Auto CAL Gate 1 Gate ...

Page 75: ...Ref Cursor Cursor A Cursor A Cursor B Cursor B Table 13 Content of the 3 5 standard menu in UT mode Submenu Parameters Display Setup Color Setup A Scan Setup VGA Meas Setup Reading Setup Unit TH Res Res Trigger A Out Inst Setup General Owner Info Status Table 14 Content of the 4 5 standard menu in UT mode Submenu Parameters Sizing Option DAC TVG DGS AWS D1 1 Table 15 Content of the 5 5 standard me...

Page 76: ...onventional UT mode menus Table 17 on page 65 to Table 21 on page 66 provide a quick reference of available submenu and parameter buttons for each PA mode menu Table 16 Phased array standard menus Menu 1 5 2 5 3 5 4 5 5 5 Submenu buttons PA Display PA Probe PA P R PA Cal PA Cursors Gate 1 Gate 2 IF Gate Gate Setup Ref Cursor Display Setup Meas Setup Inst Setup Sizing Option Files Downloaded from M...

Page 77: ...2 Table 18 Content of the 2 5 standard menu in PA mode Submenu Parameters Gate 1 Zoom Start Width Level Alarm Min Depth Status Gate 2 Zoom Start Width Level Alarm Min Depth Status IF Gate Zoom Start Width Level Alarm Alarm Status Gate Setup Setup G1 Tracks G2 Tracks Ref Cursor Cursor A Cursor A Cursor B Cursor B Table 19 Content of the 3 5 standard menu in PA mode Submenu Parameters Display Setup ...

Page 78: ...ble by selecting the corresponding parameter For example in PA operation mode choose 1 5 PA Probe Beam to access the Beam setup page shown in Figure 3 14 on page 67 Table 20 Content of the 4 5 standard menu in PA mode Submenu Parameters Sizing Option AWS D1 1 Table 21 Content of the 5 5 standard menu in PA mode Submenu Parameters Files Open Create Reset Page Setup First ID Last ID Id Downloaded fr...

Page 79: ...umn on the right A series of seven buttons appears at the bottom of setup pages and contain available values corresponding to the currently selected parameter Press ESCAPE to leave a setup page With a USB keyboard connected to the EPOCH 1000 Series pressing the ESCAPE key also allows you to leave a setup page The following sections describe the available setup pages Title bar Currently selected pa...

Page 80: ... Setup Figure 3 15 The Color setup page The available parameters are Brightness Used to adjust the screen brightness in 5 increments or by choosing one of the preset values 0 25 50 75 or 100 Color Scheme Used to set the overall instrument color scheme Factory default multicolor display Outdoor white background black text Downloaded from ManualsNet com search engine ...

Page 81: ...image scans Grey Scale Colored default value VGA at Power Up Used to automatically turn on the VGA output at start up 3 3 2 A Scan Setup Page The A Scan setup page shown in Figure 3 16 on page 69 is accessible by choosing 3 5 Display Setup A Scan Setup Figure 3 16 A Scan setup page Downloaded from ManualsNet com search engine ...

Page 82: ...ns spaced evenly and labeled with corresponding sound path values Leg up to four divisions representing half skip distances in angle beam inspection mode based on test piece thickness value and labeled L1 to L4 Y Axis Grid Used to set the vertical Y axis grid display mode to either 100 or 110 full screen height Baseline Break Used to turn this feature on or off Ascan Used to select the A scan mode...

Page 83: ... at the top of the software main display see section 3 1 9 on page 57 Figure 3 17 The Meas setup page The available parameters are Meas Selection Used to set the measurement reading box definition mode to be automatically selected based on instrument function Auto or to be manually defined Manual Description Used to select custom measurement schemes loaded using the GageView Pro interface program ...

Page 84: ... used with Angle Gate 2 Thickness Thickness in gate 2 Not used with Angle IF Gate Thickness Thickness in IF gate Not used with Angle Gate 1 Sound Path Distance Sound path Angular distance in gate 1 Gate 2 Sound Path Distance Sound path Angular distance in gate 2 Gate 1 Depth to Reflector Depth to reflector in gate 1 Used with Angle Gate 2 Depth to Reflector Depth to reflector in gate 2 Used with A...

Page 85: ...n most pulser receiver adjustments Gate 1 Current Amplitude Amplitude measurement in gate 1 Displays as of full screen height FSH Gate 2 Current Amplitude Amplitude measurement in gate 2 Displays as of full screen height FSH Gate 1 Max Amplitude Maximum amplitude in gate 1 Resets on gate adjustment and on most pulser receiver adjustments Gate 2 Max Amplitude Maximum amplitude in gate 2 Resets on g...

Page 86: ...ickness echo to echo measurement Gate 1 IF Gate Gate 1 thickness minus IF gate thickness Gate 2 IF Gate Gate 2 thickness minus IF gate thickness AWS D1 1 D1 5 Weld Rating D D rating calculated for the gated echo Flat Bottom Hole FBH Size Flat bottom hole FBH size equivalent reflector size for DGS AVG evaluation Overshoot OS Overshoot value in dB comparing echo height to DGS AVG curve Reject Percen...

Page 87: ... B and the position of the indication in IF gate Cursor X2 Cursor X1 Difference between the position of cursor X2 and the position of cursor X1 in frozen sector scan sizing mode Cursor Y2 Cursor Y1 Difference between the position of cursor Y2 and the position of cursor Y1 in frozen S scan sizing mode Cursor X1 Cursor Y1 Intersect Amplitude Value of the signal amplitude at the intersection of curso...

Page 88: ...as the user interface language and the instrument date and time Figure 3 19 The General setup page The available parameters are Language Used to select the user interface language English Japanese German French Spanish Russian and Chinese Key Beep Used to activate an audible tone after every key press Alarm Beep Used to activate an audible tone when a Gate Alarm is triggered Downloaded from Manual...

Page 89: ...t as the internal temperature of the instrument changes This calibration ensures proper vertical alignment and response of the A scan Temperature calibration suspends all data acquisition for 1 or 2 seconds For manual scanning applications automatic temperature calibration is recommended For automated scanning applications manual temperature calibration is recommended to avoid loss of data Locale ...

Page 90: ...ge shown in Figure 3 20 on page 78 is accessible by choosing 3 5 Inst Setup Owner Info The page allows you to input up to five lines of text displayed during start up at the end of the start up screens This text is typically used to show owner or company information including address and phone number Figure 3 20 The Owner Info setup page Downloaded from ManualsNet com search engine ...

Page 91: ...ou to enter a activate code to allow access to a software option not included with the standard package of instrument features This is provided by an Olympus representative after the purchase of a particular software option Refer to section 11 1 on page 195 for details on software option activation 3 3 7 Display Setup Page Phased Array Mode Only The Display setup page shown in Figure 3 22 on page ...

Page 92: ... PA Probe Beam setup page Sector Grid Used to display the X axis grid in the S scan Ascan Grid Used to display the X axis grid in the A scan Probe Front Cursor Used to display a visual marker in the S scan to represent the front of the phased array probe This feature is used for surface distance measurements much like X value correction as the beam index point BIP in phased array mode varies depen...

Page 93: ...e instrument click a submenu button d With a USB keyboard connected to the instrument press the ESC key the number of times needed to move the focus back to the menu level 2 Select the desired menu using one of the following methods a Slowly turn the adjustment knob until the desired submenus appear on the right side of the software main display b Press the RIGHT or the LEFT arrow keys until the d...

Page 94: ...ent click the desired parameter d With a USB keyboard connected to the instrument press ENTER to move the focus to the parameter level and then press the right or the left arrow keys until the desired parameter is selected 3 4 2 Navigating in a Setup Page Setup pages are accessible from parameter buttons A setup page contains related parameters To navigate in a setup page 1 Access the desired setu...

Page 95: ...ditable or selectable To change the value of a parameter with a selectable value 1 Select the parameter with a selectable value for which you want to change the value see section 3 4 1 on page 81 for details The button background of the selected parameter turns to yellow showing that it now has the focus see section 3 1 3 on page 54 for details on the focus concept 2 Use one of the following metho...

Page 96: ...button below the label b Press UP or the DOWN arrow key until the desired value appears in the button below the label c With a USB mouse connected to the instrument rotate the wheel of the mouse until the desired value appears in the button below the label d With a USB keyboard connected to the instrument press the UP or the DOWN arrow key until the desired value appears in the button below the la...

Page 97: ...the EPOCH 1000 Series click the desired character Press and hold 2nd F while clicking a character to enter an uppercase letter 4 Repeat step 3 to enter other characters 5 To delete an already entered character a Move the cursor to the right of the character to delete by pressing the LEFT or the RIGHT arrow key b Turn the adjustment knob to select BS on the virtual keyboard and then press CHECK 6 T...

Page 98: ...stment knob to modify the digit to the appropriate value 3 If needed repeat steps 1 and 2 to modify other digits 4 When the value is adjusted press LEFT or RIGHT to move the focus to the desired dialog box button 5 Press CHECK to activate the selected button 3 5 Managing Data with GageView Pro Interface Program The EPOCH 1000 Series is fully compatible with Olympus standard portable instrument com...

Page 99: ...910 269 EN Rev B June 2011 EPOCH 1000 Series Software Features 87 Refer to the GageView Pro User s Manual Downloaded from ManualsNet com search engine ...

Page 100: ...910 269 EN Rev B June 2011 88 Chapter 3 Downloaded from ManualsNet com search engine ...

Page 101: ...sing the AUTO XX Feature Setting Reference Gain and Scanning Gain Pulser Adjustments Receiver Adjustments Custom Filter Sets 4 1 Adjusting the System Sensitivity Gain To adjust the system sensitivity 1 Press GAIN 2 Use the CHECK key to select either coarse or fine adjustments 3 Use one of the two adjustment methods below to adjust the gain setting a UP and DOWN arrow keys b Adjustment knob clockwi...

Page 102: ...h the instrument s reference gain level see section 4 3 on page 91 for further information You can use the AUTO XX feature to bring an echo to XX FSH in any gate To use AUTO XX Feature 1 Press GATE to select the gate that measures the echo to be adjusted 2 Press 2nd F GATE AUTO XX to activate AUTO XX feature AUTO XX can be activated at any time during operation If you do not actively select a gate...

Page 103: ...ne adjustment mode Coarse adjustment varies the gain value by 6 dB Fine adjustment varies the gain value by 0 1 dB 3 Use the UP and DOWN arrow keys or the adjustment knob to vary the scanning gain While using the reference gain and scanning gain the following parameters appear in the 1 5 Basic submenu Add Used to add the scanning gain to the reference gain and deactivate the reference gain feature...

Page 104: ...ower the PRF to avoid wrap around interference that results in spurious signals on the display For applications with rapid scanning it is often necessary to use a high PRF rate to assure that small defects are detected as the probe moves past the part The EPOCH 1000 Series allows you to manually adjust the PRF from 5 Hz to 6000 Hz in 50 Hz coarse or 5 Hz fine increments The instrument also has two...

Page 105: ...asound mode is always equal to the PRF rate unless you are using a multiplexer 4 4 2 Pulse Energy Voltage The EPOCH 1000 Series conventional ultrasound mode can adjust the pulse energy from 50 V to 475 V in increments of 25 V With this flexibility you can set the pulse energy from to a minimum when you want to extend the battery life or provide a very high power pulser for the most difficult mater...

Page 106: ...on the transducer being used the various damping settings either improve near surface resolution or improve the instrument s penetration power 4 4 4 Test Mode The EPOCH 1000 Series conventional ultrasound mode can operate in three test modes that you can select using the 1 5 Pulser Mode parameter P E Used to select the pulse echo mode where a single element transducer sends and receives the signal...

Page 107: ...odes that you can select using the 1 5 Pulser Pulser parameter Spike Used to mimic a traditional spike pulse by using a narrow width pulse to excite the transducer Square Used to tune the width of the pulse to optimize the response of the transducer The EPOCH 1000 Series uses the PerfectSquare technology to achieve optimum response from the tunable square wave pulser This PerfectSquare technology ...

Page 108: ...e setting Actual results could vary due to the test material and or variation in the transducer center frequency Try various settings with a transducer and test piece to maximize ultrasonic performance 4 5 Receiver Adjustments The receiver settings in the EPOCH 1000 Series conventional ultrasound mode are accessed from the 1 5 Receiver submenu The receiver parameters are Filter Group Digital Recei...

Page 109: ...requency spectrum The Standard filter set also allows the instrument to provide the dynamic range dB required by EN12668 1 In most cases you should select either a broadband filter or a narrow band filter that covers the frequency of the transducer being used Due to the shifting of frequency spectrum in most materials it might be necessary to adjust the filter settings to maximize instrument perfo...

Page 110: ...ly observed Improved initial pulse main bang recovery with new DC coupled setups compared to the standard lower frequency band pass filter settings 0 2 MHz to 10 MHz 1 5 MHz to 8 5 MHz etc Optimized broadband response from medium to high frequency transducers Use of very low frequency transducers 50 kHz to 100 kHz range for specialized applications The Advanced filter set contains the following 30...

Page 111: ...sted to be compliant with EN12668 1 the letter A appears before each filter set This allows you to easily identify if the filter being used complies or not with EN12668 1 4 5 3 Waveform Rectification The EPOCH 1000 Series can operate in one of four different rectification modes that you can select using the 1 5 Receiver Rect parameter Full wave Half wave Positive Half wave Negative or RF unrectifi...

Page 112: ...Custom Filter Sets The EPOCH 1000 Series is capable of storing custom filter sets that are developed at a customer s request by Olympus The AxleInspFR filter selection is an example of this custom filter design to meet the demands of a particular application For more information contact Olympus Downloaded from ManualsNet com search engine ...

Page 113: ...parameter allows eliminating unwanted low level signals from the display The reject function is linear and adjustable from 0 to 80 FSH Increasing the reject level does not affect the amplitude of the signals above the reject level The reject function can also be used in the unrectified 1 5 Receiver Rect RF mode The reject level is displayed as an horizontal line on the instrument display see Figur...

Page 114: ...ition The display updates each pixel if a signal of greater amplitude is acquired When you scan the transducer over a reflector the signal envelope echo dynamic as a function of transducer position is held on the screen as a green line see Figure 5 2 on page 103 In addition the current live waveform is displayed at the appropriate place within the signal envelope Reject level line Downloaded from ...

Page 115: ...ak memory function cannot be activated in the unrectified 1 5 Receiver Rect RF mode To activate peak memory function 1 Press PEAK MEM The symbol appears in the flag area to indicate that the function is active 2 Scan over a reflector to acquire the echo envelope 3 Press PEAK MEM again to turn off the peak memory function Peak memory flag Peak memory signal envelope green line Current live waveform...

Page 116: ...ss 2ND F PEAK MEM PK HOLD again to shut off the peak hold function 5 4 Freeze The freeze function holds or freezes the information on the screen at the moment you press FREEZE Once the freeze function is activated the pulser receiver of the EPOCH 1000 Series becomes inactive and does not acquire any further data A symbol appears on the right side of the screen indicating that the function is activ...

Page 117: ...reased Pulser Receiver settings other than gain 5 5 Grid Modes The EPOCH 1000 Series provides multiple grid modes for easy A scan interpretation depending on the application To adjust the grid modes 1 Choose 3 5 Display Setup A Scan Setup to open the A Scan setup page 2 Move the focus to the X Axis grid Mode parameter using the UP and DOWN arrow keys see Figure 5 3 on page 106 Downloaded from Manu...

Page 118: ... 5 Figure 5 3 Selecting the x axis grid mode 3 Choose the desired x axis grid mode using the RIGHT and LEFT arrow keys or using the corresponding direct access P n key see Figure 5 4 on page 107 Downloaded from ManualsNet com search engine ...

Page 119: ...Path grid displaying actual sound path measurements at equally spaced increments along the horizontal axis This mode displays 5 divisions each labeled with its corresponding sound path value depending on the 1 5 Basic Range 1 5 Basic Delay and 3 5 Meas Setup Units settings Leg grid displaying vertical lines representing angle beam inspection legs This mode displays up to four 4 divisions labeled L...

Page 120: ...910 269 EN Rev B June 2011 108 Chapter 5 Figure 5 5 The y axis grid modes 100 110 100 or 110 grid maximum amplitude height displayed on the vertical Y Axis Downloaded from ManualsNet com search engine ...

Page 121: ...ound mode of the EPOCH 1000 Series The topics covered are as follows Measurement Gates 1 and 2 Quickly Adjusting Basic Gate Parameters Interface Gate Optional Gate Measurement Modes Viewing Measurement Readings Gate Tracking and Echo to Echo Measurements Operating in Time of Flight Mode Using the Zoom Gate Alarms Downloaded from ManualsNet com search engine ...

Page 122: ...red line while gate 2 appears as a blue line Figure 6 1 Gate 1 and gate 2 Both gates can be used to take thickness measurements with straight beam transducers sound path measurements with angle beam transducers measure signal amplitude measure time of flight in microseconds or to trigger threshold and minimum depth alarms The gates can also be used together to take echo to echo thickness measureme...

Page 123: ...isplay on the width of the gate refer to section 6 8 on page 119 for details Start Used to adjust the gate start position Width Used to adjust the gate width Level Used to adjust the vertical position of the gate Alarm Used to select a gate alarm condition refer to section 6 9 on page 120 for details Downloaded from ManualsNet com search engine ...

Page 124: ...main display The gate button shows the first available gate parameter see Figure 6 3 on page 112 Figure 6 3 The direct access gate button 2 Edit the value using the adjustment knob or the UP and DOWN arrow keys When needed press CHECK to toggle between the coarse and fine mode 3 To select the same parameter for another active gate press GATE until the desired gate is selected The gate button succe...

Page 125: ...0 Series features an optional interface gate providing a third measurement gate The interface gate positioning is controlled using the same two methods as described in 6 1 on page 110 and 6 2 on page 112 for measurement gates 1 and 2 For further information about special interface gate functions see section 11 5 on page 234 6 4 Gate Measurement Modes The EPOCH 1000 Series gate 1 and gate 2 provide...

Page 126: ...e indication must break the threshold of the gate for a measurement to be acquired Also known as the flank mode Peak Acquires measurement readings based on the position of the highest peak within the gated screen range The indication does not have to break the gate threshold for a measurement to be acquired 1stPeak Acquires measurement readings based on the position of the first peak to break the ...

Page 127: ...rigger in Edge Peak and 1stPeak modes Gate RF Setup In unrectified RF mode used to choose the polarity of the gate Options include Dual Gate The gate appears in the positive and negative side of the X axis Position and width are identical and the gate level mirrors across the X axis example 25 and 25 Positive The gate appears only on the positive side of the x axis Negative The gate appears only o...

Page 128: ...nt gate so that only the indication of interest falls within the gated region per the measurement mode definitions above 6 5 Viewing Measurement Readings The EPOCH 1000 Series provides six customizable measurement reading boxes to display acquired measurements These measurement readings must be properly defined to view the desired information from a given indication For more information on definin...

Page 129: ... fixed start position To make echo to echo measurements with gate 1 and gate 2 1 Activate both gates by selecting 2 5 Gate 1 Status On and 2 5 Gate 2 Status On 2 As shown in the example of Figure 6 6 on page 117 position gate 1 over the first echo to detect and then position gate 2 over the second echo to detect The 2 5 Gate 2 Start position defines the separation between the position of the indic...

Page 130: ...wo The entire time of flight through the test piece in both directions is displayed As a reminder when taking thickness measurements the EPOCH 1000 Series must divide the product of material velocity and time of flight by two in order to calculate the thickness of the part If this were not done the unit would display twice the actual thickness because the sound energy would pass through the part t...

Page 131: ...tection applications For example when detecting branches of cracking such as intergranular stress corrosion cracking IGSCC the inspector s job can be complicated by the geometry of the test specimen and also by the specific characteristics of the defect itself In instances where the pipe counter bore is close to the weld root it is possible to have three signals that all appear quite close to each...

Page 132: ...tes the red indicator above the display window corresponding to the gate with which the alarm has been triggered To toggle the audible alarm on and off see section 3 3 4 on page 76 The three primary types of gate alarms are positive threshold negative threshold and minimum depth 6 9 1 Threshold Alarms Threshold alarms can be set on gate 1 gate 2 and or on the interface gate A positive logic alarm ...

Page 133: ...OCH 1000 Series is equipped with a minimum depth alarm that is triggered whenever the current thickness measurement reading falls below an operator defined level The minimum depth alarm can be used either with a single gate or in echo to echo measurement mode 6 9 3 Minimum Depth Alarm with a Single Gate When the minimum depth alarm is activated a marker appears on the gate to visually indicate the...

Page 134: ... value 6 9 4 Minimum Depth Alarm with Gate Tracking The EPOCH 1000 Series can use the minimum depth alarm when making echo to echo thickness measurements with gate tracking When gate tracking is active the tracking gate moves side to side tracking the position of the echo in the non tracking first gate With gate tracking active the Min Depth alarm threshold is relative to the position of the echo ...

Page 135: ...s covered are as follows Cursors A and B Activating and Positioning Cursors Cursor Measurements 7 1 Cursors A and B The EPOCH 1000 Series provides two visual and measurement reference cursors that can be displayed on the instrument s A scan view These cursors are controlled with parameters from the 2 5 Ref Cursor submenu Downloaded from ManualsNet com search engine ...

Page 136: ...ks within the displayed range Examples include weld crown position weld root position bond line interface of two components or materials known geometric or other inclusion s that may produce a reflection etc 7 2 Activating and Positioning Cursors The reference cursors cannot be positioned beyond the visible screen range Also Cursor B can only be positioned over or on the right of Cursor A To activ...

Page 137: ... can also be used to display reference measurement readings These measurements are comparative and can be made between cursors A and B or between one cursor and a gate Gate tracking is not available with cursors You can select the measuring reading to appear at the top of the main display screen using the Meas setup page accessible by choosing 3 5 Meas Setup Reading Setup see section 3 3 3 on page...

Page 138: ...e 2011 126 Chapter 7 If the gated indication used in a cursor to gate comparative measurement precedes the position of the cursor the EPOCH 1000 Series displays a negative value Downloaded from ManualsNet com search engine ...

Page 139: ...capability This function uses pins on the output port located in the computer connection compartment on the right side of the instrument This port is a combination VGA RS 232 port Using the VGA output you are able to display the full contents of the EPOCH 1000 Series screen on any device that accepts VGA input To use the VGA output 1 Turn off the EPOCH 1000 Series and the VGA device 2 Connect the ...

Page 140: ... Analog Outputs The EPOCH 1000 Series offers four programmable analog outputs These analog outputs allow the EPOCH 1000 Series to continuously output thickness or amplitude information to an external device such as a strip chart recorder or a computer outfitted with an analog digital converter card The information is output as a scaled voltage on either a 0 1 V or 0 10 V scale These voltage signal...

Page 141: ...l Reading n Used to select the measurement thickness or amplitude to output to the ANALOG OUT connector Output n Used to select the range of voltage output from the unit 0 1 V or 0 10 V Mapping n Used to select the scale of the output voltage based either on the full screen range Range or on the gate width GateWidth Load n Used to select the value for the impedance of the peripheral device measuri...

Page 142: ...k of the instrument see section 1 4 3 on page 31 Refer to Table 32 on page 316 for the ALARMS connector pinout The trigger input and output mode is set using the 3 5 Meas Setup Trigger parameter that offers three selections Internal Standard operational mode internally controlling the pulse timing and frequency The EPOCH 1000 Series is not affected by the external trigger input but outputs a synch...

Page 143: ... USB ports One USB Client port located in the computer connection compartment Two USB Host ports located in the computer connection compartment One USB Host port located inside the battery compartment 8 5 1 USB Client The USB Client port is used for computer communication USB client allows a peripheral device to pass commands to the EPOCH 1000 Series but does not allow the EPOCH 1000 Series to com...

Page 144: ...SB Command Protocol The EPOCH 1000 Series can be remotely controlled via either the serial RS 232 communications port or the USB client port A comprehensive series of remote commands is available to allow access to all functions of the instrument Contact Olympus for further information Downloaded from ManualsNet com search engine ...

Page 145: ...g and the entry of the sound into the test piece The unit must be programmed with the correct velocity setting so that it matches the material velocity of the test piece The EPOCH 1000 Series features an advanced auto calibration parameters in the 1 5 Auto CAL submenu which provides for a fast and easy calibration process The following section details the procedure to calibrate the EPOCH 1000 Seri...

Page 146: ... mode before calibrating 1 Press GAIN to select an initial gain value that is appropriate for the calibration If the appropriate gain level is unknown set the initial gain at 20 dB and adjust it as necessary during calibration 2 Choose 1 5 Basic Velocity and then enter an approximate velocity for the test material Refer to Appendix A on page 321 for a table with sound velocities for various materi...

Page 147: ...k and then adjust the pulser and filter settings to create a clean A scan For more information on pulser and receiver adjustments see section 4 4 on page 92 and section 4 5 on page 96 Use the auto measurement reading selection feature so that the EPOCH 1000 Series automatically displays relevant thickness sound path measurements during calibration based on the instrument settings For more informat...

Page 148: ... velocity of the inspection to acquire accurate echo to echo measurements You can perform echo to echo measurements using the following pairs of gates G2 G1 G2 IF or G1 IF see section 6 6 on page 116 9 2 2 Angle Beam Modes Angle beam calibrations can be performed by two methods Sound path This standard angle beam calibration mode uses the sound path measurement of two different known material thic...

Page 149: ...etric units the calibration process is exactly the same except that the entries are in millimeters rather than inches To calibrate using a straight beam transducer 1 Follow the initial setup procedure outlined in section 9 1 on page 134 2 Connect the transducer to an appropriate cable and then connect the cable to either of the conventional transducer connectors at the top of the instrument 3 Sele...

Page 150: ...e 138 Figure 9 1 Example of a gated calibration signal 7 Once a steady reading is achieved choose 1 5 Auto CAL CAL Zero The screen freezes and the Enter Value for Zero Cal dialog box appears see Figure 9 2 on page 138 Figure 9 2 The Enter Value for Zero Cal dialog box Thickness measurement Downloaded from ManualsNet com search engine ...

Page 151: ...ng calibration data use the RIGHT and LEFT arrow keys to highlight Cancel and then press CHECK Figure 9 3 The second gated calibration signal 9 Couple the transducer to the thick calibration block step In this example the transducer is coupled to the 0 500 in step 10 Use the GATE key to position gate 1 so that the first back wall echo from the known thickness step exceeds the gate threshold 11 Pre...

Page 152: ...e sample delay line calibration described below is performed using Olympus transducer part number V202 RM with a frequency of 10 0 MHz and an element diameter of 0 25 in 6 mm The calibration requires a test block with two known thicknesses made from the material to be measured Ideally the two thickness measurements are both below and above the expected thickness of the material to be inspected For...

Page 153: ...pens the signal and the echo should jump up and down on the screen 5 Choose 1 5 Basic Zero and then increase the value to move this echo to the left side of the screen so that it is barely visible 6 Select 1 5 Auto CAL CAL Mode Thickness 7 Couple the transducer to the thin calibration block step For this example the transducer is coupled to the 0 100 in step 8 Use the GATE key to position gate 1 s...

Page 154: ...rst back wall echo being gated not a multiple echo from the end of the delay line tip 10 Once a steady reading is achieved choose 1 5 Auto CAL CAL Zero The screen freezes and the Enter Value for Zero Cal dialog box appears see Figure 9 2 on page 138 Thickness measurement Downloaded from ManualsNet com search engine ...

Page 155: ... match the known thickness of the gated indication 0 100 in in this example and then choose Continue to continue to the second calibration step see Figure 9 6 on page 144 If for any reason you need to exit without acquiring calibration data use the RIGHT and LEFT arrow keys to highlight Cancel and then press CHECK Downloaded from ManualsNet com search engine ...

Page 156: ...hold 14 Press GAIN and then adjust the gain value so that the echo amplitude is at approximately 80 A thickness measurement reading appears in large text above the A scan 15 Once a steady reading is achieved choose 1 5 Auto Cal CAL Velocity The screen freezes and the Enter Value for Velocity Cal dialog box appears 16 In the dialog box adjust the value to match the known thickness of the gated indi...

Page 157: ...mple dual element calibration described below is performed using an Olympus transducer part number DHC711 RM with a frequency of 5 0 MHz and an element diameter of 0 25 in 6 mm The calibration requires a test block with two known thicknesses made from the material being measured Ideally the two thicknesses should represent thicknesses that are both below and above the expected thickness of the mat...

Page 158: ... made over a wide temperature range it is strongly recommended to use Olympus dual transducers that are designed for high temperature applications and that have built in delay lines with a stable sound velocity that does not change significantly with temperature Specific recommendations are Olympus D790 SM and D791 dual element transducers To calibrate using a dual element transducer 1 Follow the ...

Page 159: ...te on the leading edge only 8 Use the GATE key to position gate 1 so that the first back wall echo from the known thickness step exceeds the gate threshold 9 Press GAIN to adjust the gain setting so that the echo amplitude is at approximately 80 A thickness measurement reading appears in large text above the A scan Figure 9 7 Example of a gated calibration signal 10 Once a steady reading is achiev...

Page 160: ...own thickness of the gated indication 0 100 in in this example and then choose Continue to continue to the second calibration step If for any reason you need to exit without acquiring calibration data press the RIGHT or LEFT arrow key to highlight the Cancel box and then press CHECK Downloaded from ManualsNet com search engine ...

Page 161: ... echo amplitude is at approximately 80 14 Once a steady reading is achieved choose 1 5 Auto CAL CAL Velocity The screen freezes and the Enter Value for Velocity Cal dialog box appears 15 Adjust the value to match the known thickness of the gated indication 0 500 in in this example and then choose Calculate to complete the calibration process 9 6 Calibrating in Echo to Echo Mode The sample echo to ...

Page 162: ...rather than inches To calibrate in echo to echo mode using a delay line transducer 1 Follow the initial setup procedure outlined in section 9 1 on page 134 2 Connect the transducer to an appropriate cable and then connect the cable to either of the conventional transducer connectors at the top of the instrument With a zero offset of 0 000 µs the excitation pulse or main bang should appear on the l...

Page 163: ...ate 1 and gate 2 so that the second back wall echo from the known thickness step exceeds the gate 2 threshold 12 Adjust the gain so that neither signal is saturated and so that the echo amplitude in gate 2 is above 50 A thickness measurement reading appears in large text above the A scan labeled G2 G1 In attenuating materials it might be impossible to bring the second indication above 50 while avo...

Page 164: ...ty The screen freezes and the Enter Value for Velocity Cal dialog box appears Figure 9 11 The Enter Value for Velocity Cal dialog box 14 Adjust the value to match the known thickness of the gated indication 0 300 in in this example and then choose Calculate to complete the calibration process Thickness measurement Downloaded from ManualsNet com search engine ...

Page 165: ... outlined in section 9 1 on page 134 2 Connect the transducer to an appropriate cable and then connect the cable to either of the conventional transducer connectors at the top of the instrument 3 Choose 1 5 TRIG Angle and then enter the correct refracted angle for the transducer wedge combination 45 for this example 4 Choose 1 5 Basic Velocity and then enter the approximate shear wave velocity of ...

Page 166: ...Couple the probe to the test block at the 0 mark Figure 9 12 IIW block with probe at 0 mark 2 Manipulate the probe until a high amplitude signal appears on the screen after the excitation pulse This is the reflection from the large arc of the block that is located on the Type I block at 4 00 in 100 mm 3 Move the probe forward and backward to bring the echo to its maximum amplitude peak 4 Ensure th...

Page 167: ...nce the signal is peaked up and mark the side of the transducer wedge directly over the 0 mark on the block This is the BIP the point at which the sound leaves the wedge and enters the material with maximum energy 9 7 2 Verifying the Refracted Angle The expected refracted angle of the probe should already have been entered in the EPOCH 1000 Series in the initial steps of the calibration procedure ...

Page 168: ...Plexiglas but the procedure is the same Press PEAK MEM to help find the peak of the signal 3 Hold the probe stationary once the signal amplitude reaches a maximum and then note the degree mark on the block that is aligned with the BIP which was marked on the side of the wedge in the procedure of section 9 7 1 on page 154 This is the actual refracted angle Beta for this particular transducer and we...

Page 169: ... are in millimeters rather than inches To calibrate for sound path distance 1 Choose 1 5 Basic Range and then set the value to 12 00 in 300 mm This should ensure that the echoes from the block are visible on screen 2 Select 1 5 Auto CAL CAL Mode Soundpath 3 Couple the transducer to the calibration block so that the BIP is directly over the 0 mark on the ASTM test block Do not move the transducer f...

Page 170: ...o The screen freezes and the Enter Value for Zero Cal dialog box appears Figure 9 16 The Enter Value for Zero Cal dialog box 7 Adjust the value to match the known thickness of the gated indication 4 000 in in this example and then choose Continue to continue to the second calibration step Thickness measurement Downloaded from ManualsNet com search engine ...

Page 171: ... 1 so that the second echo reflection from the arc of the block is within the gated region This reflection should be close to 9 in 225 mm Figure 9 17 The second gated calibration signal Another echo might be present on the screen at approximately the 8 in 200 mm point Disregard this echo as it is usually the result of beam spreading and sound bouncing off the side of the block Ensure that gate 1 i...

Page 172: ...Velocity Cal dialog box 11 Adjust the value to match the known thickness of the gated indication 9 000 in in this example and then choose Calculate to complete the calibration process 9 7 4 Calibrating for Sensitivity The final step in the angle beam calibration is to calibrate for sensitivity This allows you to set up a reference gain level To calibrate for sensitivity 1 Couple the probe to the I...

Page 173: ...ximized adjust the system sensitivity gain to bring the reference reflector signal to a predetermined reference line on the screen In this example the echo is brought to 80 of full screen height 4 Press 2nd F GAIN REF dB to lock in the reference gain level and add subtract scanning gain separately 5 Use the 1 5 Basic Add Scan dB and Off parameters to make scanning gain adjustments once the referen...

Page 174: ...ocedure for the depth calibration As with any angle beam calibration you must also verify the beam index point BIP refracted angle and perform a sensitivity calibration It is of particular importance to verify the refracted angle before performing a distance calibration The acquired depth measurement s used in this mode of calibration are based on calculations from the sound path of the reflector ...

Page 175: ... in 0 25 in 6 35 mm increments which are used for depth distance calibration This allows you to calibrate for various inspections ranges up to 2 75 in 69 85 mm For this sample calibration the side drilled holes at depth 0 5 in and 1 5 in 12 5 mm and 38 mm are used For information on distance calibration with other standard calibration blocks see section 9 10 on page 168 If the EPOCH 1000 Series is...

Page 176: ... mm Figure 9 21 Example of a gated calibration signal 5 Press GAIN and then adjust the gain so that the echo amplitude is at approximately 80 A thickness measurement reading appears in large text above the A scan 6 Once a steady reading is achieved choose 1 5 Auto CAL CAL Zero The screen freezes and the Enter Value for Zero Cal dialog box appears Thickness measurement Downloaded from ManualsNet co...

Page 177: ...e value to match the known thickness of the gated indication 0 500 in in this example and then choose Continue to continue to the second calibration step If for any reason you need to exit without acquiring calibration data use the RIGHT or LEFT arrow keys to highlight the Cancel box and then press CHECK Downloaded from ManualsNet com search engine ...

Page 178: ...ould be close to 1 5 in 38 1 mm 9 Press GAIN and adjust the gain so that the echo amplitude is at approximately 80 A thickness measurement reading appears in large text above the A scan 10 Once a steady reading is achieved choose 1 5 Auto CAL CAL Velocity The screen freezes and the Enter Value for Velocity Cal dialog box appears Figure 9 24 The Enter Value for Velocity Cal dialog box Downloaded fr...

Page 179: ...ons where the surface of the test piece is curved in the direction of the sound path of the transducer This feature corrects the horizontal distance and depth to reflector measurements based on part thickness and part diameter The correction is applicable for curved surface inspections where the transducer is placed on the outer diameter of the part as well as on the inner diameter To activate cur...

Page 180: ...Calibration Block Diagrams Figure 9 25 on page 168 to Figure 9 31 on page 173 illustrate calibration blocks commonly used with angle beam probes Figure 9 25 The ASTM E164 IIW type calibration block P N TB7541 1 4 in 9 in Downloaded from ManualsNet com search engine ...

Page 181: ...910 269 EN Rev B June 2011 Calibrating the EPOCH 1000 Series Conventional UT Mode 169 Figure 9 26 The IIW type 2 reference block P N TB5939 1 Downloaded from ManualsNet com search engine ...

Page 182: ...910 269 EN Rev B June 2011 170 Chapter 9 Figure 9 27 The distance and sensitivity calibration DSC test block P N TB7549 1 1 in 5 in 7 in 3 in Downloaded from ManualsNet com search engine ...

Page 183: ...EN Rev B June 2011 Calibrating the EPOCH 1000 Series Conventional UT Mode 171 Figure 9 28 The ASTM E164 IIW type metric calibration block P N TB1054 2 100 mm 225 mm Downloaded from ManualsNet com search engine ...

Page 184: ...69 EN Rev B June 2011 172 Chapter 9 Figure 9 29 The ISO 7963 MAB calibration block P N TB1065 1 Figure 9 30 The Navships cylindrical reflector block P N TB7567 1 Downloaded from ManualsNet com search engine ...

Page 185: ...910 269 EN Rev B June 2011 Calibrating the EPOCH 1000 Series Conventional UT Mode 173 Figure 9 31 The 5 step precision thickness calibration block P N 2214E Downloaded from ManualsNet com search engine ...

Page 186: ...910 269 EN Rev B June 2011 174 Chapter 9 Downloaded from ManualsNet com search engine ...

Page 187: ... data logger for ease of use and a wide range of file types and features for flaw detection and corrosion thickness gaging requirements The data logger includes the following capabilities Data organized by file and identifier ID codes Alphanumeric filenames and identifier ID codes File description inspector ID and location note field for every file File types similar to corrosion thickness gages C...

Page 188: ...r selected measurements on the instrument screen A scan waveform S scan image phased array mode only Peak memory envelope or peak hold waveform if active Complete setup parameters Flag status FREEZE zoom PEAK MEM etc Active software feature s DAC TVG DGS AVG AWS D1 1 D1 5 The EPOCH 1000 Series data logger can store over 300 000 IDs with the information listed above All data is stored for every ID ...

Page 189: ...e file Id Indicates which identifier ID is currently active for storage These parameters are covered in detail in the following sections 10 3 1 Creating Data Files You must create a data file before any information can be stored to the EPOCH 1000 Series This file creation can be performed onboard the instrument or can be created in the GageView Pro computer interface program and uploaded to the in...

Page 190: ...ctor ID and then enter identification information for the inspector c Choose Location Note and then enter information regarding the inspection location 4 Choose the desired file type tab CAL in the example shown in Figure 10 1 on page 178 For more information on available file types see section 10 3 6 on page 185 5 Complete all required file type parameters 6 Once you have completed file setup cho...

Page 191: ...e separate transducers and therefore three calibrations but you may wish to store all inspection data in one inspection file In this situation open the desired inspection file first You can then use the Recall or Quick Recall functions to recall any number of calibration files during the inspection without making those files the active storage location see section 10 3 5 on page 183 Once a new cal...

Page 192: ...row keys to scroll through each file The IDs stored in each file are listed on the right of the screen when the file is highlighted To review a list of saved measurement readings within a particular file highlight the file and press CHECK A list of all IDs with measurement readings appears in the lower half of the display Downloaded from ManualsNet com search engine ...

Page 193: ... file as the active storage location Cancel Used to leave the setup page and return to the live screen Rename Used to rename the highlighted file Clear Used to clear all data from the highlighted file but retaining the file structure the file name and all IDs Delete Used to delete the entire file clearing the file contents and removing the file name and IDs from the available file list Downloaded ...

Page 194: ...ed Files are created by choosing 5 5 Files Create as described in section 10 3 1 on page 177 or in GageView Pro and transferred to the instrument Pressing SAVE saves the data within the active file If there is no active ID the instrument displays the error message No active ID at the top of the display You must have an active file survey and an ID entered before saving data For more information se...

Page 195: ...lighted file name 4 Use the UP and DOWN arrow keys to highlight the desired ID 5 Press CHECK The contents of the file for the highlighted ID appears in the lower half of the screen 6 Turn the adjustment knob to scroll up and down within the lower half of the screen to review the entire file content 10 3 5 Quick Calibration File Recall The EPOCH 1000 Series allows you to quickly recall a calibratio...

Page 196: ... a file using the recall setup 1 Press RECALL SETUP The Quick Recall dialog box appears 2 Use the UP and DOWN arrow or the adjustment knob to select the desired calibration file 3 Press CHECK to select the desired file and recall its settings as the live instrument parameters 4 Press ESCAPE to cancel the operation and return to the live screen Downloaded from ManualsNet com search engine ...

Page 197: ...has a unique set of setup items Not all items are mandatory to properly set up a file for data storage The following sections describe each file type in detail In each section a list of mandatory and optional fields is provided to aid in file setup 10 3 6 1 Calibration File A CAL file is designed for storage of instrument setups calibrations These files can only contain one saved ID at a time This...

Page 198: ... whichever comes first can increment Digits are cycled 0 1 2 9 0 etc The 9 to 0 transition is done only after incrementing the character to the left Letters are cycled A B C Z A etc The Z to A transition is done only after incrementing the character to the left In either case if there is no character to the left or if the character to the left is a punctuation mark then the ID number cannot increm...

Page 199: ...through a range of numbers several digits wide while beginning with a single digit ID number the maximum number of digit positions must be entered initially using leading zeroes see Figure 10 6 on page 187 Figure 10 6 Example of an INC file type Downloaded from ManualsNet com search engine ...

Page 200: ...ut and have access to a PCL5 compatible printer To set up and print a report 1 Choose 5 5 Files Page Setup to open the ReportSetup setup page Figure 10 7 The ReportSetup setup page 2 Using the virtual keyboard or a USB keyboard a Enter up to eight lines of text for the Report Label These lines appear at the top of the report that is printed from the instrument b Enter up to eight lines of text for...

Page 201: ...resolution draft of the report 5 Optionally choose Color On to print the report in color Off for black and white 6 Select Print Function Report 7 Press ESCAPE to save the report configuration and exit the setup page 8 Press the 2nd F RECALL SETUP PRINT keys to print the report to the destination specified in step 6 see the report example shown in Figure 10 8 on page 189 Figure 10 8 Report example ...

Page 202: ...ation for use in reports To save a screen capture 1 Choose 5 5 Files Page Setup to open the ReportSetup setup page 2 Choose Print Function and then select the save destination for the screen capture file a Select Image CF to save screen capture files to the CompactFlash card OR b Choose Image USB to save screen capture files to the USB storage device connected to a USB host port of the EPOCH 1000 ...

Page 203: ...trument Resets The EPOCH 1000 Series allows you to reset its current settings to default values when necessary The instrument reset parameters are available in the Resets setup page accessible by choosing 5 5 Files Reset Use the UP and DOWN arrow keys to highlight the desired data set There are four data set options Master Database Represents the entire data logger and the live parameters Paramete...

Page 204: ... user defined default settings and then turns the instrument off The factory data set is available when you restart the instrument 10 7 Hard Instrument Reset In some situations standard instrument resets may not correct an error occurring in the EPOCH 1000 Series software On rare occasions the instrument may get stuck while starting up which does not allow you to access standard instrument resets ...

Page 205: ...esence of the RESET TXT file on the USB storage device performs a hard instrument reset and restarts the instrument 4 Allow the instrument to complete the startup process For more information on troubleshooting tips see chapter 18 on page 307 Downloaded from ManualsNet com search engine ...

Page 206: ...910 269 EN Rev B June 2011 194 Chapter 10 Downloaded from ManualsNet com search engine ...

Page 207: ...The EPOCH 1000 Series comes standard with many software features that expand the instruments capabilities beyond standard flaw detection The following software features are standard components of the EPOCH 1000 Series conventional flaw detector Dynamic DAC TVG DGS AVG AWS D1 1 D1 5 Weld Rating Software The EPOCH 1000 Series also has two software options available These options are not standard inc...

Page 208: ... a software option 1 Choose 3 5 Inst Setup Status to open the Status setup page shown in Figure 11 1 on page 196 Figure 11 1 The Option key entry dialog box 2 Note the 16 character software serial number for your instrument that appears in the S N parameter 3 Contact Olympus to purchase the software option providing the software serial number Olympus provides an activation code 4 Once this remote ...

Page 209: ... also creates a time varied gain TVG setup TVG is used to compensate for the same factors as DAC but the presentation is different Instead of drawing a curve across the display that follows the reference reflector peaks downward as sound is attenuated the TVG setup amplifies the gain as a function of time distance to bring the reference reflectors to the same screen height 80 FSH The EPOCH 1000 Se...

Page 210: ...known as Ref Correct reference correction to the digital analysis of the live A scan and DAC TVG option The reference correction feature when activated allows full gain manipulation of either the live echo peaks or the DAC curve while providing the amplitude or dB comparison of the actual peak to curve ratio In this way you can use scanning gain while maintaining an accurate measurement reading of...

Page 211: ...odes are covered The DAC TVG setup procedure is the same for all modes with the exception of TVG table The setup is covered in detail in the ASME ASME III section to follow Any differences in the procedure to set up other DAC TVG modes are discussed in the pertinent section for that particular mode 11 2 2 ASME ASME III DAC TVG The ASME DAC mode is a single DAC curve drawn from peak to peak on refe...

Page 212: ...a DAC curve to 80 FSH before acquiring the point This feature can help create a more precise DAC curve especially in the far field Choose 6 6 DAC Setup 1 Auto or 2nd F GATE to activate auto 80 for each indication before capturing the point Once a point is captured the peak amplitude of that point is marked using an x symbol Figure 11 4 on page 201 shows one DAC point captured using Add Downloaded ...

Page 213: ...oftware Features and Options Conventional UT Mode 201 Figure 11 4 DAC Setup one point Figure 11 5 on page 202 shows the EPOCH 1000 Series display when the second point has been captured Downloaded from ManualsNet com search engine ...

Page 214: ...ecause amplitude resolution is better at greater echo heights This also pushes the first captured echo over 110 FSH so the main DAC curve and the 6 dB warning curve extend downward to the second point from off screen While acquiring DAC points you have three other choices besides Add and 1 Auto Delete Deletes the entire DAC curve acquired Erase Erases only the point s within the gated region Done ...

Page 215: ...y adjusted to 80 FSH prior to capture Figure 11 6 DAC Setup five points If you need to continue capturing points you may increase the instrument range or increase the display delay to view echoes further out in time Once the correct number of points have been captured choose 6 6 DAC Setup Done to complete the DAC curve and switch to the DAC inspection mode Downloaded from ManualsNet com search eng...

Page 216: ...mation Curve Gain This adjustment allows you to manipulate the screen height gain of both the DAC TVG curve as well as the echoes on screen This allows for amplitude to curve comparison at code compliant screen levels across the time base Curve dB This setting controls the steps by which Curve Gain is adjusted Possible steps are 0 1 1 0 2 0 3 0 6 0 12 0 dB Next DAC This function cycles through the...

Page 217: ...1 8 Completed DAC curves in DAC view mode While DAC TVG is active you have full control of the Range Delay and Zoom settings With this you can focus on areas of interest within the DAC setup Figure 11 9 on page 206 shows a reduced range with delay Downloaded from ManualsNet com search engine ...

Page 218: ...ind and identify potential defects it is commonly required by code to increase the gain scanning gain on the EPOCH 1000 Series from the reference calibration gain for scanning purposes However once a potential defect is identified this gain is usually removed to view the reflector at Ref gain level set at calibration The DAC TVG software for the EPOCH 1000 Series is fully capable of adding tempora...

Page 219: ...se scanning gain 3 Press ESCAPE twice to return to the 1 5 Basic submenu 4 Choose 1 5 Basic Scan dB to toggle between the base reference gain and the adjusted scanning gain 5 Choose 1 5 Basic Off to turn scanning gain off completely Figure 11 10 on page 207 shows an ASME DAC setup with 3 dB of scanning gain added Figure 11 10 ASME DAC with 3 dB scanning gain Downloaded from ManualsNet com search e...

Page 220: ...ved from the dB to curve measurement in location 5 The instrument compares the echo height to the DAC curve compensates for the added scanning gain and reports the true amplitude comparison Figure 11 11 ASME DAC with 3 dB scanning gain and reference correction active 11 2 4 2 Curve Adjustment Gain DAC Gain or TVG Gain The overall gain level of the entire DAC curve and TVG line setup can be adjuste...

Page 221: ...t 2 Choose 6 6 TVG Curve Gain and then adjust the curve gain by the selected increment either positive or negative Figure 11 12 on page 209 shows a DAC setup with DAC gain in use to provide accurate echo amplitude measurement by placing the echo close to 80 FSH Figure 11 12 DAC curves with adjusted gain 11 2 4 3 Transfer Correction Transfer Correction is an adjustment in the reference gain setting...

Page 222: ...lity differences when compared to other DAC TVG modes Only the main DAC curve is viewable in TVG mode Any of the six curves can be used to trip the alarm when in the JIS DAC mode Additionally you can set the alarm to positive or negative To select the curve to be used as the alarm reference level first activate JIS DAC and then choose 6 6 TVG Next DAC The selected curve appears as a double thickne...

Page 223: ... line segments 4 Select the No Of Curves to be used in addition to the main curve for example if six 6 curves are activated you see seven curves in total 5 For each warning curve choose Curve n dB and set the value compared to the main curve 6 Press ESCAPE to return to the live screen to begin capturing DAC points Figure 11 13 Custom DAC setup The custom DAC setup and functionality are the same as...

Page 224: ...urves as well as the primary DAC curve Custom DAC curve also incorporates the reference correction functionality if desired 11 2 7 20 80 DAC The 20 80 DAC function incorporates a combination of the DAC curve and TVG techniques For most sizing and inspection codes that use a DAC curve the inspector cannot interrogate a potential defect that does not rise above 20 FSH In the past scanning gain was a...

Page 225: ...ion of the gated echo in time Figure 11 15 Completed 20 80 DAC The setup procedure for the 20 80 DAC is the same as the ASME ASME III setup described earlier The only difference is that you cannot use the auto 80 function during the setup The instrument automatically compensates for falling echo amplitude once an echo is captured below 20 full screen height Once the 20 80 DAC curve is completed yo...

Page 226: ...e interface echo during an immersion inspection can be very high in amplitude which can severely decrease the near surface inspection capabilities of the instrument Using a TVG table you can manually adjust the gain in the screen range right around the interface echo to suppress the effects of the interface echo Other echoes near the surface are then easier to see and size The EPOCH 1000 Series TV...

Page 227: ...he back wall 11 2 8 1 TVG Table Setup The TVG table option can be used to define a TVG curve using a test block and size reflectors without ever entering and or editing specific TVG points This operation is similar to any of the DAC setups described earlier in this section The TVG curve defined with the TVG table option uses the following parameter functions in the 6 6 TVG Setup submenu Add Add TV...

Page 228: ... 2 8 3 Building a TVG with the TVG Table The TVG table is set up to display all information regarding the variable gain applied to the echo signal along the screen range of the instrument Each row of the TVG table represents a single point along the screen range and the gain associated with that point The EPOCH 1000 Series uses these points as a reference and draws a straight line representing cha...

Page 229: ...pared to base reference gain of the exact point defined along the screen range To build a TVG setup with TVG Table 1 Choose TVGTable On to view the current TVG table 2 Choose Edit to edit points within the table 3 Choose Add to add a new point to the table 4 Use the RIGHT and LEFT arrow keys to select Depth either TOF or units and adjust the value of the point depth using the adjustment knob 5 Use...

Page 230: ...e being set up 7 Use the UP and DOWN arrow keys to move up and down between rows to edit previously adjusted points 8 When finished choose TVGTable Off to hide the setup table and inspect using a full screen A scan view Downloaded from ManualsNet com search engine ...

Page 231: ...er to create a DGS curve for flaw sizing This is much different than the DAC or TVG method that requires that you have representative defects at various depths within a part in order to create a curve for flaw sizing To setup DGS AVG curves on the instrument very quickly Olympus has developed a transducer library that is stored in the instrument s memory This library contains the entire Atlas Seri...

Page 232: ...es you with rapid setup times and easy flaw size evaluation This software option has been designed to meet the EN 583 2 2001 requirements It is extremely important that you be familiar with this specification and others and be qualified according to local standards to properly use this instrument function Since the curves used for defect sizing are calculated based upon many variables a proper ins...

Page 233: ...djustments that can be made from this setup page DGS AVG Activate Deactivate the DGS AVG function Probe Type Selects the type of probe to be used Straight Beam Angle Beam Dual or Custom Probe Name Selects the actual probe to be used Reflector Type Defines the type of reflector to be used to acquire a reference indication to build the DGS AVG curve For straight beam and dual probes the available re...

Page 234: ...ition from the calibration block to the test piece EN 583 2 2001 provides methods for calculating transfer correction Reg Level The height of the main DGS AVG curve The curve represents the amplitude from a flat bottom hole with a diameter of the registration level at different depths This is usually equal to the critical flaw size for the application Warning Level This is the position of the seco...

Page 235: ...efore affect the accuracy of defect sizing A suggested method for the measurement of relative attenuation can be found later in this manual Once you have correctly completed the selections in the DGS AVG setup page press ESCAPE to return the live A scan display To complete the DGS AVG curve setup 1 Couple the transducer to the calibration block and obtain a reflection from the selected reference r...

Page 236: ...erence reflector before capture After capturing the reference reflector the EPOCH 1000 Series automatically calculates the DGS AVG curve s and displays them at the correct registration level amplitude on the screen Downloaded from ManualsNet com search engine ...

Page 237: ...1 3 3 Transfer Correction Transfer correction is an adjustment in the reference gain setting during calibration of the instrument It is typically added when the surface conditions between a calibration block and test piece are different The coupling conditions on the test surface can often cause signal loss after calibrating a DGS AVG curve which results in inaccurate comparisons of the test refle...

Page 238: ...w 20 FSH Therefore to inspect beyond a certain depth sound path time within a part it is necessary to raise the gain of both the live A scan and the DGS AVG curve to continue the inspection This is accomplished on the EPOCH 1000 Series using DGS AVG curve adjustment gain To adjust the DGS AVG curve gain 1 Press GAIN 2 Use the UP and DOWN arrow keys or the adjustment knob to adjust the curve gain T...

Page 239: ...flaw size for the application The EPOCH 1000 Series allows you to adjust this registration level during a live inspection This curve height adjustment is possible because the DGS AVG curves are calculated based on a captured reference reflector and mathematical probe data This allows the EPOCH 1000 Series to plot the attenuation curve in steel for a particular size reflector without having to acqu...

Page 240: ...le in many conditions to measure relative attenuation in the test piece or calibration block as needed This section outlines one method of relative attenuation measurement that is simple and has been found to be generally effective There might be more suitable methods available You must decide the most appropriate method to arrive at the values for AcvSpecimen and AcvCalBlock based on the applicat...

Page 241: ... Ultrasonic Acceptance Rejection Criteria table produced by the AWS in order to classify the severity of the discontinuity that has been located As an inspection is performed you are required to develop an AWS report that lists the values for all variables listed above as well as transducer information discontinuity length and location and the your overall evaluation of the discontinuity For furth...

Page 242: ... calibration section of this manual or the appropriate guidelines from the American Welding Society To activate the AWS software feature Select 4 6 Sizing Option AWS D1 1 On After activation you must set a Ref B value in order to begin an inspection This number represents the gain level necessary to bring the echo from a reference reflector to 80 full screen height FSH The reference reflector is o...

Page 243: ...live D rating of any gated indication This live D value which represents the defect indication rating used with the published AWS Acceptance Rejection Criteria tables to classify a potential flaw can be viewed as a separate measurement reading in one of the six boxes To activate and view this measurement see section 3 3 3 on page 71 Downloaded from ManualsNet com search engine ...

Page 244: ... B gain value This allows you to locate flaws that might be smaller or deeper in the test piece than the reference flaw To add scanning gain 1 Use the GAIN key to adjust the scanning gain value necessary to perform the inspection as outlined by the AWS Code 2 Choose 6 6 AWS Scan dB to toggle the scanning gain on and off as necessary Downloaded from ManualsNet com search engine ...

Page 245: ...1000 Series uses the data in the sound path calculator to generate an attenuation factor In order for this calculation to be accurate you must enter the correct thickness for the test piece By pressing SAVE you can now save the data for this discontinuity in the EPOCH 1000 Series data logger For general data logger information see chapter 10 on page 175 At the bottom of an ID saved with AWS D1 1 a...

Page 246: ...ace of the test material is not uniform a slight difference in the water path distance may result The interface gate option tracks the position of the reflection from the interface of the water path and test piece and compensates for the variance in this reflector s position The interface gate is also commonly used with captive water column transducers 11 5 1 Option Activation When the interface g...

Page 247: ...ccurate thickness reading particularly when using edge detection mode In edge detection mode the floating gate tracks the highest amplitude echo breaking the gate but reports a measurement reading from the first leading edge to break the gate threshold If the indication height fluctuates floating gate tracks this fluctuation to provide more consistent measurements from the same point along the ind...

Page 248: ...ess ESCAPE to return to the live A scan view and begin the inspection with floating gate features active 11 6 2 Operating in 6 dB Mode In 6 dB mode the desired gate floats at 6 dB below the peak echo amplitude in the gate This corresponds to 50 of the echo s maximum height Figure 11 27 on page 237 depicts gate 1 with floating gate active in the 6 dB mode Note that the gate is exactly at 50 of the ...

Page 249: ...esired gate floats at 14 dB below the peak echo amplitude in the gate This corresponds to 20 of the echo s maximum height Figure 11 28 on page 238 depicts gate 1 with floating gate active in the 14 dB mode Note that the gate is exactly at 20 of the echo s peak amplitude The peak amplitude is at approximately 80 of the full screen height Downloaded from ManualsNet com search engine ...

Page 250: ...loating gate cannot be turned on or off while the screen is frozen 11 6 4 Gate Alarms Individual gate alarms can be set while floating gate is active The minimum depth alarm is most commonly used to monitor thinning areas in the material when floating gate is active and the gates are in edge detection mode Downloaded from ManualsNet com search engine ...

Page 251: ...d brings you directly to the Beam setup page for probe setup If a phased array probe is plugged into the EPOCH 1000 Series while the instrument is in conventional UT mode the instrument provides a prompt which allows you to switch to phased array mode or stay in conventional UT mode If you switch to phased array mode the instrument switches modes and goes straight the Beam setup page described in ...

Page 252: ... setup page The EPOCH 1000 Series phased array mode provides a sector scan S scan image with associated A scans This S scan creates an image using amplitude information from the full sound path range of multiple A scans The image is built by acquiring A scans in regular increments between two fixed angles For example a common S scan image uses A scans from 40 to 70 in 1 increments to create an ima...

Page 253: ...be ID and Wedge ID These are the two most important items to adjust to ensure proper phased array probe setup Probe ID The name of the phased array probe connected to the instrument This item is automatically populated with the correct probe ID name in most cases when using an Olympus phased array probe Wedge ID The name of the wedge attached to the phased array probe Changing the Wedge ID adjusts...

Page 254: ...ems in the Beam setup page allows adjustment of the material and geometry being inspected When a standard probe and a wedge are selected using Probe ID and Wedge ID the value of these items change to default values You may then make manual adjustments to fit the needs of the current inspection These items include Thick Defines the thickness of the part to be inspected In angle beam inspections Thi...

Page 255: ...s calculated for the given probe wedge combination Focal law definition defines the angular coverage sweep and resolution of the phased array probe for the inspection When a standard probe and wedge are selected using Probe ID and Wedge ID these items default to the most common settings used with the selected probe wedge combination These items include Start Angle Used to define the starting inspe...

Page 256: ...y After reviewing the Beam setup page the instrument must recalculate all focal laws based on any changes to the item definitions This recalculation typically takes less than 15 seconds 12 3 Edit Probe Setup Page The EPOCH 1000 Series allows you to connect any phased array probe wedge combination for use during inspection If the phased array probe and or wedge are not available in the standard lib...

Page 257: ...910 269 EN Rev B June 2011 Probe and Beam Setup Phased Array Mode 245 Figure 12 3 The Edit Probe setup page Downloaded from ManualsNet com search engine ...

Page 258: ...910 269 EN Rev B June 2011 246 Chapter 12 Downloaded from ManualsNet com search engine ...

Page 259: ...up using the Beam setup page the instrument automatically adjusts the pulser and receiver settings to the most common values used for inspections with the specified probe The values can be reviewed using in the 1 5 PA P R submenu For phased array probes that are not automatically recognized or to allow optimization of the pulser and receiver settings the EPOCH 1000 Series allows you to manually ad...

Page 260: ...eter The EPOCH 1000 Series phased array mode is limited to 1360 Hz 13 2 2 Pulser Frequency Selection Pulse Width Pulser frequency selection sets the pulse width applied to the phased array transducer This frequency selection allows you to tune the shape and duration of each pulse to obtain the best performance from the transducer being used In general the best performance is achieved by tuning the...

Page 261: ...1 5 PA P R submenu The receiver setup parameters are Waveform Rectification Video Filtering Digital Receiver Filters 13 3 1 Waveform Rectification The EPOCH 1000 Series phased array mode can operate in one of four different rectification modes Full full wave Half half wave positive Half half wave negative RF unrectified The RF mode is not active while operating in special software feature modes su...

Page 262: ...thing the shape of each acquired A scan the instrument produces a smoothed S scan image that is easier to interpret Video filtering is common in phased array applications to provide a clean S scan image However this smoothing can obscure small indications from the A scan It is recommended to avoid video filtering in applications where you rely on fine A scan interpretation to characterize potentia...

Page 263: ...trument calibration 13 3 3 Digital Receiver Filters The EPOCH 1000 Series has a total instrument bandwidth of 26 5 MHz at 3 dB The instrument has several broadband and narrow band digital filter settings These are designed to improve the instrument s signal to noise ratio by filtering out unwanted high and or low frequency noise outside of the test frequency spectrum The EPOCH 1000 Series phased a...

Page 264: ...description of these available filter sets see chapter 4 on page 89 Based on the selected phased array probe the instrument only allows access to a subset of all available filters during manual adjustment This subset includes all digital filters that include the center frequency of the selected probe within the filter limits Downloaded from ManualsNet com search engine ...

Page 265: ... Scan Grid and Rulers Peak Memory Peak Hold Freeze Display Grid Modes and Overlays 14 1 Display View Mode In phased array mode the EPOCH 1000 Series offers four live inspection views accessible by choosing 1 5 PA Display Screen A S Vert Selected A scan and S scan are both viewable A scan is oriented vertically and located on the left side of display Sscan Only S scan is viewable Ascan Only the sel...

Page 266: ... The four display view modes The EPOCH 1000 Series displays all A scans in sound path mode only The S scan view is displayed in true depth mode This means that in A S Vert mode indications viewed in the selected A scan do not line up horizontally with their corresponding point in the S scan For further information see section 14 8 on page 263 Downloaded from ManualsNet com search engine ...

Page 267: ...ency and ease of use the EPOCH 1000 Series gives direct access to this adjustment To adjust the focal law angle selection cursor 1 Press ANGLE 2 Use the UP and DOWN arrow keys or the adjustment knob to change the value of the selected focal law angle Alternatively you may adjust the focal law angle selection cursors by choosing 1 5 PA Display Angle When the focal law angle selection cursor is adju...

Page 268: ...e The S scan palette allows you to identify amplitude variations in the S scan image A color gradient is applied to the image which allows the instrument to visually display variation in amplitude from 0 to 110 FSH An example of a color amplitude relationship is shown below Red 110 FSH Yellow 50 FSH White 0 FSH Currentlyselected focal law angle Focal law cursor red line Downloaded from ManualsNet ...

Page 269: ...n palettes in phased array mode are as follows Colored Default setting Full color palette from white LOS to red high saturated signal Grey Scale Grey scale palette from black LOS to white high saturated signal To adjust the EPOCH 1000 Series S scan palette choose 1 5 PA Display Scan Palette Downloaded from ManualsNet com search engine ...

Page 270: ...y RANGE for each angle within the focal law range sweep This S scan image is drawn on the display as a to scale representation of the angular coverage within the test piece For example a 70 focal law is drawn within the S scan display window at 70 from vertical This allows you to visualize reflections from the S scan as if viewing a cross section of the test piece Downloaded from ManualsNet com se...

Page 271: ...f the image limits the amount of the display area used to draw the S scan In a standard 40 to 70 S scan image almost 30 of the vertical display window used to draw the S scan is left blank The EPOCH 1000 Series phased array mode uses the best fit feature to rotate the S scan image so that it uses the maximum amount of screen area possible to draw the S scan Downloaded from ManualsNet com search en...

Page 272: ...y window This rotation means that the horizontal and vertical S scan rulers are not correct when best fit is active Best fit mode is automatically deactivated when freeze is activated 14 4 Image and A Scan Grid and Rulers The EPOCH 1000 Series phased array mode provides separate rulers for the A scan display and S scan display Best fit off Best fit on Downloaded from ManualsNet com search engine ...

Page 273: ... depth measurements per grid division in the currently selected measurement units in mm or µs Horizontal The horizontal ruler displays surface distance measurements per grid division in the currently selected measurement units in mm or µs In angle beam applications the horizontal ruler scale is based on the front of wedge and not the beam index point This allows the ruler to maintain consistent va...

Page 274: ...14 5 Peak Memory The peak memory feature in the EPOCH 1000 Series phased array mode applies only to the selected A scan display current focal law For a full description of the peak memory function refer to section 5 2 on page 102 14 6 Peak Hold The peak hold feature in the EPOCH 1000 Series phased array mode applies only to the selected A scan display current focal law For a full description of th...

Page 275: ...hange between all four display views using the 1 5 PA Display Screen parameter Gate movement Gain Range and delay Data logger Printing When Freeze is active the following parameters cannot be changed accessed Zero offset Range cannot be increased Pulser receiver settings other than gain To disable the freeze function and return to normal operation press FREEZE again 14 8 Display Grid Modes and Ove...

Page 276: ...horizontal position of the front of the transducer wedge When active this feature draws a vertical white line on the S scan image indicating the position of the wedge front for visual reference To activate the probe front cursor 1 Choose 3 5 Display Setup Image Overlay to open the Display setup page 2 Select Probe Front Cursor On The probe front cursor appears on the S scan see Figure 14 8 on page...

Page 277: ... in the Beam setup page see chapter 12 on page 239 the instrument draws multiple horizontal line s depending on the overall inspection range to visually indicate the part thickness on the S scan image These lines correspond to the part thickness on the vertical depth axis of the S scan image Probe front cursor vertical white line Downloaded from ManualsNet com search engine ...

Page 278: ...y setup page choose 3 5 Display Setup Image Overlay 2 Select Sector Grid On or Ascan Grid On These grid modes correspond to the x axis grid modes described in chapter 5 on page 101 Available grid modes include Off Standard Sound Path Leg 100 and 110 These modes can be activated or deactivated from the A scan Setup setup page accessible by choosing 3 5 Display Setup A Scan Setup Leg indicators hori...

Page 279: ...e S scan These horizontal lines allow you to visually correlate an A scan indication at division 3 with its corresponding S scan image also at division 3 Figure 14 10 A scan and S scan in Grey Scale mode with indication The A scan display is a sound path A scan Therefore indications on the A scan do not line up horizontally with their corresponding indications on the S scan This requires that the ...

Page 280: ...910 269 EN Rev B June 2011 268 Chapter 14 Downloaded from ManualsNet com search engine ...

Page 281: ...asound mode Refer to chapter 6 on page 109 for a complete overview of gate functions 15 2 Gate S Scan View The EPOCH 1000 Series displays gates in both the A scan and S scan views The placement of the gate s in A scan view is identical to placement of the gate s in conventional ultrasound mode In the S scan view gates are displayed as two colored lines overlaid on the S scan image All gates applie...

Page 282: ...gates are only equivalent at the 0 focal law Since gates are represented as sound path values any displayed gate appears as a curved line on the S scan image The gate start position is represented with a single curved line across all focal laws and the gate end position is represented with a second curved line across all focal laws This gate end position is defined using the Gate Width parameter F...

Page 283: ...le when freeze is active on the instrument These two cursor sets are applied to the S scan image to allow visual reference and sizing of image components The X cursor set X2 X1 allows measurements in the horizontal plane and the Y cursor set Y2 Y1 allows measurements in the vertical plane Because the S scan image provides scaled representations of defects these cursor sets can provide accurate fla...

Page 284: ... FREEZE to activate freeze 2 Select 1 5 PA Cursors Cursor X On and Cursor Y On 3 Choose 1 5 PA Cursors Cursor X1 Cursor X2 Cursor Y1 and Cursor Y2 parameters to adjust cursor position values Figure 16 1 Cursors and S scan during adjustment The image sizing cursors cannot be positioned beyond the visible screen range Also Cursor X2 or Cursor Y2 cannot be positioned before Cursor X1 or Cursor Y1 res...

Page 285: ...tup Reading Setup You can select the following cursor measurements X2 X1 The horizontal distance between X cursors Y2 Y1 The vertical distance between Y cursors CursorX1 CursorY1 Intersect Amplitude The signal amplitude at the intersection point of X1 and Y1 CursorsX1 CursorY1 Intersect Depth The thickness TOF measurement of the signal at the intersect point of X1 and Y1 Figure 16 2 Cursors on S s...

Page 286: ...910 269 EN Rev B June 2011 274 Chapter 16 Downloaded from ManualsNet com search engine ...

Page 287: ...on The EPOCH 1000 Series has an advanced auto calibration feature which provides a fast and easy calibration process The following section details the procedure for calibrating the EPOCH 1000 Series for each of the parameters listed above in angle or straight beam zero degree mode The topics covered are as follows Getting Started Calibration Types Calibrating with a Zero Degree Transducer Calibrat...

Page 288: ... appropriate gain level is unknown set the initial gain to 12 dB and adjust it as necessary during calibration 3 Use the Range parameter to set the range based on the sound path range within the selected calibration block Always use the steepest angle to select the maximum range for calibration This ensures full coverage across all focal laws during calibration 17 2 Calibration Types The EPOCH 100...

Page 289: ...ate measurement readings of sound path depth and or surface distances for all angles of inspection through a single calibration 17 2 3 Sensitivity Gain The Sensitivity Gain calibration type allows you to properly correct variations in system sensitivity to a particular reflector across all focal laws This calibration is related to the fourth step of a conventional angle beam calibration where the ...

Page 290: ...ero Degree Transducer Use Olympus transducer part number 5L16 A10P with a frequency of 5 0 MHz and an element count of 16 to perform the sample zero degree calibration This calibration requires the use of the zero degree wedge part number SA10P 0L The calibration also requires a test block with two known thicknesses made from the material to be measured Ideally the two thicknesses should represent...

Page 291: ... 1 00 in 25 4 mm 2 Select 1 5 PA CAL CAL Mode Velocity 3 Press ANGLE and then adjust the selected focal law angle to 0 4 Couple the transducer to the 0 200 in step of the calibration block 5 Use the GATE key to position gate 1 so that the back wall echo from the 0 200 in step of the block is exceeding the gate threshold 6 Adjust the gain so that the echo amplitude is at approximately 80 A thicknes...

Page 292: ...hoose Continue to continue to the second calibration step If for any reason you need to exit without acquiring calibration data use the LEFT or RIGHT arrow key to highlight Cancel and then press CHECK 9 Couple the transducer to the 0 500 step of the calibration block 10 Use the GATE key to position gate 1 to surround only the back wall echo from the test block 11 Adjust the gain so that the echo a...

Page 293: ...d choose 1 5 PA CAL Depth 2 The screen freezes and the Enter Value for Thick Standard dialog box appears Figure 17 4 The Enter Value for Thick Standard dialog box 13 Adjust the value to match the known thickness of the gated indication 0 500 in in this example and then choose Continue to continue to complete the calibration process Downloaded from ManualsNet com search engine ...

Page 294: ... delay with a zero degree transducer 1 Press RANGE to enter an appropriate range for the calibration For this example use 10 in 254 mm 2 Select 1 5 PA CAL CAL Mode CAL Zero 3 Press ANGLE and then adjust the selected focal law angle to 0 4 Couple the transducer to the side of the block 5 Use the GATE key to position gate 1 to surround only the first back wall echo from the block 6 Adjust the gain s...

Page 295: ...n at the top of the screen is replaced by a new view representing the thickness measurement reading yellow line for the gated indication across all focal laws see Figure 17 7 on page 284 Ideally the thickness measurement reading line should be a straight line indicating that the instrument is making the same thickness measurement from the same reflector for each focal law A dotted line through the...

Page 296: ...quire the most accurate curve move the probe slowly Use a guide when possible to avoid probe skew Make multiple passes over the reflector 10 Choose 1 5 PA Cal Erase to clear the current wedge delay curve and redraw a new curve If the yellow wedge delay curve saturates the screen adjust the gain to a lower value and redraw the curve Thickness measurement yellow line for the gated indication across ...

Page 297: ...ept the drawn line and to calculate the wedge delay Figure 17 8 A completed wedge delay calibration When using a side drilled hole to calibrate wedge delay it is necessary to move the probe across the side drilled hole to acquire a thickness measurement for all focal laws Downloaded from ManualsNet com search engine ...

Page 298: ...ll reflection In the following example the small side drilled hole of the IIW block is used to calculate sensitivity gain To calibrate the sensitivity with a zero degree transducer 1 Press RANGE and then enter an appropriate range for the calibration For this example use 2 in 50 mm 2 Select 1 5 PA CAL CAL Mode PA CAL 3 Press ANGLE and then adjust the selected focal law angle to 0 4 Couple the tran...

Page 299: ...he amplitude reading yellow line for the gated indication across all focal laws see Figure 17 7 on page 284 Ideally the thickness reading line should be a straight line indicating that the instrument is making the same thickness measurement from the same reflector for each focal law when that reflector is peaked up In this example the uncalibrated line should look like the one shown in Figure 17 1...

Page 300: ...e most accurate curve move the probe slowly use a guide when possible to avoid probe skew and make multiple passes over the reflector 9 Choose 1 5 PA CAL Erase to clear the current gain curve and to redraw a new curve If the yellow gain curve saturates the screen adjust the gain to a lower value and redraw the curve 10 Choose 1 5 PA CAL Done to accept the drawn line and calculate sensitivity Downl...

Page 301: ... for any focal law during calibration the instrument does not properly calculate sensitivity gain for that those focal laws Sensitivity gain calibration can be performed before wedge delay calibration if desired In some cases normalizing the amplitude response of a given reflector allows a more precise thickness measurement during wedge delay calibration However velocity calibration must always be...

Page 302: ...obe Beam 3 Highlight Wedge ID and then select SA10P N55S wedge 4 Verify that the Start Angle is 40 and the End Angle is 70 17 4 1 Calibrating the Velocity With an Angle Beam Transducer To calibrate the velocity with an angle beam transducer 1 Press RANGE and then enter an appropriate range for the calibration For this example use 10 in 250 mm 2 Select 1 5 PA Cal Calibration CAL Velocity 3 Press AN...

Page 303: ...an use the A scan to position the gate start and width positions so that only the first back wall reflection is in the gated region 7 Use the GATE key to position gate 1 so that the first reflection from the arc of the block is exceeding the gate threshold This reflection should be close to 4 in 100 mm 8 Adjust the gain so that the echo amplitude is at approximately 80 A thickness measurement read...

Page 304: ...e Enter Value For Thin Standard dialog box 10 Adjust the value to match the known thickness of the gated indication 4 000 in in this example and then choose Continue to continue to the second calibration step If for any reason you need to exit without acquiring calibration data use the LEFT or RIGHT arrow key to highlight Cancel and then press CHECK Downloaded from ManualsNet com search engine ...

Page 305: ...from the arc of the block is within the gated region This reflection should be close to 9 in 225 mm 13 Adjust the gain so that the echo amplitude is at approximately 80 A thickness measurement reading appears in large text above the image 14 Once a steady reading is achieved choose 1 5 PA Cal Depth 2 The screen freezes and the Enter Value For Thick Standard dialog box appears Figure 17 16 The Ente...

Page 306: ...ulate the wedge delay To calibrate the wedge delay with an angle beam transducer 1 Press RANGE and then enter an appropriate range for the calibration For this example use 6 in 150 mm 2 Choose 1 5 PA Cal Calibration CAL Zero 3 Choose 1 5 PA Cal CAL Mode Soundpath The wedge delay calibration can be performed using a reflector of known depth such as a side drilled hole To use such a reflector select...

Page 307: ...ed to the 0 mark of the IIW block 6 Use the GATE key to position gate 1 so that the first reflection from the arc of the block is exceeding the gate threshold This reflection should be close to 4 in 100 mm 7 Adjust the gain so that the echo amplitude is at approximately 80 Downloaded from ManualsNet com search engine ...

Page 308: ...he screen freezes and the Enter Value for Zero Cal dialog box appears Figure 17 19 The Enter Value for Zero Cal dialog box 9 Adjust the value to match the known thickness of the gated indication 4 000 in in this example and then choose Continue to continue to the second calibration step Downloaded from ManualsNet com search engine ...

Page 309: ...ector at each focal law A dotted line through the center of this small window represents the user defined known value of the actual thickness measurement In this example the uncalibrated line should look like the one shown in Figure 17 20 on page 297 Figure 17 20 The Wedge Delay acquisition screen 10 Move the probe forward and backward to acquire uncalibrated thickness measurement data across all ...

Page 310: ...t the gain to a lower value and redraw the curve 12 Choose 1 5 PA Cal Done to accept the drawn line and calculate wedge delay Figure 17 21 The completed wedge delay calibration When using a side drilled hole to calibrate wedge delay it is necessary to move the probe across the side drilled hole to acquire a thickness measurement for all focal laws Downloaded from ManualsNet com search engine ...

Page 311: ...ed hole or a back wall reflection In the example below the small side drilled hole of the IIW block is used to calculate sensitivity gain To calibrate the sensitivity with an angle beam transducer 1 Press RANGE and then enter an appropriate range for the calibration For this example use 2 in 50 mm 2 Choose 1 5 PA Cal Calibration CAL Gain 3 Press ANGLE and then adjust the selected focal law angle t...

Page 312: ...tude reading yellow line for the gated indication across all focal laws Ideally this amplitude reading line should be a straight line indicating that the instrument is making the same amplitude measurement from the same reflector at each focal law when that reflector is peaked up In this example the uncalibrated line should look like the one shown in Figure 17 23 on page 301 Downloaded from Manual...

Page 313: ...focal laws To acquire the most accurate curve move the probe slowly Use a guide when possible to avoid probe skew Make multiple passes over the reflector 9 Choose 1 5 PA Cal Erase to clear the current gain curve and redraw a new curve When the yellow gain curve saturates the screen adjust the gain to a lower value and redraw the curve 10 Choose 1 5 PA Cal Done to accept the drawn line and calculat...

Page 314: ...uring calibration the instrument does not properly calculate sensitivity gain for that those focal laws Sensitivity gain calibration can be performed before wedge delay calibration if desired In some cases normalizing the amplitude response of a given reflector allows a more precise thickness measurement during wedge delay calibration However velocity calibration must always be the first calibrati...

Page 315: ...he gated region during either wedge delay or sensitivity gain acquisition those other reflections can interfere with the data being tracked by the instrument and can corrupt the calibration process Figure 17 25 Wide gate with two echoes interfering The EPOCH 1000 Series allows you to adjust the start position and or width of gate 1 while acquiring data during a calibration procedure This allows yo...

Page 316: ...s allows you to toggle both the wedge delay and sensitivity gain calibration on and off Both calibrations have an impact on the image displayed in the S scan Wedge delay while correcting for measurement readings can make the S scan image appear slightly distorted from the natural image view This is not a problem as it correctly represents the delay inherent across all focal laws but you may find a...

Page 317: ...Series allows surface distance correction when inspecting pipes cylinders and other curved surfaces using an angle beam transducer This applies only to inspections where the surface of the test piece is curved in the direction of the sound path of the transducer This feature corrects the horizontal distance and depth to reflector measurements based on part thickness and part diameter The EPOCH 100...

Page 318: ...910 269 EN Rev B June 2011 306 Chapter 17 Downloaded from ManualsNet com search engine ...

Page 319: ...t Main o ring seals between the top and bottom half of the instrument and the aluminum heat sink band Phased array connection cover seal Conventional transducer gasket Regularly clean and verify the state of the above seals and gaskets to ensure the integrity of the hardware protection 18 3 Protecting the Display EPOCH 1000 Series instruments include a clear plastic sheet protecting the instrument...

Page 320: ...tion o ring gasket and membrane seal evaluation and replacement as needed to assure environmental durability Contact Olympus for details 18 5 Trouble Shooting Symptom The On Off power key is the only operational front panel key Nothing happens when pressing other keys Possible cause The All Lock function is active locking all front panel keys Solution Turn the instrument power Off and On to unlock...

Page 321: ... firing at the desired rate Symptom The instrument does not start when pressing the ON OFF power key following a software update Possible cause Interrupted incomplete or corrupted software update Solution 1 Remove the battery from the EPOCH 1000 Series as well as the AC line power 2 Replace the battery in the EPOCH 1000 Series 3 Start the unit Symptom The instrument indefinitely stays in the start...

Page 322: ...910 269 EN Rev B June 2011 310 Chapter 18 Downloaded from ManualsNet com search engine ...

Page 323: ...une 2011 Specifications 311 19 Specifications 19 1 General and Environmental Specifications Figure 19 1 Overall EPOCH 1000 Series dimensions 123 mm 272 mm 196 mm 254 mm 292 mm Downloaded from ManualsNet com search engine ...

Page 324: ...s AC Mains 100 VAC to 120 VAC 200 VAC to 240 VAC 50 Hz to 60 Hz Display type Full VGA 640 x 480 pixels transflective color LCD 60 Hz update rate Display dimensions W x H Diagonal 132 5 mm x 99 4 mm 165 1 mm 5 2 in x 3 9 in 6 5 in Warranty 1 year limited Table 24 Environmental ratings specifications Parameter Value IP rating Designed to meet requirements of IP66 Explosive atmosphere MIL STD 810F Pr...

Page 325: ...6000 Hz in 5 Hz increments Automatic Maximum 1360 Hz Energy settings 50 V to 475 V in 25 V increments 40 V or 80 V Pulse width Adjustable from 25 ns to 5 000 ns 0 1 MHz with PerfectSquare technology Adjustable from 40 ns to 1000 ns with PerfectSquare technology Damping 50 Ω 100 Ω 200 Ω and 400 Ω Not applicable Pulser delay Not applicable 0 µs to 10 µs 2 5 ns resolution Table 27 Receiver specificat...

Page 326: ...echo Angle beam sound path or depth Velocity zero offset Sensitivity using sound path or depth Test modes Pulse echo dual or through transmission Pulse echo Units mm in or µs Range 1 86 mm to 25 400 mm 0 073 in to 1000 in Up to 762 mm 30 in 30 focal laws Velocity 635 m s to 15 240 m s 0 0250 in µs to 0 6000 in µs Zero offset 0 µs to 750 µs Not applicable Display delay 59 mm to 25 400 mm 2 323 in t...

Page 327: ...on Gate 1 Thickness sound path projection depth amplitude time of flight min max depth min max amplitude Gate 2 Same as gate 1 IF gate optional Thickness Echo to echo Standard Choose between Gate2 1 Gate2 IF Gate1 IF Not applicable Other measurements Overshoot dB value for DGS AVG FBH equivalent reflector size for DGS AVG AWS D1 1 D1 5 rating D reject value DAC TVG Standard DAC points Up to 50 poi...

Page 328: ...andard RS 232 Yes Analog outputs 4 analog outputs selectable 1 V 10 V full scale 4 mA max Alarm outputs 6 alarm outputs 5 V TTL 10 mA Trigger I O Trigger input 5 V TTL Trigger output 5 V TTL 10 mA Encoder outputs 2 axis encoder line quadrature conventional UT only Table 32 Pinout of the ALARMS connector Pin Signal Description 1 5 V 5 V voltage 2 5 V 5 V voltage 3 GND Ground 4 GND Ground 5 ALARM CO...

Page 329: ...pare input 1 22 SPARE IN 2 Spare input 2 23 NO CONNECT No connection 24 NO CONNECT No connection 25 GND Ground 26 GND Ground Table 33 Pinout of the ANALOG OUT connector Pin Signal Description 1 ANALOG OUT 1 Analog output 1 2 ANALOG OUT 2 Analog output 2 3 GND Ground 4 GND Ground 5 ANALOG OUT 3 Analog output 3 6 ANALOG OUT 4 Analog output 4 7 GND Ground 8 GND Ground 9 NO CONNECT No connection Table...

Page 330: ... 16 0 6 9 6 x 10 10 22 5 0 89 15 6 0 61 20 0 0 79 10L16 A10P 10 0 16 0 6 9 6 x 10 10 22 5 0 89 15 6 0 61 20 0 0 79 2 25L16 AWS1 AWS D1 1 D1 5 2 25 16 0 94 15 x 15 16 37 6 1 48 25 4 1 0 17 8 0 70 2L8 DGS1 Europe Integral Wedge DGS AVG 2 0 8 1 8 x 9 9 27 3 1 07 16 8 0 66 22 3 0 88 4L16 DGS1 4 0 16 0 5 8 x 9 9 27 3 1 07 16 8 0 66 22 3 0 88 5L64 A12 General purpose 5 0 64 0 6 9 6 x 10b b For 16 elemen...

Page 331: ...23 0 0 91 53 4 2 1 SA12 N55S 5L64 A12 55 SW 30 to 70 Normal 58 0 2 28 23 0 0 91 23 0 0 91 Table 35 EPOCH 1000i supported Wedges continued Part Matching probes Nominal refracted beam angle in steel Sweep Probe orientation Dimensions in mm in L x W x H Downloaded from ManualsNet com search engine ...

Page 332: ...910 269 EN Rev B June 2011 320 Chapter 19 Downloaded from ManualsNet com search engine ...

Page 333: ...racy establish the sound velocity in a given material by first testing a sample of the material Table 36 Ultrasonic velocities in a variety of common materials Material V in µs V m s Acrylic resin Perspex 0 107 2730 Aluminum 0 249 6320 Beryllium 0 508 12900 Brass naval 0 174 4430 Copper 0 183 4660 Diamond 0 709 18000 Glycerin 0 076 1920 Inconel 0 229 5820 Iron Cast slow 0 138 3500 Iron Cast fast 0...

Page 334: ... P Panametrics unpublished notes 1972 Nickel pure 0 222 5630 Polyamide slow 0 087 2200 Nylon fast 0 102 2600 Polyethylene high density HDPE 0 097 2460 Polyethylene low density LDPE 0 082 2080 Polystyrene 0 092 2340 Polyvinylchloride PVC hard 0 094 2395 Rubber polybutadiene 0 063 1610 Silicon 0 379 9620 Silicone 0 058 1485 Steel 1020 0 232 5890 Steel 4340 0 230 5850 Steel 302 austenitic stainless 0...

Page 335: ...e other than the input signal Amplitude Referring to an indication on the data display the vertical height of an indication measured from the lowest to the highest point on the indication Angle beam transducer A transducer that transmits or receives the acoustic energy at an angle to the surface to set up shear waves or surface waves in the part being inspected A scan Pulse echo format wherein the...

Page 336: ...specimen to eliminate air from this space and thus facilitate the passage of sound waves into and out of the specimen Critical defect Either the largest tolerable defect or the smallest intolerable defect The critical defect size is usually given by a specification or code Cross talk An unwanted condition affecting dual element transducers in which acoustic energy travels from the transmitting cry...

Page 337: ...n size reflector at varying known distances from the transducer This allows you to plot a curve on the data display that represents the amplitude of that size reflector throughout a given distance range This curve compensates for the loss of energy due to beam spreading and attenuation Dual element probe A probe containing two piezoelectric elements one which transmits and one which receives Dynam...

Page 338: ...as a couplant The transducer is also immersed in the liquid but not in contact with the part being tested Incidence angle of The angle between a sound beam striking an acoustic interface and the normal that is perpendicular to the surface at that point Usually designated by the Greek symbol α alpha Indication The signal displayed on the data display signifying the presence of a sound wave reflecto...

Page 339: ...ident angles other than zero degrees In NDT this usually involves conversion of longitudinal waves into shear waves or surface waves Peaking up Maximizing the height of any indication displayed on the data display by positioning the main axis of the sound beam directly over the reflector Penetration The ability of the test system to overcome loss in acoustic energy due to the material that is the ...

Page 340: ...reflector signal to peak at the reference line on the data display Reference line A predetermined horizontal line usually dictated by specifications on the data display representing some percentage of total data display height at which reference echoes and indication echoes are compared Reference reflector A reflector of known size geometry at a known distance such as a flat bottom hole Refraction...

Page 341: ...ingle element probe A probe containing only one piezoelectric element which is used to both transmit and receive sound Skip distance In angle beam testing the surface distance which represents one V path of sound in the material Sound beam The characteristic shape of the ultrasonic wave sent into the material Sound path distance The distance from the transducer beam index point to the reflector lo...

Page 342: ...smitter Circuit of the flaw detector that sends the initial pulse voltage to both the transducer and receiver Ultrasonic Of or relating to frequencies above the human audible range for example above 20 000 cycles s 20 kHz V path The angular distance sound travels measured from the top surface of the material to the bottom and reflecting back up to the top surface Vertical B The larger length if re...

Page 343: ...ed with the EPOCH 1000 Series spares can be purchased Part Description EPXT BAT L Lithium ion battery EP MCA X Charger adaptor X power cord configuration 910 269 EPOCH 1000 Series User s Manual 910 269 EN EP1000 TC S Heavy duty transport case small version hand held EP1000 TC L Heavy duty transport case large style with two wheels and handle Table 40 Instrument software options Part Description EP...

Page 344: ...ries Part Description EP4P C USB 6 USB client cable EPXT EC External stand alone battery charger EP4 CH Chest harness Table 43 Spare parts Part Qty Description EP1000 DP Package of 10 Clear plastic protecting sheets for the EPOCH 1000 display window EPXT C VGA 6 1 VGA output cable EP1000 C RS232 6 1 RS 232 communications cable EP1000 C HWIO 6 1 Hardware I O cable for analog alarm outputs and RS 23...

Page 345: ...tom and rear stands 36 Figure 2 1 Location of the EPOCH 1000 power key and indicator 40 Figure 2 2 The Beam setup page appearing at startup when a PA probe is connected 41 Figure 2 3 The AC adaptor plug 42 Figure 2 4 The battery charge indicator 43 Figure 2 5 Opening the battery compartment 46 Figure 3 1 Exploded view of the software main display elements 50 Figure 3 2 Overview of the menu system ...

Page 346: ...re 6 3 The direct access gate button 112 Figure 6 4 The Gates setup page 114 Figure 6 5 Arrow indicating measurement trigger in Edge Peak and 1stPeak modes 115 Figure 6 6 Echo to echo measurement example 117 Figure 6 7 Gate tick marks indicating alarm threshold type 121 Figure 6 8 Minimum depth alarm marker 122 Figure 7 1 A scan with active reference cursors 124 Figure 8 1 The VGA RS 232 output co...

Page 347: ...963 MAB calibration block P N TB1065 1 172 Figure 9 30 The Navships cylindrical reflector block P N TB7567 1 172 Figure 9 31 The 5 step precision thickness calibration block P N 2214E 173 Figure 10 1 The Create setup page 178 Figure 10 2 The Open setup page 180 Figure 10 3 The File ID review screen 181 Figure 10 4 The Quick Recall dialog box 184 Figure 10 5 The Create setup page with the INC file ...

Page 348: ...ure 14 2 A scan and S scan with the focal law cursor and the angle parameter box 256 Figure 14 3 S scan example with the color palette 257 Figure 14 4 The color and the grey scale palettes 258 Figure 14 5 S scan showing the location of visible defects 259 Figure 14 6 Best fit off and on 260 Figure 14 7 Display setup page 264 Figure 14 8 S scan with the probe front cursor active 265 Figure 14 9 S s...

Page 349: ...Thick Standard dialog box 293 Figure 17 17 The transducer coupled to the 0 mark of the IIW block 295 Figure 17 18 The first echo 296 Figure 17 19 The Enter Value for Zero Cal dialog box 296 Figure 17 20 The Wedge Delay acquisition screen 297 Figure 17 21 The completed wedge delay calibration 298 Figure 17 22 The captured echo 300 Figure 17 23 The Gain acquisition screen 301 Figure 17 24 The comple...

Page 350: ...910 269 EN Rev B June 2011 338 List of Figures Downloaded from ManualsNet com search engine ...

Page 351: ...standard menu in UT mode 63 Table 15 Content of the 5 5 standard menu in UT mode 63 Table 16 Phased array standard menus 64 Table 17 Content of the 1 5 standard menu in PA mode 65 Table 18 Content of the 2 5 standard menu in PA mode 65 Table 19 Content of the 3 5 standard menu in PA mode 65 Table 20 Content of the 4 5 standard menu in PA mode 66 Table 21 Content of the 5 5 standard menu in PA mode...

Page 352: ...ted Wedges 318 Table 36 Ultrasonic velocities in a variety of common materials 321 Table 37 Glossary 323 Table 38 EPOCH 1000 Series ultrasonic flaw detector 331 Table 39 Items included with the EPOCH 1000 Series spares can be purchased 331 Table 40 Instrument software options 331 Table 41 GageView PRO interface program and accessories 332 Table 42 Optional hardware accessories 332 Table 43 Spare p...

Page 353: ...9 activation note 90 AcvCalBlock note 223 AcvSpecimen note 223 adding scanning gain 91 232 temporary scanning gain 207 transfer correction to a completed DAC curve 210 transfer correction to a completed DGS AVG curve 226 adjusting curve gain 209 damping 94 DGS AVG curve gain 226 filter 97 filter group 97 focal law selection cursor 255 parameters 23 PRF value 93 pulser energy 93 pulser frequency 96...

Page 354: ...ife note 249 location in compartment 33 maximizing life note 93 operating time 43 replacing 46 usage instructions 45 USB host port in compartment 33 using 42 beam menu 240 parameter calculation note 244 spreading echo disregarding note 159 beam index point BIP locating 154 peak memory tip 155 beep gate alarm 120 best fit feature important note 260 note 260 best fit mode 258 BNC connector 4 20 28 b...

Page 355: ...56 color setup menu 68 CompactFlash card 176 CompactFlash card connector in battery com partment 33 compartment battery 20 computer connections 20 33 USB client connector 34 hosts connector 34 video output connector 34 128 compatibility with instrument 6 completing DGS AVG curve setup 223 compliance C Tick Australia 2 EMC directive 10 FCC USA 10 ICES 001 Canada 10 computer connection compartment 2...

Page 356: ...3 curve gain 226 curve gain adjusting note 226 curve gain adjusting 226 option activation and setup 220 registration level 227 relative attenuation measurement 228 sizing technique advantage note 227 transfer correction 225 digital filter 251 digital measurements viewing 116 digital receiver filters 97 dimensions 311 DIR direction 317 direct current symbol 2 direct access keypad 21 24 disabling fr...

Page 357: ...ivation 235 software option 235 Fn function keys 21 23 focal law range and resolution 243 selection cursor adjusting 255 freeze disabling 105 display 263 front panel user interface 20 21 frozen display trouble shooting 309 full file content review accessing 183 function Fn keys 21 23 G GageView 86 measurement schemes 71 part numbers 332 gain adjustment options 206 coarse adjustment note 91 curve s...

Page 358: ...fit feature 260 gate captures all focal laws 286 289 299 302 reject level 262 signal word 8 INC file type 187 increase range to view echoes note 203 incremental data file 186 indication in gate note 116 indicator 26 alarms 27 power 27 40 input output connectors 31 features 127 specifications 316 inspection material 242 instruction manual 5 instrument cleaning 307 compatibility 6 dimensions 311 har...

Page 359: ... 233 acquisition for all focal laws 298 AcvSpecimen and AcvCalBlock 223 angle beam application angle beam applica tion note 261 auto calibration and single thickness test block 145 auto calibration scope 133 AUTO XX activation 90 AUTO XX usage 90 battery and transducer life 249 battery complete charge discharge cycles 43 battery maximize life 93 beam parameter calculation 244 best fit feature 260 ...

Page 360: ...h known reflectors 294 curve saturation 284 298 O Olympus office address ii technical support 11 ON OFF power key 21 open file before saving information note 179 open setup page 180 opening data files 179 options activating software 196 software 331 order of calibration note 289 302 o ring 36 output analog 128 connector 31 overlay display grid 263 grid mode 266 leg indicator 265 probe front cursor...

Page 361: ...pecifications 313 rectification 249 adjusting 100 Ref B value storing 230 reference correct 198 correction accuracy note 208 cursor activating 124 cursors 123 gain 91 refracted angle verifying 156 registration level 227 adjusting 228 reject function 261 function and RF mode note 101 262 level important note 262 reject function 101 repair do not 6 replacing battery 46 report printing 188 setting up...

Page 362: ...D1 1 229 conventional UT mode 195 floating gate 235 sound path distance calibrating 157 grid mode 107 spare parts 332 S scan curved grid note 267 stand 35 back 20 bottom 36 rear 36 standard filter set 97 standard grid mode 107 standard wedges and materials note 243 status menu 79 storing Ref B value 230 straight beam modes 136 straight beam transducer calibrating using a 137 support information 11...

Page 363: ...entions 16 U ultrasonic velocity in materials 321 UP key 22 USA FCC compliance 10 USB client 131 communication 131 host 131 host port in battery compartment 33 keyboard and mouse control 27 USB client connector 34 USB hosts connector 34 use only EPXT BAT L batteries warning note 43 44 46 user interface front panel 20 21 using AC power line 42 AUTO XX feature 90 V velocity calibration PA mode 276 w...

Page 364: ...nsducer 282 with an angle beam transducer 294 with known reflectors note 294 wedge delay curve saturation note 284 298 WEEE directive 2 9 Z zero degree transducer calibrating 278 zoom activating 119 applications 119 Downloaded from ManualsNet com search engine ...

Reviews: