background image

2-3

Section 2 Fax Operation (Basic)

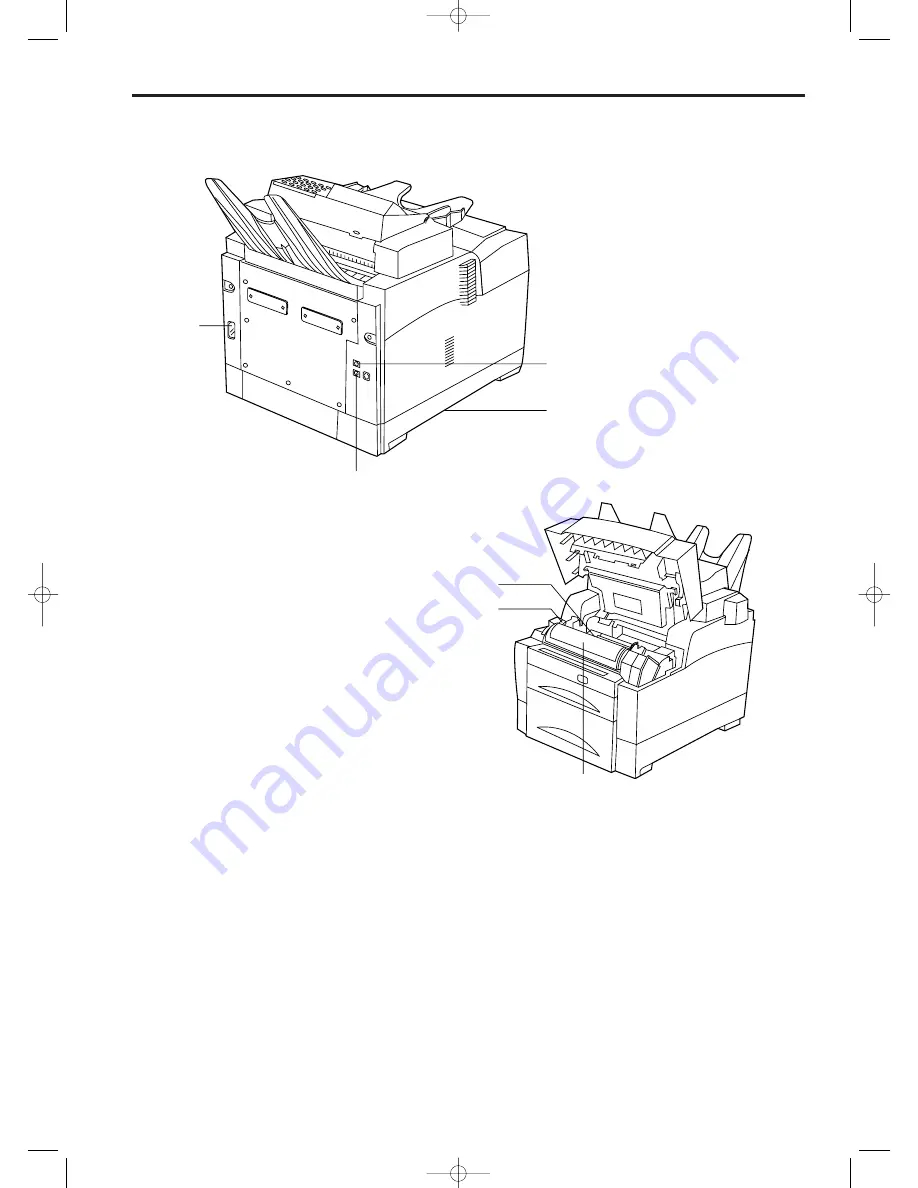
Imaging unit…This unit plays a major role in creating the image on received faxes and copies. When a message is displayed which tells
you to replace the imaging unit, replace the old unit with a new one.

Toner cartridge…When a message telling you to replace the toner cartridge is displayed, replace the old unit with a new one.

Toner cartridge release lever…Use this lever when replacing the toner cartridge.

Fax moving handles…Hold these handles when moving the facsimile.

Telephone jack…Use this jack to connect a separately purchased telephone.

* This jack is not available on those units purchased in the Netherlands and Ireland.

Line jack…Use this jack to connect the fax to a telephone line with the modular cord.

Power receptacle…Connect the power cord here.

%

^

&

*

$

@

#

(Rear view)

(Internal view)

02/Basic/1/1-12(En)/E.q  13-07-2000 15:36  Pagina 3

Summary of Contents for OFX8800

Page 1: ...INSTRUCTION HANDBOOK Please read the instruction handbook before using the facsimile Keep it close to the facsimile for easy reference OFX 8800 p n 533153R 00 01 front En E q 13 07 2000 15 39 Pagina 1...

Page 2: ...egistered mark PUBLICATION ISSUED BY Olivetti Lexikon S p A Via Jervis 77 10015 Ivrea Italy Copyright 2000 Olivetti All rights reserved The manufacturer reserves the right to carry out modifications t...

Page 3: ...orporation HP PCL is a trademark of Hewlett Packard Corporation Symantec and WinFax Pro are registered trademarks of Symantec Corporation Adobe and Photoshop are trademarks of Adobe Systems Incorporat...

Page 4: ...ation of your facsimile such as communications errors and paper jams as well as information on troubleshooting procedures Fax Operation Other functions This section contains explanations on somewhat m...

Page 5: ...he symbol indicates that the related section includes safety warnings Specific points of attention are indicated inside the symbol General warning Warning of danger of electrical shock Warning of high...

Page 6: ...plex Fax Reception 2 11 6 Batch Transmission 2 11 7 ECM Error Correction Mode Communication 2 11 8 Password Check Reception Restricted Communication 2 11 9 Auto Shut Off Function 2 11 10 Auto Clear Fu...

Page 7: ...ng 7 20 2 Modifying and Deleting 7 24 3 Using a Program Key 7 25 4 Printing Out a Program Dial List 7 25 Section 7 Fax operation Other functions Restricted Access 7 25 1 Restricted Access ON OFF 7 26...

Page 8: ...aking a Test Print 10 13 6 Setting the Printing Parameters 10 13 7 Managing the Printing Process 10 14 8 Removing the Printer Driver 10 15 9 Cautions when Printing 10 16 Section 10 Options Specificati...

Page 9: ...Section 1 Important Please read first 1 1 01 PL En E q 13 07 2000 15 37 Pagina 1...

Page 10: ...in locations which are unstable or not level Such locations may cause the facsimile to fall down or fall over This type of situation presents a danger of personal injury or damage to the facsimile Av...

Page 11: ...here is a danger of fire electrical shock or damage to the laser If the laser beam escapes there is a danger of it causing blindness If the facsimile becomes excessively hot smoke appears from the fac...

Page 12: ...rly ventilated The facsimile may only be used within the country of purchase due to the different safety and communication standards in each country International communication standards however make...

Page 13: ...Section 2 Fax Operation Basic 2 1 02 Basic 1 1 12 En E q 13 07 2000 15 36 Pagina 1...

Page 14: ...ray Paper eject table Once ejected received faxes and copies are stacked on this table Paper eject table extension Fold open when receiving faxes or making copies Paper cassette Up to 500 sheets of pl...

Page 15: ...the old unit with a new one Toner cartridge release lever Use this lever when replacing the toner cartridge Fax moving handles Hold these handles when moving the facsimile Telephone jack Use this jack...

Page 16: ...n select key to light the resolution indicator corresponding to the desired mode When all of the indicators are out the fax is in the Normal mode Refer to page 2 13 Reception mode select key Press to...

Page 17: ...STOP key is pressed while this key is held down it is possible to cancel that background operation PRINT REPORTS key Press to print out a desired report or list DELAYED TX key Press to perform proced...

Page 18: ...onding one touch key No 1 20 and with the cover plate up over one touch keys No 21 45 in order to indicate the information registered under that key The one touch key label sheet should be marked with...

Page 19: ...6 6 Reinsert the paper cassette in the facsimile 4 Connecting the Power Cord Plug one end of the power cord into the power receptacle and the other end into the power outlet in the room 5 Warm Up Onc...

Page 20: ...en registered as a Confidential box or a Relay box This facsimile can transmit a SUB subaddress that is anywhere between 1 and 20 digits long and that subaddress may include any combination of the sym...

Page 21: ...d Refer to Dual Access Function Table page 2 10 for more detailed information on the operations available under the Dual access function Due to the fact that the fax handles all Dual access operations...

Page 22: ...ort or list print out may occur even after a telephone conversation 15 JBIG operation is not available during a JBIG fax communication or JBIG printing 1 Scanning Data into Memory Transmission Polling...

Page 23: ...or one touch keys In order to use Password Check reception it is necessary to register the desired fax numbers under abbreviated numbers and or one touch keys and turn Password Check reception ON Ref...

Page 24: ...f A5 or other small size documents hold the rear edge of the documents and place them under the ADF cover scanning section as far as they will go If the documents are aligned with the rear of the docu...

Page 25: ...2 transmission modes Direct Feed transmission mode The other party s fax number is dialled first and once the connection has been established scanning of the documents to be transmitted begins Memory...

Page 26: ...estination name and or number displayed is actually the one desired and press the key on the keypad corresponding to the number indicated on the bottom line of the message display Dialling will begin...

Page 27: ...Press the DUPLEX key 3 Use the cursor keys to select whether or not to include a fax cover page If you selected YES the reverse side of the first page will not be scanned into memory Select YES when...

Page 28: ...ey will be automatically scanned into memory combined with the previously scanned data and the transmission operation will begin Refer to Entering a fax number with a one touch key page 2 14 for more...

Page 29: ...d manually from a separately purchased telephone TAD reception Page 4 6 In this mode a separately purchased telephone with answering machine capabilities is used in conjunction with the fax Super Fine...

Page 30: ...the STOP key The message display will revert to the initial mode 1 2 1 Press the FUNCTION key 2 Press the cursor key once 3 3 Press the ENTER FUNCTION key The file number corresponding to a communicat...

Page 31: ...ed or Encryption transmission proceed to step 13 The entered SUB subaddress will also be used as the SEP selective polling address 11 Press the ENTER FUNCTION key 12 Use the keypad to enter a SID suba...

Page 32: ...key that has been used in the registration of a program key group dial key or Relay box is selected for modification or deletion CANNOT DELETE will appear in the message display and it will not be po...

Page 33: ...e touch key No 19 to switch between input of upper and lower case letters Once the desired character is displayed press the cursor key to register that character 01 NAME A 01 NAME A 01 NAME A 01 NAME...

Page 34: ...T want to designate this abbreviated number for F Code based or Encryption transmission proceed to step 12 The entered SUB subaddress will also be used as the SEP selective polling address 10 Press th...

Page 35: ...cation of all the desired items is complete press the ENTER FUNCTION key until the following message is displayed 6 Modification of the registered information is complete Use the cursor keys to select...

Page 36: ...d then press the ENTER FUNCTION key Refer to 5 Entering Your Access Code page 7 28 09 10 99 12 00 SET DOCUMENT AD ENTER No A4 81 2 C A A 61 62 63 64 65 66 67 68 69 70 36 37 38 39 40 41 42 43 44 45 11...

Page 37: ...Entering Your Access Code page 7 28 09 10 99 12 00 SET DOCUMENT AD ENTER No A4 81 2 C A A 61 62 63 64 65 66 67 68 69 70 36 37 38 39 40 41 42 43 44 45 11 12 13 14 15 16 17 18 19 20 0 9 A a 3 3 Press t...

Page 38: ...redialling to that number will be carried out a predetermined number of times at set intervals If the facsimile is waiting to redial a number for a transmission in the Direct Feed transmission mode an...

Page 39: ...Section 3 Making Copies 3 1 03 copy En E q 13 07 2000 15 33 Pagina 1...

Page 40: ...opies from one or more originals with each copy produced from a single original grouped together in a set When making copies the resolution will be automatically be set to FINE unless another resoluti...

Page 41: ...0 2 A A 3 3 If the Optional Cassette IS installed use the cursor keys to select which cassette copying will be accomplished from Select 1 for the cassette that is included with the facsimile or 2 for...

Page 42: ...py resolution contrast and magnification ratio refer to Standard Copying and Group Copying page 3 2 4 5 6 5 4 3 2 1 4 3 4 3 4 3 6 5 6 5 6 5 2 1 2 1 2 1 6 5 4 3 2 1 6 5 4 3 2 1 6 5 4 3 2 1 09 10 99 12...

Page 43: ...is also possible to make multiple sets of copies from a single set of originals Duplex Sort copying A maximum setting of 99 copies or copy sets is possible For more detailed information regarding the...

Page 44: ...le and if necessary select the desired resolution and contrast Duplex Copying 2 sided to 1 sided Carry out the following procedure when making 1 sided copies from 2 sided originals It is also possible...

Page 45: ...tional Cassette IS installed use the cursor keys to select which cassette copying will be accomplished from Select 1 for the cassette that is included with the facsimile or 2 for the Optional Cassette...

Page 46: ...ry combined with the previously scanned data and the copy operation will begin If DOCUMENT MISMATCH appears in the message display the number of originals scanned for the front side and the number sca...

Page 47: ...Section 4 Fax Operation Various Functions 4 1 04 Various En E q 13 07 2000 15 32 Pagina 1...

Page 48: ...s entered with the keypad or an abbreviated number check the number and then press the START key The documents will be scanned and stored in memory Standby transmission refers to the process where doc...

Page 49: ...38 39 40 1 2 3 4 5 6 7 8 9 10 11 12 13 14 15 ABC DEF GHI JKL MNO PQR ST UVW XYZ 6 Press the ENTER FUNCTION key 7 Press the START key The documents will be scanned and stored in memory awaiting the app...

Page 50: ...ssion To cancel the procedure part way through press the STOP key The message display will revert to the initial mode If Restricted access is turned ON it is first necessary to enter your access code...

Page 51: ...and may be answered from the telephone Auto FAX TEL switching is only possible if a separately purchased telephone is connected to this fax To use the Auto FAX TEL switching mode it is necessary to se...

Page 52: ...he TAD reception mode be adjusted to a number GREATER than the setting for the number of rings of the answering machine itself If it is set to ring fewer times than the answering machine there is a po...

Page 53: ...mber of times the telephone will ring before the connection is made to the fax refer to Number of Rings page 9 9 If the telephone receiver is picked up while the telephone is still ringing this facsim...

Page 54: ...Section 5 Replacing Consumables and Maintenance 5 1 05 Consumables En E q 13 07 2000 15 31 Pagina 1...

Page 55: ...If you continue to use the facsimile without replacing the toner cartridge after a certain amount of time ADD TONER will be the only message shown in the message display and print out will not be pos...

Page 56: ...down as there is a danger that the toner will spill 8 8 Use the supplied seal to close the opening in the toner disposal box that is attached to the toner cartridge 10 10 Shake the new toner cartridge...

Page 57: ...ging unit should be replaced as soon as possible If you continue to use the facsimile without replacing the imaging unit after a certain amount of time REPLACE IU will be the only message shown in the...

Page 58: ...on on the left side of the facsimile as shown in the illustration When the charger cleaner is properly set it will click into place 9 9 Gently close the facsimile If the facsimile doesn t close proper...

Page 59: ...rea in the illustration with a soft dry cloth NEVER use water or thinner based solvents 4 4 4 Gently close the ADF cover 5 5 5 Plug the power plug back into the outlet 2 Cleaning the Document Scanning...

Page 60: ...Section 6 Troubleshooting 6 1 06 Trouble En E q 13 07 2000 15 29 Pagina 1...

Page 61: ...whether the MEMORY indicator is lit or not BEFORE intentionally disconnecting power to this facsimile If it is lit print out all important documents from memory and then confirm that the MEMORY indic...

Page 62: ...s to be copied All data scanned to that point will be deleted If you are using the SUPER FINE or PHOTO MODE setting reduce the resolution setting to FINE If you are using the FINE setting reduce the r...

Page 63: ...O NOT reuse paper which has jammed as it can cause another jam ALWAYS try to remove jammed paper without tearing it If the paper does happen to tear be sure to remove all loose scraps Loose scraps of...

Page 64: ...ide the facsimile When a message like the one below is displayed a paper jam has occurred in the paper eject section or somewhere within the facsimile Remove the jammed paper according to the followin...

Page 65: ...in the charger section Take sufficient care when working in this area as there is a danger of electrical shock CAUTION The facsimile s fixing unit is extremely hot Take sufficient care when working in...

Page 66: ...cator will light and DOCUMENT JAM will appear in the message display along with the page of the document or original which is jammed All data scanned to that point will be deleted 1 1 Remove all remai...

Page 67: ...t minor adjustments If trouble persists contact your service representative an authorised service centre or the place of purchase Is the power cord connected correctly Connect the power cord correctly...

Page 68: ...Install the facsimile in a different area 1 3 Set the paper correctly in the paper cassette 2 6 Replace the curled or wrinkled paper with new paper 2 6 Perform the appropriate procedure to remove the...

Page 69: ...y 2 18 Some telephones allow you to transmit the desired tone signals after pressing the star or other key Refer to the Instruction manual for the telephone being used Check the registered number 8 4...

Page 70: ...ntial box ID registered for the corresponding Confidential box Have the destination party register the appropriate Confidential box Check the Confidential box number and Confidential box ID for that C...

Page 71: ...Section 7 Fax operation Other functions 7 1 07 Other 1 1 14 En E q 13 07 2000 15 28 Pagina 1...

Page 72: ...mode If Restricted access is turned ON it is first necessary to enter your access code or the registered management password and then press the ENTER FUNCTION key Refer to 5 Entering Your Access Code...

Page 73: ...ted access is turned ON and you entered your access code in the beginning of the procedure proceed to step 3 2 Press the cursor key once 2 Memory Polling Transmission To scan documents into memory and...

Page 74: ...g cycles The time interval can be set to any amount between 0 90 minutes in 10 minute increments If the time interval is set to 00 the next polling cycle will begin about 1 minute after the previous c...

Page 75: ...lay and press the ENTER FUNCTION key If you pressed the DELAYED TX key at the beginning of the procedure press the ENTER FUNCTION key after all desired fax numbers have been entered A message that wil...

Page 76: ...Communication Using the Timer page 4 2 12 Press the START key A corresponding file number will appear in the message display 7 6 Section 7 Fax operation Other functions 7 Storing Documents in a Confid...

Page 77: ...he ENTER FUNCTION key Refer to 5 Entering Your Access Code page 7 28 1 Press the FUNCTION key 2 Press the cursor key until the following message appears in the message display 3 Press the ENTER FUNCTI...

Page 78: ...Confidential boxes 11 Press the ENTER FUNCTION key If you chose to continue deleting Confidential boxes the message display will return to step 6 If you chose NOT to continue the message display will...

Page 79: ...ave been entered A message that will allow you to enter a desired start time will appear Carry out steps 5 and 6 of Communication Using the Timer page 4 2 12 Press the START key A corresponding file n...

Page 80: ...the user to confirm information such as the corresponding Confidential box numbers etc related to Confidential boxes that contain documents which are waiting to be transmitted upon receipt of a pollin...

Page 81: ...fax with the final destination s registered under that box In this case it is possible to limit from which facsimiles you can receive a Relay broadcast transmission command by entering the TSI Transmi...

Page 82: ...step 20 18 Enter the fax number of the destination to which you want to have the Relay transmission report sent Max 32 digits 19 Press the ENTER FUNCTION key 20 Use the keypad to enter the TSI Transmi...

Page 83: ...ers have been entered A message that will allow you to enter a desired start time will appear Carry out steps 5 and 6 of Communication Using the Timer page 4 2 12 Press the START key A corresponding f...

Page 84: ...r Encryption transmission and registers a SUB subaddress that matches the Confidential box number of the destination Confidential box A maximum of 20 encryption keys can be registered in this fax 7 14...

Page 85: ...you can register an encryption key 2 Register the corresponding Confidential box Refer to 1 Registering Confidential Boxes page 7 7 If the Confidential box has already been registered proceed to step...

Page 86: ...received through the following types of communication will not be forwarded Polling reception Continuous polling reception F Code based Confidential polling reception F Code based Confidential recepti...

Page 87: ...ering characters 16 Press the ENTER FUNCTION key GR03 NEW DIAL 1234567 SUB 6789 SID 3456 ENTER DEST FAX No 03 NAME ABC FUNCTION REGISTER SPEED DIAL REGISTER SPEED DIAL REGISTER GROUP DIAL 2 Modifying...

Page 88: ...s the START key The communication will begin If PRESS NUMERIC KEY appears in the message display confirm that the group name displayed is actually the one desired and if it is press the key on the key...

Page 89: ...TER SPEED DIAL REG CHAIN DIAL CH04 NEW DIAL 04 0022 04 NAME ABC 2 Press the cursor key until the following message appears in the message display 3 Press the ENTER FUNCTION key 4 Press the cursor key...

Page 90: ...dure part way through press the STOP key The message display will revert to the initial mode If Restricted access is turned ON it is first necessary to enter the registered management password and the...

Page 91: ...Press the ENTER FUNCTION key 16 Registration for that program key is complete Use the cursor keys to select whether or not you want to continue registering program keys 17 Press the ENTER FUNCTION key...

Page 92: ...ct whether or not you want to continue registering program keys 22 Press the ENTER FUNCTION key If you chose to continue registering program keys return to step 6 page 7 21 If you chose NOT to continu...

Page 93: ...keys P 01 NEW DIAL 1234567 SUB 6789 01 NAME ABC SID 6789 TIME 12 34 F Code based Confidential polling reception Continued from step 7 page 7 21 8 Press an unregistered one touch key 9 Press the ENTER...

Page 94: ...e message display will revert to the initial mode P 01 DELETE 09 10 99 12 00 SET DOCUMENT FUNCTION REGISTER SPEED DIAL REGISTER SPEED DIAL REG PROGRAM DIAL Continuous polling reception Continued from...

Page 95: ...key Refer to 5 Entering Your Access Code page 7 28 1 If the operation involves the transmission of documents set the documents to be transmitted and if necessary select the desired resolution and cont...

Page 96: ...nning 4 Use the keypad to enter the desired 4 digit access code RESTR ACCESS SETTING ON DEPARTMENT CODE 01 ACCESS CODE The following functions of the unit are available without the need to enter a via...

Page 97: ...codes return to step 2 If you chose NOT to continue the message display will revert to the initial mode 01 NAME ABC CONTINUE YES CONTINUE NO 3 Deleting Department Codes It is possible to delete one or...

Page 98: ...d in this facsimile If there are no department codes registered a Department list will not be printed out Restricted access must be turned ON and the registered management password entered before you...

Page 99: ...Section 8 Management Report List Print Out 8 1 08 Report En E q 13 07 2000 15 26 Pagina 1...

Page 100: ...PORT Transmission Report Having this report printed out automatically enables the user to confirm such information as the date and time of a transmission as well as the fax number of the destination p...

Page 101: ...EPTION REPORT RECEPTION REPORT OFF RECEPTION REPORT ON Delayed Communication Report Memory Entry Report Having this report printed out automatically enables the user to confirm the information related...

Page 102: ...key The message display will revert to the initial mode If Restricted access is turned ON it is first necessary to enter the registered management password and then press the ENTER FUNCTION key Refer...

Page 103: ...the ENTER FUNCTION key 8 Press the cursor key until the following message appears in the message display 9 Press the ENTER FUNCTION key 10 Use the cursor keys to select whether you want the Restricte...

Page 104: ...Section 9 Other Settings and Registration 9 1 09 Registration En E q 13 07 2000 15 25 Pagina 1...

Page 105: ...mission To enter this information carry out the following procedure Modification of previously registered information is accomplished by following the procedure below and changing the registered data...

Page 106: ...DOCUMENT FUNCTION SETTING SETTING TTI TTI ON TTI OFF Reception Date and Time Print Out ON OFF Select here whether or not the time and date of the reception will be printed out onto the top edge of inc...

Page 107: ...MENT FUNCTION SETTING SETTING REPORT WITH COPY REPORT WITH COPY ON REPORT WITH COPY OFF Message Display and Reports Lists Language The language used in the message display and on reports lists can be...

Page 108: ...STOP key The message display will revert to the initial mode 09 10 99 12 00 SET DOCUMENT FUNCTION SETTING SETTING PASSWORD COMMUNIC PASSWORD COMMUNIC ON PASSWORD COMMUNIC OFF Speaker Monitor Volume T...

Page 109: ...tration 09 10 99 12 00 SET DOCUMENT FUNCTION SETTING SETTING BUZZER BUZZER ON BUZZER OFF Speaker Monitor ON OFF Select here whether to turn the speaker monitor ON or OFF To cancel the procedure part w...

Page 110: ...Super Fine Function ON OFF If the Super Fine function is turned ON and the transmitting party transmits documents in the SUPER FINE setting reception with the SUPER FINE setting is possible It is als...

Page 111: ...r OFF 7 Press the ENTER FUNCTION key 8 Press the STOP key The message display will revert to the initial mode 9 8 Section 9 Other Settings and Registration 09 10 99 12 00 SET DOCUMENT FUNCTION SETTING...

Page 112: ...setting 7 Press the ENTER FUNCTION key 8 Press the STOP key The message display will revert to the initial mode 09 10 99 12 00 SET DOCUMENT FUNCTION SETTING SETTING OF RINGS SETTING OF RINGS TAD OF RI...

Page 113: ...ic Reception Mode This facsimile has 2 automatic reception modes Auto Fax Reception page 2 17 and Auto FAX TEL Switching page 4 5 To change the presently selected mode carry out the following procedur...

Page 114: ...age 7 28 1 Press the FUNCTION key 2 Press the cursor key until the following message appears in the message display 3 Press the ENTER FUNCTION key 4 Press the cursor key until the following message ap...

Page 115: ...Section 10 Options 10 1 10 Options 1 1 20 En E q 13 07 2000 15 24 Pagina 1...

Page 116: ...lt setting is A4 size Therefore there is no need to change this setting during the initial set up procedure if you will be using A4 size paper To cancel the procedure part way through press the STOP k...

Page 117: ...g Your Access Code page 7 28 1 Press the FUNCTION key 2 Press the cursor key until the following message appears in the message display 3 Press the ENTER FUNCTION key 4 Press the cursor key until the...

Page 118: ...mode is turned ON Refer to Dual Access Function Table page 2 10 The normal fax capabilities of this unit will not be accessible during the period the RS 232C mode is ON and the related application sof...

Page 119: ...s NOT installed To cancel the procedure part way through press the STOP key The message display will revert to the initial mode If Restricted access is turned ON it is first necessary to enter the reg...

Page 120: ...he scanning system under Windows 95 98 Windows NT 4 0 and Windows 3 1 are as follows IBM PC AT or compatible Minimum 33MHz i486SX CPU Windows 95 98 and Windows NT 4 0 Minimum 16MB installed RAM Window...

Page 121: ...e box which is displayed 4 Click on Acquire from within the TWAIN compatible software in use in your computer to open the Scanning Control dialogue box 5 Set the scanning parameters such as the resolu...

Page 122: ...open the Scanning Control dialogue box If the scanner is connected to the correct port on the computer click on Option to open the Option dialogue box and change the Connect Port setting to that port...

Page 123: ...BM PC AT or compatible Minimum 33MHz i486DX CPU Windows 95 Minimum 66MHz i486DX CPU Windows 98 Minimum 8MB installed RAM 5MB free hard disk space Not including swap space 1 parallel port 3 5 floppy di...

Page 124: ...lder and from within an application Opening the Properties dialogue box from the Printers folder 1 Click on Start in the Task Bar Use the mouse to point to Settings and click on Printers in the submen...

Page 125: ...for printing purposes is displayed in the Information box If printing troubles develop information regarding the trouble is indicated by check marks in the Call for service and Operator call boxes The...

Page 126: ...ck on Yes 6 Click on Yes 7 The files for this Printing System will be removed If this printer was selected as the default printer a message asking you to select a new default printer will be displayed...

Page 127: ...ument Defaults in the menu which is displayed The Properties dialogue box will appear Opening the Properties dialogue box from within an application 1 Use the mouse to point to File in the application...

Page 128: ...e lower field 300 dpi or 600 dpi Normally the most appropriate resolution is 600 dpi However there may be cases when the computer cannot send that data at a speed sufficient for the printer If such a...

Page 129: ...r to Replacing the Toner Cartridge page 5 2 or Replacing the Imaging Unit page 5 4 and confirm that both the toner cartridge and the imaging unit are set properly Paper Mismatch The size of paper load...

Page 130: ...ing on Restart Windows 9 Once Windows 3 1 is running again an icon with the name of this printer will appear The facsimile may now be used as a printer 5 Connecting to the Printer in Windows 3 1 The f...

Page 131: ...andscape as desired Once you are finished with the settings above click on OK Then click on Close in the Printers dialogue box Graphics dialogue box Click on Graphics in the Setup dialogue box in orde...

Page 132: ...y for this printer and one in the Main group The following explanations refer to the Print Manager used specifically for this printer Brightness Change this setting to adjust the brightness of the pri...

Page 133: ...f copies to be printed is set in both the application and the Setup dialogue box depending on how the application handles multiple copies the correct number of copies may not be printed It is recommen...

Page 134: ...12 Courier Italic Portrait 12 10 Line Printer Regular Portrait 16 66 8 5 10 20 Section 10 Options PCL 4 5 Emulation 1 Description In addition to standard printing under Windows 95 98 Windows NT 4 0 a...

Page 135: ...irmation Report page 8 4 One touch keys etc under which a party s number is registered can be used for communication on either line The Redial function will dial the most recently dialled number regar...

Page 136: ...to the receiving party s fax and displayed on the incoming documents thereby instantly notifying the receiver of the source of fax transmission Refer to page 9 2 for more detailed information on regis...

Page 137: ...R FUNCTION key 8 The scheduled communication will be cancelled If other scheduled communications remain a Confirmation report will be printed out 51 52 53 54 46 47 48 49 56 57 58 59 61 62 63 64 26 27...

Page 138: ...tion Mode 2nd line This setting is fixed at AUTO FAX RECEPTION in this fax and can not be changed To cancel the procedure part way through press the STOP key The message display will revert to the ini...

Page 139: ...stered in advance It is also possible to have the received documents printed out at this fax in addition to the designated fax In this fax the 1st line standard line and the 2nd line can be set indepe...

Page 140: ...6 11 Registering and Deleting Relay Boxes 2nd line Carry out the following procedure to register and or delete Relay boxes for use with the 2nd line To cancel the procedure part way through press the...

Page 141: ...Section 11 Reference 11 1 11 Reference En E q 13 07 2000 15 22 Pagina 1...

Page 142: ...rt Activity Report Power Supply AC 230V 50Hz Dimensions W x D x H 425 mm x 505 mm x 436 mm Weight Approx 21 kg Without imaging unit installed Noise emission 70 dB A Options Optional Cassette Memory Bo...

Page 143: ...ion F Code Based Polling Reception Reverse Polling F Code Based Confidential Transmission Storing Documents in a Confidential Box Printing Out Documents from a Confidential Box Memory Forwarding ON OF...

Page 144: ...eport Reception Report Delayed Communication Report Memory Entry Report Add Sample Image on Reports ON OFF Default Settings Continued from page 11 3 Restricted Access Report 3 Duplex Fax Reception ON...

Page 145: ...eception Mode Auto fax reception 6 Cancelling a Communication 2 Only available when the optional Dual Line Kit is installed Activity Report User Setting List Confirmation Report Memory Entry Report Re...

Page 146: ...onnection with the other party was not possible There is a possibility that communication with the other party s fax cannot be accomplished in this state It is possible that your telephone line or the...

Page 147: ...plished properly Contact our service centre I 45 Transmission was attempted but was unsuccessful because the necessary DC Loop was not detected for dialling Check all your telephone line connections a...

Page 148: ...machine and is not in a user access area The labels shown below are attached on the rear side of the machine Invisible laser radiation when open Avoid direct exposure to beam Invisible laser radiation...

Page 149: ...nditional assurance of successful operation on every PSTN network termination point In the event of problems you should contact your equipment supplier in the first instance Network compatibility Decl...

Page 150: ...Hauptisoliervorrichtung Die anderen Schalter auf dem Ger t sind nur Funktionsschalter und k nnen nicht verwendet werden um den Stromflu im Ger t zu unterbrechen WARNING This is Class A product In a d...

Page 151: ...12 back En E q 13 07 2000 15 16 Pagina 1...

Reviews: