4
To confirm the setting.
The display shows:
AUTOMATIC RX
CHECK PRINT HEAD
T
O
INSTALL
THE
HEAD
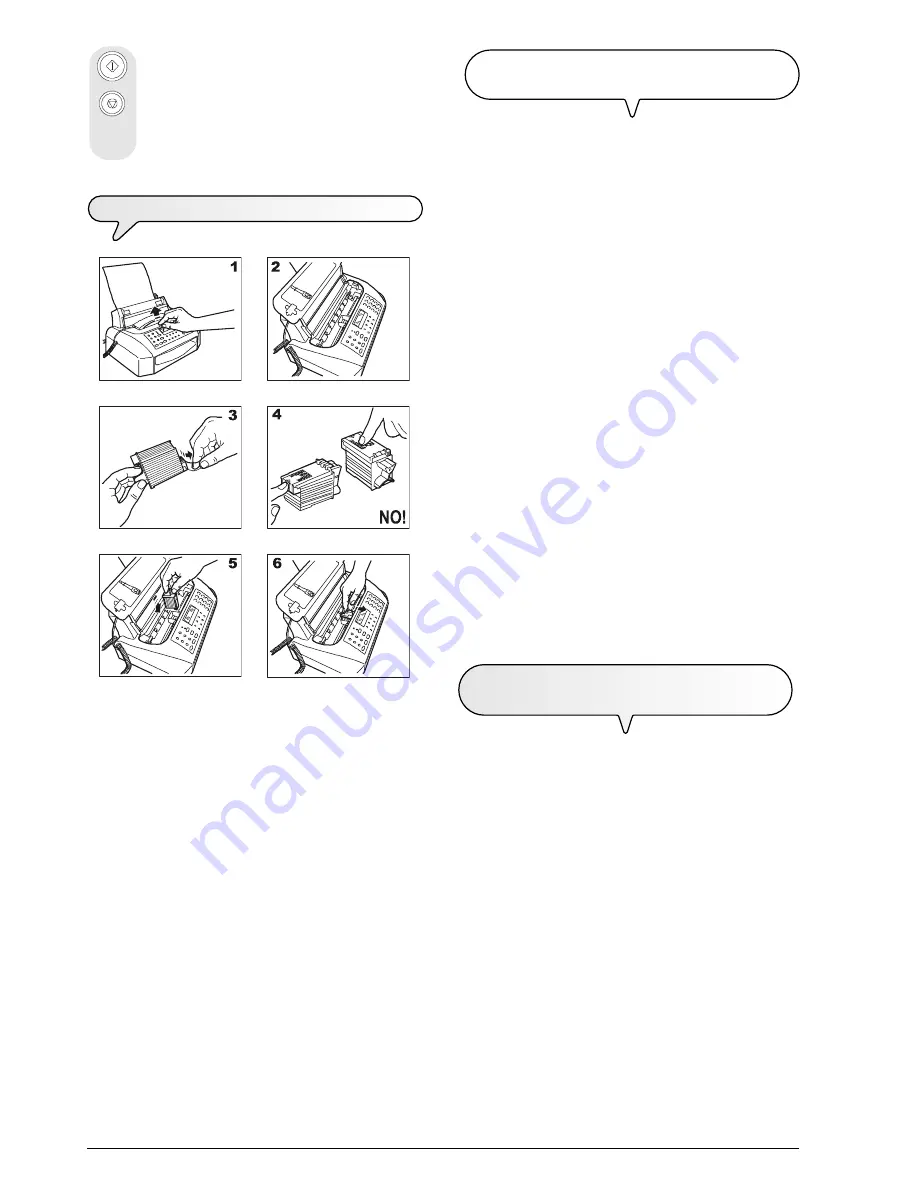
1-2 Lift the print head compartment cover by putting your finger in the
notch at its centre, as shown in the figure.
3. Remove the print head from its package and, holding it by the grip,
peel off the film covering the nozzles.
4. Avoid touching the nozzles and the electrical contacts with your
fingers.
5. Place the print head in its seat with the electrical contacts facing
towards the front of the fax machine.
6. Push the print head in the direction indicated by the arrow until it
clicks into place and close the print head compartment cover.
notE
If, after the print head has been installed, the "CHECK PRINT
HEAD" message appears again, try removing it and then
reinserting it, pressing it more firmly into position. If the mes-
sage remains on the display, remove the print head and
clean the electrical contacts of the print head and the car-
riage, see "
To clean the electrical contacts of the print
head
", section "
Maintenance operations
".
notE
To replace the print head, see the section "
Maintenance
operations
".
A
UTOMATIC
HEAD
NOZZLE
CLEANING
AND
TESTING
PROCEDURE
Once the print head has been inserted
, the fax machine starts
the
nozzle cleaning and checking procedure
, which is com-
pleted by:
the
printing
, on the sheet loaded automatically, of a diagnostic
test sheet containing:
-a
numbered scale
, for checking the flow of ink and the
electrical circuits of the print head nozzles.
-a group of
graphics and text
, so that the printing quality
may be evaluated.
the display shows the message: "CHECK PRINT OUT",
"1 = EXIT 0 = REPEAT".
Examine the print test sheet as follows:
Check that the numbered scale
is not interrupted at any
point
and that the black areas
do not
present any horizon-
tal white lines
: if these conditions, which confirm that the print
head has been inserted correctly and is working properly, are
respected, set the value
1
. The fax machine returns to its initial
stand-by status and is ready for use. The display shows the
message:
AUTOMATIC RX 00
25-07-02 11:23
On the other hand, if there are any
interruptions or white
lines
present, set
0
to clean the nozzles again: if the new print
test continues to be unsatisfactory, repeat the procedure an-
other time. Then, if the printing quality does still not meet your
expectations, clean the electrical contacts and the nozzles as
indicated in "
To clean the electrical contacts of the print
head
" and "
To clean the nozzles of the print head
", sec-
tion "
Maintenance operations
".
P
RECAUTIONS
ABOUT
THE
USE
OF
HEADS
For
base models
you can
only
use
monochrome print heads
(black), whereas for
multifunctional models
you can use
mono-
chrome
or
colour print heads
. Howewer, remember that in both
cases you can
only
use
single-block print heads
(
non recharge-
able
).
Monochrome
, for use with the
facsimile
,
or the
printer
in
black
and white
mode.
Colour
, for use with the
printer
in
colour
mode.
notE
For multifunctional models only
When the colour print head is installed, the documents re-
ceived will
not be printed straight away
, but stored in the
memory of the facsimile machine. Once the memory is full, the
facsimile will no longer be able to receive documents, so
always remember
to replace the monochrome print head
each time the facsimile is reset.


