53
08
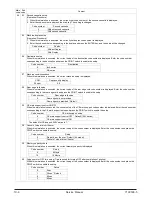
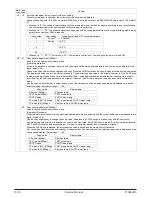
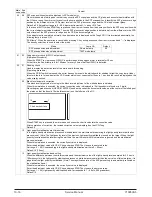
SPF scan position automatic adjustment <SPF model only>
Place three sheets of white paper so that they cover the SPF scan glass and the OC glass, and execute the simulation with
the OC cover open, the mirror unit scans from the home position to the SPF scan position to identify the SPF glass cover edge
position by the difference in the CCD output levels of the SPF glass cover edge and the OC side document glass.
Default is 50. Adjustment range is 0 – 99. Adjustment increment: 1 = about 0.127mm
In the case of AUTO, when START key is pressed, the mirror unit scans from the home position to the SPF scan position with
the current adjustment value displayed. Then the SPF glass cover edge position is determined from the difference in the CCD
output levels of the SPF glass cover edge and the OC side document glass.
If the adjustment is completed normally, the adjusted value is displayed on the 7seg/LCD. If it is terminated abnormally, the
following lamp is turned ON.
"JAM lamp": When the operation is canceled by pressing C key during execution, the mirror is returned and "- -" is displayed.
The density select key is used to select the mode.
61
03
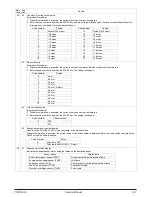
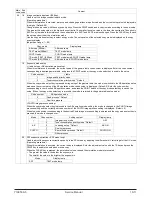
Polygon motor check (HSYNC output check)
(Operation/Procedure)
When the START key is pressed, HSYNC is performed and the polygon motor is rotated for 30 sec.
At that time, the Zoom lamp is lit for 100msec for every 3 times that the HSYNC is detected.
63
01
Shading check
Used to display the detection level of the white board for shading.
(Operating procedure)
When the PRINT switch is pressed, the mirror base unit moves to the white board for shading to light the copy lamp. Under
this state, the level of one pixel at the CCD center which is not corrected for 10sec in 1 sec, and the result is displayed on the
value display section.
02
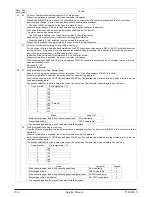
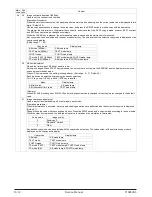
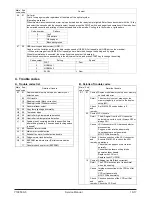
Black level automatic correction
The black level target value for using in the black level adjustment of the white balance is obtained.
When this simulation is executed, the current correction value is displayed in 12bit hexadecimal number in 3 digits.
Place the gray gradation chart (UKOG-0162FCZZ) used as the correction document face-down at the center of the left edge of
the platen so that the density 10 side (black side) is on the left side of the OC.
When START key is pressed, the mirror base unit scans the chart to calculate the correction value.
After completion of correction, the revised correction value is displayed on the LCD/7seg.
Default: 0
12
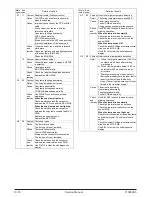
Light quantity stabilization wait time setting
In the light quantity stabilization process on white balance, the wait time before entering the light quantity level stabilization
process is set. (Note: The light quantity level of the previous light quantity stabilization is used as the target. When the light
quantity level reaches the level during the wait time, the wait time set with this simulation is ignored and the stabilization
process is started.
When this simulation is executed, the currently set value is displayed.
Enter the adjustment value with UP/UP key, and press START key to save the entered value.
Set range: 0 – 99 (Corresponding to the light quantity stabilization wait time 0 – 99 sec)
Default: 15 (15 sec)
13
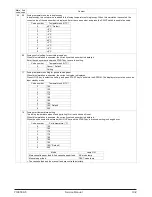
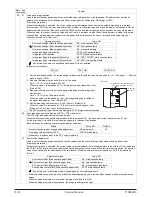
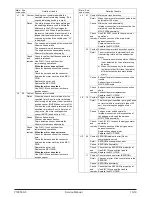
Light quantity stabilization band setting
When the difference between the minimum value and the maximum value of the light quantity levels sampled for 3.2 sec in
100msec cycle in the light quantity stabilization process on white balance is smaller than the set value of this simulation, it is
judged that the light quantity is stabilized. (Note: The magnification ratio of the AFE gain setting is automatically reflected on
the stabilization band.)
When this simulation is executed, the currently set value is displayed.
Enter the adjustment value with UP/UP key, and press START key to save the entered value.
Set range: 1 – 99 (Light quantity stabilization band: Corresponds to 1 – 99 of 4,095 gradations)
Default: 16
Main
code
Sub
code
Content
Mode
Lamp ON
Default
SPF scan position auto adjustment
AE mode lamp
50
SPF scan position manual adjustment
TEXT mode lamp
Chart back surface
1
10
10-16 Service Manual Y109500-5
Summary of Contents for d-Copia 200D
Page 1: ...d Copia 200D d Copia 201D Digital Copier SERVICE MANUAL Code Y109500 5...
Page 6: ...This page is intentionally left blank...
Page 8: ...This page is intentionally left blank 1 2 Service Manual Y109500 5...
Page 12: ...This page is intentionally left blank 2 4 Service Manual Y109500 5...
Page 22: ...This page is intentionally left blank 4 8 Service Manual Y109500 5...
Page 28: ...This page is intentionally left blank 5 6 Service Manual Y109500 5...
Page 86: ...This page is intentionally left blank 10 20 Service Manual Y109500 5...
Page 94: ...This page is intentionally left blank 12 6 Service Manual Y109500 5...
Page 96: ...UPDATING STATUS DATE UPDATED PAGES PAGES CODE 05 2008 1ST EDITION 96 Y109500 5...

