


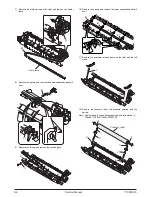

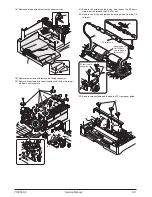

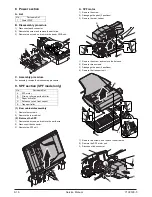

10) Move the carriage to the position indicated on the figure.
11) Loosen the screw which is fixing the tension plate.
12) Move the tension plate in the arrow direction to release the
tension, and remove the belt.
13) Remove the screw, and remove the rod stopper.
14) Remove the rod.
15) Lift the rear side of the carriage, remove the belt and the con-
nector, and remove the carriage.
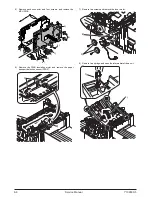
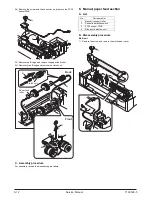
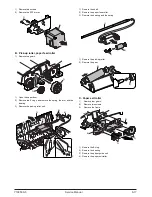
C. Assembly procedure
CCD core
1) Pass the core through the CCD-MCU harness.
2) Insert the CCD-MCU harness into the CCD PWB connector of
the carriage unit.
3) Move the core which was passed through the CCD-MCU har-
ness near the CCD PWB connector as shown in the figure
below, and fix it with a filament tape (19mm wide, 40mm long).
For the attachment reference, refer to the figure below. Clean
and remove oil from the attachment section.
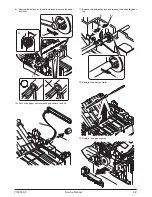
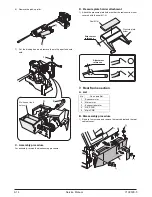
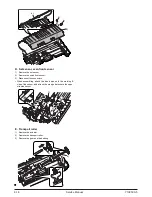
4) Attach the CCD-MCU harness to the duplex tape on the back
of the carriage unit.
5) Attach the PWB holder to the position specified in the figure
below.
6) Pass the core through the FFC and the PWB holder, and fix
the core.
1)
2)
4)
3)
1)
2)
3)
1)
2)
4)
3)
Marking line
Note: Attach the FFC
to fit with the marking line.
Note: Attach the FFC to the base
plate securely with duplex tape to
prevent against coming loose.
8-4 Service Manual Y109500-5
Summary of Contents for d-Copia 200D
Page 1: ...d Copia 200D d Copia 201D Digital Copier SERVICE MANUAL Code Y109500 5...
Page 6: ...This page is intentionally left blank...
Page 8: ...This page is intentionally left blank 1 2 Service Manual Y109500 5...
Page 12: ...This page is intentionally left blank 2 4 Service Manual Y109500 5...
Page 22: ...This page is intentionally left blank 4 8 Service Manual Y109500 5...
Page 28: ...This page is intentionally left blank 5 6 Service Manual Y109500 5...
Page 86: ...This page is intentionally left blank 10 20 Service Manual Y109500 5...
Page 94: ...This page is intentionally left blank 12 6 Service Manual Y109500 5...
Page 96: ...UPDATING STATUS DATE UPDATED PAGES PAGES CODE 05 2008 1ST EDITION 96 Y109500 5...