background image

5-35

Operation on the Machine > Scanning

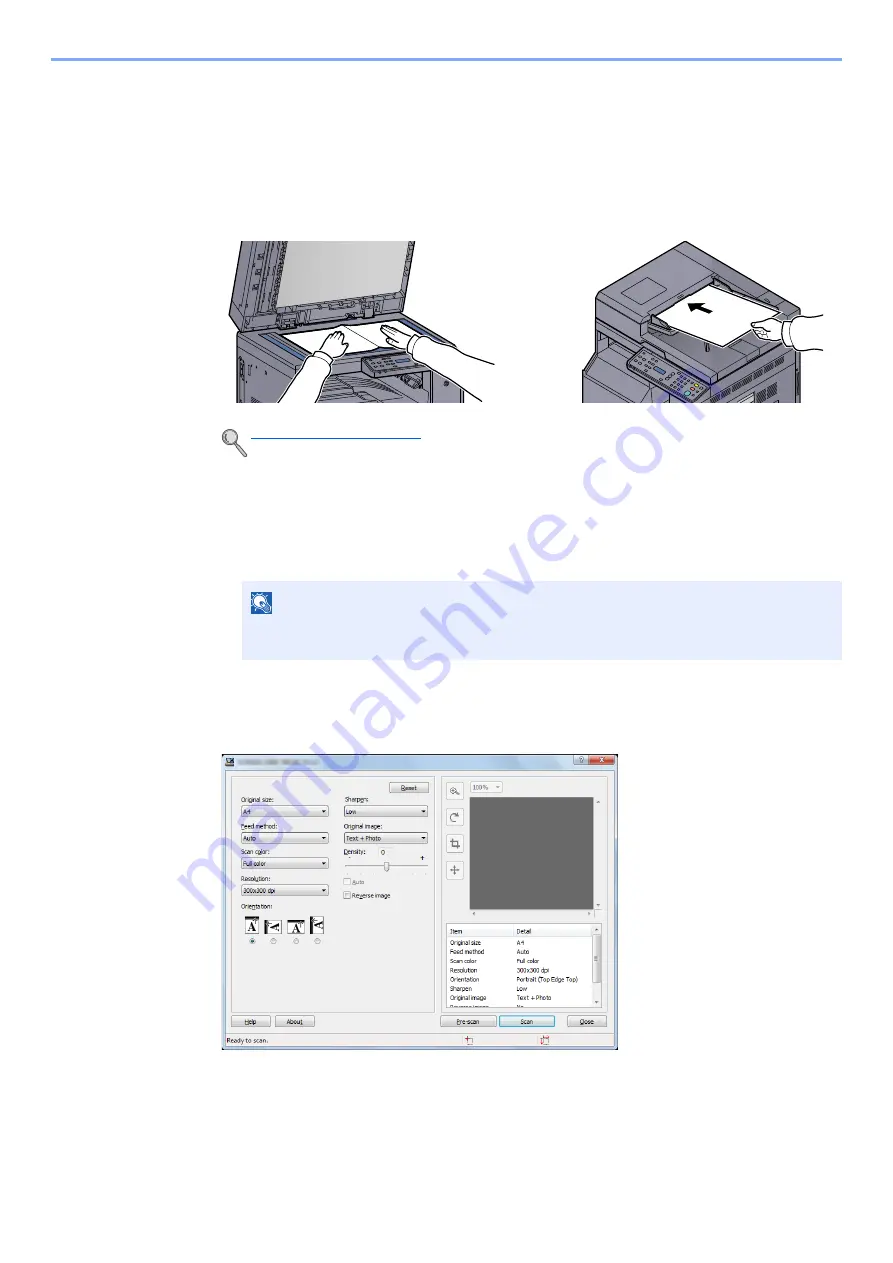
Scanning using TWAIN

This section explains how to scan an original using TWAIN.

The procedure for scanning using the TWAIN driver is explained as an example. The WIA driver is used in the same 
way.

1

Place the originals.

2

Display the screen.

1

Activate the TWAIN compatible application software.

2

Select the machine using the application and display the [

TWAIN

] dialog box.

3

Configure the scan settings.

Select scanning settings in the TWAIN dialog box that opens.

Configure the scan settings as needed. For details, refer to Help.

4

Scan the originals.

Click the [

Scan

] button. The document data is scanned.

Loading Originals (page 5-2)

NOTE

For selecting the machine, see the Operation Guide or Help for each application 
software.

Summary of Contents for d-COPIA 1801 MF

Page 1: ...NINGSVEJLEDNING BEDIENUNGSANLEITUNG H H GU A DE USO MANUEL D UTILISATION HASZN LATI TMUTAT GEBRUIKERSHANDLEIDING PODR CZNIK OBS UGI GUIA DE USO 5 3425 3 GUIA DE USO GHID DE OPERARE K YTT OPAS BRUKSANV...

Page 2: ...the conformity attested to above as well as the characteristics of the product incorrect electrical power supply incorrect installation incorrect or improper use or use not in compliance with the warn...

Page 3: ...an always be used in the optimum condition Please read this Operation Guide before using the machine We recommend the use of our own brand supplies Please use our genuine toner containers which have p...

Page 4: ......

Page 5: ...1 7 Energy Star ENERGY STAR Program 1 7 2 Installing and Setting up the Machine 2 1 Part Names 2 2 Machine Exterior 2 2 Connectors Interior 2 4 With Optional Equipments Attached 2 5 Determining the C...

Page 6: ...e Platen 5 2 Loading Originals in the Document Processor Option 5 3 Checking the Equipment s Serial Number 5 5 Copying 5 6 Basic Operation 5 6 Interrupt Copy 5 7 ID Card Copy 5 8 Using Various Functio...

Page 7: ...t Accounting Report 8 14 Using Job Accounting 8 15 Login Logout 8 15 Printing When Sharing the Printer 8 15 9 Troubleshooting 9 1 Regular Maintenance 9 2 Cleaning 9 2 Toner Container Replacement 9 3 W...

Page 8: ...v Duplex Unit Option 10 18 Glossary 10 19 Index Index 1...

Page 9: ...eparation before Use on page 3 1 Copy functions Printer functions Scan functions Output Data Input Data Operations from PC Original Electronic data Print Box functions Print Box functions allow you to...

Page 10: ...e interruption copy ends the machine resumes the paused print jobs Interrupt Copy page 5 7 Optimize your office workflow Scan originals of different sizes at a time Mixed Size Originals It is useful w...

Page 11: ...und the border of a copy when the original is scanned You can also remove the shadows that appear at the border and at the center of the copy when a book is scanned This creates a more attractive docu...

Page 12: ...documents Print Box You can temporarily save a printer document in a Print Box of your computer Printing the document from the machine can prevent someone from taking your document With a PIN code as...

Page 13: ...of the machine Safety Guide Provides safety and cautionary information for installation and use of the machine Be sure to read this guide before using the machine Safety Guide Indicates the space req...

Page 14: ...is used as a printer 5 Operation on the Machine Explains the basic procedures for using the machine such as placing originals making copies and scanning 6 Checking the Status Explains how to check the...

Page 15: ...play Press the or key to select On Regular Indicates a message or setting displayed on the computer screen You can select from the Print size menu Click to move from the current page to the previously...

Page 16: ...e this Guide Conventions used in operation procedures Operation panel keys that are pressed are outlined in red Procedures consisting of a sequence of operation panel actions or computer operations ar...

Page 17: ...zontal orientation The following icons are used to indicate original and paper placement orientations on the message display Orientation Setting Position X Width Y Length Display Indicated Size in thi...

Page 18: ...l Image page 5 14 Duplex page 5 14 Combine page 5 17 ID card Copy page 5 8 Collate Offset page 5 19 Original Size page 5 19 Orig Orientation page 5 20 Mixed Size Orig page 5 21 EcoPrint page 5 21 Back...

Page 19: ...tus page 6 10 Report Report Print Menu Map page 7 4 Status Page page 7 4 Service Status page 7 4 Counter page 2 26 System I F Block Set page 7 5 Admin Accounting Admin Setting page 2 20 Job Account Se...

Page 20: ...pe page 7 9 Cassette 4 Set Cassette 4 Size page 7 9 Cassette 4 Type page 7 9 MP Tray Set MP Tray Size page 7 9 MP Tray Type page 7 9 Media Type Set page 7 7 Auto Detect Orig page 7 7 Media for Auto pa...

Page 21: ...e Name Entry page 7 13 Continuous Scan page 7 13 Detail Settings 2 in 1 Layout page 7 14 4 in 1 Layout page 7 14 Border Line page 7 14 Orig Binding page 7 14 BookOrg Binding page 7 14 Finish Binding p...

Page 22: ...his Guide 1 2 Environment 1 3 Precautions for Use 1 3 Laser Safety Europe 1 4 Safety Instructions Regarding the Disconnection of Power 1 5 Legal Restriction on Copying Scanning 1 5 Legal Information 1...

Page 23: ...mbol indicates that the related section includes safety warnings Specific points of attention are indicated inside the symbol General warning Warning of high temperature The symbol indicates that the...

Page 24: ...urns Keep parts which contain toner out of the reach of children If toner happens to spill from parts which contain toner avoid inhalation and ingestion as well as contact with your eyes and skin If y...

Page 25: ...r In the normal operation of the product by user no radiation can leak from the machine This machine is classified as Class 1 laser product under IEC EN 60825 1 2007 Caution Performance of procedures...

Page 26: ...ying Scanning the following items is prohibited and may be penalized by low It may not be limited to these items Do not knowingly copy scan the items that are not to be copied scanned Paper money Bank...

Page 27: ...ernet Explorer are registered trademarks or trademarks of Microsoft Corporation in the U S A and or other countries Adobe Acrobat and Flash are registered trademarks of Adobe Systems Incorporated IBM...

Page 28: ...duplex printing be set to use duplex mode by default Resource Saving Paper For the preservation and sustainable use of forest resources it is recommended that recycled as well as virgin paper certifi...

Page 29: ...cessary Cables 2 6 Connecting Cables 2 7 Connecting USB Cable 2 7 Connecting the Power Cable 2 7 Power On Off 2 8 Power On 2 8 Power Off 2 9 Installing Software 2 10 Software on Product Library Disc W...

Page 30: ...onal Equipment page 10 2 1 Document Processor DP 2 Original Width Guides 3 Original Table 4 Original Eject Table 5 Slit Glass 6 Original Size Indicator Plates 7 Platen 8 Operation Panel 9 Cassette 1 1...

Page 31: ...djusting Tab 15 Paper Length Guide 16 Paper Width Guide 17 Cleaning Cloth Compartment 18 Original Stopper 19 Right Cover 1 Lever 20 Right Cover 1 21 Paper Width Guide 22 Multi Purpose Tray 23 Support...

Page 32: ...2 4 Installing and Setting up the Machine Part Names Connectors Interior 1 USB Interface Connector 2 Toner Container 3 Toner Container Lever 4 Waste Toner Box 1 4 2 3...

Page 33: ...ine Part Names With Optional Equipments Attached 1 Original Cover 2 Document Processor DP 3 Cassette 2 4 Cassette 3 5 Cassette 4 6 Duplex Unit 7 Right Cover 2 8 Right Cover 3 9 Right Cover 4 Optional...

Page 34: ...ample Connect the machine to the PC by referring to the illustration below Preparing Necessary Cables Prepare the necessary cables according to the interface you use Available Standard Interfaces Conn...

Page 35: ...erface connector located on the left side of the body 2 Connect the other end of the cable to the PC Connecting the Power Cable Connect one end of the supplied power cable to the machine and the other...

Page 36: ...or is lit Recovery from sleep Press any key on the operation panel When the Energy Saver indicator is off Turn the power switch on IMPORTANT When turning off the power switch do not turn on the power...

Page 37: ...ed period of time Sleep and Sleep Timer page 2 22 IMPORTANT When the Processing indicator is lit up or blinked the machine is operating Turning off the power switch while the machine is operating may...

Page 38: ...XML Paper Specification format developed by Microsoft Corporation GX DRIVER Driver for printing files on a computer using the machine This printer driver enables full use of the machine s features TWA...

Page 39: ...port and select the software to be installed 1 Insert the Product Library disc 2 Display the screen Click View License Agreement and read the License Agreement Click Accept The following procedures v...

Page 40: ...2 19 NOTE The machine cannot be detected unless it is on If the computer fails to detect the machine verify that it is connected to the computer via a USB cable and that it is turned on and click Relo...

Page 41: ...between icon and text display This button is used to select multiple items If the target device is not displayed press this button to directly select the device to be used 2 Select the device to be in...

Page 42: ...he printer driver installation procedure If you are installing the TWAIN driver or WIA driver continue by configuring the Quick Scan TWAIN Settings on page 7 23 or Setting WIA Driver on page 2 19 NOTE...

Page 43: ...Uninstall Olivetti Product Library 2 Uninstall the software Place a check in the check box of the software to be deleted 3 Finish uninstalling If a system restart message appears restart the computer...

Page 44: ...on Desktop and select Control Panel and then Devices and Printers 2 Right click the printer driver icon of the machine and click the Printer properties menu of the printer driver 3 Select Share this...

Page 45: ...icon 2 Display the screen Double click OS X 10 5 or higher and Olivetti OS X 10 5 3 Install the Software Install the printer driver as directed by the instructions in the installation software This c...

Page 46: ...nctions Accessing Client Tool Start Client Tool In Windows 8 select Search in charms Apps and then Client Tool Function Description Reference Page Print Access to printing preferences and machine driv...

Page 47: ...ras in the search list then the Scanners and Cameras screen appears In Windows 8 click Search in charms and then Settings and enter Scanner in the search box Click View scanners and cameras in the sea...

Page 48: ...t ID Refer to Login Logout on page 8 15 1 Enter the login user name If this screen is displayed during operations enter the login user name using the numeric keys and press the OK key 2 Enter the logi...

Page 49: ...OK key 5 Press the or key to select Yes and press the OK key The login user name and login password for the administrator are changed NOTE If the login user name entry screen appears during operation...

Page 50: ...performed while the message display remains unlit To use the machine press any key on the operation panel The machine will be ready to operate within 11 seconds Note that ambient environmental conditi...

Page 51: ...e refer to Power Off Rule on page 7 12 and Power Off Timer on page 7 12 To use the Power Off Timer configure the following settings Power Off Rule page 2 23 Power Off Timer page 2 24 Power Off Rule Fo...

Page 52: ...below to select the length of time before the machine shuts off automatically when not in use 1 Display the screen 1 Press the Status System Menu Counter key NOTE If the login user name entry screen...

Page 53: ...select the power off time and press the OK key NOTE If the login user name entry screen appears during operations log in by referring to Administrator User Name and Password on page 2 20 The factory...

Page 54: ...ey to check the number of sheets printed and scanned 1 Display the screen 1 Press the Status System Menu Counter key 2 Press the or key to select Counter and press the OK key 2 Check the counter Press...

Page 55: ...ns Using the Operation Panel 3 2 Operation Panel Keys 3 2 Operation Method 3 3 Display for Originals and Paper 3 4 Loading Paper 3 5 Before Loading Paper 3 6 Loading in the Cassettes 3 7 Loading Paper...

Page 56: ...ing operations Displays the Interrupt Copy screen Displays the function menu for copy Increments or decrements numbers or selects menu in the message display In addition moves the cursor when entering...

Page 57: ...to select a menu Press the or key to select a menu Press the or key to move to the previous or next menu When OK is displayed press the OK key to confirm the selection Common Settings Language Press...

Page 58: ...efore Use Using the Operation Panel Display for Originals and Paper The copy screen displays the selected paper source Ready to copy A4 A4 1 Original size Paper source Original orientation Paper size...

Page 59: ...ad methods for each cassette refer to the page below No Cassettes Page 1 Cassette 1 page 3 7 2 Cassette 2 page 3 7 3 Cassette 3 page 3 7 4 Cassette 4 page 3 7 5 Multi Purpose Tray page 3 10 NOTE The n...

Page 60: ...exposing opened paper to high temperatures and high humidity as dampness can be a cause of problems Seal any remaining paper after loading in the multi purpose tray or cassettes back in the paper stor...

Page 61: ...you until it stops 2 Push down on the cassette base plate and secure it IMPORTANT When using media types other than plain paper such as recycled or colored paper always specify the media type and pape...

Page 62: ...guide and move the guide to fit the length of the paper Paper sizes are marked on the cassette 4 Load paper 1 Set the paper strait from the upper part IMPORTANT Make sure that the width guides are flu...

Page 63: ...the loaded paper does not exceed the level indicator see illustration below The paper length and width guides must be adjusted to the paper size before loading the paper Loading the paper without adju...

Page 64: ...i 2 5 sheets 1 Open the multi purpose tray Pull out the MP tray extension to match the paper size Refer to the label which sealed inside the machine when opening the MP tray IMPORTANT When using media...

Page 65: ...be uncurled before use Straighten the top edge if it is curled When loading paper into the multi purpose tray check that there is no paper left over in the tray from a previous job before loading the...

Page 66: ...w to load envelopes orientation and facing will differ depending on the type of envelope Be sure to load it in correctly otherwise printing may be done in the wrong direction or on the wrong face NOTE...

Page 67: ...Press the Status System Menu Counter key 2 Press the or key to select Common Settings and press the OK key 3 Press the or key to select Orig Paper Set and press the OK key Selection Item Selectable S...

Page 68: ...ss the OK key To select the paper size press the or key to select Standard Size and press the OK key Press the or key to select the paper size and press the OK key 2 Press the Back key 3 Specify the m...

Page 69: ...O B5 Envelope 10 Envelope 9 Envelope 6 Envelope Monarch Envelope DL Envelope C5 Envelope C4 Hagaki Oufukuhagaki Youkei 4 Youkei 2 Custom 1 1 For instructions on how to specify the custom paper size re...

Page 70: ...ard sizes press the or key to select Size Entry and press the OK key Use the numeric keys or press the or key to enter the paper length and press the OK key Use the numeric keys or press the or key to...

Page 71: ...3 17 Preparation before Use Loading Paper 2 Press the or key to select the media type and press the OK key MP Tray Type Plain 2 1...

Page 72: ...topics Printing from PC 4 2 Printer Driver Print Settings 4 5 Printer Driver Help 4 6 Changing the Default Printer Driver Settings Windows 7 4 6 Canceling Jobs 4 6 Using Print Box 4 8 Saving Document...

Page 73: ...click the Properties button NOTE To print the document from applications install the printer driver on your computer from the supplied Product Library disc In some environments the current settings ar...

Page 74: ...ou loaded a paper size that is not included in the print sizes of the machine register the paper size in the Basic tab of the print settings screen of the printer driver The registered size can be sel...

Page 75: ...PC Printing from PC 8 Click MP tray in the Source menu 9 Select the type of paper in the Media type menu NOTE If you loaded a postcard or envelope select Cardstock or Envelope in the Media type menu...

Page 76: ...including booklet printing combine mode poster printing and scaling Finishing tab This tab lets you offset printed media Imaging tab This tab lets you configure settings related to the quality of the...

Page 77: ...ss the F1 key on your keyboard Changing the Default Printer Driver Settings Windows 7 The default printer driver settings can be changed By selecting frequently used settings you can omit steps when p...

Page 78: ...u can cancel the job by following the steps below 1 Double click the printer icon displayed on the taskbar at the bottom right of the Windows desktop to display a dialog box for the printer 2 Click th...

Page 79: ...Boxes A maximum of 10 Print Boxes Box 01 to 10 can be set by using Client Tool When connecting the computer Host PC connected to the machine via USB to the computer on the network Client PC and using...

Page 80: ...machine security is enhanced 1 Start Client Tool on the Host PC Refer to Accessing Client Tool on page 2 18 2 Display the screen on your PC 1 Click File and select Print in the application 2 Select th...

Page 81: ...t Box are printed Client Tool must be running on the computer from which printing from Print Box is executed Refer to Accessing Client Tool on page 2 18 After being printed the documents in the Print...

Page 82: ...t Processor Option 5 3 Checking the Equipment s Serial Number 5 5 Copying 5 6 Basic Operation 5 6 Interrupt Copy 5 7 ID Card Copy 5 8 Using Various Functions 5 10 Program 5 25 Canceling Jobs 5 29 Scan...

Page 83: ...e the optional original cover or document processor open as there is a danger of personal injury IMPORTANT Do not push the optional original cover or document processor forcefully when you close it Ex...

Page 84: ...ections Crumpled paper Originals with folds Straighten the folds before loading Failure to do so may cause the originals to jam Originals bound with clips or staples Remove the clips or staples and st...

Page 85: ...tion refer to Orig Orientation Original Orientation on page 5 20 IMPORTANT Confirm that the original width guides exactly fit the originals If there is a gap readjust the original width guides The gap...

Page 86: ...Equipment s Serial Number The equipment s serial number is printed in the location shown in the figure NOTE You ll need the equipment s serial number when contacting your Service Representative Pleas...

Page 87: ...e 3 Select the functions Select the copier functions to use 4 Use the numeric keys to enter the copy quantity Specify the desired number up to 999 5 Press the Start key Copying starts NOTE For loading...

Page 88: ...y 3 Select the functions Select the copier functions to use 4 Press the Start key Interrupt copying starts 5 When interrupt copying ends press the Interrupt key The machine resumes the paused print jo...

Page 89: ...the or key to select On and press the OK key 2 Place the original Align with the ID Card marks on the Original Size Indicator Plates 3 Select the functions Select the copier functions to use 4 Use the...

Page 90: ...ard is scanned 6 Turn the original over Align with the ID Card marks on the Original Size Indicator Plates 7 Press the Start key The front and back sides of the card are copied on one sheet of paper T...

Page 91: ...usts the zoom to reduce or enlarge the image page 5 13 Density Adjust density page 5 14 Original Image Select original image type page 5 14 Duplex 1 1 The optional duplex unit and document processor a...

Page 92: ...even if they are of different sizes page 5 21 EcoPrint Saves toner when printing page 5 21 Backgrnd Density Removes dark background from originals such as newspapers page 5 21 Margin Adds margin white...

Page 93: ...ustom paper sizes refer to Custom PaperSize on page 7 7 Select from the standard size Size Entry Set the sizes of Y vertical Metric 98 to 297 mm in 1 mm increments Inch 3 86 to 11 69 in 0 01 increment...

Page 94: ...in 400 Max 200 A5 A3 141 A4 A3 A5 A4 127 Folio A3 106 11 15 A3 Metric Asia Pacific 100 86 A3 B4 A4 B5 81 B4 A4 B5 A5 70 A3 A4 B4 B5 50 25 Min 400 Max 200 A5 A3 141 A4 A3 B5 B4 122 A4 B4 A5 B5 115 B4 A...

Page 95: ...t to Binding Left Right Images on the second sides are not rotated B Original Left Right to Binding Top Images on the second sides are rotated 180 degrees Copies can be bound on the top edge facing th...

Page 96: ...on for original and finished documents NOTE The paper sizes supported in Two sided to Two sided mode are A3 B4 A4 A4 R B5 B5 R A5 R Ledger Legal Letter Letter R Executive Statement R Oficio II 216 340...

Page 97: ...Orig Orientation Top Edge on Top Top Edge on Left Select the orientation of the original document top edge to scan correct direction Choose orientation of the originals either Top Edge on Top or Top E...

Page 98: ...the page boundary line and press the OK key Orig Orientation Top Edge on Top Top Edge on Left Select the orientation of the original document top edge to scan correct direction Choose orientation of...

Page 99: ...The paper sizes supported in Combine mode are A3 A4 R A4 A5 R B4 B5 R B5 Folio 216 340 mm Ledger Letter R Letter Legal Statement R Oficio II 8K 16K R and 16K When placing the original on the platen b...

Page 100: ...et are A4 B5 Letter and 16K Offset Each Set When offsetting is used printed copies are produced after rotating each set by 90 degrees NOTE To use offsetting the same size of paper as the selected pape...

Page 101: ...ollowing functions the document s original orientation must be set Duplex Margin Combine Select original orientation from Top Edge on Top or Top Edge on Left Item Image Top Edge on Top Top Edge on Lef...

Page 102: ...s or any other occasion when high quality print is not required Backgrnd Density Background Density Removes dark background from originals such as newspapers NOTE The optional document processor is re...

Page 103: ...rement on page 7 11 Top Bottom Metric 18 mm to 18 mm in 1 mm increments Inch 0 75 to 0 75 in 0 01 increments Set the margin width 1 Use the numeric keys or press the or key to enter the margins for To...

Page 104: ...ge 7 13 Book Advanced Erase Changes the settings Sheet Border Metric 0 mm to 50 mm in 1 mm increments Inch 0 00 to 2 00 in 0 01 increments Set the border erase width 1 Use the numeric keys or press th...

Page 105: ...ntry Adds a file name Additional information such as job number can also be set You can check a job history or job status using the file name or job number specified here Enter the file name up to 32...

Page 106: ...u want to register in a program For the settings of functions refer to Using Various Functions on page 5 10 2 Register the program 1 Press the Program key 2 Press the or key to select a program number...

Page 107: ...ess the or key to select a program number 01 to 04 to recall and press the OK key 3 Press the or key to select Recall and press the OK key 2 Execute the program Place the originals and press the Start...

Page 108: ...ey 2 Press the or key to select a program number 01 to 04 to edit and press the OK key 2 Edit the program name 1 Press the or key to select Edit Name and press the OK key 2 Enter a program name using...

Page 109: ...ation on the Machine Copying 2 Delete the program 1 Press the or key to select Delete and press the OK key 2 Press the or key to select Yes in the confirmation screen and press the OK key Program 01 D...

Page 110: ...5 29 Operation on the Machine Copying Canceling Jobs You can cancel jobs by pressing the Stop key The copy job is canceled...

Page 111: ...hen saving an image in a location other than My Documents the destination needs to be set beforehand by using Client Tool If the shared folder in the computer Client PC on the network is selected for...

Page 112: ...can the following 3 types of scan are possible Scan to PDF Saves the scanned image in PDF format Scan to Email Attaches the scanned image to a new E mail message Scan to Folder Saves the scanned image...

Page 113: ...set for the destination Scanning can be performed without preparing the destination 1 Start Client Tool on the Host PC Refer to Accessing Client Tool on page 2 18 2 Press the Scan key on the machine 3...

Page 114: ...Default Settings on the PC Client Tool on page 7 16 1 Start Client Tool on the Host PC Refer to Accessing Client Tool on page 2 18 2 Press the Scan key on the machine 3 Place the originals 4 Select th...

Page 115: ...1 Start Client Tool as explained in Accessing Client Tool on page 2 18 2 Click Scan to PDF Scan to Email or Scan to Folder icon on the Scan tab Scan to PDF Scanning starts When scanning finishes the...

Page 116: ...1 Activate the TWAIN compatible application software 2 Select the machine using the application and display the TWAIN dialog box 3 Configure the scan settings Select scanning settings in the TWAIN di...

Page 117: ...5 36 Operation on the Machine Scanning Canceling Jobs You can cancel jobs by pressing the Stop key...

Page 118: ...ollowing topics Checking Job Status 6 2 Checking Job History 6 4 Pause and Resumption of Jobs 6 7 Canceling the Jobs in Printing Waiting 6 8 Checking Device Status 6 9 Checking the Remaining Amount of...

Page 119: ...tatus System Menu Counter key 2 Press the or key to select Status and press the OK key 3 Press the or key to select Print Job Status and press the OK key 2 Select the job you want to check 1 Press the...

Page 120: ...previous screen Item Description Status Status of job Processing The status before starting to print Pause Pausing print job or error Canceling Canceling the job Job Name Job Type Copy Copy job Print...

Page 121: ...y 2 Press the or key to select Status and press the OK key 3 Press the or key to select Print Job Log or Send Job Log and press the OK key 2 Select the job you want to check Press the or key to select...

Page 122: ...has been canceled Job Name Job Type Copy Copy job Printer Printer job Report Report List Page and Copy Number of pages printed Number of copies printed Total number of copies to be printed Press the...

Page 123: ...ears during operations log in by referring to Administrator User Name and Password on page 2 20 The factory default login user name and login password are set as shown below Login User Name Login Pass...

Page 124: ...int jobs and press the OK key Printing is paused When resuming the printing of jobs that have been paused press the or key to select Resume print jobs and press the OK key NOTE If the Back key or othe...

Page 125: ...nt job remains on a PC you can cancel the job by following the steps below 1 Double click the printer icon displayed on the taskbar at the bottom right of the Windows desktop to display a dialog box f...

Page 126: ...ner or Printer Then press the OK key to show the status of the selected device Scanner Printer Item Description Ready The device is ready Pausing The device is being paused Scanning The device is scan...

Page 127: ...Status You can check the remaining amount of toner level from 100 to 0 10 increments Paper Status Press the or key to select a paper source from Cassette 1 to 4 or MP Tray Then press the OK key to sh...

Page 128: ...check the current status of the machine from the Client Tool No Item Description 1 Machine status Show a 3D image of the selected machine and its current status Click Refresh to refresh the machine s...

Page 129: ...3 Report 7 4 System 7 5 Admin Accounting 7 5 Common Settings 7 5 Copy 7 14 Printer 7 15 Adjust Maint Adjustment Maintenance 7 15 Default Settings on the PC Client Tool 7 16 Operation Method 7 16 Scre...

Page 130: ...age 3 3 NOTE If the login user name entry screen appears during operations log in by referring to Administrator User Name and Password on page 2 20 The factory default login user name and login passwo...

Page 131: ...display page 7 5 Default Screen Select the screen appearing right after start up default screen page 7 6 Sound Set options for buzzer sound during the machine operations page 7 6 Display Bright Set th...

Page 132: ...before the report can be printed Report Report Print Item Description Report Print Menu Map Prints Menu Map to check the settings of the machine Status Page Prints the status page allowing you to che...

Page 133: ...nistrator Setting page 2 20 Job Accounting page 8 1 Unknown ID Job page 8 11 Common Settings Configure overall machine operation Language System I F Block Set Item Description I F Block Set USB Device...

Page 134: ...pressed on the operation panel Value Off On Job Finish Emit a sound when a print job is normally completed Value Off On Ready Emit a sound when the warm up is completed Value Off On Warning Emit a so...

Page 135: ...assette 1 to 4 Set Select the paper size and media type for cassettes For information on how to select the paper size and media type refer to Cassette 1 to 4 Set Cassette 1 to 4 Settings on page 7 9 M...

Page 136: ...rce Select paper cassette for default setting Value Cassette 1 to 4 MP Tray NOTE Cassette 2 Cassette 3 and Cassette 4 are displayed when the optional paper feeder is installed SpcialPaper Act When pri...

Page 137: ...Recycled Preprinted 2 Bond Color Prepunched 2 Letterhead 2 Thick 106 to 128 g m High Quality Custom 1 8 2 To print on preprinted or prepunched paper or on letterhead refer to SpcialPaper Act on page...

Page 138: ...or the cassettes Y 1 Y 1 default Rough Y Y Y Y default Y 1 Y 1 N Vellum Y default Y Y Y N N N Labels Y 1 Y 1 Y 1 Y 1 Y 1 default Y 1 Y 1 Recycled Y Y Y default Y N N N Preprinted Y Y Y default Y N N N...

Page 139: ...Settings Error Handling Item Description Error Handling DuplexPaperError Set what to do when duplex printing is not possible for the selected paper sizes and media types Value 1 sided Printed in 1 sid...

Page 140: ...pt Clear Set the period after which the machine reverts to Normal mode when it has been set to Interrupt Copy mode and then left unused Value 5 to 495 seconds in 5 second increments Power Off Rule Sel...

Page 141: ...0 mm in 1 mm increments Inch 0 to 2 in 0 01 increments NOTE To specify border erase widths around original set the value in Border To specify border erase widths in the middle of original set the valu...

Page 142: ...ight Top BookOrg Binding Set the default for the binding orientation of open book originals to produce two sided copies Value Left Right Finish Binding Set the default for the binding orientation of f...

Page 143: ...evels Value Darker 3 Darker 2 Darker 1 Normal 0 Lighter 1 Lighter 2 Lighter 3 Scan Adjust scan density Adjustment can be made in 7 levels Value Darker 3 Darker 2 Darker 1 Normal 0 Lighter 1 Lighter 2...

Page 144: ...rovided Product Library disc Operation Method Configure the settings on the Client Tool as follows 1 Access the Client Tool For more information refer to Accessing Client Tool on page 2 18 2 Select th...

Page 145: ...ailable options such as configuration maintenance and driver download 2 Print Access to printing preferences and machine driver properties Preferences Open the Printing Preferences screen for the sele...

Page 146: ...uick Scan function Performing this function saves the scanned image to a specified folder page 5 34 5 Maintenance Order replacement toner view our web site and download software Order Toner You can or...

Page 147: ...t icon is displayed on the Supplies tab at the bottom of Client Tool screen Enable event notification Select to activate the notification feature for selected machine events When selected notification...

Page 148: ...lue Auto A3 A4 A5 A6 B4 B5 JIS B6 Folio 216 340 mm Ledger Letter Legal Statement 11 15 Oficio II 8K 16K Hagaki Oufuku Hagaki Custom NOTE Refer to Custom Orig Size on page 7 7 for selecting Custom Orig...

Page 149: ...k Image Mask File format settings The item displayed changes depending on the value specified for File format Quality Set the image quality Increasing the number results in higher quality and decreasi...

Page 150: ...where the scanned image will be saved To select the folder click Browse to open Browse for Folder The default settings are shown below C Users user My Documents on Windows Vista Windows 7 Windows 8 C...

Page 151: ...ig Size on page 7 7 for selecting Custom 2 Feed method 1 1 The optional document processor is required Select the original feed method Value Auto Document processor Platen 2 sided Binding Top 2 sided...

Page 152: ...creen 12 Authentication Enter assigned account ID to manage the scan count accumulated of Quick Scan TWAIN jobs by using job accounting 13 OK Close Clicking OK exits the TWAIN Settings after applying...

Page 153: ...ile formats Non numeric characters cannot be entered If entered number is beyond range the max min value will be restored PDF A 1 Set PDF A 1 format type Value Off PDF A 1a PDF A 1b Quality Stage Set...

Page 154: ...gs of the selected box Name Set a name for the Print Box Up to 16 characters can be entered This name is displayed when you select a Print Box on the machine operation panel NOTE If a document is stor...

Page 155: ...Restricting the Use of the Machine 8 6 Editing an Account 8 7 Deleting an Account 8 8 Job Accounting when Sharing the Printer 8 9 Unknown ID Job 8 11 Configuring Job Accounting 8 12 Default Setting 8...

Page 156: ...nage the scan job account by using WIA you need to configure the WIA driver settings on the computer Host PC connected to the machine via USB Refer to Setting WIA Driver on page 2 19 NOTE When using t...

Page 157: ...ress the OK key NOTE If the login user name entry screen appears during operations log in by referring to Administrator User Name and Password on page 2 20 The factory default login user name and logi...

Page 158: ...nd press the OK key Item Descriptions Account Name Enter the account name up to 32 characters Account ID Enter the account ID as many as eight digits between 0 and 99999999 Restriction This prohibits...

Page 159: ...restriction to the account ID press the or key to select Detail and press the OK key To exit the operation press the or key to select Exit and press the OK key NOTE Refer to Character Entry Method on...

Page 160: ...one page increments up to 9 999 999 copies 1 Reject Usage Restriction is applied Scan Restrict Limits the number of sheets scanned excludes copying Value Off No restriction is applied Counter Limit R...

Page 161: ...account you want to change and press the OK key 2 Press the or key to select Detail Edit and press the OK key 3 Refer to step 2 of Adding an Account on page 8 4 and Restricting the Use of the Machine...

Page 162: ...e account you want to delete and press the OK key 2 Press the or key to select Delete and press the OK key 3 Press the or key to select Yes in the confirmation screen and press the OK key The account...

Page 163: ...ollows 1 Display the screen 1 Click Start button on the Windows and then click Devices and Printers In Windows 8 select Settings in charms on Desktop and select Control Panel and then Devices and Prin...

Page 164: ...tab 4 Click the OK button NOTE If Prompt for account ID is set the screen for entering the Account ID appears when printing from the Client PC When printing from the Client PC refer to Printing When...

Page 165: ...r key to select Unknown ID Job and press the OK key 2 Press the or key to select Permit or Reject and press the OK key Item Descriptions Permit The job is permitted to be printed Reject The job is rej...

Page 166: ...99 999 The items that can be set differ depending on whether Split or Total is selected for Copy Print Count Split selected for Copy Printer Count Copy Restrict Sets the default restriction on the num...

Page 167: ...escriptions Printed Pages Displays the number of pages copied and printed and the total number of pages used You can also use Duplex Pages and Combine Pages to check the number of pages used Copy Prin...

Page 168: ...he Status System Menu Counter key 2 Press the or key to select Admin Accounting and press the OK key 3 Press the or key to select Job Account Set and press the OK key 3 Print the report 1 Press the or...

Page 169: ...the rest of the steps Logout When the operations are complete press the Logout key to return to the account ID entry screen Printing When Sharing the Printer If the following account ID entry screen a...

Page 170: ...er explains the following topics Regular Maintenance 9 2 Cleaning 9 2 Toner Container Replacement 9 3 Waste Toner Box Replacement 9 6 Troubleshooting 9 8 Solving Malfunctions 9 8 Responding to Message...

Page 171: ...a soft cloth dampened with alcohol or mild detergent Slit Glass When using the document processor clean the slit glass surface and the reading guide with the dry accessory cloth Dirt on the slit glas...

Page 172: ...ay cause burns NOTE For the toner container always use a genuine toner container Using a toner container that is not genuine may cause image defects and product failure The memory chip in the toner co...

Page 173: ...9 4 Troubleshooting Regular Maintenance 4 5 6 7 IMPORTANT Shake the toner container according to the procedure and place the container in position...

Page 174: ...8 9 10 NOTE Return the exhausted toner container and waste toner box to your dealer or service representative The collected toner container and waste toner box will be recycled or disposed in accorda...

Page 175: ...toner container replace the waste toner box as well You also need to replace the waste toner box when WasteTonerBox is full or not installed is displayed on the message display 1 2 3 4 CAUTION Do not...

Page 176: ...ce 5 6 7 8 NOTE Return the exhausted toner container and waste toner box to your dealer or service representative The collected toner container and waste toner box will be recycled or disposed in acco...

Page 177: ...ne in Sleep mode Press any key on the operation panel to recover the machine from Sleep mode page 2 22 Blank sheets are ejected Are the originals loaded correctly When placing originals on the platen...

Page 178: ...ty Select appropriate density level page 5 14 page 7 15 Is the toner distributed evenly within the toner container Shake the toner container from side to side several times page 9 3 Is EcoPrint mode e...

Page 179: ...nal is scanned Is the original cover or the glass platen dirty Clean the original cover or the glass platen page 9 2 Printouts have vertical lines Is the slit glass dirty Clean the slit glass page 9 2...

Page 180: ...lear the error Even if the error is not cleared contact your service representative Message Display Checkpoints Corrective Actions Reference Page Add toner Toner is empty Replace the toner container p...

Page 181: ...by job accounting exceeded The printing count exceeded the acceptable count restricted by job accounting Cannot print any more This job is canceled Press the OK key Message Display Checkpoints Correct...

Page 182: ...multaneously for 3 seconds or more Message Display Checkpoints Corrective Actions Reference Page PaperJam Cassette 1 to 4 A paper jam has occurred Refer to Clearing Paper Jams on page 9 16 and remove...

Page 183: ...Scanner memory is full Scanning cannot be performed any more due to insufficient memory of scanner Press the OK key to cancel the job Set another cassette Have you selected Offset To use offsetting t...

Page 184: ...n the PC power on Cannot find Client Tool Press the OK key and open Client Tool page 2 18 Message Display Checkpoints Corrective Actions Reference Page WasteTonerBox is full or not installed The waste...

Page 185: ...e machine Scraps of paper left in the machine could cause subsequent jamming After clearing the paper jam close the cassette and cover in the reverse procedure Error Message Paper Jam Location Referen...

Page 186: ...ocedures for handling a paper jam in Cassettes 2 3 and 4 are all the same This section explains procedures using Cassette 2 as an example Multi purpose tray 1 2 NOTE If you cannot remove the paper do...

Page 187: ...9 18 Troubleshooting Troubleshooting Inside Right Cover 1 1 2 3 4...

Page 188: ...ling a paper jam in Right Covers 2 and 3 are all the same This section explains procedures using Right Cover 2 as an example Document Processor 1 2 3 NOTE If the original is difficult to remove turn t...

Page 189: ...he Numeric Keys 10 4 Entering Symbols 10 5 Entering Characters 10 6 Paper 10 7 Basic Paper Specifications 10 7 Choosing the Appropriate Paper 10 8 Special Paper 10 11 Specifications 10 15 Common Funct...

Page 190: ...10 2 Appendix Optional Equipment Optional Equipment Overview of Optional Equipment The following optional equipment is available for the machine 1 DP 480 2 DU 480 1 PLATEN COVER TYPE H 3 PF 480...

Page 191: ...the PLATEN COVER TYPE H 2 DU 480 Duplex Unit Installing the duplex unit allows you to produce two sided copies Two sided copies are available in sizes A3 to A5 R Folio Ledger to Statement R Executive...

Page 192: ...eys Press to enter characters and symbols 4 key Press to move the cursor backward 5 OK key Press to finalize entry and return to the screen before the entry To enter a symbol press to confirm the sele...

Page 193: ...ry p q r s P Q R S 7 Repeats from the first character on the left 7 During number entry t u v T U V 8 Repeats from the first character on the left 8 During number entry w x y z W X Y Z 9 Repeats from...

Page 194: ...is entered 2 Press the key r changes to R 3 Press the key The cursor moves to the right 4 Press the key Displays the symbol list 5 Press the or key to move the cursor and select 6 Press the OK key is...

Page 195: ...the quality of paper Poor quality paper may result in unsatisfactory output Basic Paper Specifications The following table lists the specifications of paper that is supported with this machine Refer...

Page 196: ...ure to use the standard paper that contains at least 80 pulp i e not more than 20 of the total paper content consists of cotton or other fibers Supported Paper Sizes Paper of the following sizes is su...

Page 197: ...w the paper is supplied the electrostatic chargeability of the paper and how the toner adheres Paper moisture content varies depending on the relative humidity in the room High relative humidity cause...

Page 198: ...ss Paper whiteness affects print contrast Use whiter paper for sharper brighter copies Quality Machine problems may occur if sheet sizes are not uniform or if corners are not square edges are rough sh...

Page 199: ...quality of special paper Thus special paper is more likely than regular paper to cause printing problems Before purchasing special paper in volume try testing a sample to ensure the print quality is...

Page 200: ...by the force applied in the machine The carrier sheet bears the top sheet until the label is used This composition of labels may cause more problems The label surface must be covered completely with...

Page 201: ...in which the adhesive is exposed after the top layer is peeled off Serious damage may be caused if the paper covering the adhesive comes off in the machine Do not use envelopes with certain special f...

Page 202: ...ng It must be resistant to silicone oil as well Do not use paper with a treated surface such as glossy paper used for calendars Recycled Paper Recycled paper must conform to the specifications listed...

Page 203: ...C5 Envelope C4 Envelope 10 Envelope 9 Envelope 6 3 4 Envelope Monarch Youkei 2 Youkei 4 Ledger Legal Oficio II Letter Letter R Statement R Executive Folio 216 340 mm 8K 16K 16K R Size Entry Metric X...

Page 204: ...eets min 11 sheets min A3 Ledger 7 sheets min 9 sheets min B4 Legal 7 sheets min 10 sheets min B5 13 sheets min 16 sheets min B5 R 11 sheets min 11 sheets min A5 R 9 sheets min 9 sheets min A6 R 9 she...

Page 205: ...300dpi 1 sided B W 22 Images min Grayscale 14 Images min Color 14 Images min 2 sided B W 8 Images min Grayscale 6 Images min Color 6 Images min A4 landscape Image quality Text Photo original Interfac...

Page 206: ...Prepunched Letterhead Thick High Quality Custom 1 to 8 Dimensions W D H 22 1 4 20 1 2 5 7 8 565 520 148 5 mm Weight 13 2 lbs 6 kg Item Description Paper Size A3 B4 A4 A4 R B5 B5 R A5 R Ledger Legal Of...

Page 207: ...ng white and black for 8 bits and 65 536 gray levels for 16 bits Multi Purpose MP Tray The paper supply tray on the right side of the machine Use this tray instead of the cassettes when printing onto...

Page 208: ...adopted on a large amount of graphic software e g Adobe Photoshop and OCR software USB Universal Serial Bus 2 0 A USB interface standard for Hi Speed USB 2 0 The maximum transfer rate is 480 Mbps Thi...

Page 209: ...Amount of Toner 6 10 Cleaning Original Cover Glass Platen 9 2 Slit Glass 9 2 Cleaning Cloth Compartment 2 3 Collate Offset 5 19 Default 7 13 Colored Paper 10 13 Combine 5 17 Common Settings 7 5 Defaul...

Page 210: ...Screens 6 2 Pause and Resumption 6 7 Job Accounting Adding an Account 8 4 Copy Print Count 8 12 Counting the Number of Pages Printed 8 13 Default Setting 8 12 Deleting an Account 8 8 Editing an Accou...

Page 211: ...ings 7 10 MP Tray 7 9 Size and Media Type 3 13 7 7 10 7 Special Paper 10 11 Special Paper Action 7 8 Specifications 10 7 Weight 7 10 Paper Feeder 300 sheet 10 3 Paper Jams 9 16 Cassette 1 9 17 Cassett...

Page 212: ...0 15 Common Functions 10 15 Copy Functions 10 16 Document Processor 10 17 Duplex Unit 10 18 Paper Feeder 300 sheet 10 18 Printer Functions 10 16 Scanner Functions 10 17 Status 6 1 Client Tool 6 11 Pap...

Page 213: ......

Page 214: ...you need and the instructions for handling the waste correctly for example location and times of the waste collection centres etc b When you purchase a new device of ours give a used device similar t...

Page 215: ...s and methods of measurement EN 61000 3 2 2006 A1 2009 A2 2009 Electromagnetic Compatibility EMC Part 3 Limits Section 2 Limits for harmonic current emissions equipment input current 16 A per phase EN...

Reviews: