background image

2021-03-23 / Rev. 10 

VV016042 

36


9.7.1.3 

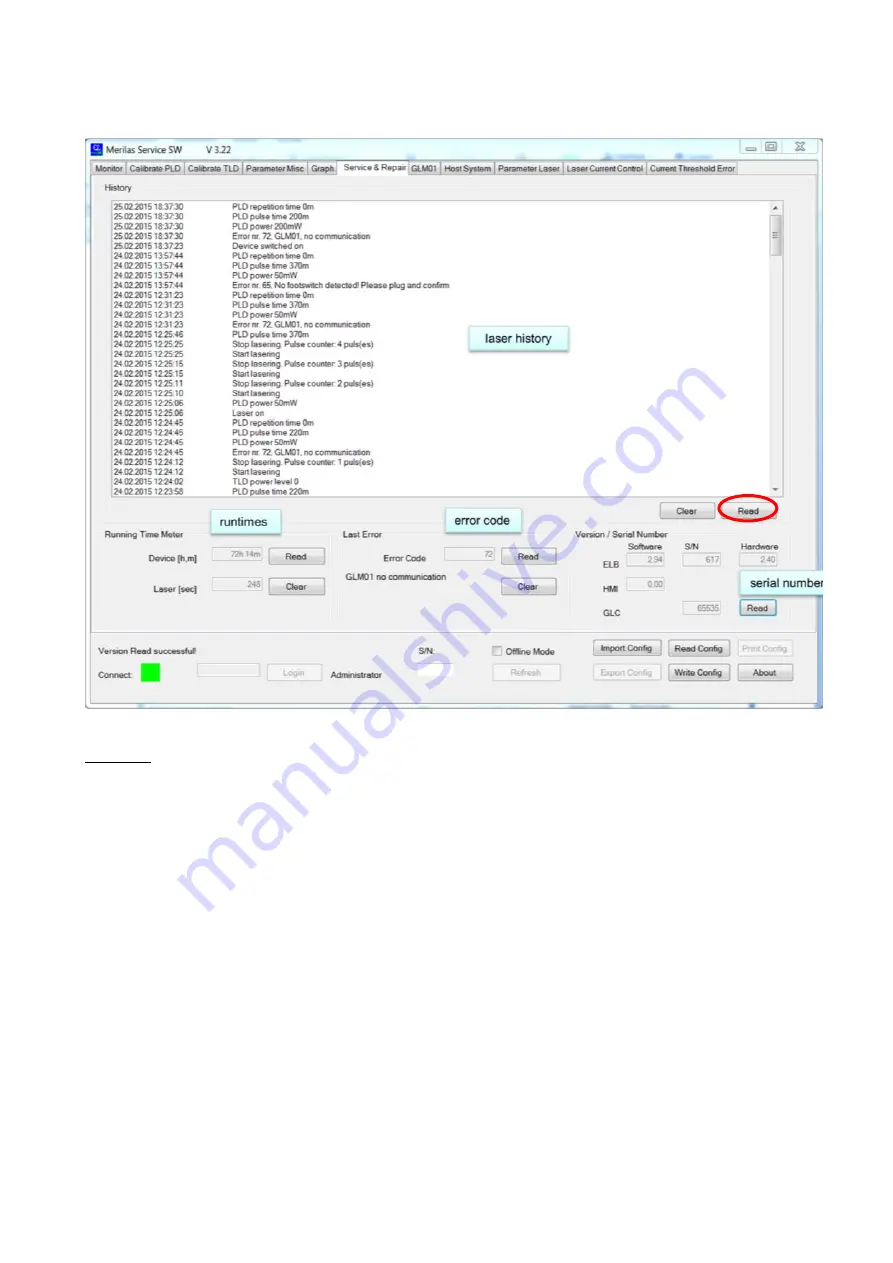
Safe History 

This page contains information which is important for second-level support. 


Procedure: 
 
1.  On this tab you can read the history, runtime, error code and version numbers. 
2.  To make a print screen and store  the file, 

right click into the blank window, and click on “Select all”, then right click onto 

the marked text, and click on “Copy to Clipboard”. Open Word, or Word-Pad, and paste into document and safe 
(SN…….._YYMMDD_Technician_History.doc) for future reference. 


Summary of Contents for OS 4

Page 1: ......

Page 2: ...ademarks of Oertli Instrumente AG OS 4 SPEEP HFDS and ParaProg are trademarks of Oertli Instrumente AG This service manual shall not be used without authorization for competitive purposes without explicit consent of Oertli Instru mente AG Subject to modifications Contact and service Oertli Instrumente AG Customer Service and Support Hafnerwisenstrasse 4 CH 9442 Berneck Switzerland Tel 41 0 71 747 ...

Page 3: ... a device with SW version 1 3 0 20 8 1 4 Trouble shooting 22 8 2 Loading of calibration values of spare parts 23 8 2 1 Installation of the driver software 23 8 2 2 Loading of adjustment values with the service tool 25 9 Endo laser system calibration 28 9 1 Laser safety 28 9 2 General servicing procedure 29 9 3 Maintenance schedule 29 9 4 Inspection and cleaning of test fibre 29 9 5 Laser servicing...

Page 4: ...5 11 2 2 Power LED module 96 11 3 Components of laser version 97 11 3 1 Spare key for endo laser 97 11 3 2 Laser DRS dongle 97 11 3 3 Protection cap for laser 97 11 3 4 Fibre coupling unit for endo laser 98 11 3 5 Endo laser module 99 11 3 6 Exchange of Connecting cable laser to UPF connector 101 12 Software update 103 12 1 Update order 103 12 2 General updating procedure 104 12 3 Versions 105 12 ...

Page 5: ...tli 129 16 Appendix A Recommended service tools for laser 130 17 Appendix B Spare parts 132 17 1 Spare parts for the unit 132 17 2 Spare parts for pedal 133 17 3 Set of replacement screws 133 17 4 Set of small replacement parts 133 18 Appendix C Safety check 134 19 Appendix D Functional test 136 20 Appendix E Laser installation protocol 147 ...

Page 6: ...GER Imminent danger Death serious injury WARNING Possible danger Death serious injury CAUTION Possibly dangerous situation Slight injury NOTE Possibly dangerous situation Material damage Explanation of the structure of a warning message using the example of a warning WARNING Indication of the hazard Indication of a potential impact Steps to take to avoid the hazard Symbol Meaning Safety sign Elect...

Page 7: ...evice may only be performed by service technicians authorized by Oertli and based on the last valid version of the service manual Improper repairs can compromise the safety of staff and patients and will void any war ranty NOTE This unit contains Electrostatic Sensitive Devices ESD When opening the unit it is very important that both you and the unit are grounded at all times 3 Abbreviations and t...

Page 8: ...tor for light LUM 1 6 Connector for gas forced infusion GFI 12 N a 4 3 Anterior posterior segment version with endo laser function VC86030X 1 Button LASER STOP 7 Connector for AIR 2 Connector for Visco EXTRACTION IN JECTION 8 Connector for pneumatic cutter green 3 Connector for laser probe 9 Connector for high frequency applications DIA CAPS HFDS GLAU 4 Connector for PHACO handpiece 10 Connector f...

Page 9: ...spare fuses Always replace defective fuses with new fuses of the same type You will find the values printed next to the power source on the device The device is designed for two separate voltage ranges Type Value Supply system Voltage 115 VAC Frequency 50 Hz 60 Hz Output 600 VA Type Value Supply system Voltage 230 VAC Frequency 50 Hz 60 Hz Output 600 VA Select the voltage at the fuse drawer before...

Page 10: ...r 5 Reinsert the fuse drawer 6 3 Infusion pole 1 Insert 4 infusion pole 1 into the holder 3 2 Firmly rotate the infusion pole in the direction of the arrow 5 3 If the infusion hooks are not at a 45 degree angle to the device proceed as follows Use an Allen key to loosen the screw 2 position infusion pole at a 45 degree angle as illustrated above and secure screw once more 6 4 Door remote switch DR...

Page 11: ...ode operation 7 1 Login and main menu Reset the device and enter service mode by pushing the lock button Enter the password 9442 and commit The following information is displayed on the service mode main screen Serial number Software versions ...

Page 12: ...el in the start level Cassette is ejected infusion pole travels downwards Cutting pressure Indicates whether low or high pressure is used for cutting in VIT functions Valid for all surgeons User protection filter Indicates whether a passive or active user protection filter is used with the OS 4 This setting is valid for all surgeons In case of the usage of an active user protection filter make sur...

Page 13: ...n memory from the drop down field to be exported 3 Press the Export button 4 The message Export successful ap pears Only use an Oertli service USB flash drive in conjunction with the OS 4 Import of single surgeon memory from a USB stick To import a single surgeon memory from a USB stick please proceed as follows 1 Insert USB stick into the USB port of the device The Import button is enabled 2 Sele...

Page 14: ...ly in use 2 Inoperable memory previous version of surgeon memory Export of surgeon memory It is possible to export the active memory as well as the inoperable memory to an USB stick To do this please proceed as follows 1 Insert USB stick into the USB port of the device 2 Press the Export key Import of surgeon memory 1 Insert the USB stick that contains the surgeon memory to be imported into the US...

Page 15: ... a single surgeon forward or backward in the sequence of the surgeon memory Press the Save button to save the new surgeon order Configuration Date Time Change To change date and or time press the button Change Change date and time values by pressing the relevant buttons Commit Save new settings ...

Page 16: ...16042 16 Configuration display touch Backlight front screen Change the brightness of the display with the buttons 7 3 Pedal status Status pedal The actual pedal status as well as the sta tus of the laser switch is displayed ...

Page 17: ...dal with cable to the OS 4 Turn on the device Call up the service mode see 7 1 Pedal Adjustment The pedal adjustment has to be carried out before the pedal pairing is started Make sure that the foot pedal is placed on the ground Push Start to begin with the cali bration routine Move to pedal position shown on the sequence and Confirm Pedal Pairing In the menu Calibration select Pe dal Push the but...

Page 18: ...ply copying the software onto the laptop or executing it directly from a USB stick is enough Convert the surgeon database before performing the software update Otherwise in the case of a faulty data base especially as regards pedal assignments corrections cannot be made anymore The converted database must be located on a USB stick in the folder dbexport so that it can be imported into the OS 4 Thi...

Page 19: ...n the USB stick The original database has been stored as a backup copy with the ending of the corresponding scheme ver sion 8 The software of the device can now be updated to software package 2 0 x 12 9 Following a successful software update the converted database has to be loaded into the device according to 7 2 8 1 2 Procedure for converting a database from a device with SW version 1 4 0 1 Expor...

Page 20: ... been reselected 1 Export surgeon database from device with SW 1 3 0 to USB according to 7 2 2 Insert the USB stick containing the exported surgeon database into the USB port of your laptop 3 Start the software for the conversion of the surgeon database OS 4_Database_Conversion exe 4 Click on the Browse db files button and select exported database 5 After successful loading of the file Status File...

Page 21: ...or these surgeons the pedal as signments sections or buttons have not been correctly set There are two possibilities of how to pro ceed Click on the button Replace in valid by default Invalid pedal assignments will be replaced by the corresponding default set tings Click on the Cancel button if the pedal assignments must not be overwritten In this case the conversion process will be aborted 8 Succ...

Page 22: ...gnments for required sur geons correctly in the ParaProg and ex port database again ERROR setting pedal assign ments failed Error occurred when setting pedal as signments to default Use valid database file Use correct version of conversion tool ERROR changes not com pletely defined Error in the script as regards the defi nition of conversion data Use correct version of conversion tool ERROR databa...

Page 23: ...lowing chapter describes the installation of the driver software required for the Oertli USB interface cable VX400313 The driver software is required for loading adjustment values onto the device It has to be installed only once for each laptop It is the pre condition for using the Oertli USB interface cable VX400313 Install driver software To perform the following steps administrator permissions ...

Page 24: ... Rev 10 VV016042 24 6 Click on the Extract button The de vice operator installation assistant will appear 7 Click on the button Next 8 Agree to the licence agreement in the following dialog box and click on Next ...

Page 25: ...g adjustment values onto the OS 4 in the case of spare parts The pre condition is that the driver software for the Oertli USB interface cable VX400313 8 2 1 has previously been installed on the laptop The software for loading the adjustment values does not have to be installed Simply copying the software onto laptop or executing it directly from the USB stick is enough 8 2 2 1 Procedure The spare ...

Page 26: ...mally the description of the COM port is USB Serial Port 8 If the correct COM port is not indicated Check if the USB interface cable has been correctly connected after plugging it into the laptop it may take a few seconds before the ca ble is correctly recognised by the operating system Restart the software for loading the adjustment values 9 Load the file with the stored adjustment values by clic...

Page 27: ...ALID Checksum 1 of the file is not OK file has either been manipulated or file is corrupt Checksum 2 INVALID Checksum 2 of the file is not OK file has either been manipulated or file is corrupt File format INVALID File format of the file does not corre spond with file format required by the tool Use the correct version of the tool Values INVALID For the values in the file there is no counterpart i...

Page 28: ...n Calibrating gain FAILED Only concerns the fluidics spare part Gain could not be calibrated Either error in communication or calibration value outside tolerance range Connect required equipment as described in the tool and start tool again Spare part not defined For this spare part there is no coun terpart in the tool Use correct version of the tool 9 Endo laser system calibration 9 1 Laser safet...

Page 29: ...nd or calibrated once a year The routine includes Calibration of working beam Calibration of aiming beam Checking system according to Appendix D Functional test 9 4 Inspection and cleaning of test fibre The test fibre end face on both sides must be inspected prior to connection and if neces sary cleaned Otherwise the test fibre might get damaged and erroneous calibration may result DANGER Direct o...

Page 30: ...tiply reple tion of the wet dry cleaning process it must be replaced It is recommended to keep a replacement fibre 9 5 Laser servicing software The servicing software as well as the access key to the software will be provided after the successful participation of a laser service training carried out by Oertli 9 5 1 Introduction The laser servicing software enables the service engineer to modify th...

Page 31: ...only install dotNet Framework 4 3 Create a folder on the hard disc of your PC 4 Copy all files from the zip file into this folder All files must be in the same folder 5 Start the servicing software by double clicking SERVICE_Vx xx EXE The servicing software automatically checks the software version compatibility between servicing software and software on the laser module during the communication i...

Page 32: ...cation on connector 3 19 Fill out report 19 Measured output power at laser unit within specification Prepare laser as stand alone unit and directly measure at the laser module 9 7 1 Replace fibre 11 3 4 Calibrate laser 9 7 3 Measured output power within specification Fill out report 19 Contact Oertli Instrumente AG End End yes yes yes no no no ...

Page 33: ...irectly into FSW socket of the laser module Connect laser module with service laptop via an USB connection The laser will now be checked directly by the servicing software STEP 3 7 8 Inspect and clean the test fibre on one side according to 9 4 Connect it to the power sensor Inspect and clean the test fibre on the other side according to 9 4 Connect the test fi bre to the laser probe port on the O...

Page 34: ...r Read Config reads the values from the module and displays them The configuration can be saved into a file by Export Config and restored by Import Config Recommended file name for Config Export as SN _YYMMDD_Technician_Start ini Use serial number of OS 4 device_Date_Technicians initials_State of Backup ini Before calibration is started make a BackUp called Start and after completion of BackUp use...

Page 35: ...Write Config Equipment type Type that indicates how the software communicates with the laser module 3500 module is used with service software USB connector 3100 default module is controlled by OS 4 software Power TLD Minimum power of the TLD default is 3 Sound Minimum level of internal beeper default is 3 UPF Passive Allowed Always set yes ...

Page 36: ...tab you can read the history runtime error code and version numbers 2 To make a print screen and store the file right click into the blank window and click on Select all then right click onto the marked text and click on Copy to Clipboard Open Word or Word Pad and paste into document and safe SN _YYMMDD_Technician_History doc for future reference ...

Page 37: ... attached to the fibre itself Connect test fibre of measuring sen sor head to laser module Set external fibre detection to NO see 9 7 1 2 Measure power and compare it with the intended value If the value is within the tolerance exchange the fibre see 11 3 4 Calibrate as described in 9 7 If the power at the module itself matches the values submitted at the software then the power loss is caused by ...

Page 38: ...r 2 Click on Read config 9 7 1 2 3 Change equipment type to 3500 9 7 1 2 4 Click on Write config 5 Reboot GML01 6 Check for error messages 9 7 1 3 7 enable GLM01 module 9 7 3 1 8 Click on System ON 9 Click on Laser ON 10 Module is heating up time varies between 10 and 60 seconds 11 Go to calibrate PL and click on Endo 12 Measure the power at 50 mJ 100 mJ 200 mJ 400 mJ 800 mJ 1500 mJ at duration 10...

Page 39: ...2021 03 23 Rev 10 VV016042 39 9 7 3 1 Front end for GLM01 The front end allows controlling the laser module without the OS 4 front panel Power pulse and interval settings can be made here ...

Page 40: ...power meter measurement unit WATT to perform measurement Perform measurement at the fibre connector at the front panel Procedure 1 Start the laser in such a way that the aiming beam can be measured 9 7 3 1 procedure 1 6 The aiming beam is on as soon as Laser ON is activated 2 Measure the aiming beam at level 9 9 7 3 1 3 Change new value until a value of minimal 700µW is shown on the measurement de...

Page 41: ...her in order to achieve that the value of the aiming beam reaches the specified value and tolerance range For GLM01 adapter Endo is used Make sure the correct adapter is selected during calibration Read Config reads the values from the module and displays them After calibration the configuration must be written on the module by Write Config The configuration can be saved into a file by Export Conf...

Page 42: ...d the recording time The default values normally work 2 Click Set Parameter 3 Change to tab GLM 01 and enable GLM01 4 Click System On 5 Select relevant laser settings See Functional Test documents for settings 6 Click Laser On Laser will start preheating 7 Fire the Laser via the service foot pedal 8 Change to the tab Graph 9 Click Load Ok 10 Safe each graph according to the Functional Test 19 NOTE...

Page 43: ...cted to the internet TeamViewer Version 8 0 or higher must be installed on the servicing laptop Procedure 1 Prepare laser module according to 9 5 2 Connect service laptop to internet 3 Call service centre 4 Start TeamViewer and commit access data to service centre 10 Device composition 10 1 PCB overview 10 1 1 Unit 10 1 2 Pedal ...

Page 44: ...2021 03 23 Rev 10 VV016042 44 10 2 Core PCB ...

Page 45: ...dic PCB JP001 JP013 JP014 Laser key switch JP016 Laser emergency switch JP017 Laser detect signal JP018 Front panel glass X2 JP400 LEDplus PCB X1 JP401 JP402 Valves vit pn JP403 LED pcb X1 JP404 JP405 Visco module JP406 Air gfi front JP407 Vit pn JP500 JP501 Air sensor PCB JP001 JP502 Vit pn sensor PCB JP001 JP503 Visco sensor PCB JP001 JP504 JP505 JP700 JP701 JP703 JP704 JP705 JP706 JP708 JP800 S...

Page 46: ...2021 03 23 Rev 10 VV016042 46 10 3 Power PCB From To JP001 JP002 Supply PCB JP206 JP003 JP005 Socket DIA JP006 JP007 JP200 Socket PHACO JP201 ...

Page 47: ...04 JP005 JP100 Laser module COM JP101 Socket DRS JP102 IV pole motor JP103 Laser module DRS JP104 Laser module FSW JP105 Compressor JP106 JP107 Fan JP108 Valves JP200 Power supply 24VDC JP201 Switch ON OFF JP202 Carrier board PCB JP600 JP203 Power supply 12VDC JP204 JP205 Fluidic PCB JP005 JP206 Power PCB JP002 JP207 Core PCB JP800 JP300 ...

Page 48: ...48 10 5 Carrier print VX541128 From To JP001 CoM board JP101 Speaker left X200 JP203 JP204 Core PCB JP009 JP300 Ethernet X400 Front panel PCB X1 JP500 Remote control JP600 Supply PCB JP202 X801 X802 X900 USB service X1000 JP1001 ...

Page 49: ...2021 03 23 Rev 10 VV016042 49 From To JP100 Speaker right JP200 JP201 JP202 BAT700 Support battery ...

Page 50: ... Supply PCB JP205 JP003 Air module JP004 Motor irrigation valve JP005 Valves V7 V8 JP006 Pump motor JP007 Venturi JP008 Force sensor JP009 Pump motor encoder JP010 Fluidics level detector JP011 Pump position sensor JP012 Cassette recognition JP013 Cassette release switch SENS1 SENS2 ...

Page 51: ... panel PCB Part of VX210159 From To X1 Carrier board PCB X400 X2 Display X3 Touch controller X4 Display X5 Display 10 8 Power LED module PCB Part of VX210149 From To X1 Core PCB JP403 X2 Led module X3 Led plus module PCB X3 X4 X5 X7 Led module ...

Page 52: ...0 VV016042 52 10 9 Power LEDplus module PCB Part of VX210148 From To X1 Core PCB JP400 X2 Core PCB JP004 X3 Led PCB X3 X4 X5 X6 Led plus module 180 X7 X8 Led plus module 90 X9 Led plus module 180 X10 Led plus module 90 ...

Page 53: ...PCB From To JP001 Core PCB JP501 SENS1 10 11 Visco sensor PCB Part of VX210132 From To JP001 Core PCB JP503 SENS1 10 12 Vit pn sensor PCB Part of VX210157 From To JP001 Core PCB JP502 SENS1 10 13 Wireless module VX541130 From To JP001 Core PCB JP010 ...

Page 54: ...1 X3 X4 Level sensor 2 10 15 Pedal PCB VX541135 From To JP001 Wireless module JP003 JP004 Horizontal sensor JP005 Vertical sensor JP100 Heel switch left JP101 Heel switch right JP102 Side switch right JP103 Top switch right JP104 Top switch left JP105 Side switch left JP106 Laser switch JP200 CAN supply JP201 Battery ...

Page 55: ...23 Power supply 12V BK Laser module BL X23 Power supply 24V BK Isolation transformer BK GND Power supply 12V GN YE Power supply 24V GN YE GND Mains inlet GN YE Laser module GN YE X21 Cable fuse holder WH Isolation transformer WH Pos Bottom Top X3 R2 T Isolation transformer BL X2 R2 T Varistor BL X1 Mains inlet GY Isolation transformer GY Colour abbreviations according to IEC 60757 ...

Page 56: ...ing to IEC 60757 Pos Abbr Colour L RT Red N BK Black E GN YE Green Yellow Pos Abbr Colour 1 WH White 2 BN Brown 3 GN Green 4 YE Yellow 5 GY Grey 6 PK Pink 10 16 3 Power supply 12 VDC VX320024 Do not fix any single wires to the power supply Attach the grounding wire with additional spring washer ...

Page 57: ...rect voltage has been selected The laser module contains another fuse To find this fuse please check the laser module This should only blow if an internal error of the module occurs 11 1 2 Hook for infusion pole VX100869 Quantity Description 1 Mount for infusion pole incl hooks 1 M5x10 hex socket screw STEP 1 1 2 Unfasten screw of the mount for infusion pole Pull mount out of the infusion pole Ple...

Page 58: ...person should be con sulted to do this Loosen screw at the underside of the castor Pull castor out of carrier 11 1 4 Back castor wheel VX120178 Quantity Description 1 Back castor wheel STEP 1 1 2 Get access to the underside of the unit by tipping it so that the castor wheels come free A second person should be con sulted to do this Remove cover by releasing 8 screws The part stays connected with t...

Page 59: ...ove the screw that holds the wheel in the carrier STEP 3 4 5 Remove the isolator transformer as sembly according to procedure 11 1 9 Remove wheel carrier by loosening 3 screws STEP 4 6 Pull wheel carrier out so that the hexagonal bar comes free ...

Page 60: ...l bar can enter the wheel 11 1 5 Housing VX102156 Quantity Description 1 Side cover 8 M3x12 countersunk screw TORX black VX102177 Quantity Description 1 Lower enclosure 8 M3x12 countersunk screw TORX black VX102179 Quantity Description 1 Upper enclosure 4 M3x12 countersunk screw TORX black ...

Page 61: ...nd gasket over IV pole STEP 2 4 5 6 Remove 4 screws from the upper en closure Lift upper enclosure over IV pole Remove 8 screws from lower enclosure and pull sheet metal backwards There is only one position for cor rect mounting of the lower enclo sure STEP 3 7 8 Remove 8 screws on each side of the panels Pull panel away in a sideways di rection ...

Page 62: ...de viewed from the back and the black from the valves Unplug laser detect JP17 cable from CORE Print STEP 3 5 6 7 Pull lower part of the enclosure to wards the front until the light mod ules are no longer positioned in the openings Pull front enclosure downwards so that it comes free from the slot Make sure not to tear any cables and tubes that are still connected to the part Please take great car...

Page 63: ...042 63 STEP 4 8 Pull part towards the front Make sure not to tear any cables and tubes that are still connected to the unit Support the front panel with the at tached table or by any other means to avoid strain on the ca bles ...

Page 64: ...sor cable is routed through a ring Therefore leave the ring in the unit STEP 2 3 4 5 6 Disconnect all cables from the power supply Remove 4 screws from the supply carrier sheet metal Turn supply carrier over Remove 4 screws from the backside of the carrier and take power supply away For connection scheme of wires see 10 16 2 NOTE Use of incorrect screws Risk of a short circuit Do not use any other...

Page 65: ...les and grounding wire Loosen 4 screws from the distance keeper and remove PCB For connection scheme of wires see 10 16 3 11 1 9 Varistor isolation transformer assembly STEP 1 1 2 3 Disconnect all wires from the termi nal block Remove 2 screws from the assem bly carrier Lay assembly carefully aside It re mains attached to the device by the cables For connection scheme of wires see 10 16 1 ...

Page 66: ...istor on the cap rail Remove var istor in a sideways direction 11 1 10 Drive for infusion pole VX210126 Quantity Description 1 Drive for infusion pole STEP 1 1 2 Remove the isolation transformer assembly as described in 11 1 9 so that access is granted to the screws of the lower mounting bracket Remove 2 screws from the lower mounting bracket ...

Page 67: ...sure no picture so that the part can be swung upwards slightly STEP 3 7 Disconnect 2 cables from the supply PCB STEP 4 8 9 Push the complete assembly towards the enclosure Lift assembly upwards and then back wards NOTE Improper dismounting Sheet metal is deformed perma nently Push gently so that sheet metal is not deformed permanently NOTE Improper dismounting Cables are damaged Follow the instruc...

Page 68: ... STEP 2 2 Disconnect all cables from the power PCB STEP 3 3 4 Unscrew 4 screws from the print frame sheet metal 2 screws on each side The picture on the left shows the posi tion of the screws Pull sheet metal frame upwards NOTE Screw falls into device Risk of short circuit Do not lose any screws ...

Page 69: ...3 Rev 10 VV016042 69 STEP 4 5 Carefully pull the PCB upwards Contact springs should remain on the PCB STEP 5 6 Insert the new PCB into the slots Make sure the PCB has been properly inserted into the board guide ...

Page 70: ...escription 1 Supply PCB STEP 1 1 2 3 Disconnect all cables from the PCB Remove 2 screws on each side of the PCB holder Pull PCB out of holder 11 1 13 Wireless module VX541130 Quantity Description 1 Wireless module STEP 1 1 Disconnect cable loosen 2 screws and remove PCB ...

Page 71: ...osen 2 screws from the Ethernet interface and remove cover STEP 2 2 Loosen 1 screw from the plastic cover Remove the plastic cover STEP 3 3 Loosen 2 screws in front and 3 screws below from the metal cover and remove the plastic cover STEP 4 4 Remove 2 screws on each side of the PCB fastening 4 screws in to tal ...

Page 72: ...le to core PCB Power cable STEP 6 6 7 Pull the carrier PCB out of the unit Dismantle the right and left metal clamps Do not throw away the metal clamps They have to be used with the replacement part The flat ribbon cable must be connected with both con nector and bare metal contact facing in the direction of the PCB ...

Page 73: ...r Gas Forced Infusion GFI VX102184 Quantity Description 1 Holder for GFI STEP 1 1 2 Remove the screw Take off lever and plastic disc 11 1 16 Control panel VX210159 Quantity Description 1 Control panel 1 5x25 flat washers 1 M5x10 oval head screw TORX ...

Page 74: ...Remove 2 screws from the joint cover Lift cover off STEP 2 3 Disconnect 2 cables from the core PCB STEP 3 4 5 Disconnect the flat ribbon cable from the carrier PCB Open the holder of the flat ribbon cable and pull cable out towards front panel ...

Page 75: ...ket Remove the screw and washer from the top of the bracket STEP 5 8 Lift the complete control unit from the pivot STEP 6 9 ASSEMBLING The horizontal pivot point is derived from screw 1 the vertical pivot point from screw 2 Screw 1 horizontal pivot point Screw 2 vertical pivot point ...

Page 76: ...2021 03 23 Rev 10 VV016042 76 STEP 7 10 Tighten these screws so that the forces at the points displayed on the left are Horizontal 23 3 N Vertical 33 3 N To measure the forces use a spring scale ...

Page 77: ...n 1 Phaco connector with cable STEP 1 1 2 Loosen the front enclosure accord ing to 11 1 6 Disconnect the cable from the power PCB The cable is attached to other ca bles Do not damage these while cutting the cable ties STEP 2 3 Unscrew the nut at the phaco socket and remove the cable ...

Page 78: ...1 1 6 Disconnect the cable from the power PCB The cable is attached to other ca bles Do not damage these while cutting the cable ties STEP 2 3 Unscrew the nut at the phaco socket and remove the cable 11 1 19 Fluidics unit VX210130 Quantity Description 1 Fluidics unit 2 M5x20 cheese head screw TORX 1 M5x10 countersunk screw TORX 1 M3x12 countersunk screw TORX black ...

Page 79: ...ng to section 11 1 6 step 1 Carefully move front enclosure to the side so as to get access to the two fixation screws of the fluidics unit Loosen 2 fixation screws from the front Please take great care of the key switch on the left to avoid break age STEP 2 5 Dismount air module according to 11 1 21 STEP 3 6 Disconnect the flat ribbon cable from the fluidic PCB ...

Page 80: ... Rev 10 VV016042 80 STEP 4 7 8 Disconnect the green tube from the venturi unit Disconnect the black tube both at the venturi unit and at the exhaust STEP 5 9 Disconnect the power supply cable from the fluidic PCB ...

Page 81: ...from the cas sette release switch Remove the cable tie used for fixing the cable to the cassette eject but ton STEP 7 12 Remove the 2 screws from the un derside STEP 8 13 Remove complete module upwards by tilting it sideways Avoid tearing off or damaging any cables ...

Page 82: ...to the AIR module of the old unit and mount it to the sen sor of the new device STEP 10 15 Install new fluidics unit by paying particular attention to exposed components of the OS 4 1 Flat cable 2 Irrigation valve Avoid tearing off or damaging any cables ...

Page 83: ...ixation screws of the fluidic unit mount the screw loosely Mount 2 fixation screws to the front and tighten them Tighten the remaining fixation screws STEP 12 20 21 Mount all tubes and cables Secure the cable to the cassette eject button with cable tie STEP 13 22 23 Install AIR module Mount protection plate STEP 14 24 Load adjustment values onto the device according to 8 2 ...

Page 84: ...2021 03 23 Rev 10 VV016042 84 11 1 20 GFI module STEP 1 1 Open clamp of flat ribbon cable STEP 2 2 Remove both screws that hold the module on the front enclosure ...

Page 85: ...2021 03 23 Rev 10 VV016042 85 STEP 3 3 4 5 Disconnect all tubes from the mod ule 1x black 1x green 2x transparent Disconnect the cable to the PCB Loosen the front enclosure accord ing to 11 1 6 ...

Page 86: ...nsparent Remove the 2 screws that hold the sensor unit in place When assembling the replace ment part do not tighten the screws at the beginning Make sure the sensor is at the correct distance from the valve parts STEP 5 8 9 Pull the complete module out of the unit Disconnect the cable from the air sensor ...

Page 87: ... 87 11 1 21 AIR module STEP 1 1 2 Remove housing components ac cording to section 11 1 5 steps 1 und 2 Remove the protection plate STEP 2 3 4 Disconnect air module cable from the fluidic PCB Remove the tube from the air mod ule ...

Page 88: ...2021 03 23 Rev 10 VV016042 88 STEP 3 5 Remove the transparent tubes from the valves STEP 4 6 7 Remove the 4 screws on the under side Pull the module out of the unit by holding it upwards ...

Page 89: ...n 1 Visco module 4 M3x6 oval head screw TORX ecosyn fix STEP 1 1 Disconnect all tubes from the mod ule 2x green 1x pink 1x blue 1x black As an alternative the green tubes can also be disconnected from the tee branches When assembling pay attention to the difference in tube lengths ...

Page 90: ...e the cover of the cable duct must be opened STEP 3 3 4 Disconnect cable from the pressure sensor Disconnect air tube from the pres sure sensor Do not break sensor hose inlet by applying too much force STEP 4 5 Remove the 4 screws that hold the complete bracket in place 2 screws on each side ...

Page 91: ...2021 03 23 Rev 10 VV016042 91 STEP 5 6 7 Move brackets upwards so that the screws on the side below can be reached Unscrew the 4 screws that hold the Visco module in place ...

Page 92: ... STEP 1 1 2 Remove system PCB according to 11 1 11 Remove board carrier by unfas tening the 4 screws STEP 2 3 4 5 Disconnect the 2 tubes from the air module Disconnect the green and black tubes from Vit PN outputs Disconnect the black tube from the Visco module STEP 3 6 Unfasten the 4 screws from carrier by using a tool with a long shaft ...

Page 93: ...ule upwards To remove the pressure control valve see the procedure described in 11 1 22 NOTE Incorrectly placed tubes and wires Improper function of VIT PN When mounting the new module back into the unit make sure that all tubes and wires are placed correctly under the sheet metal carrier ...

Page 94: ... place See step 2 of 11 1 7 Disconnect 2 tubes from the com pressor Disconnect all cables between the compressor and the supply PCB STEP 2 4 5 Remove the 2 screws that connect the compressor with the spring sus pension Take the compressor unit out of the unit in a sideways direction STEP 3 6 Remove the tube connectors from the old compressor module and fix them to the new module ...

Page 95: ...10148 Quantity Description 1 Power LEDplus module STEP 1 1 Remove 4 screws on the underside STEP 2 2 Disconnect all cables from the PCB Wires are tied together with wire ca ble ties remove them carefully STEP 3 3 Pull module out of the unit in a side ways direction Be careful not to damage any wires ...

Page 96: ...according to 11 2 1 Remove 2 screws from the under side of the module STEP 2 3 4 5 Disconnect all cables from core PCB Wires are tied together with wire ca ble ties remove them carefully Pull module out of the unit in a side ways direction Be careful not to damage any wires Remove holder from the light mod ule and use it for the replacement part ...

Page 97: ...afety key New keys can be replaced without taking any specific action 11 3 2 Laser DRS dongle VX400279 Quantity Description 1 DRS dongle The new plug connector can be replaced without taking any specific action 11 3 3 Protection cap for laser VX520405 Quantity Description 1 Protection cap STEP 1 1 Remove chain by unfastening the screw ...

Page 98: ...the power output of the laser module Risk of fire inside the unit reduction or damage of laser fibre Always keep connector clean from dust and debris Use the protection cap at all times STEP 3 6 7 Carefully pull light fibre and cable out of the unit Make sure to remember the route Best is to use a tracing line Remove 4 TX4 screws from the fi bre NOTE Laser power loss too high Laser output cannot b...

Page 99: ...solation transformer as sembly to get access to the laser module Remove the top screw completely TX30 The bottom screw needs only to be loosened Swing the transformer to the left side STEP 2 3 Remove 2 TX10 screws from the power supply carrier STEP 3 4 5 Remove 8 TX25 screws from both supports where one of them holds the supply PCB in place Push the supports out of the frame ...

Page 100: ... connect the laser module with the supply print at the supply print Plug out all cables at the laser mod ule STEP 6 11 Loosen the screws TX25 from the three marked spacers so that the module comes free and remember the corresponding positions NOTE Laser module is not fixed in the device Laser module and device can be damaged The force that holds the laser module can be adjusted by the rubber buffe...

Page 101: ...ation of the target and the power laser according to chapters 9 7 3 and 9 7 4 This will ensure the correct power output of the lasers 11 3 6 Exchange of Connecting cable laser to UPF connector VX400300 Quantity Description 1 Connecting cable laser to UPF connector STEP 1 1 Open the UPF socket with a Lemo key DCH 91 161 PA do not loosen completely otherwise the toothed lock washer could be lost Rem...

Page 102: ...he photo Remove the housing and the venti lation plate Remove the two cable ties accord ing to the photos Disconnect and unthread the UPF cable from the laser and completely remove it Mount the replacement cable in re verse order Remember to secure the UPF socket with the Lemo key at the end of the exchange ...

Page 103: ...ng Laser active user protection filter is plugged but not in place appears 14 Repeat step 10 to 12 one more time The Connecting cable laser to UPF connector is correctly installed if laser power can be activated and the filter of the fully automated UPF moves back and forth 12 Software update VX541969 Quantity Description 1 USB stick with software update The software of the OS 4 is delivered in fo...

Page 104: ...pdate process failed with error 1 appears the update order has not been followed Always upgrade or downgrade software packages according to the instructions in 12 1 Procedure 1 Switch unit off 2 Plug USB stick into the lower ser vice port 3 Switch unit on and enter service mode see 7 4 Select the relevant button Up date of the software that needs to be updated 5 Press button Select File 6 In path ...

Page 105: ...to 12 2 6 Import the converted surgeon memory from USB stick as described in 7 2 12 3 2 Versions 1 5 x 12 3 2 1 Version 1 5 5 Files OS 4 system_1 3 0 tar gz OS 4 apps_1 5 5 tar gz OS 4 voice_1 0 0 tar gz Displayed in service mode tab General when installed App v1 5 5 System v1 3 0 OS 4 prod image Specific upgrading procedure from version 1 5 3 or higher 1 Make sure that version 1 5 3 or higher is ...

Page 106: ...n service mode tab General when installed App v1 5 3 System v1 3 0 OS 4 prod image Specific upgrading procedure 1 Make sure that version 1 4 0 is installed on the device 12 3 4 2 Export the surgeon memory to a USB stick as described in 7 2 3 Convert the surgeon memory on the USB stick as described in 8 1 2 4 Update the operating system package according to 12 2 5 Update the application package acc...

Page 107: ...pedal section assignments are se lected in ParaProg To use the new pedal section assignments and the new parameters influencing the pedal section assignments for a certain surgeon and function press one of the Assignment buttons and save the settings in ParaProg 12 3 5 Version 1 2 0 Files OS 4 system_1 0 0 tar gz OS 4 apps_1 2 0 tar gz Displayed in service mode tab General when installed App v1 2 ...

Page 108: ...necessary remove the gasket from electronic compartment NOTE Improper sealing of pedal Pedal does not correspond to IPX class anymore After repair do seal the pe dal with the sealing set VX102479 STEP 2 4 5 If necessary pull the wires out of the slot If necessary release cable routing NOTE Improper sealing of pedal Pedal does not correspond to IPX class anymore After repair do seal the pe dal with...

Page 109: ... from electronic compartment NOTE Improper sealing of pedal Pedal does not correspond to IPX class anymore After repair do seal the pe dal with the sealing set VX102479 Remove screws red arrows Remove screws orange arrows STEP 2 4 5 If necessary pull the wires out of the slot If necessary release cable routing NOTE Improper sealing of pedal Pedal does not correspond to IPX class anymore After repa...

Page 110: ...antity Description 1 Sealing mat 1 TEMPO SIL2 white STEP 1 1 2 2a 2b Open pedal housing according to the procedure described in 13 1 Seal pedal with TEMPO SIL 2 in three steps Pre fill pouch Press the cable into sealing com pound and refill pouch up to the rim ...

Page 111: ...2021 03 23 Rev 10 VV016042 111 2c Fill pouch above the rim STEP 2 3 Place adhesive tape on uncoated area and wait until TEMPO SIL 2 has cured approx 2 minutes ...

Page 112: ...ording to pro cedure described in in 13 1 NOTE Improper sealing of pedal Pedal does not correspond to IPX class anymore After repair do seal the pe dal with the sealing set VX102479 13 3 Rechargeable battery VX400015 Quantity Description 1 Rechargeable battery STEP 1 1 2 Open pedal housing according to the procedure described in 13 1 Lift battery pack out of the contact terminal ...

Page 113: ...o 13 3 Take a photo of the connected ca bles Disconnect all cables Release PCB by removing 4 screws When mounting the new print take care that you plug in the cables ac cording to the photo After this procedure the pedal must be paired with the unit CAUTION Incorrect pedal signals trans ferred to device Faulty operation of device After this procedure the pe dal needs recalibrating ac cording to 7 ...

Page 114: ...ation 1 Seal 3 M3x8 cheese head screw TORX STEP 1 1 2 3 4 5 Remove protection sheet according to 13 8 Open pedal housing according to the procedure described in 13 1 Remove seal Remove battery pack according to 13 3 Loosen the grub screw by turning it three times STEP 2 6 Push out the wave vertical deflec tion component from the base body keep the tool in the mounting STEP 3 7 8 Release spring Pla...

Page 115: ... c STEP 6 12 Mount new connecting rod in the re verse order of the uninstallation Secure three cheese head screws with screw locking Hook in spring with auxiliary means i e cable tie NOTE Improper sealing of pedal Pedal does not correspond to IPX class anymore After repair do seal the pe dal with the sealing set VX102479 CAUTION Incorrect pedal signals trans ferred to device Faulty operation of de...

Page 116: ...ing set see chapter 13 2 STEP 1 1 2 3 4 Open pedal housing according to the procedure described in 13 1 Remove battery pack according to 13 3 Disconnect cable from PCB Undo the grub screw STEP 2 5 6 7 Push out the wave vertical deflection component from the base body Release spring Place rocker in such a way that ac cess is given to both sensors Do not lose the washers when pushing out the wave ve...

Page 117: ...device Faulty operation of device After this procedure the pe dal needs recalibrating ac cording to 7 5 When mounting the new sensor keep attention to the following steps Mount the sensor up to the stop After mounting the new sensor fix the cable with the help of ca ble ties at the cable tie holders Ensure that the loop of the cable enables sufficient moving space for the sensor see picture ...

Page 118: ...ee chapter 13 2 STEP 1 1 2 3 4 Open pedal housing according to the procedure described in 13 1 Remove battery pack according to 13 3 Disconnect cable from PCB Undo the grub screw STEP 2 5 6 7 Push out the wave vertical deflection component from the base body Release spring Place rocker in such a way that access is given to both sensors Do not lose the washers when pushing out the wave vertical de ...

Page 119: ...vice After this procedure the pe dal needs recalibrating ac cording to 7 5 When mounting the new sensor keep attention to the following steps Mount the sensor up to the stop Route the sensor cable un derneath the key switch ca ble Tie the two cables with the cable tie on the rising side of the sensor cable loop together and make sure that the cables are pushed down and away from the spring see pic...

Page 120: ...with medical benzene Remove the film from the new rub ber mat Apply the new rubber mat to the rocker attachment 13 8 Protection sheet VX102472 Quantity Description 1 Protection sheet left 1 Protection sheet right 1 Front protection sheet 8 M3x6 countersunk bolt Torx STEP 1 1 2 Loosen the screws from the protec tion sheets Remove protection sheet 3 parts towards the pedal s back side ...

Page 121: ...andle STEP 1 1 2 Open pedal housing according to the procedure described in 13 1 Completely loosen the 2 screws that hold the pedal handle STEP 2 3 Lift handle off the screws When assembling the new han dle make sure that the plungers fit straight in the bores before you tighten the screws ...

Page 122: ...t Torx 1 TEMPO SIL2 white 1 Seal VX310081 right Quantity Description 1 Side switch right 2 M5x16 countersunk bolt Torx 1 TEMPO SIL2 white 1 Seal STEP 1 1 2 3 Open pedal housing according to the procedure described in 13 1 Disconnect cable from PCB Remove the screws that fix the side switch assembly STEP 2 4 Gently pull the cable through hole ...

Page 123: ...he procedure described in 13 1 Unfasten the 2 screws that hold the wireless module in place Disconnect cable from the PCB and remove the module Following this procedure the pe dal must be paired with the unit according to 7 5 13 12 Cable for pedal VX102522 Quantity Description 1 Cable for pedal The new cable can be replaced without taking any specific action ...

Page 124: ...sette into a drainage bag or change cassette HF tip defective Change HF tip or HF handpiece Laser in saturation Decrease laser power and or pulse duration Increase interval between two pulses Laser output power too low Check fibre and recalibrate laser Call for laser second level support Laser beeper malfunction Call for laser second level support Laser microphone malfunction Call for laser second...

Page 125: ... the laser again disconnect the OS 4 from power and restart it Laser GLM01 IF no communication Call service Faulty connection of giving set at cassette immediately remove cassette Immediately remove cassette from device Close infusion line of giving set Empty cassette Connect giving set correctly to infusion port Dry cassette outside if wet Insert cassette to device ...

Page 126: ...e for infusion pole ERROR 15 Force sensor Adjust force sensor Ascertain whether the force sensor is plugged in or whether there is a severed cable Replace fluidic unit ERROR 16 Adjust Venturi sensor Adjust Venturi sensor or replace fluidic PCB ERROR 17 Adjust force sensor Adjust force sensor or replace fluidic unit ERROR 18 Check Venturi pump system Adjust Venturi and force sensor Replace fluidic ...

Page 127: ...K disable LASER to disable the laser function All other functions of the OS 4 remain availa ble Call for laser second level support ERROR 202 Laser PLD light control malfunction Press OK disable LASER to disable the laser function All other functions of the OS 4 remain availa ble Call for laser second level support ERROR 203 Laser PLD current measurement malfunc tion Press OK disable LASER to disa...

Page 128: ...e Call for laser second level support ERROR 219 Laser cooling system malfunction Press OK disable LASER to disable the laser function All other functions of the OS 4 remain availa ble Call for laser second level support ERROR 230 Laser processor malfunction Press OK disable LASER to disable the laser function All other functions of the OS 4 remain availa ble Call for laser second level support ERR...

Page 129: ...ROR 274 Laser processor malfunction Press OK disable LASER to disable the laser function All other functions of the OS 4 remain availa ble Call for laser second level support 15 Authorized service points Oertli Instrumente AG Hafnerwisenstrasse 4 Customer service and support CH 9442 Berneck Switzerland Tel 41 0 71 747 42 00 E mail css oertli instruments com Website www oertli instruments com Conta...

Page 130: ... Available at Oertli Instrumente AG Article No 322100 Fibre inspection scope for inspection of the SMA connector Recommended Thorlabs www thorlabs com FS201 Fibre Inspection Scope Fibre end face cleaning products Universal fibre connector cleaner handheld box with spool of lint free cleaning cloth Lint free wipes Optical grade fibre connector cleaning fluid Recommended Thorlabs www thorlabs com FC...

Page 131: ...L02 Power meter Recommended Ophir Optronics Solutions Ltd www ophi ropt com OPHIR NOVA II Article No 7Z01550 Measurement head Recommended Ophir Optronics Solutions Ltd www ophi ropt com Ophir 3A P SH V1 Article No 7Z02622 SMA fibre adapter for 3A P SH V1 Recommended Ophir Optronics Solutions Ltd www ophi ropt com Article No 1G01236 CAUTION The laser power meter must be cali brated periodically ...

Page 132: ...ght module spare part for OS 4 1 VX210159 Control panel spare part for OS 4 1 VX102184 Holder for GFI spare part for OS 4 1 VX240053 Spare key for endolaser spare part for OS 4 box of 2 2 VX400279 DRS dongle spare part for OS 4 1 VX400236 Phaco connector spare part for OS 4 1 VX400235 Dia connector spare part for OS 4 1 VX520405 Cap for endolaser incl chain spare part for OS 4 1 VX100869 Hook for ...

Page 133: ...e switch right for pedal spare part for OS 4 1 VX102806 Heel switch for pedal spare part for OS 4 1 VX102472 Protection sheet for pedal spare part for OS 4 1 VX400285 Wireless module for pedal spare part for OS 4 1 VX102741 Crank plate for pedal standard spare part for OS 4 1 VX102571 Crank plate for pedal with long aspiration path spare part for OS 4 1 17 3 Set of replacement screws VX950046 Quan...

Page 134: ...2021 03 23 Rev 09 VV016042 134 18 Appendix C Safety check Please see form on next page ...

Page 135: ...ntact person OS 4 device Article No Serial No Software version App System Test device Brand Model Serial No Perform safety check not OK OK 1 Check protective earth connections according to IEC 60601 1 2 Check leakage currents according to IEC 60601 1 Work completed yes no Installation accepted yes Needs follow up yes no Service ac cepted yes Field engineer Customer Name Name Date Date Signature Si...

Page 136: ...2021 03 23 Rev 09 VV016042 136 19 Appendix D Functional test Please see form on next page ...

Page 137: ...d log files OK 1 1 Save user data on a USB flash drive according to the OS 4 service manual VV016042 chapter 7 2 Notice _____________________________________________________________________________ 1 2 Save log files on a USB flash drive according to the OS 4 service manual VV016042 chapter 7 6 Notice _____________________________________________________________________________ 2 Software OK 2 1 L...

Page 138: ...ors Without cassette OK 3 7 Force sensor 0 10 Current value _________ mmHg New value _________ mmHg Notice _____________________________________________________________________________ 3 8 Venturi sensor 0 10 Current value _________ mmHg New value _________ mmHg Notice _____________________________________________________________________________ 3 9 Control air sensor 0 10 Current value _________ ...

Page 139: ...__________________________________________________________________ 4 5 Check mains cables and power socket with fuses for mechanical damages Notice _____________________________________________________________________________ 4 6 Check compressed air connection for stability and impermeability Notice _____________________________________________________________________________ 4 7 Measure input pr...

Page 140: ...___________________________________________________________ 7 2 Generate occlusion with I A values from surgeons memory Reaches set values Notice _____________________________________________________________________________ 7 3 Generate occlusion with a maximum of 60 ml min flow and 500 mmHg vacuum Reaches maximum values in approx 2 5 s Notice ______________________________________________________...

Page 141: ..._______ 8 2 After completion of the phaco test the notice Test OK appears Notice _____________________________________________________________________________ 8 3 Activate maximum phaco power output Reaches 100 hisses Notice _____________________________________________________________________________ 8 4 Activate pulse burst and CMP Function OK hisses Notice ______________________________________...

Page 142: ...___________ 10 4 Activate VIT with maximum cutting rate Function OK Notice _____________________________________________________________________________ 10 5 Check light 1 Brightness and color regulation Function OK Notice _____________________________________________________________________________ 10 6 Check light 2 Brightness regulation Function OK Notice _______________________________________...

Page 143: ...um values depending on altitude above sea level can be taken from the following table Place Altitude above sea level in meters Vacuum in mmHg Berneck Switzerland 427 m 600 Mexico City Mexico 2 250 m 4761 1 calculated values 12 Laser Test not applicable non laser device Observe Laser protective measures Measuring equip ment Reference power meter Type _________ Serial no _______________________ Refe...

Page 144: ...________________________________________ 12 7 Confirm message Laser changes to Ready mode Notice _____________________________________________________________________________ 12 8 Get pedal to position 2 Aiming beam is activated Notice _____________________________________________________________________________ 12 9 Get pedal to position 3 100 Working beam is activated sound is correct Notice ___...

Page 145: ... to 9 0 7 mW n a n a 0 3 mW _________________ mW Working Beam 50mW 1000 ms 50 mJ 10 mJ _________________ mJ 100 mW 1000 ms 100 mJ 20 mJ _________________ mJ 200 mW 1000 ms 200 mJ 40 mJ _________________ mJ 400 mW 1000 ms 400 mJ 80 mJ _________________ mJ 800 mW 1000 ms 800 mJ 160 mJ _________________ mJ 1500 mW 1000 ms 1500 mJ 300 mJ _________________ mJ 2500 mW 500 ms 1250 mJ 2 500 mJ ___________...

Page 146: ...Service ac cepted yes Adjustments com pleted yes no Needs follow up yes no Needs estimate of costs yes no Send to Field engineer Customer Name Name Date Date Signature Signature Comments recommendations Oertli Instrumente AG CH 9442 Berneck Switzerland Phone 41 0 71747 42 00 Fax 41 0 71 747 42 90 www oertli instruments com info oertli instruments com ...

Page 147: ...2021 03 23 Rev 09 VV016042 147 20 Appendix E Laser installation protocol Please see form on next page ...

Page 148: ... no _______________________ 1 Laser safety test OK Set key switch to 0 LASER STOP key on DRS plugged out no fibre connected 1 1 Select Laser function Message Laser key switch off is displayed Notice _____________________________________________________________________________ 1 2 Set key switch to I Message Laser key switch off disappears message Laser emergency switch activated is displayed Notic...

Page 149: ..._______________________ 1 8 Get pedal to position 2 Aiming beam is activated Notice _____________________________________________________________________________ 1 9 Get pedal to position 3 100 Working beam is activated sound correct Notice _____________________________________________________________________________ 2 Laser power calibration Connect test fibre 2 1 Measure and check the following ...

Page 150: ...ries and consumables see user manual chapter 24 1 Teacher Company Attendee Function Attendee Function Attendee Function Attendee Function Attendee Function Attendee Function Attendee Function Attendee Function Work completed yes no Installation accepted yes Needs follow up yes no Field engineer Customer Name Name Date Date Signature Signature Comments recommendations Oertli Instrumente AG CH 9442 ...

Page 151: ...VV016042 2021 03 23 Rev 10 ...

Reviews: