background image

Scan to file

83

Make a scan-to-file

Scanning an original to file is an easy operation. If the settings (see chapter , 
‘Settings for scan-to-file’ on page 85) are correct, the only thing you have to 
do is press the start button 

 on the scanner.

Scan-to-file

1

Place your original face-down, aligned to the right along the original guide.

2

Select the appropriate original type.

3

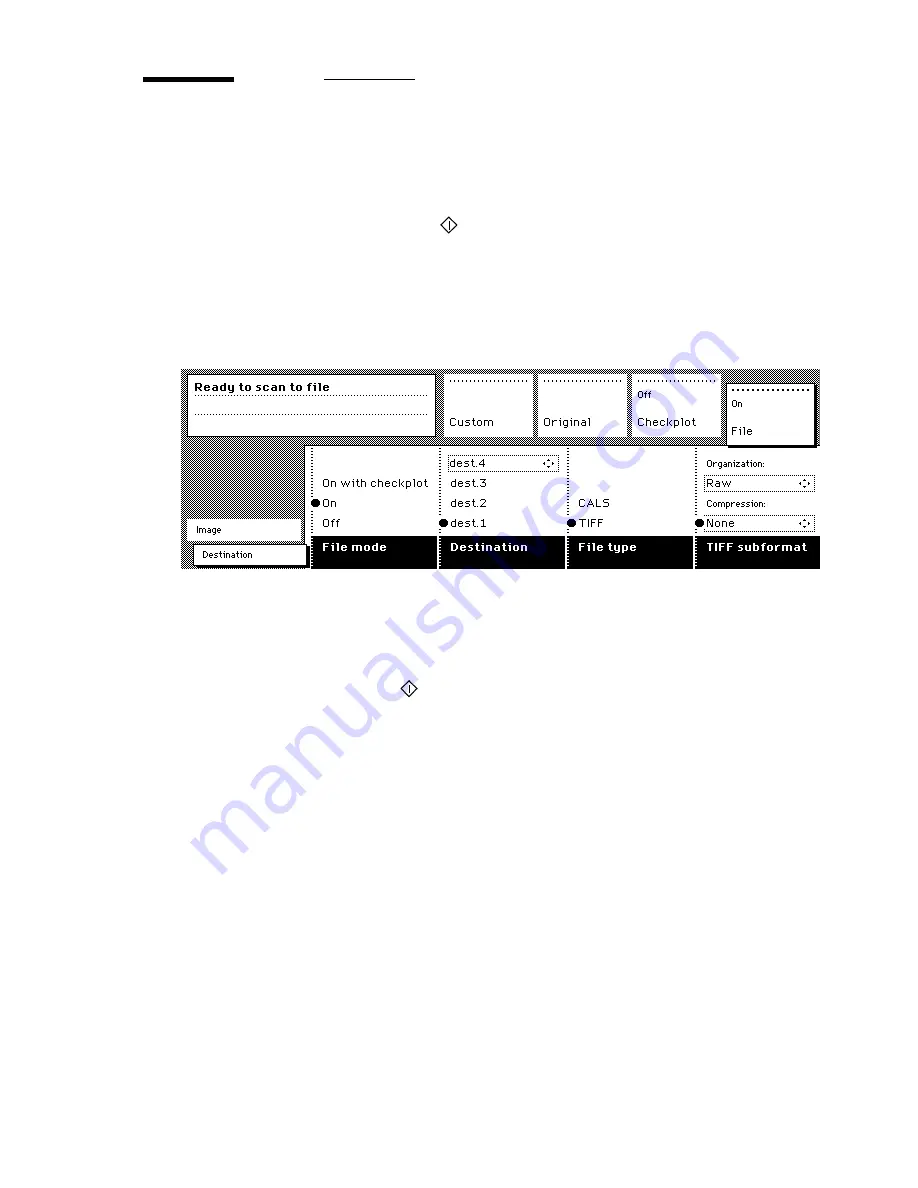
Select the ‘Destination’ card in the ‘File’ section.

[41] ‘Destination’ card in the file section

4

Select ‘File mode’ On.
The status message is displayed: Ready to scan to file.

5

Select a Destination (see ‘Destinations’ on page 93).

6

Press the start button 

.

The original is scanned. 
A status message is displayed (see figure 42 on page 84):
“Scanning job “Scan job number X””
“File scan22.tif”

Summary of Contents for 9600

Page 1: ...Copier Printer User Manual Oc 9600...

Page 2: ...y any person of such revision or changes Edition 3 0 Oc Technologies B V US This manual which can be kept behind the left hand door of the copier contains a description of the Oc 9600 and the copy job...

Page 3: ...operating panel 26 Display 27 Counter 28 Buttons 29 Printer panel actions 30 Starting up and shutting down the Oc 9600 31 Media type and size on the printer 32 Special media indication 34 Interrupt a...

Page 4: ...Defining delivery of copies 55 Stopping a copy job 55 Chapter 4 Performing special copy jobs Non standard size originals 58 The scan width 59 The copy size 60 Scanning originals with filing strip 61 I...

Page 5: ...anage the temporary store 98 How to retrieve scanned files 99 Get files via FTP 99 Oc View Station 101 Menu options 102 Function buttons 103 View error 104 Chapter 7 System status Introduction 106 Str...

Page 6: ...ettings Editor 137 How to perform actions from the Settings Editor 137 Key operator settings 139 Job related settings for copying 140 Job related settings for copying single 141 Original group 143 Cop...

Page 7: ...ity settings 211 Chapter 12 Loading supplies Introduction 218 Media 219 Rolls 220 Cut sheet material 225 Toner 227 Maintenance of the glass platen and the reference roller 230 Reinforcement unit maint...

Page 8: ...uct specifications Oc 9600 281 List of available material types and sizes 288 Reinforcement strips 289 Appendix B Safety information Recommended weight limits 292 Instructions for safe use 294 Safety...

Page 9: ...nter User Manual Chapter 1 Introduction This chapter contains a general introduction to the Oc 9600 including a general description of the main features delivery options and software applications prov...

Page 10: ...n the Oc 9600 Chapter 5 Managing print and copy jobs describes how to view the Oc 9600 print queue and how to abort the active print how to delete and pause print jobs in the queue and how to restart...

Page 11: ...mation contains the recommended weight limits instructions for safe use the available safety data sheets and the applicable ENERGY STAR specifications Appendix C Overview of printer copier parts To he...

Page 12: ...lable in a number of printer configurations ranging from two rolls in a single drawer the minimum configuration to a maximum of six rolls with one cassette tray and three cassette trays with four roll...

Page 13: ...inations are supported Network connectivity The Oc 9600 supports a number of popular network protocols This means that it can be used in multiple networking environments such as TCP IP NetBEUI and Nov...

Page 14: ...Remote Control Format RCF files or Oc Job Tickets OJT and remote applications Operating panels The Oc 9600 consists of two operating panels for making a wide variety of settings for printing and copy...

Page 15: ...a user on a control panel or by means of the user interface UI on a workstation or PC The RCF file job ticket specifies the sets of inputs the sets of outputs and the processing that is needed to form...

Page 16: ...of the Oc 9600 The key operator replenishes toner when necessary loads media as needed and defines the default printer settings for recurring print jobs Also the key operator defines all time setting...

Page 17: ...e Oc 9600 printer More information about installing configuring and using drivers can be found in the documentation provided with the drivers Note All Oc drivers and file submitters can be freely down...

Page 18: ...operations Oc 9600 manual feeder The Oc 9600 offers you the ability to manually feed sheets of printing material This can be convenient if you want to print a job on a media type and or size that is n...

Page 19: ...already been printed on one side Otherwise the Oc 9600 might become damaged 5 Use both hands to align the print material with the format indication on the manual feed 6 Move the material forward into...

Page 20: ...nner Set memory monitor to view the available storage space on the controller Overview of the loaded media types and sizes See chapter 6 Scan to file on page 81 for more information about the Oc 9600...

Page 21: ...utput delivery device The IRT is the rack on top of the machine see figure 1 on page 12 A number of optional features are also available with the Oc 9600 These include Rolls and cassette trays The Oc...

Page 22: ...same time comply with the international safety regulations as far as maximum roll weights are concerned Oc provides an optional roll loader for use with the Oc 9600 See Recommended weight limits on pa...

Page 23: ...folded copies can be delivered to the Copy Delivery Tray The Copy Delivery Tray can be used in combination with the Integrated Receiving Tray IRT 5 Copy Delivery Tray Folder If the Oc 9600 is equipped...

Page 24: ...24 Oc 9600 Copier Printer User Manual Reinforcement unit The optional reinforcement unit adds a firm plastic rim with punched holes to the copy see figure 7 7 Copy with reinforcement unit...

Page 25: ...Oc 9600 Copier Printer User Manual Chapter 2 Using the Oc 9600 Printer This chapter contains a brief description of the operating panel of the Oc 9600 Printer and the actions that can be performed on...

Page 26: ...of the printer console is easy to use see figure 8 The panel consists of a number of buttons and a graphical display At the top of the panel there is an indicator a light which starts flashing when o...

Page 27: ...rinter will continue to operate but it is possible that the print quality will not be optimal e g Fill B5 toner A graphical overview of available rolls and cassette trays including the material type a...

Page 28: ...a job when the system does not yet know the total number of pages only the current page may be displayed e g Page 5 With set input set counter In this case the counter shows the current total number...

Page 29: ...mall selection triangles next to the specified option are no longer dimmed These selection triangles indicate that you can select an op tion from a predefined list with the help of the Up Down but ton...

Page 30: ...a limited number of actions These include Starting up and shutting down the printer Setting media type Setting media type for manual feeder Setting media size Setting a special media indication Stoppi...

Page 31: ...switch 2 Turn on the scanner 3 Turn on the controller and the monitor Note The Oc 9600 controller will be started up automatically Turn off the system 1 Select the Shut down option from the System Con...

Page 32: ...itself you have to specify type and size after you re load media as described in Media on page 219 See List of available material types and sizes on page 288 for an overview of all materials that can...

Page 33: ...nto an uninterrupted line and the small selection triangles next to the specified material are no longer dimmed 5 Use the up down buttons to select the material you just loaded 6 Press the on line but...

Page 34: ...the right selection button to activate the Type option The dotted line around the current selection is changed into an uninterrupted line and the small selection triangles next to the specified type...

Page 35: ...on line button on the printer operating panel to put the printer off line The Off line message is displayed in the status window 2 Press the left selection button to shift the focus to the Language o...

Page 36: ...o an uninterrupted line and the small selection triangles next to the specified option are no longer dimmed 3 Use the up down buttons to toggle through the available options 4 Activate the Input optio...

Page 37: ...ress the on line button on the printer operating panel to put the printer off line The Off line message is displayed in the status window 2 Press the left selection button to shift the focus to the Fo...

Page 38: ...38 Oc 9600 Copier Printer User Manual...

Page 39: ...600 Copier Printer User Manual Chapter 3 Using the Oc 9600 Copier This chapter contains a brief description of the interface of the Oc 9600 Copier and the actions that can be performed on its operatin...

Page 40: ...ed below As you can see in this diagram the panel consists of a display in the center surrounded by a number of function section and arrow buttons To the left of the display you can find the Stop and...

Page 41: ...opier The following buttons are available Button type Function Start buttons The green button marked with is used to start the feeding of the original or to re start the copy process Numeric buttons T...

Page 42: ...on The other function buttons allow you to select functions or subfunctions within a card Finally the arrow buttons can be used like the numeric buttons to define numeric settings The arrow buttons ar...

Page 43: ...2 on page 40 for an example of the Custom section Original section The Original section contains all settings for the original divided over a number of cards The following cards are available top to b...

Page 44: ...ss the Card selection button to select the appropriate card You can switch cards from bottom to top by pressing the button again Note The active card is likewise visually separated from the other card...

Page 45: ...s Also a combination of simple selection and numeric selection is possible as shown in the Cut length setting demonstrated in figure 14 on page 44 Note The Up arrow and Down arrow buttons can be used...

Page 46: ...f basic tasks These include Starting up and shutting down the scanner Making copies Selecting the required media Selecting the input mode Specifying the zoom factor Select the brightness Delivering or...

Page 47: ...The on off switch has two settings on the scanner is switched on off the scanner is switched off 15 On off switch Start up 1 Push the switch to the on position The system is immediately available for...

Page 48: ...by the symbol Use the Media function to select copy material and format 4 Specify how a job will be sorted Single sheet Multiple sheets output 1 1 2 2 3 3 or Set output 1 2 3 1 2 3 The currently sele...

Page 49: ...utomatic the Oc 9600 Copier will try to use a roll or cassette tray format that matches the original size After inserting the original the roll or cassette tray that is used is indicated by the symbol...

Page 50: ...e job cannot be interrupted by a high priority copy job and there will be no risk of getting mixed output Set produces one copy for each sheet in a set and then continues with the next copy of the ent...

Page 51: ...Arrow buttons on the right of the display see figure 12 on page 40 If you press one of the vertical buttons the zoom factor will increase or decrease with steps of 0 1 If you press one of the horizont...

Page 52: ...lect the exposure level from the Custom section if this setting has been defined for this Delivering originals after scanning You can choose for delivery of the original at the front rewind or the rea...

Page 53: ...sure about the settings that belong to an original insert an original when the settings are correct Note To increase your versatility at the scanner input side you can ask your key operator to turn o...

Page 54: ...Select any other required settings 4 Enter the number of copies using the numeric buttons 5 Feed in the original 6 Press the start button 7 Take your sheet of copy material to the side of the printer...

Page 55: ...ng steps Deliver copies on the copy delivery tray 1 Open the Finishing card in the Copy section 2 Use the Copy delivery function button to select the Copy deliv tray option 23 Delivering copies on the...

Page 56: ...56 Oc 9600 Copier Printer User Manual...

Page 57: ...57 Oc 9600 Copier Printer User Manual Chapter 4 Performing special copy jobs In this chapter special copy functions are described in greater detail...

Page 58: ...system uses a memory table that contains all standard width standard length combinations to predict the length of the original The scanner also measures the real length of each original while it is tr...

Page 59: ...scan width 1 Open the Sheet card in the Original section 2 Press Scan width to select the required setting Standard This option must be used to copy a standard sized original Non standard This option...

Page 60: ...om the Custom section Note When Automatic is selected the roll or cassette tray that is used is indicated by the symbol 2 Press the Cut length function button to select the required cut option Standar...

Page 61: ...ple of adjusting the left hand side of an original Copying with removed filing strip along the left hand side 1 Press the catch underneath the original guide and move it to the right 27 Adjusting the...

Page 62: ...roll or cassette tray the remaining paper part on the right hand side will not be scanned see figure 28 28 Example of removing the right hand side of an original Scan with removed filing strip along...

Page 63: ...original Copy with removed filing strips along the leading and trailing edge 1 Open the Sheet card in the Original section 2 Press the Remove strip function button 30 Removing strip 3 Adjust the value...

Page 64: ...in the Copy section 2 Press the Add strip function button 31 Adding strip 3 Adjust the values for the trailing edge using the numeric or arrow buttons 4 Press the Add strip function button again 5 Ad...

Page 65: ...ation will provide a good quality copy from a large variety of originals The automatic background compensation setting which is activated by default ensures the production of background free copies of...

Page 66: ...ss according the type of image 1 Press the Original type function button to select the appropriate image type By default Lines text is selected with Background compensation enabled This is the most su...

Page 67: ...he original Note You can select only one edit function at a time Auto shift By selecting the automatic shift function you can move your image to one side of the page Auto shift supports these shift op...

Page 68: ...tion 35 Automatic shift with the Align function 2 Press the Align function button and select a horizontal alignment value Left Middle or Right with the arrow buttons 3 Press the Align function button...

Page 69: ...the image In some cases the margin may be too narrow to accommodate filing strips without loss of information To avoid this you can shift the image in horizontal and or vertical direction as shown be...

Page 70: ...or to the right Note When you shift the image horizontally you can only shift to the left or to the right 3 Press the Shift function button again and select a vertical shift value by pressing the nume...

Page 71: ...y of an original as shown in the next figure 38 Example of a mirror image copy Make mirror image copy 1 Open the Image card in the Copy section 39 Mirror image 2 Press the Mirror function button to en...

Page 72: ...72 Oc 9600 Copier Printer User Manual...

Page 73: ...pter 5 Managing print and copy jobs This chapter describes how to view the Oc 9600 print copy queue and how to abort the active print how to delete and put on hold print and copy jobs in the queue and...

Page 74: ...out Connect to Exit Edit options defining first and second language and setting default printer only remote The Auto login option allows you to start the Queue Manager application automatically in the...

Page 75: ...eparators It is also possible to change the order of the columns by dragging a specific column to a new position 40 Queue Manager window Modes The Oc 9600 Queue Manager has four modes Anonymous user m...

Page 76: ...allow only authorized personnel to use particular functions You can enter these modes by selecting the Login option from the File menu and by specifying the correct password when prompted for it see...

Page 77: ...The job is being received and printed at the same time The job is being processed and printed at the same time The job is being printed Note Jobs that are being printed this is indicated by a printer...

Page 78: ...s quite useful as well The remote applications allow key operators and system administrators to manage multiple Oc 9600 systems from a single location They can centrally monitor the system status and...

Page 79: ...starting jobs currently on hold This list will be automatically updated Note Queue operations can only be performed when you are properly authorized Before you can use the Queue Manager in a different...

Page 80: ...g on the last job You can select a non consecutive list of jobs to be put on hold by clicking on each desired job while holding down the Ctrl key 2 Click on the Hold button An icon for a job that is p...

Page 81: ...81 Oc 9600 Copier Printer User Manual Chapter 6 Scan to file This chapter describes the Oc 9600 scan to file function...

Page 82: ...nformation documents contain in another application A scan to file is made at the Oc 9600 scanner On the scanner operating panel you can among other things choose at which resolution you want to scan...

Page 83: ...al face down aligned to the right along the original guide 2 Select the appropriate original type 3 Select the Destination card in the File section 41 Destination card in the file section 4 Select Fil...

Page 84: ...84 Oc 9600 Copier Printer User Manual 42 Feedback during scan to file 7 On the controller Oc View Station starts automatically showing the result of the scan see figure 43 43 Oc View Station...

Page 85: ...le on the scanner operating panel are divided into two cards Destination and Image Destination card File mode Destination File type Tiff subformat 44 Scanner operating panel Destination card Image car...

Page 86: ...define up to ten destinations in the Scan Manager application On the scanner operating panel you can choose one of these destinations Select a destination 1 Press the function button to select destin...

Page 87: ...Compression of the file Organization can be select with the arrow buttons Stripped Tiled Raw Note Only choose Stripped or Tiled when you are sure you can use these organizations afterwards Choose Raw...

Page 88: ...of the following three settings Custom This option let s you specify a custom zoom value You can enter a range from 25 to 400 This value also shows the zoom value when the Automatic option is chosen...

Page 89: ...Scan to file 89 Mirror You can use the Mirror option to scan a horizontally mirrored image of an original Mirroring is performed in the vertical axis...

Page 90: ...er displays the filename and the status of the file generation process When the scan is completed a view of the scanned image is automatically displayed on the controller Figure 46 on page 90 shows th...

Page 91: ...ight table viewer this destination will appear as having been selected Figure 46 on page 90 shows that the destination Temp10 is selected If for any reason a scan to file cannot be sent to the appropr...

Page 92: ...umstances it is possible that your most recent scanned file is not visible in the on screen table In this case you can update the table view Update the table view 1 From the View menu select Refresh o...

Page 93: ...ate delete and lock destinations You can also define automatic file naming to ensure your files get the desired names A destination can also be a file server or an end user PC It is better to select r...

Page 94: ...t box 6 Enter a path of the target folder in the Path text box You can also click the Browse button to select the path Note This is only possible if you choose On the controller as Type see step 4 7 E...

Page 95: ...igure 50 50 Delete button on the toolbar The selected destination is deleted Note This option is only available if you are logged on as a Key operator or as a Repro operator Note You are not able to d...

Page 96: ...these files You can also view the file properties View a scanned file 1 Select a file in the right hand pane 2 Open the File menu and select View or click the View button on the toolbar see figure 52...

Page 97: ...ption is only available if you are logged on as a Key operator or as a Repro operator View properties of a scanned file 1 Select a file in the right hand pane 2 Open the File menu and select Propertie...

Page 98: ...nned file Manage the temporary store When you regularly scan originals to a file many files are created in the temporary store You can clean up the temporary store manually or automatically To manuall...

Page 99: ...A DOS box now appears with the FTP prompt 3 Enter the Open command followed by either the registered name of the Next Generation Controller NGC or the IP address for example 194 2 66 146 to connect to...

Page 100: ...ry 6 Go to the tempstore directory using the following command cd tempstore 7 Go to the scan directory if you want to retrieve a file from a destination on the local host or go to the unsent directory...

Page 101: ...canned files This can be done automatically see Automatically view a file after scanning on page 98 after scanning or via the Scan Manager see Print a scanned file on page 96 Oc View Station has the f...

Page 102: ...se Rotate 180 Rotates the image 180 degrees Sample When active displays only a sample of bi level raster pixels Negate Reverses the raster image pixels on display and changes which are dominant for sc...

Page 103: ...s counter clockwise 8 Rotate 90 CW Rotates the image 90 degrees clockwise 9 Rotate 180 Rotates the image 180 degrees 10 Measurement when active allows you to measure lines and areas on the image Refer...

Page 104: ...ays the entire current page in miniature for reference 12 Displays or removes the Detail window View error When the memory is almost full sometimes the viewer does not show the scanned file Instead it...

Page 105: ...105 Oc 9600 Copier Printer User Manual Chapter 7 System status This chapter describes how to view the status of the Oc 9600 system...

Page 106: ...ication The Auto login option allows you to start the application automatically in the specified user mode View The View menu allows you to switch between the display languages as defined in the Edit...

Page 107: ...meter which is divided into three zones Green safe you have enough space left to print large jobs many small jobs Orange pay attention you might reach the set memory limit soon Red the set memory is n...

Page 108: ...ia type is polyester the thickness is expressed in mil 0 001 otherwise the weight is expressed in g m2 or in pounds When a roll or tray is disabled the roll or tray icon is dimmed and the media inform...

Page 109: ...f a status bar divided into three zones to show the current state of the set memory Green normal zone Yellow warning almost full zone Red error set memory full zone Note You can hide the memory status...

Page 110: ...e and the roll is ready for printing The roll is enabled but empty The material is available in portrait orientation and the cassette tray is ready for printing The material is available in landscape...

Page 111: ...tings on the Oc 9600 Changing the display language 1 Select the View menu option Here you can select one of two available display languages Clearing the system 1 Select the Clear system option in the...

Page 112: ...systems and click on OK Note If the system you want to connect to is not available in the list you can click on the Edit button A dialog box will appear which allows you to manually add a 9600 system...

Page 113: ...113 Oc 9600 Copier Printer User Manual Chapter 8 Remote Logic This chapter describes how to install the remote versions of the Queue Manager System Control Panel and Settings Editor on a user PC...

Page 114: ...oint of view the availability of remote versions of the applications is quite useful as well They allow key operators and system administrators to manage multiple Oc 9600 systems from a single locatio...

Page 115: ...quite simple and self explanatory When you select the Install remote applications option on this CD ROM a wizard is started which guides you through the installation process Once the installation proc...

Page 116: ...and a Welcome window is displayed 63 Welcome window 4 Exit all Windows programs as recommended and click the Next button to continue The Software License Agreement window is displayed 64 Software Lic...

Page 117: ...to the Software License Agreement window or to click the Exit button to terminate the installation procedure The User Information window is now displayed 65 User Information window Enter your name an...

Page 118: ...n The programs are now installed Each application is installed separately and as part of a combined version called Applications When the installation is complete you can start the applications by sele...

Page 119: ...119 Oc 9600 Copier Printer User Manual Chapter 9 The Oc 9600 applications This chapter describes the general functionality of the Oc 9600 applications...

Page 120: ...ns to authorized users only Access one of the four user modes by logging in To facilitate working with the Oc 9600 applications the display languages can be configured Should you find yourself not abl...

Page 121: ...or and the system administrator have the same user rights In the Settings Editor however the user modes offer different rights In repro operator mode the operator is allowed to view settings only in t...

Page 122: ...Note You will have to perform the Logout action in all four Oc 9600 programs separately To change the password To avoid taking any security risks on the Oc 9600 you may want to change your password on...

Page 123: ...c 9600 applications automatically in the specified user mode Enable automatic login 1 Open the Edit menu and select Options The Options window appears 2 Select the Auto login check box 3 Select the re...

Page 124: ...tions Set the languages 1 Open the Edit menu and select Options The Options window appears 2 Choose the desired first and second language from the two drop down list boxes 3 Click OK to close the Opti...

Page 125: ...you want to connect to language1 lang Specifies the first language in combination with the parameter country1 country country1 country Specifies the first language in combination with the parameter la...

Page 126: ...ple command line parameter Below is an example of how to start the Oc 9600 applications with the configuration file Myconfig cfg connected to the My9600 server The first language is set to US English...

Page 127: ...of the Oc 9600 system you want to connect to in the Systems text box 4 Click Add The Oc 9600 is added to the list You can add more systems Note You can remove an Oc 9600 system Select one from the li...

Page 128: ...128 Oc 9600 Copier Printer User Manual...

Page 129: ...129 Oc 9600 Copier Printer User Manual Chapter 10 Key operator settings This chapter describes how to choose key operator settings in the Settings Editor of the Oc 9600...

Page 130: ...for maintaining correct system default settings These include default settings and groups of default printer settings for recurring print and copy jobs Also the key operator can define all timer sett...

Page 131: ...zed in order to save screen space Take the following steps to shut down the controller Shut down the Oc 9600 controller 1 Go to the System Control Panel application 2 Select the Shutdown option from t...

Page 132: ...modified within the key operator settings System Administrator settings SA settings The system administrator group allows authorized users to configure default printer language PDL settings and print...

Page 133: ...or paper series all related settings are instantaneously converted to the new setting with a bullet for the settings that are changed 69 Settings Editor General structure The Settings Editor is struct...

Page 134: ...start the Settings Editor application automatically in the specified user mode View The View menu allows you to switch between the display languages as defined in the Edit options window and between K...

Page 135: ...pdate area The user can move through the tree and select a setting If he selects a setting for which he is authorized he can edit the setting in the update area If the user is not authorized for a par...

Page 136: ...ndo button is disabled at first This button is enabled the moment the first setting is changed It is disabled after an Apply action is performed or after an undo action 73 Control buttons Status bar T...

Page 137: ...ings editor These activities include Save settings to file Load settings from a file Specify the custom card Save and load settings All key operator and system administrator settings can be saved in a...

Page 138: ...pply button The loaded settings are transferred to the system Note This is only possible if the user is logged in as a key operator or system administrator Specify the custom card The custom card on t...

Page 139: ...ngs Editor to prevent unauthorized use of the Oc 9600 Make key operator settings in the Settings Editor 1 Maximize the Settings Editor on the screen 2 Log in as key operator 3 Click on one of the top...

Page 140: ...the copy job via a job ticket or from the scanner panel plus a folder with settings for horizontal and vertical zoom calibration The Defaults folder contains the following groups of options Output mod...

Page 141: ...values N A Menu path Jobs Copy File Defaults Checkplot value Apply Number of prints sets Description Use Number of prints sets to define the default number of copies for each job in the printer memory...

Page 142: ...ue Ap ply Custom zoom Description The custom zoom value defines the zoom ratio when you se lect Custom for Zoom method Menu path Jobs Copy File Defaults Custom zoom value Ap ply Mirror Description You...

Page 143: ...he following options see figure 75 on page 143 Input mode Legend location Remove leading strip Remove trailing strip Scan width method Custom scan width Scan length method Custom scan length Original...

Page 144: ...to fold the copy in such a way that the legend is always on top of the folded package Min max values N A Menu path Jobs Copy File Defaults Original Feeding Legend location value Apply Remove leading s...

Page 145: ...The Custom scan width option allows you to select the width that will be scanned Useful if the original has an arbitrary width This setting will overrule the automatically detected original format Th...

Page 146: ...146 Oc 9600 Copier Printer User Manual Min max values N A Menu path Jobs Copy File Defaults Original Sheet Scan length method value Apply...

Page 147: ...type Description Select the type of original that you want to scan from the fol lowing range Lines text Grays lines Dark original Blueprint Printed matter Photo Min max values N A Menu path Jobs Copy...

Page 148: ...can be set for every original A negative value indicates a lower brightness resulting in a darker scan a positive value indicates a higher brightness thus resulting in a lighter scan Min max values N...

Page 149: ...e following options see figure 76 on page 149 Align Horizontal shift Vertical shift Automatic media Default paper source Default paper source number Manual feed Cut length method Custom cut length Add...

Page 150: ...e for in stance filing strips without loss of information To avoid this shift the image in a horizontal and or vertical direction Image shift can be used in combination with the align func tion Min ma...

Page 151: ...efaults Copy Sheet Automatic me dia value Apply Default paper source Description Use Default paper source to define the default paper source The default is Roll 1 Whether a roll or a cassette tray is...

Page 152: ...print length is related to the length of the im age This is the default value The minimum print length is 279 mm or 11 inches Custom The print length is defined by the user The mini mum length is 279...

Page 153: ...se accordingly Add leading strip will add a blank strip at the top of the im age Add trailing strip will add a blank strip at the bottom of the image By default no leading or trailing strip is defined...

Page 154: ...anual File group The File group contains the following options see figure 77 on page 154 File format File extension TIFF File extension CALS TIFF compression TIFF organization File resolution Optimiza...

Page 155: ...S Description You can enter an extension of your own choice for CALS files Min max values N A Menu path Jobs Copy File Defaults File Destination File ex tension CALS value Apply TIFF compression Descr...

Page 156: ...ze Min max values 200 400 dpi Menu path Jobs Copy File Defaults File Image File resolution value Apply Optimization Description There are two ways to optimize a scan to file Scan quality optimizes for...

Page 157: ...ertical zoom calibration Description In order to optimize the 1 to 1 copy and print quality the key operator can adjust the zoom calibration factor to an accura cy of 0 1 The zoom factor can be adjust...

Page 158: ...that are sent along with the print job plus a setting for printing error pages see figure 79 The Print tab contains 4 single options and 4 groups of options Print error page single option Number of p...

Page 159: ...ogether as a set If set processing is off sorting is al ways done by page and every original will be presented as a job If set processing is on sorting is done by page and all originals will belong to...

Page 160: ...at Fit method Feed preference Default paper source Default paper source number Print cut method Custom print length Add leading strip Remove leading strip Remove trailing strip Add trailing strip Defa...

Page 161: ...define on which media size an original will be printed if the specified media size is not available The following buttons are available Exact fit The original will only be printed if the specified med...

Page 162: ...ource Min max values 1 2 Menu path Jobs Print Defaults Sheet Default paper source number value Apply Print cut method Description The Oc 9600 determines the length and width of each digi tal image The...

Page 163: ...5 in Menu path Jobs Print Defaults Sheet Custom print length val ue Apply Default roll format Description Use Default roll format to define the default media size for your print jobs The default is A0...

Page 164: ...e plot Min max values 0 16 inches Menu path Jobs Print Defaults Sheet Strip Add leading trailing strip value Apply Remove leading trailing strip Description Use the remove leading or trailing strip se...

Page 165: ...ettings 165 Finishing group The finishing group contains the following options see figure 81 Folding Drawing method Image orientation Folding length Folding width Binding strip 81 Printer related fini...

Page 166: ...ription To specify the image orientation for folding Choose be tween Portrait Landscape or Auto detect Min max values N A Menu path Jobs Print Defaults Finishing Image orientation val ue Apply Folding...

Page 167: ...Key operator settings 167 Min max values 5 1 inch Menu path Jobs Print Defaults Finishing Binding strips value Apply...

Page 168: ...Oc 9600 Copier Printer User Manual Image group The Sheet group contains the following options see figure 82 Zoom method Custom zoom Mirror Invert Rotate value Legend correction 82 Image folder for Pr...

Page 169: ...m Min max values 25 400 Menu path Jobs Print Defaults Image Custom zoom value Apply Mirror Description You can use the Mirror option to print a horizontally mir rored image of an original Mirroring is...

Page 170: ...ormat The following values are available Auto rotate productive if possible the orientation is changed to landscape to allow for faster printing paper movement through the machine will be reduced Auto...

Page 171: ...at The following values are available Auto rotate productive if possible the orientation is changed to landscape to allow for faster printing paper movement through the machine will be reduced Auto ro...

Page 172: ...172 Oc 9600 Copier Printer User Manual Layout group The Layout group contains the following options see figure 83 Auto shift Horizontal shift Vertical shift 83 Layout folder for Print...

Page 173: ...Right down Min max values N A Menu path Jobs Print Defaults Layout Auto shift value Apply Horizontal Vertical shift Description The print margin may be too small to accommodate for in stance filing s...

Page 174: ...600 switches to another roll or cassette tray depending on the specified feed preference with the same material type and size as soon as a roll or cassette tray is empty If Set next larger fit is acti...

Page 175: ...ty might slightly deteriorate printouts get lighter To avoid this and to guarantee the best possible print quality you may use the Block number with correct light intensity option to adjust the light...

Page 176: ...single system related settings and five groups of settings for a key operator see figure 85 Scan to file password single Telephone number single Localization group Job priorities group Media group Ti...

Page 177: ...o activate this option a password is required Call your lo cal dealer for this password After you have entered the password you can use Scan to file Min max values N A Menu path System Scan to file va...

Page 178: ...panels printer and scanner of your Oc 9600 for providing information to the users Users can choose between the first and second lan guages by changing the language at the printer operating panel For t...

Page 179: ...priorities settings for key operators Copy priorities Description When you activate Copy priorities the copy job will be placed right behind the active job When you deactivate the option the job will...

Page 180: ...ault on your Oc 9600 When the user sets a new media size on the printer operating panel only the sizes in the selected paper series are available If Auto format is enabled the Paper Series setting det...

Page 181: ...rator settings 181 Timers group The Timers group allows you to adjust the following settings see figure 89 Sleep mode timer Manual feed time out Controller panel time out 89 Timers settings for key op...

Page 182: ...anual feed time out in This is done in terms of seconds This time out is the amount of delay time that must pass before jobs will get the not ready to print status e g when the sheet is not being fed...

Page 183: ...e disk clean up to clean the disk in regular intervals Clean up can be done automatically or manually Three directories can be cleaned see figure 90 Temporary store folder Unsent folder Scan spool fol...

Page 184: ...lder than the specified time and date will be deleted Min max values 0 850 h Menu path System Disk cleanup Local storages Unsent folder Scan spool cleanup File age value Apply Next time Description Ne...

Page 185: ...four single scanner related settings and two groups of settings for a key operator see figure 91 Printer family single Rewind originals single Automatic feed single Fit method single Zoom steps group...

Page 186: ...d originals Description Use Rewind originals to have the Oc 9600 rewind the originals after they have been scanned You can then take the scanned original from the front of the scanner Min max values N...

Page 187: ...edia size is not available The following options are available Exact fit he document will only be printed if the specified media size is available Next larger if the specified media size is not availa...

Page 188: ...tep 3 35 5 Reduction step 4 25 Enlargement step 1 141 4 Enlargement step 2 200 Enlargement step 3 282 8 Enlargement step 4 400 Timers group There are three scanner related timer settings a key operato...

Page 189: ...pecify how much time must elapse before the set on the scanner is automatically closed if no new original is fed and the set is not closed with the start key Min max values 10 600 seconds Menu path Sc...

Page 190: ...190 Oc 9600 Copier Printer User Manual...

Page 191: ...191 Oc 9600 Copier Printer User Manual Chapter 11 System administrator settings This chapter describes how to make System Administrator settings on the Oc 9600 Settings Editor...

Page 192: ...settings Pen settings Automatic Language Selection ALS settings Controller identification settings Set memory reservation settings Connectivity settings To modify the system administrator settings you...

Page 193: ...on the screen 2 Log in as system administrator See User modes on page 121 for more information about logging into the Settings Editor 3 Click on one of the top buttons to display the desired group of...

Page 194: ...194 Oc 9600 Copier Printer User Manual There are two types of system administrator settings see figure 94 Printer System 94 System administrator settings in the Settings editor...

Page 195: ...gs Dithering matrix single option Poker PDL heap size single option Poker min number of vertices in polygons single option Poker max number of vertices in polygons single option Scale down algorithm s...

Page 196: ...rinter PDLs Dithering matrix value Apply Poker PDL heap size Description This setting allows you to increase the PDL heap size if the system is unable to perform transformations due to large polygons...

Page 197: ...by connection type which printer languages are accepted for automatic data format recognition and which language is forced These settings are called ALS Automatic Language Sensing settings Poker max...

Page 198: ...or printing listings VDF and BGL are not available on the Oc 9600 C4 or CALS type 4 was previously called EDMICS NIRS is also called CALS type 3 CALS type 2 is recognized but not interpreted only CALS...

Page 199: ...ic in order to return to your normal working mode For further information on remote control refer to the Remote Control File Reference Manual or the Oc Job Ticket Reference Manual Enable Automatic Lan...

Page 200: ...ged at the intersection of vectors and polygons Pen width scaling To enable or disable the pen width scaling If enabled scaling an image will scale the pen width correspond ingly HPGL 2 Setting Descri...

Page 201: ...e the type of printer you want to emulate HP650C or HP750C The default emulation type is HP650C which is compatible with older ma chines Differences occur in the default pen palette and the de fault n...

Page 202: ...character code for the end of message byte This will indicate the end of a data sequence Pen priori ty Pen parameters can be defined in two ways In the plot data file In the Remote Configuration File...

Page 203: ...ing Description Enable C4 The Enable option allows you to enable or disable C4 Should problems with C4 arise the C4 PDL can be disabled by select ing the Disabled option TIFF Setting Description Enabl...

Page 204: ...tion allows you to define the font size to use in points 1 point 1 72 inch Tab size The Tab size option allows you to define the tab size to use Top margin The Top margin option allows you to define t...

Page 205: ...ows you to define the selected page height when Custom has been selected as default page type Standard page for mat The Standard page format option allows you to define the de fault size of the format...

Page 206: ...ll vector languages HP GL HP GL 2 and CalComp 95 Making pen settings Pen width Pen width can be defined from 0 12 up to 16 25 mm By default all pen widths are set to 0 12 mm Adjustment can be made in...

Page 207: ...a pen number in the Pen number box or select a number with the selection arrows to the right of the box The Pen width and Pattern boxes now become active 4 Specify a pen width by typing a value or sel...

Page 208: ...he system related settings contains one single option and three groups of options see figure 97 Scan memory reservation single option Controller identification group Set memory reservation group Conne...

Page 209: ...Host name Description Location Administrator Scan memory reservation Description To specify the maximum amount of the file system disk us age allowed for all folders to store scanned files temporary s...

Page 210: ...n max values N A Menu path System Controller identification Hostname value Apply Description Description To enter additional information about the system It is not mandatory to fill in this field Min...

Page 211: ...Orange zone limit Description To specify the orange limit in Megabytes The orange zone is entered when the free space in the set memory becomes less than this limit Min max values 100 2048 Mb Menu pa...

Page 212: ...older with the appropriate connection type 4 Select any of the available options for the selected connection type 5 Change the setting in the update area as appropriate 6 Click on the Apply button to...

Page 213: ...abled or disabled Time out To define the plot time out on a FTP connection 60 900 s Communication mode To define the communication mode for an FTP connection With Print while spool the data will be sp...

Page 214: ...string should not be preceded by a period Pserver pass word To specify the Novell PSERVER password Access mode To define the Novell access mode File server names To specify the names of the available...

Page 215: ...pecify the IP subnet mask for the server The subnet mask is a number that when compared by the computer with a network address number will block out all but the neces sary information Default gateway...

Page 216: ...216 Oc 9600 Copier Printer User Manual NetBeui Setting Description Enable To specify whether or not the NetBeui adapter is enabled or disabled...

Page 217: ...217 Oc 9600 Copier Printer User Manual Chapter 12 Loading supplies This chapter describes regular maintenance tasks such as refilling paper and toner and refilling the folder reinforcement unit...

Page 218: ...duction This chapter covers the important maintenance activities such as Loading rolls of print material Loading cut sheet material Adding toner Cleaning the glass platen and the scanner reference rol...

Page 219: ...bottom cassette trays The minimum size of media in the third cassette tray is A2 Attention After loading new print material you need to inform the system about the size of the material and of the type...

Page 220: ...r Red label plus 20 lb bond Plain paper Red label 6 lb bond Transparent paper 4 5 5 lb bond Polyester film CPRF 3 5mil Polyester film 4 5mil vellum 9020 9022 20lbs Caution See Appendix B for more info...

Page 221: ...can place the new roll in the groove on top of the printer 5 Slide the roll holder in the new roll of material while pressing the green knob 6 Align the roll with the appropriate size indicator on the...

Page 222: ...k the top few centimeters no more than 10 of the print material to facilitate the load process 9 Press the appropriate green button inside the paper roll compartment see figure 103 The material will a...

Page 223: ...drawer the roll loaders are installed The roll loaders consist of a metal frame with a lever and a green knob in the middle of the lever 2 Put the appropriate horizontal lever in an upright position...

Page 224: ...loading rolls of print material 11 Press the appropriate green button inside the roll compartment The material will automatically be fed into the machine Note You may also refer to the sticker inside...

Page 225: ...in the System Control Panel SCP application You then have to load new cut sheet print material Note Polyester cut sheets must be ventilated before use in order to prevent sticking together Also avoid...

Page 226: ...be printed should be face down Note You can check if the material is properly loaded by looking through the view holes in the drawer see figure 107 5 Adjust the right hand guide Note Carefully place...

Page 227: ...If you do not refill toner in time the system will stop and an Out of toner message will appear In that case printing will only be resumed after you have refilled toner and pressed the on line button...

Page 228: ...as far as possible over the holder see figure 109 109 Replacing the waste toner bag Attention Use only Oc B5 toner 4 Shake the toner bottle thoroughly and open the bottle 5 Screw in the bottle clockw...

Page 229: ...close it 10 Close the cover Printing will be resumed after you press the on line button Note When you have refilled toner after a toner low message it may take a while up to thirty seconds depending o...

Page 230: ...nsure top quality copies are produced At the same time you can clean the white reference roller Clean the glass platen and reference roller 1 Turning off the scanner 2 Open the top scanner cover see f...

Page 231: ...ence roller with soft cloth moistened with a small quantity of Cleaner A see figure 113 5 Lift the top cover of the scanner to release the hinge lock then close the cover see figure 114 114 Closing th...

Page 232: ...s from Oc to avoid damage to the reinforcement unit A new tape roll When the tape roll is empty while the engine is on stand by one of these messages will appear on the display Load reinforcement tape...

Page 233: ...Open the side door of the reinforcement unit see figure 116 116 Opening the side door of the reinforcement unit 2 Turn the two guide plates away from the pin roller and lock them into their open posi...

Page 234: ...ing the green nut and removing the old kernel Note It is recommended that you clean the reinforcement knives before you insert a new roll See Maintenance of the reinforcement knives on page 241 for mo...

Page 235: ...and lead the tape over the large guide roller see figure 120 120 Guiding the tape around the guide roller 7 Lead the tape between the upper and lower knife and over the pin roller see figure 121 121 L...

Page 236: ...figure 122 122 Protruding tape 9 The holes in the tape must be aligned with the hole pattern on the sticker found on the frame plate of the reinforcement unit see figure 123 If this is not the case l...

Page 237: ...Loading supplies 237 10 Close the pin roller guide plates see figure 124 124 Closing the guide plates 11 Peel the protection sheet off of the tape see figure 125 125 Peeling off the protection sheet...

Page 238: ...n the upper and lower knife 126 Leading the protection sheet between upper and lower knife 13 Lift the guide and lead the protection sheet between the protection sheet rollers pulling the protection s...

Page 239: ...128 Inserting the tape into the closed section of the slide 15 Hold the upper guide plate down and cut the tape at the knife section by quickly pulling the edge up so that the tape is cut by the upper...

Page 240: ...l of tape the box should be emptied twice Note You can empty the waste box while the engine is running Emptying the waste box 1 Open the waste box by first pulling it to the left hand side and then pu...

Page 241: ...reinforcement unit Cleaning the reinforcement knives 1 Press the on line button on the printer operating panel to put the printer off line The Off line message is displayed in the status window 2 Pre...

Page 242: ...elt using Fixing Unit Cleaning Oil silicon oil 133 Oiling the felt Close the side door of the reinforcement unit The knives are automatically placed back in their home positions The picture on the dis...

Page 243: ...243 Oc 9600 Copier Printer User Manual Chapter 13 Problem solving This chapter describes the problems that may occur while using the Oc 9600...

Page 244: ...r or door will be displayed on the graphic display indicating in which part of the system the material has been jammed Stickers on some parts of the system indicate which green handles green knobs gre...

Page 245: ...red Stop button Removing a jammed original 1 Open the top scanner cover see figure 134 134 Opening the top scanner cover 2 Remove the original 3 Lift the top cover of the scanner to release the hinge...

Page 246: ...ee List of available material types and sizes on page 288 Make sure the original is inserted along the guide Use the carrier sheets available from Oc to protect your valuable originals Note When worki...

Page 247: ...e media and feed it in again If originals are mis fed frequently make sure that the printing material is properly loaded see Rolls on page 220 or Cut sheet material on page 225 the correct printing ma...

Page 248: ...lay re check the cassette tray section Roll feed section The roll feed section is indicated as section B in figure 136 on page 247 Clearing a jam in the roll compartments 1 Open the appropriate roll c...

Page 249: ...has occurred in the manual feeder Clearing a jam in the manual feeder 1 Open the manual feeder by tilting it toward you see figure 138 138 Opening the manual feeder 2 Remove any jammed printing mater...

Page 250: ...ive gloves when removing printing material from the fuser section Clearing a jam in the fuser section 1 Turn off the printer 2 Wait a few moments to let the fuser cool down 3 Open the manual feeder to...

Page 251: ...h the help of the green handle 8 Close the cover 9 Turn the printer on again Clear a jam at the integrated receiving tray 1 Open the manual feeder to release the printing material Attention If you fai...

Page 252: ...ection Jams in the folder can occur in either the first fold section the second fold section the folder transport section or the belt unit Clearing a jam in the first fold section 1 Opening the top co...

Page 253: ...tion see figure 142 142 Opening first fold section 4 Open the guide plate see figure 143 143 Opening the guide plate 5 Remove any jammed printing material 6 Close the guide plate 7 Close the cover of...

Page 254: ...nting material 3 Close the folder transport section cover from the left side by lifting it up and pushing the hinge away from you Clearing a jam in the second fold section 1 Open the front door of the...

Page 255: ...em solving 255 4 If you have a belt unit put the belt in an upright position see figure 146 146 Putting the belt in an upright position 5 Open the delivery unit see figure 147 147 Opening the delivery...

Page 256: ...with the green lever see figure 148 148 Opening the guide plate with the green lever 7 Remove any jammed printing material 8 Open the vertical transport with the green lever see figure 149 149 Opening...

Page 257: ...Problem solving 257 10 Close the vertical transport see figure 150 150 Closing the vertical transport 11 Close the guide plate 12 Close the delivery unit see figure 151 151 Closing the delivery unit...

Page 258: ...t door see figure 152 152 Opening the belt unit door 2 Squeeze the two green knobs in the upper section of the belt unit and open the plate see figure 153 153 Opening the plate 3 Remove any jammed pri...

Page 259: ...it and pulling it forward to open the lower plate see figure 154 154 Opening the lower plate 6 Remove any jammed printing material 7 Pull up the green lever again until it locks into position to close...

Page 260: ...ms No reinforcement strips on the output This section explains how these errors can be solved Paper jams with the reinforcement unit When a paper error occurs the following message is displayed Paper...

Page 261: ...First Fold delivery and remove all paper inside see figure 156 156 Open the cover of the folder transport section 2 Close the cover of the folder transport section 3 Open the front door of the reinfor...

Page 262: ...nd side door of the reinforcement unit Clear tape jams in the reinforcement unit When a tape jam occurs the following message appears on the display Reload tape in reinforcement unit When a tape jam o...

Page 263: ...Open the front door of the reinforcement unit see figure 160 160 Opening the reinforcement unit front door 2 Turn the two guide plates away from the pin roller and lock them into their open position s...

Page 264: ...there are no reinforcement strips on the output although reinforcement is selected Solve this error 1 Put the printer off line by pressing the on line button on the operating panel 2 Opening the rein...

Page 265: ...w tape roll as described in A new tape roll on page 232 If this error frequently occurs you should call the Oc service organization see Other problems on page 266 5 Remove all tape between the rollers...

Page 266: ...mply pressing the on line button as indicated on the operating panel Should there be a problem that cannot be solved in that way the system displays a Call service message If this happens you must cal...

Page 267: ...267 Oc 9600 Copier Printer User Manual Chapter 14 Folder This chapter contains a description of the optional folder delivered with the Oc 9600...

Page 268: ...system a folder can be installed which allows you to have your copies folded see figure 165 The copies are folded according to the selected folding width and length in combination with a drawing meth...

Page 269: ...package length range 276 310 mm 10 87 12 2 inches in increments of 1 mm default 297 mm 11 3 inches Binding edge enabled or disabled range 15 30 mm 0 59 1 18 inches in increments of 1 mm default 20 mm...

Page 270: ...ge function button and change the length and or width of the folded package as required by using the arrow buttons or the numeric buttons 6 If required press the Binding function button Set the requir...

Page 271: ...st fold delivery 6 56 yd length known at start Unfolded delivered in IRT 6 56 yd length not known at start Possible paper jam 167 Folding settings 75 grams Folding settings 110 grams Output length Del...

Page 272: ...is is off the printer is on line and off line folding is not possible If this is blinking slowly the printer is off line but the folder is still processing the last prints If this is blinking rapidly...

Page 273: ...Oc 9600 folder on page 268 for more information Note Wait until the light on the folder no longer blinks before you feed in a new sheet Otherwise a media jam may occur 4 Collect your output Reinforcem...

Page 274: ...ings Editor Note Reinforcement is only possible with the Standard folding method See Reinforcement unit on page 273 for more information about inserting a new tape roll and other maintenance issues En...

Page 275: ...e selected from the drivers including Plot Director or the copier operating panel The remote command overrules the key operator setting Selecting belt as folded copy delivery on copier operating panel...

Page 276: ...276 Oc 9600 Copier Printer User Manual...

Page 277: ...277 Oc 9600 Copier Printer User Manual Appendix A Overview and tables...

Page 278: ...Oc 9600 system 173 The Oc 9600 system 1 Off line folding input 2 Integrated receiving tray 3 Printer operating panel 4 Manual feed 5 Printer 6 Rolls or cassette trays 7 Scanner 8 Scanner operating pan...

Page 279: ...279 Printer operating panel Stop button On line button Up Down buttons Selection buttons...

Page 280: ...280 Oc 9600 Copier Printer User Manual Scanner operating panel Stop button Interrupt button Correction button Start button Section buttons Arrow buttons Function buttons Numeric buttons...

Page 281: ...281 Product specifications Oc 9600 The Oc 9600 is a wide format mid to high volume printing and copying system...

Page 282: ...ions 55 1 W x 57 9 H x 29 6 D inches including inte grated receiving tray Weight From 250 kg 550 lb model with 2 rolls to 360 kg 792 lb model with 6 rolls and 1 sheet feeder Safety approvals T V GS CE...

Page 283: ...monitor Electrical require ments 120 230 V 50 60 Hz Scanner Model Free standing console Optional Original delivery tray Technology CCD Oc Image Logic real time image processing hardware Speed 5 linea...

Page 284: ...tomatic reduction enlargement Standard cut synchro cut and custom cut modes Leading and trailing edge adjustment up to 400 mm 15 75 inches Two languages available Image editing Image align Horizontal...

Page 285: ...t and enhancement software Oc Batch Processor Automated editing software Drivers and application software Oc ADI driver For AutoCAD 12 13 14 Windows 3 x 95 98 and NT 3 51 4 0 Oc HDI driver For AutoCAD...

Page 286: ...odes On line fanfold and crossfold Folding method Standard DIN like Ericsson Afnor like Length 10 9 12 2 inches Width 7 3 9 inches Filing strip 59 1 18 inch Paper size 20 lb bond Width 11 36 inches Le...

Page 287: ...30 V 50 60 Hz Dimensions 89 4 W x 42 9 H x 56 7 D inches with tray fully ex tended Weight 78 26 lb Original Delivery Tray for scanner Model Wheeled delivery tray with blower unit Capacity Up to 150 sh...

Page 288: ...wing material sizes are available for the Oc 9600 Plain paper 20 to 27 lb bond Transparent paper 20 to 27 lb Vellum 16 20 lbs Polyester film 3 5 or 4 5 mil Special Colored paper etc Minimum Maximum Wi...

Page 289: ...and direct sunlight Wrap unused paper in plastic to prevent it absorbing moisture Reinforcement strips Information about the different reinforcement strips is available from your Oc representative Att...

Page 290: ...290 Oc 9600 Copier Printer User Manual...

Page 291: ...291 Oc 9600 Copier Printer User Manual Appendix B Safety information...

Page 292: ...e materials in all roll positions without exceeding the RWLs The roll loader allows you to safely use the following weights per roll Weight limits in kg and lbs Roll 1 13 5 kg 29 7 lbs Roll 2 8 9 kg 1...

Page 293: ...ed when rolls of imaging materials having a net weight of more than 7 kg 15 5 lbs i e a width of more than approximately 50 cm or 20 inches are placed in the roll positions 2 4 and 6 by a single perso...

Page 294: ...witch in the fixed connection if any should be easily accessible This machine has not been designed for connection to an IT power system An IT power system is a voltage network in which the neutral wi...

Page 295: ...ailable It is the user s responsibility to determine the suitability of this information for the adoption of such safety precautions as may be necessary and to contact the company to make sure that th...

Page 296: ...tion Below the Threshold Limit Value for UV radiation TLV list of ACGIH Heat emission Standby 50 W in operation 1470 W Ozone emission 0 004 mg min at continuous operation Room volume Recommendation mi...

Page 297: ...r only 5 Oc 9600 folder optional As an ENERGY STAR partner Oc Technologies B V has determined that both the printer and the copier printer meet the ENERGY STAR guidelines for energy efficiency The EPA...

Page 298: ...f a sleep mode default time of 60 minutes still causes you significant inconvenience due to your particular usage pattern the key operator may disable the sleep mode feature Recycled paper The use of...

Page 299: ...299 Oc 9600 Copier Printer User Manual Appendix C Miscellaneous...

Page 300: ...tep through all phases of performing the operation Figures and tables Figures and tables are titled and numbered sequentially throughout this manual Figures include pictures of product components scre...

Page 301: ...his manual convenient in size easy to read and layed out well Yes No Did you find the information you were looking for Always Most of the times Sometimes Not at all How did you find the information yo...

Page 302: ...d by Name optional Occupation Company Phone Address City Country Please return this sheet to Oc Technologies B V Attn ITC User Documentation P O Box 101 5900 MA Venlo The Netherlands Send you comments...

Page 303: ...haoyang District Beijing 100028 China Oc esk republika s r o Hanusova 18 14021 Praha 4 Pankr c Czech Republic Oc Danmark A S Kornmarksvej 6 DK 2605 Br ndby Denmark Oc France S A 32 Avenue du Pav Neuf...

Page 304: ...0 Wisma Gulab 190 MacPherson Road Singapore 348548 Oc Espa a SA Business Park MAS BLAU C Osona 2 2 3a Planta 08820 El Prat del Llobregat Barcelona Spain Oc Svenska AB P O box 1231 S 164 28 Kista Swede...

Page 305: ...der 249 roll feed section 248 command line parameters 125 compression 87 connect to a controller 127 Connecting 127 connecting workstations 100 copying 48 long short originals 58 counter 28 Custom car...

Page 306: ...feed see sheet feed manual feeder 18 media jam belt unit 258 cassette tray 248 first fold section 252 folder 252 folder transport section 254 fuser section 250 manual feeder 249 roll feed section 248...

Page 307: ...print job window 74 deleting print jobs 80 functions 20 74 introduction 20 74 79 menu bar 74 modes 75 pausing print jobs 80 print queue window 74 restarting paused print job 80 restarting paused prin...

Page 308: ...print job 34 supported media 220 System administrator settings 132 System Control Panel SCP icons 110 introduction 106 structure 106 T table view 91 file properties 91 temporary store 98 tiff subform...

Reviews: