background image

96

www.Observint.com

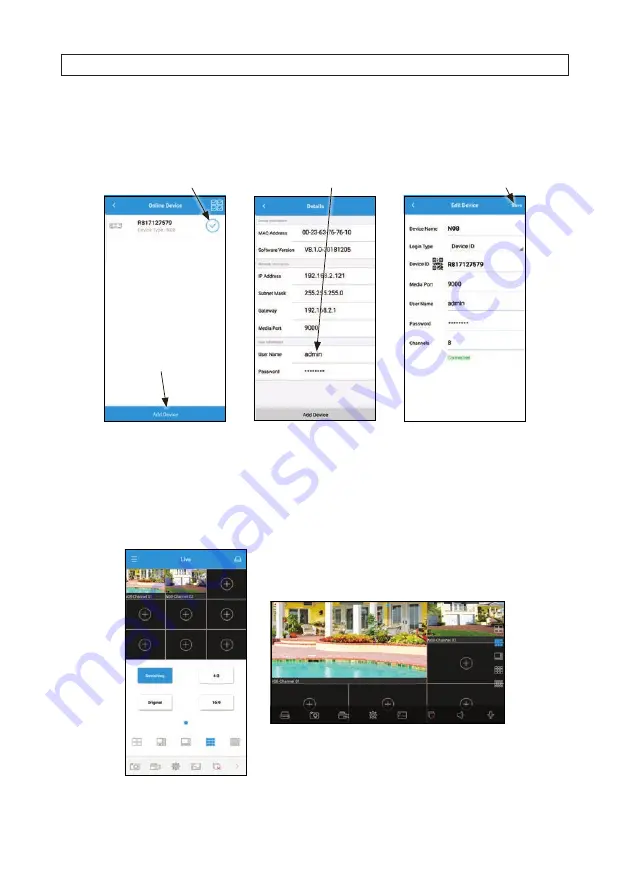
6.  In the list of online devices, tap the checkmark to select a device, and then tap the 

Add Device

 button at the bottom of the 

screen. (See below, left.) A “

Success

” message should appear momentarily. 

Tap to select device

Tap Save 

Enter User Name / Password

Tap to Add Device

7.  In the left screen above, tap on the device you added to open the 

Details

 screen. 

8.  In Details, enter the administrative 

User Name

 and 

Password

 for the device in the fields provided, and then tap 

Add 

Device

. The 

Edit Device

 screen should open. 

9.  If the settings are correct for the device, a “

Connected

” message should appear on 

Edit Device

. Tap 

Save

 to open the 

Live


screen. The 

Live

 screen supports different split view layouts and screen rotation. 

SECTION 11: HDVISION MOBILE APP FOR REMOTE ACCESS

Summary of Contents for NVR4

Page 1: ...irmware User Manual Products NVR4 NVR8 NVR16 NVR32 NetworkVideo Recorders PLEASE READ THIS MANUAL BEFORE USING YOUR SYSTEM and always follow the instructions for safety and proper use Save this manual...

Page 2: ...product applications such as the making transmission or recording of video and or audio signals of others without their knowledge and or consent We encourage you to check and comply with all applicab...

Page 3: ...3 Channel Protocol Manage menu 24 3 2 4 Channel Live menu 25 3 2 5 Channel Image Control menu 27 3 2 6 Channel PTZ menu 28 3 2 7 PTZ control panel 28 3 2 8 Channel Privacy Mask menu 29 3 2 9 Channel M...

Page 4: ...2 Load Default 66 8 3 3 Upgrade 67 8 3 4 Parameter Management 67 8 3 5 Auto Reboot 69 8 4 IP Camera Maintain 69 8 4 1 Upgrade 69 8 4 2 Load Default 70 8 4 3 Reboot IPC 71 8 5 Information 71 8 5 1 Chan...

Page 5: ...Vision Mobile App for Remote Access 95 11 1 Getting Started 95 11 2 Help screens 97 11 2 1 Overview 97 11 2 2 Live View 98 11 2 3 Remote Playback 98 11 2 4 Record Local Playback 99 11 2 5 Image Manage...

Page 6: ...vi www Observint com NOTES...

Page 7: ...esolution Multi screen display in live view is supported and the display sequence of channels is adjustable Live view screen can be switched in groups Manual switch and auto switch are provided and th...

Page 8: ...ay reverse speed up speed down when playback and locating by dragging the mouse Supports thumbnails view and fast view during playback Up to 16 ch synchronous playback at 1080p real time See specifica...

Page 9: ...parameters Remote viewing of the device status system logs and alarm status Remote keyboard operation Remote HDD formatting and program upgrading Remote system restart and shutdown RS 485 transparent...

Page 10: ...Using the Remote Control 3 5 11 14 16 9 1 6 4 2 10 13 15 12 7 8 9 No Icon Description 1 1 8 Numeric keys Press to display channel 1 8 2 9 0 Numeric keys 3 ALL Press to display all channels Multiple di...

Page 11: ...u click in an editable data entry field a virtual keyboard will appear Click on the character in the keyboard to enter it into the field When the data entry is complete click the Enter key in the lowe...

Page 12: ...ithin 3 minutes If it is the first time powering on the recorder an activation screen will open You must use this menu to setup an admin password for the system and an Unlock Pattern if preferred for...

Page 13: ...e drop down list and then click Enable Click Apply to continue 3 Click the Draw button to open the Set Unlock Pattern window 4 In the Set Unlock Pattern window drag the mouse cursor across a pattern o...

Page 14: ...vided for your recorder for more information 1 When the initial Wizard window appears click Start Wizard to continue 2 The next Wizard screen is used to configure the network settings of the recorder...

Page 15: ...192 168 001 001 DNS1 DNS2 DNS1 is the primary DNS server and DNS2 is a backup DNS server Usually should be enough just to enter the DNS1 server address b You can also configure the ports the NVR If yo...

Page 16: ...e time format between 24 hour and 12 hour Time Zone Set the correct time zone b Click the NTP tab To use a Network Time server to automatically set the date and time in your recorder check the Enable...

Page 17: ...time and end time for daylight saving 4 Click Next to continue 5 In the IP Camera menu the Wizard automatically lists all cameras connected to the channel RJ 45 connectors on the back panel If some c...

Page 18: ...assigned ii In the Edit Connection Information menu open the Switch Mode drop down list and then select Manual Mode Click OK to close this menu iii In the IP Camera Wizard window click the Search butt...

Page 19: ...forecontinuing vi Repeat this procedure to add additional network cameras to you NVR vii Click Next to advance to the next Wizard menu 6 In the Disk menu you can configure how your disk HDD will be us...

Page 20: ...elect Auto b To format an HDD i Check the select box for the HDD you want to Format from the list above ii Click the Format button Allow the format operation to complete before continuing 7 Click Next...

Page 21: ...solution you prefer and then click Apply 9 Click Next to continue The Mobile screen shows the P2P settings provided with your recorder and a QR code you can scan to easily connect the NVR to the mobil...

Page 22: ...eens and change your selections Click Finish to close the Wizard 12 Click Finish to close the Wizard a If cameras were added using the Wizard video from those cameras will appear in the Live screen Se...

Page 23: ...pens a list of cameras that can be added appears at the top Click on the one you want to add to the viewing frame ii Check the parameters in the menu to ensure they are correct see above and then clic...

Page 24: ...18 www Observint com Status Icons SECTION 2 INITIAL SETUP...

Page 25: ...ay also includes Status icons in each frame that indicate is recording or detected motion and I O alarm or an HDD problem Task menu bar Date Time Start button Filter panel Task Menu Bar The Task Menu...

Page 26: ...toolbar and then click the Start Menu icon Click to switch user or enable multi user Click for search playback and backup download Click to Setup the system enter menu mode Click to Lock Unlock the s...

Page 27: ...Menu Bar and then click the Setup icon Click the block for the setup configuration you want to see or change Using these menus may require authentication NOTE Iftherecorderisnotinmenuoperationforone 1...

Page 28: ...the NVR is currently recording This icon appears when the camera has detected motion The icon indicates that the external I O alarm device is triggered This icon indicates that the HDD is in error to...

Page 29: ...u will appear over the Live View screen 3 2 2 Channel Channel menu To configure the Live View screen channels click the Channel tile See above The Channel menu includes the following buttons Search Se...

Page 30: ...anual Mode After selecting a camera clicking Manual Mode to open a menu for changing the network settings of the IP camera Auto Mode After selecting a camera clicking Auto Mode will delete the POE cha...

Page 31: ...want to enable the sub stream Type Only RTSP available now Port Enter the RTSP port of your IP camera Resources Path Enter the RTSP address of your IP camera To use this menu 1 Select the protocol yo...

Page 32: ...ate of the camera for IP camera only Show Name Show Time show on screen options Alpha use to set the transparency of the OSD camera name date and time etc Adjust the Hue Brightness Contrast and Satura...

Page 33: ...tion Choose the appropriate options to rotate flip the image For Angle Flip select teh Angle Trad 0 or 360 Select Enable to choose Backlight compensation Select Enable to choose 3D Noised Reduction Se...

Page 34: ...rmation sent from the NVR to the PTZ camera Make sure it matches the compatibility level of your PTZ camera DataBit StopBit The information between the NVR and PTZ camera is sent in individual package...

Page 35: ...cy Mask menu Use the Privacy Mask menu to block areas of the field of view where information may appear that you do not want to view or record You can configure up to four privacy areas in the field o...

Page 36: ...hecking the select box for that area and then clicking Apply 3 2 9 Channel Motion menu Use the Motion menu to configure areas in the camera field of view where motion of interest can occur When motion...

Page 37: ...y the orange tint For improved efficiency of your system click Clear All areas and then drag a rectangle across only the areas where motion is of interest Motion detection area orange highlight To dis...

Page 38: ...the NVR to send you an auto email when the motion is detected You must configure your email settings to use this feature See 6 3 Email setup on page 48 Full Screen If this function is enabled and a mo...

Page 39: ...lowest sensitivity level level 8 is the highest sensitivity level 3 Click the icon in the Setup column to open the setup menu See below By default the entire field of view is selected for PIR sensing...

Page 40: ...lick the settings icon and choose which channel s you want to record when the motion detection is triggered Post Recording You can set how long after an event occurs that the NVR will continue to reco...

Page 41: ...ement software CMS To open the Encode menus click the Record tile in the main menu or click the Record tab on the Setup screen and then click the Encode link the left panel Mainstream setup 1 In the E...

Page 42: ...terval the higher the video quality with a higher network bandwidth Video containing a high level of motion city street traffic etc should have a low iframe interval for better video quality ETR ETR i...

Page 43: ...your settings to other channels 4 2 1 Record Schedule Use the Record Schedule graphical user interface GUI to define when recording a channel is enable for either Normal continuous recording Motion t...

Page 44: ...r PIR 3 Drag the mouse linearly or diagonally across an area of the matrix where you want to enable that recording mode To disable a recording mode on the schedule select the mode you enabled and then...

Page 45: ...detected Alarm Out Not used Latch Time Use the Latch Time parameter to set how long the buzzer will sound when the alarm is triggered 10s 20s 40s and 60s Record Click the settings icon and choose whic...

Page 46: ...The PIR alarm menu is shown below 1 Configure the PIR alarm options for the camera you are configuring Buzzer Enable this option to sound an alarm tone when a PIR event is detected You can set the bu...

Page 47: ...click the mouse to return to the Live View Main menu 3 Click the PIR Detection button to re configure the PIR detection settings for a camera Options in this menu are the same as those in the Channel...

Page 48: ...to enable PIR alarm event to point a PTZ camera at a Preset field of view PTZ1 4 Click the Settings icon associated with a PTZ camera and then in the popup menu select the PTZ camera channel and a Pre...

Page 49: ...wing Switch Check the select box to enable the monitoring of the event Buzzer Set the buzzer duration when the event occurs Off 10s 20s 40s 60s To disable buzzer select OFF Alarm Out Check the select...

Page 50: ...to acquire compatible Ethernet network settings from a DHCP server on your network often with a router or disable DHCP uncheck the DHCP box and enter your own settings Settings you use must be compati...

Page 51: ...which IP cameras are connected Each IP camera connected to the internal switch has a different IP address Subnet Mask Subnet mask is a network parameter which defines a range of IP addresses that can...

Page 52: ...port 9000 is already taken by other applications please change it RTSP Port Default is 1050 if the default port 1050 is already taken by other applications please change it UPNP If you want to log in...

Page 53: ...ddress you enter in the URL box when you want to connect remotely to the recorder via PC Fox example NVR no ip org User Password Enter the user name and password you obtained when creating an account...

Page 54: ...cryption Open the drop down list and select the appropriate option for your Email provider Options include Auto SSL TSL and Disable If you are unsure about the correct setting set Encryption to Auto d...

Page 55: ...the notification modes listed to the right of the matrix Motion Exception or PIR 3 Drag the mouse linearly or diagonally across an area of the matrix where you want to enable that notification mode T...

Page 56: ...ormat HDD To format the device you must enter an administrative user name and password and then click OK to confirm to continue formatting Overwrite Use this option to overwrite old recordings on the...

Page 57: ...you want to apply to the HDD Disk Type options are Read write default read only and redundant Set the HDD to Read only mode to prevent new recordings from being written to the device You can still se...

Page 58: ...Group Type drop down list and select the type of group to configure 2 Open the Disk Group drop own list and select the Disk Group you want to assign cameras to 3 Click the numbered boxes representing...

Page 59: ...Long This is a longer test that verifies the above plus it performs a surface scan to reveal problem areas on the disk surface if any and forces bad sector relocation Conveyance This is a quick test t...

Page 60: ...ds a message will appear that an activation link was sent to your email address the email address you used to create the Dropbox account Check your email and then click the link to activate the settin...

Page 61: ...er is particularly important when operating one recorder among other recorders with a remote control You can identify the target recorder using the Device ID Language Select a language you would like...

Page 62: ...ect the preferred date format Time Format Open the drop down list to select the preferred time format Time Zone Open the drop down list to select a time zone of your region or city 2 Click Apply to sa...

Page 63: ...the NTP feature Select an NTP Server Address from the drop down list 4 Click Update Now to manually sync the date and time 5 Click Apply to save your settings DST Settings With the Daylight Saving Tim...

Page 64: ...cular day and time when Daylight Saving starts and ends For example 2 a m on the first Sunday of a particular month Date Select the start date click the calendar icon end date and time when Daylight S...

Page 65: ...e Scale and offset adjusts the size and position of the display on the monitor a To adjust the scale and offset i Select either Scale X Offset or Y Offset ii Click the arrows icons below to adjust the...

Page 66: ...rator has full control of the system Administrators can change both administrator and user passwords and enable and disable password protection None Normal User has access to Live View Search Playback...

Page 67: ...Authentication menu enter the OLD password and then click Authenticate 5 In the Multi User menu enable Password Enable strongly recommended Add New Users To create a new user 1 Select one of the user...

Page 68: ...drop down list and then select Enable 3 Click the User Name field to change the user name 4 Open the Password Enable drop down list and then select Enable strongly recommended 5 Enter a new password...

Page 69: ...he Authentication window enter the admin user password Setting User Permissions You must login as an admin user to set the user permissions for a user Admins can enable or disable access to certain me...

Page 70: ...r capabilities you want the user to use Click All to check all boxes Click Clear to check none of the boxes 9 Click Save to save your settings 8 3 Maintenance In this menu you can search and view the...

Page 71: ...s in the Start Date and End Date fields to set the date range for the log messages you want to search for 2 Click the Start Time and End Time fields and then edit the time to set the start time for th...

Page 72: ...h drive for your log backup into a USB port b Click Backup to copy the search result to a flash drive c When the backup menu appears navigate to the folder on the flash drive where you want to save th...

Page 73: ...ash drive Click OK 4 Click Upgrade to start the system upgrade The system upgrade will last around 5 10 minutes Allow the upgrade process to complete before continuing Follow the on screen instruction...

Page 74: ...lace for possible use later To Load the Main Menu settings 1 Plug a USB flash drive containing the Main Menu Settings you saved earlier into a USB port on the recorder 2 Click Load Settings on the Par...

Page 75: ...ct box to enable this feature 2 Open the Time drop down list and then select either Every Day Every Week or Every Month 3 Depending on your selection use the lower menus to define what day and time th...

Page 76: ...select the firmware file you need for the Upgrade and then click OK 3 In the Upgrade menu click IPC Ugrade to install the new firmware You may be required to enter the admin user password to initiate...

Page 77: ...this menu to reboot an IP camera To use this menu 1 Check the select box for the camera s you want to reboot 2 Click Reboot Camera You may be required to enter the admin user password to initiate the...

Page 78: ...on Used the Channel Information screen to see the mainstream and substream recording configuration motion detection status and other parameters for each IP camera monitored by the system 8 5 2 Record...

Page 79: ...73 NVR4 NVR8 NVR16 NVR32 Firmware User Manual 8 5 3 Network Status The Network Status screen includes a summary of all network settings SECTION 8 SYSTEM SETTINGS...

Page 80: ...menu Playback Status Channel selection Video Playback Controls Timeline Time frame options Search Type Search Options Search Date The Search menu includes the following Search Options the system provi...

Page 81: ...ursor to the channel you want to capture and then click the icon to save the snapshot Add Default Custom Tag Click to assign a name to the video clip The clip can then be searched for by tag name Time...

Page 82: ...on Video Playback Controls 6 Use the time frame options to expand or contract the timeline to see more or less detail 7 If you want to save a section of video during playing back a Plug a USB flash d...

Page 83: ...ure your USB drive has enough free space to accommodate the file j Click Save k When the backup drive menu appears navigate to the folder where you want to save the file l Click OK to begin The progre...

Page 84: ...le statistics Backup Play icon Event info Search Type Search Date Time To search play back up for events 1 Choose the date and time you want to search 2 Check the recording types you want to search or...

Page 85: ...t the right bottom of the screen 9 To backup the files you selected click the Backup icon to save the video to USB flash drive or click the Play icon in playback controls to play the video s 9 1 3 Eve...

Page 86: ...h Date To search and play video in sub periods 1 Configure the date and time you want to search 2 Select the split screens you want the videos to be played in 3 Select the recording types you want to...

Page 87: ...arched automatically Please note that this function only supports to search and play one channel at a time 4 Click the Play button to start playback Control the playback with buttons on Video Playback...

Page 88: ...Search area selected To define one or more specific areas do the following 1 Click and drag the mouse cursor across the area you want to search You can define multiple areas In the example shown abov...

Page 89: ...e Live view frame you want to tag If the video is not being recorded no record icon in the upper right corner of the frame click on the Manual Record icon to begin recording Record in progress icon Ad...

Page 90: ...k Save in the Add Tag window to save the tag name Search for Tags To find tagged recordings 1 Open the Search window 2 Click the Tag tab Click Search icon Play icon Select Start End date and time Sear...

Page 91: ...d at that time range 5 To play a tagged recording double click on the entry in the list Edit icon 6 To edit the tag name click the edit icon for the tag name you want to change 7 To quickly find a rec...

Page 92: ...86 www Observint com The Search result is shown in the chart SECTION 9 SEARCH PLAYBACK BACKUP AND TAGS...

Page 93: ...Internet Explorer Ver 11 10 9 8 It does not support Microsoft Edge Apple Safari 5 1 or above 10 2 Remote login NOTE TheinstructionsandscreenshotsincludedhereinforaninitiallogintotheNVRuseaMicrosoftWi...

Page 94: ...of the recorder as the URL for your browser 3 If the plugin SurveillancePlugin exe SurveillanceClient dmg on iOS was not previously installed on your PC a The recorder will prompt you to install the...

Page 95: ...ouble click on the plugin file to execute it e Click Install in the setup wizard window wait until the plugin installation completes Follow the on screen instructions 4 Open an IE browser window enter...

Page 96: ...iew frames 16 Open Channel List Open Channel List Live Toolbar Color adjust PTZ controls Stream select Main Menu Tabs Logout Live View toolbar Screen split Open all channels Original proportion Close...

Page 97: ...lick the Color adjust icon Balance the screen colors using the sliders in the Color frame as needed for your monitor 3 Click the Channel list icon In the list that opens you can start and stop manual...

Page 98: ...he PTZ icon to select it 10 4 Playback screen Open the Playback screen by clicking the Playback tab You can playback recorded video from up to four channels at a time Controls and options for the remo...

Page 99: ...n the Remote Settings screen by clicking the Remote Settings tab Click the links in the left panel to open the menu for that item For more information about items in the menu refer to the descriptions...

Page 100: ...gs tab Items in this menu configure the directories on your local computer where you want to save record download and capture files and the format of record and capture files to save NOTE Ifattemptsto...

Page 101: ...is chapter uses screens captured on Android smartphone 11 1 Getting Started In this example an Android phone was used to open the HDVision Mobile app for the first time add a device and open the Live...

Page 102: ...In the left screen above tap on the device you added to open the Details screen 8 In Details enter the administrative User Name and Password for the device in the fields provided and then tap Add Devi...

Page 103: ...Mobile app and a description of the icons on each screen This subsection includes each Help screen included in the V1 0 release To access the Help screens tap the Help button on the Main Menu and then...

Page 104: ...98 www Observint com 11 2 2 Live View 11 2 3 Remote Playback SECTION 11 HDVISION MOBILE APP FOR REMOTE ACCESS...

Page 105: ...99 NVR4 NVR8 NVR16 NVR32 Firmware User Manual 11 2 4 Record Local Playback 11 2 5 Image Manager SECTION 11 HDVISION MOBILE APP FOR REMOTE ACCESS...

Page 106: ...100 www Observint com 11 2 6 Remote Setting 11 2 7 Alarm SECTION 11 HDVISION MOBILE APP FOR REMOTE ACCESS...

Page 107: ...101 NVR4 NVR8 NVR16 NVR32 Firmware User Manual SECTION 11 HDVISION MOBILE APP FOR REMOTE ACCESS 11 2 8 Device Manager...

Page 108: ...video memory For Mac users install the file named VideoPlayer_ x x xx_xxxx_xx_x dmg for example VideoPlayer_1 0 15_2017_01_6 dmg Minimum system requirements include Mac OS X 10 9 or above 2GB RAM 12 1...

Page 109: ...er Manual SECTION 12 USING VIDEO PLAYER SOFTWARE SECTION 1 6 In th Ready to Install menu click Install Allow the installation to complete before continuing 7 Click Finish to complete the installation...

Page 110: ...ormats from your recorder While a file s is playing you can Capture a screen shot and record a section Clip from the recording You can play multiple files simultaneously by changing the screen divisio...

Page 111: ...n the Play controls 12 2 1 Capture image To capture a screen image 1 Play the video file you want to capture an image from 2 Click the Capture icon in the upper right corner of the screen A message bo...

Page 112: ...ing To create a clip 1 Play the video file you want to save a clip from 2 At the place in the video where you want to start creating a clip click the scissors icon in the upper right corner The icon w...

Page 113: ...YER SOFTWARE 3 At the place in the video where you want to stop creating the clip click the scissors icon again A message box will appear in the lower right corner of the monitor with a link to where...

Page 114: ...108 www Observint com SECTION 12 USING VIDEO PLAYER SOFTWARE...

Page 115: ...rn out or needs to be replaced Verify that the video format NTSC or PAL is configured correctly in the camera and the NVR Q Q 4 How can I protect the NVR from being harmed by heat A A The NVR must dis...

Page 116: ...PTZ decoder with a 120 resistor to suppress reflections and match impedance Otherwise PTZ control may be unstable Q Q 12 Why doesn t dynamic detection work A A Please check if the motion detection ti...

Page 117: ...e unit 4 Do not plugin audio and video cables or cables connected to ports like the RS 485 while power is applied to the NVR Always make connections to the NVR when it is powered off 5 Check the syste...

Reviews: