background image

DOC-00500 Rev. F

5–29

Eden500V/350V/350 User Guide

To display 

stl

 files without the build tray:

1. From


the


File


menu,


select


Open Tray

.

2. In


the


Open


dialog


box,


open


the


Files


of


type


pull

down


menu,


and


select


STL Files (*.stl)

.

3. Click


Open

.

A


three

dimensional


image


of


the


file


is


displayed.


You


can


use


many


of


the


Objet


Studio


tools


to


manipulate


the


image


on


the


screen.

Configuring 

the GL Driver

The


GL


driver


displays


3

D


graphics


on


your


screen.


There


is


normally


no


reason


to


adjust


its


settings.


If


you


suspect


a


problem


with


the


way


Objet


Studio


displays


objects,


you


can


use


the


OpenGL


Driver


Configuration


tool


to


check


and


configure


the


driver


settings.


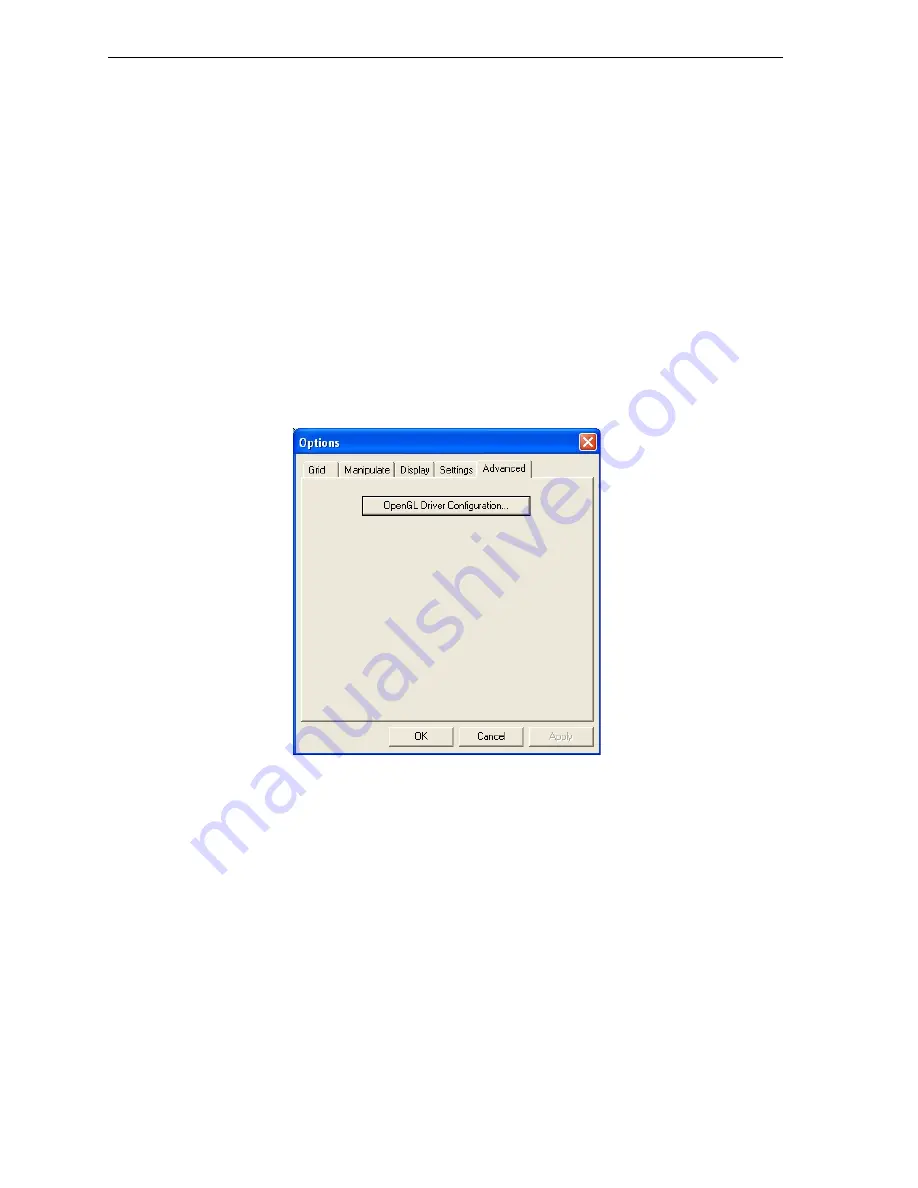
To access the OpenGL Driver Configuration dialog box:

1. From


the


Tools


menu,


select


Options

.

2. In


the


Options


dialog


box,


display


the


Advanced


tab


and


click


OpenGL 

Driver Configuration…

Figure 5-39:Accessing GL-driver configuration

Note:

If the 

Advanced

 tab is not displayed, activate the 

Advanced

 option in 

the 

Tools

 menu and re-open Objet Studio.

Summary of Contents for Eden350

Page 1: ...User Guide English Eden500V 350V 350 3 D Printer System...

Page 2: ......

Page 3: ...rference to radio and TV reception requiring the operator to take whatever steps are necessary to correct the interference Equipment Recycling In the European Union this symbol indicates that when the...

Page 4: ...or more of the following U S patents 5 263 130 5 287 435 5 386 500 5 519 816 5 695 708 6 259 962 6 569 373 6 644 763 6 658 314 6 850 334 6 863 859 7 183 335 7 209 797 7 225 045 7 300 619 Objet Geomet...

Page 5: ...erials 3 4 Storage 3 5 Shelf Life 3 5 Light 3 5 Safety Considerations 3 5 Disposal 3 5 Work Environment 3 5 Workstation Requirements 3 6 Preparing Files for Use with Eden 3 D Printing Systems 3 6 Conv...

Page 6: ...ction of Objects 5 25 Printing the Screen Display on Paper 5 26 Saving the Screen Display as an Image File 5 26 Exporting and Importing Objet Build Trays 5 27 Advanced Mode Features 5 27 Save Tray As...

Page 7: ...ern Test 7 19 Improving Print Quality 7 20 Cleaning and Replacing the Wiper 7 20 Aligning the Print Heads 7 23 Replacing Print Heads 7 27 Replacing the UV Lamps 7 37 Built in Tests 7 43 Replacing the...

Page 8: ......

Page 9: ...DOC 00500 Rev F 1 1 About This Guide Using This Guide 2 For More Information 2 Terms Used in This Guide 3...

Page 10: ...network components of your Eden system are installed configured and operating correctly the operator has a working knowledge of the Windows PC platform For More Information Visit http www 2objet com...

Page 11: ...sed for controlling the Eden printer Eden software Software running on the computer inside the Eden printer that controls all printer operations host server workstation The workstation on which the fu...

Page 12: ......

Page 13: ...DOC 00500 Rev F 2 1 Safety Safety Features 2 Symbols and Warnings 3 Safety Guidelines 4 Eden Printer 4 Model and Support Material 5 First Aid for Working With Resins 6 Waste Disposal 7...

Page 14: ...the UV lamp motion motors and the tray heater is turned off when the cover is opened WARNING Do not defeat the interlock switch Doing so could result in serious personal injury If the interlock does...

Page 15: ...he back of the printer Caution Hot surface Near head block Risk of burns Do not touch this surface when hot High voltage Near UV lamp connectors on the rear left and right covers of the UV enclosure R...

Page 16: ...If the interlock safety switch ever fails or if servicing is ever necessary while the main cover is open never stare directly at the UV lamps without glasses that screen out UV radiation For this purp...

Page 17: ...nk are stored prepared and consumed Uncured resin is considered a hazardous material requiring certain precautions when handling it To prevent skin irritation wear protective gloves if necessary If th...

Page 18: ...not reapply it until the skin has been completely cleansed Contact with Eyes If uncured resin comes in contact with the eyes flush immediately with large amounts of water for 15 minutes and seek medic...

Page 19: ...le gloves should be worn When handling cured materials that may not be completely cured on the surface common latex gloves are adequate Even if not classified as hazardous industrial waste or otherwis...

Page 20: ......

Page 21: ...TL Files 4 SLC Files 4 Printing Materials 4 Storage 5 Shelf Life 5 Light 5 Safety Considerations 5 Disposal 5 Work Environment 5 Workstation Requirements 6 Preparing Files for Use with Eden 3 D Printi...

Page 22: ...a multi station system When connected to a local computer network the system can serve multiple users In such configurations each user workstation client prepares files with Objet Studio software for...

Page 23: ...onfigurations the operator of the server typically the production administrator has total control over the jobs sent to the 3 D printer and can prioritize and delete jobs review job history and reprin...

Page 24: ...g point values The coordinates of all triangles should be positive and should fall within the volume of the model SLC Files SLC is short for Stereo Lithography Contour SLC files describe two dimension...

Page 25: ...If printing materials are not in their sealed cartridges make sure to shield them from sunlight and other sources of UV radiation such as fluorescent and mercury vapor lights Exposure to UV radiation...

Page 26: ...a CAD program 1 From the File menu select Save As 2 In the Save As dialog box open the Save As Type pull down menu and select STL 3 Click Options and set the following parameters Total Quality approxi...

Page 27: ...e objects on the build tray 2 Positioning the object s on the tray 3 Configuring object and tray parameters 4 Saving the tray configuration as an otf Objet Tray Format file 5 Sending the otf file to t...

Page 28: ......

Page 29: ...DOC 00500 Rev F 4 1 Installing Objet Software How to Install Software for the Eden 3 D Printing System 2...

Page 30: ...he server host application or the client application To install Objet software 1 Insert the Objet Studio CD into the disk drive 2 Right click the Start button and select Explore or use any other metho...

Page 31: ...Studio and Job Manager for the server host station and for a standalone station that is the computer directly connected to the Eden printer Figure 4 3 Objet Setup Choose Destination Location screen 6...

Page 32: ...e icons in another program folder select it To continue click Next Figure 4 5 Objet Setup Select Printer Type screen 8 In the Select Printer Type screen select the Objet 3 D printer used for producing...

Page 33: ...al wizard screen 9 To complete installation you must restart the computer To do so remove the CD from the disk drive select Yes and click Finish The computer shuts down and restarts and the software i...

Page 34: ......

Page 35: ...cts 14 Using a Grid to Position Objects 15 Changing an Object s Orientation 15 Freezing an Object s Orientation 16 Surface Finish 17 Display Options 17 Tray Viewing Options 19 Handling Completed Trays...

Page 36: ...Studio opening screen Toolbars The icons shown in this chapter are available only when relevant toolbars are displayed You can control the toolbars displayed at any time and you can re arrange them o...

Page 37: ...al selection toolbar Note It is not necessary to select the model material now but it is recommended each type of material has unique characteristics that may affect the valid positioning of objects o...

Page 38: ...ons but not its units of measure Therefore make sure to correctly select either millimeters or inches when inserting an object Otherwise the size of the object on the build tray will be either much to...

Page 39: ...sing keyboard shortcuts Ctrl C and Ctrl V respectively The Paste Special command in the Edit menu enables you to place duplicate objects even more efficiently You can specify the number of duplicates...

Page 40: ...ut From the View menu select Layout then the desired number of build tray views 2 Views is the default screen layout already displayed see figure 5 5 on page 4 By default the Entity Properties dialog...

Page 41: ...350V 350 User Guide Figure 5 9 4 view screen layout Figure 5 10 1 view screen layout You can change the perspective of the active viewing pane by clicking any of the nine viewing icons Figure 5 11 Vi...

Page 42: ...considerations explained in Model Orientation on page 10 Automatic Positioning There are two ways to have Objet Studio position the items on the build tray Anytime you insert an object onto the build...

Page 43: ...tomatic placement with the Arrange models option selected in the Insert dialog box Considerations for positioning objects are reviewed in Model Orientation on page 10 Tools for changing the position o...

Page 44: ...axis are printed in one pass From this point of view it is advisable to place the object s intermediate dimension along the Y axis Tall Left Rule This rule considers models where after being orientat...

Page 45: ...ed directly on the tray If you do not insert objects with automatic positioning they often appear either above or below the tray To position objects directly on the tray 1 Select the object 2 Click th...

Page 46: ...splayed in the Transform tab of the Entity Properties dialog box Icon Menu Option Purpose What to do none For selecting an object Click the object on the build tray Object Translate For selecting and...

Page 47: ...s allowed by the Objet Studio settings see Object Position on the Z Axis on page 11 The properties displayed in the Transform tab of the Entity Properties dialog box are absolute values representing t...

Page 48: ...isely positioning objects on the tray Grouping and Ungrouping Objects You can manipulate two or more objects on the build tray at the same time To group objects 1 Select the objects see Selecting Obje...

Page 49: ...The dialog box displays the current grid settings 2 As required make changes to the settings and select or clear the check boxes 3 Click Apply or OK Changing an Object s Orientation There are several...

Page 50: ...ees on any axis 1 Select the object 2 From the Object menu select Flip Flip X Flip Y Flip Z To make precise changes to the object s orientation on any axis 1 Select the object 2 Display the Transform...

Page 51: ...all be printed with a Y axis resolution of 300 dpi To choose the finish type for a model 1 Select the model 2 In the Options tab of the Entity Properties dialog box select Matte or Glossy or 1 Right...

Page 52: ...me icon Figure 5 23 Tray and model displayed in Wire frame view To revert to the shaded view Select View Shaded or click the Shaded icon To display objects as boxes showing their maximum dimensions in...

Page 53: ...various perspectives Note You must display the relevant toolbar s to access many of the icons described below see Objet Studio displays objects to be produced with matte and glossy finishes in differ...

Page 54: ...o stop the movement click in the active view pane or click one of these icons Zoom In Each mouse click zooms one step to the center of the active viewing pane Zoom Out Each mouse click zooms out one s...

Page 55: ...nted Note Because of the unique characteristics of each type of modeling material make sure that the correct material is selected before performing Tray Validation To validate that the tray can be pri...

Page 56: ...en producing models on Eden500V and Eden350V printers Objet Studio allows you to choose the quality speed setting most suitable for your project Eden350 printers operate in High Quality mode only High...

Page 57: ...ing see page 22 You can compare the required resources for each of the settings Saving the Tray File Trays are saved as otf files You can save a tray before it is ready for production and open it at a...

Page 58: ...k OK The composite parts are saved as new stl files with Part 1 Part 2 etc added to the original file name Note Before printing the newly created stl files it is recommended that you check them for de...

Page 59: ...jects The Section feature enables you to view the interior of an object by slicing it on any axis You can then manipulate the object to inspect the interior from different angles This may be important...

Page 60: ...select Page Setup Page Preview Print You can also print a paper copy of the tray by using the standard Windows keyboard shortcut for printing Ctrl P Saving the Screen Display as an Image File You can...

Page 61: ...e As dialog box opens 2 Select the appropriate folder and change the file name if necessary 3 Click Save To open an ozf file 1 From the File menu select Import Packed Job 2 In the Open dialog box disp...

Page 62: ...ay as an otf file for producing it with an Eden 3 D printer you can save a group of objects positioned on the tray as an stl file You can then use this file as any other stl file both in Objet Studio...

Page 63: ...driver displays 3 D graphics on your screen There is normally no reason to adjust its settings If you suspect a problem with the way Objet Studio displays objects you can use the OpenGL Driver Config...

Page 64: ...ou can select Choose Format and change the values in this dialog box To perform a test of the driver configuration and enter the suggested pixel format ID 1 Select Choose Format 2 Click Test Objet Stu...

Page 65: ...ger Client Job Manager 2 Job Manager Screen 3 Configuring User Alerts 5 Server Job Manager 7 Job Manager Screen 7 Job Manager Operations 9 Making changes to a Job 10 User Alerts 11 Sending the Tray to...

Page 66: ...obs and enables re sending previously printed jobs to the printer Client Job Manager When you open the client Objet Studio Job Manager software for the first time a dialog box opens prompting you to c...

Page 67: ...job began but was interrupted by the administrator before being completed Stopped Printing of this job was terminated by the administrator and was put in the print queue again Error Errors occurred du...

Page 68: ...ose 3 D Printer New Job Launches Objet Studio to prepare new trays 3 D Printer Set Printer Displays a network browsing dialog box to connect to an Objet server computer To specify a computer it must b...

Page 69: ...S messages the e mail program must convert the messages and transmit them Microsoft Outlook for example can do this Outlook Express cannot In addition the cellular phone service must support the trans...

Page 70: ...pective sections 3 To choose the events reported to you by Job Manager click Details in the relevant sections Figure 6 5 Event selection for alerts 4 Select the desired events for sending alerts and c...

Page 71: ...ection dialog box opens Figure 6 6 Printer connection dialog box Click Browse to find and select the name of the computer inside the printer and then click OK to close the dialog box Job Manager Scree...

Page 72: ...g Printing of this job is in progress Paused Printing of this job began but was interrupted by the administrator before being completed Stopped Printing of this job was previously terminated by the ad...

Page 73: ...you group together jobs to be printed with the same type of model material This way the need for changing model material between jobs is reduced Moves down the selected job by one step in the print q...

Page 74: ...er 5 Using Objet Studio 4 In Objet Studio save the changes by selecting File Save Tray or by pressing Ctrl S 5 Close Objet Studio The status of the job in Job Manager changes back to Waiting Job Delet...

Page 75: ...g User Alerts on page 5 To set parameters for Low level of material alerts 1 From the 3 D Printer menu select Material Consumption 2 In the dialog box that opens set the time or the material weight re...

Page 76: ...ning icon changes color from a yellow to a red background Sending the Tray to the 3 D printer for Production If there is a job in the print queue it is sent automatically to the Eden printer as long a...

Page 77: ...Stopped 6 Changing the Model Material 8 Keeping the Eden 3 D Printer in Idle Mode 13 Shutting Down the Eden 3 D Printer 14 Maintaining Eden 3 D Printers 16 Routine Maintenance Schedule 16 Cleaning th...

Page 78: ...witch turns on the Eden printer which includes the built in Eden computer 2 After the computer boots log in to Windows and launch the Eden control software On the computer desktop double click the Ede...

Page 79: ...ears in the Eden printer interface see figure 7 3 To load model and support cartridges 1 On the front of the Eden printer see figure 7 1 pull open the doors of the storage compartment 2 If you are rep...

Page 80: ...in the Eden printer interface see figure 7 3 You may want to replace the cartridges of model and support material currently loaded in the printer to avoid the need for replacing them during printing F...

Page 81: ...e temperature has reached the acceptable range Red not suitable for printing or indicates a warning For example in figure 7 4 Waste The weight of the waste container is 9000 grams more than allowed wh...

Page 82: ...epending on the size of the model s to be produced printing can take between several hours to several days As long as there is enough model and support material in the supply cartridges printing proce...

Page 83: ...from Slice confirmation dialog box There was a relatively long interruption in printing even if the last slice and continue from slice indicators are correct The part of the model already printed may...

Page 84: ...eed tubes by running the Resin Replacement wizard To replace the model material 1 Start the Resin Replacement wizard either from the Wizards tab on the right side of the Eden interface or from the Opt...

Page 85: ...enu choose the type of model material resin you want to install and click Next Figure 7 10 Resin Selection screen Note This selection automatically affects the default material setting in Objet Studio...

Page 86: ...or VeroBlack or if the color of the printed models is unimportant Double Short Cycle During this cycle which takes about 50 minutes the wizard cleans the feed tubes and print block more thoroughly by...

Page 87: ...ne so and click Next 10 When prompted insert the new cartridge s of model material Select the check box and click Next Figure 7 14 Prompt to insert new right hand model cartridge Once you start this p...

Page 88: ...n replacement filling heads with new model material 11 When the final wizard screen appears click Done to close the wizard CAUTION Dispose of cartridges of Eden model and support material in accordanc...

Page 89: ...figures 7 3 7 4 and 7 5 on pages 3 5 and 6 If after printing a job you know that the printer will not be used for 10 hours or more you can immediately turn off the heating of the print heads by putti...

Page 90: ...perform several processes These are controlled by the Shutdown wizard Always use this wizard instead of just closing the Eden printer interface To run the Eden Shutdown wizard 1 Select Shutdown from...

Page 91: ...heated c The print heads are cleared of any remaining material After these tasks are completed the final wizard dialog box appears in which you choose whether or not to shutdown the computer in the Ed...

Page 92: ...supplied cleaning cloth or equivalent a mirror 2 Start the Heads Cleaning wizard either from the Wizards tab on the right side of the printer interface or from the Options menu see figure 7 25 on page...

Page 93: ...clean the print heads 5 When the following screen appears open the cover Figure 7 20 Head cleaning wizard steps 5 10 6 Place the mirror on the build tray 7 Put on the gloves 8 Soak the cleaning cloth...

Page 94: ...e the cleaning materials from the printer and close the cover 12 Select the confirmation check boxes in the wizard screen and click Next The head purge cycle begins When this is complete the final wiz...

Page 95: ...In the Eden computer interface open the Options menu and select Pattern Test or press F3 5 In the Confirm dialog box click Yes Figure 7 23 Pattern test confirmation The Eden printer prints a series o...

Page 96: ...sequence 3 Perform the pattern test If the results of the pattern test are still poor 1 Carefully clean the print heads again making sure there is no residue left on them 2 Perform the purge sequence...

Page 97: ...or from the Options menu Figure 7 25 Starting the Wiper Cleaning wizard 3 Close the Eden printer cover and click Next in the wizard screen 4 Follow the instructions on the wizard screens and select t...

Page 98: ...If the wiper blade is scratched torn or worn or if you cannot clean it completely replace it a Grasp it and pull it up and out of its bracket b Insert the new wiper blade making sure that it is straig...

Page 99: ...ad Alignment wizard either from the Wizards tab on the right side of the Eden interface or from the Eden Options menu see figure 7 25 on page 21 3 Click Next to begin and close the cover 4 In the wiza...

Page 100: ...rint head Figure 7 30 Sample head alignment test The three columns on the right were printed by the heads used for applying model material when producing models From right to left the columns represen...

Page 101: ...es in the set are aligned you need to change the alignment of that head in the next wizard screens 10 In the wizard screen shown in figure 7 29 select the Transparency removed check box and click Next...

Page 102: ...ant to make alignment changes in the printer at this time select No and click Next 14 In the final wizard screen choose to either repeat the head alignment procedure or close the wizard If the most cl...

Page 103: ...nents of the Eden printer to enable you to perform it Only replace a print head with the aid of the wizard The procedure takes 75 90 minutes and consists of the following phases A Identifying the head...

Page 104: ...se items before running the Head Replacement wizard 2 Start the Head Replacement wizard either from the Wizards tab on the right side of the Eden interface or from the Options menu see figure 7 25 on...

Page 105: ...creen 6 Select the Open door check box and click Next if you are ready to continue 7 Open the Single Head Replacement kit and remove the safety gloves and the instructions 8 Put on the safety gloves 9...

Page 106: ...If necessary you may use a screwdriver to loosen the screws Figure 7 39 Releasing the locking screws 11 Press down on the upper and lower locking screws to release the print head Figure 7 40 Releasing...

Page 107: ...Figure 7 42 Releasing the print head driver card to remove the head 14 Make sure that along with the head you remove the two rubber O ring seals Figure 7 43 O ring seals on the print head Figure 7 44...

Page 108: ...Figure 7 45 Inserting the print head driver card into its socket 17 Push the head up until you hear it click into place in both front and rear holders Figure 7 46 Clicking the head into place in the...

Page 109: ...vel of the new head 22 Confirm that the heads are level and even by selecting the check box in the next wizard screen and click Next Figure 7 48 Installation check screen 23 In the next wizard screen...

Page 110: ...correct installation screen showing which head s to re insert If this happens a Open the print head compartment see figure 7 41 on page 30 b Re insert the print head driver card into its socket see fi...

Page 111: ...o re install the head Weight Calibration After the successful installation of print heads the wizard begins the first of two weight tests in which each head prints a sample Each test takes 15 25 minut...

Page 112: ...inter build tray 27 Using the scale weigh each sample and enter the weight in grams for the corresponding head in the wizard screen Then click Next Figure 7 56 Weight Test data entry screen After the...

Page 113: ...working life The Objet service engineer tests their effectiveness during regular maintenance checks and replaces them if necessary If for any reason you need to replace a UV lamp follow these instruct...

Page 114: ...en confirm this and click Next Figure 7 59 Empty tray confirmation screen 5 Select the UV lamp s to be replaced and click Next Figure 7 60 UV lamp selection screen 6 Disconnect the power connection to...

Page 115: ...Pull the lamp reflector out of the print block Figure 7 63 Removing the UV lamp reflector 9 On the inside of the lamp reflector a black strip covers part of the reflector Remove this strip by sliding...

Page 116: ...re 7 65 Fastening the black strip to the right UV lamp reflector 12 Insert the new UV lamp reflector unit into the housing next to the print block Figure 7 66 Print block and UV lamp assembly showing...

Page 117: ...using and tighten the securing screw on top Figure 7 67 Replacing the lamp cover 14 Reconnect the power connection to the UV lamp Figure 7 68 Connecting power to the UV lamp 15 In the wizard screen co...

Page 118: ...checks if their power is within the acceptable range for each printing mode The mode currently being checked appears in the lower left corner of the printer interface Figure 7 70 Status screen during...

Page 119: ...cations Data cards Temperatures Voltages Encoder repeatability Print head heating Print head filling A clear display of test results and the source of any failures enabling you to determine if printin...

Page 120: ...the tests you want to run To remove a selection click the check box again To quickly select all of the tests in a component category use the Group pull down menu at the bottom of the screen Group This...

Page 121: ...o Unknown Save Click to save a report that summarizes the tests run The report is saved as an HTML file You can save any number of reports for the tests you run the name of the file saved is BITReport...

Page 122: ...data queue in the DATA PCI card Faulty DATA_PCI card Encoder Tests the encoder s reliability by comparing readings from multiple runs along the X axis Faulty encoder System Info Compares the following...

Page 123: ...er You can monitor the weight of the waste container in the Maintenance screen of the printer interface You can also visually inspect the level of waste in the container To access it see page 48 To mo...

Page 124: ...new plastic container into the box Note Do not close the box until you connect the waste drain tube from the printer see below To replace the waste container 1 Locate the door on the lower left side...

Page 125: ...ntainer box using tape to hold it closed 8 Position the waste container under the Eden printer on the load cells The container should be on the extreme right side of the compartment Make sure that the...

Page 126: ......

Page 127: ...DOC 00500 Rev F 8 1 Handling Printed Models Removing Models After Printing 2 Removing the Support Material 2 Storing Models 3...

Page 128: ...ls cool for several hours Removing the Support Material After printed models have cooled the support material must be removed This can be done by different methods depending on the size of the model h...

Page 129: ...e removed but it is typically between half an hour and several hours In any case you should remove as much support material as possible before the caustic soda treatment and rinse the model thoroughly...

Page 130: ......

Reviews: