background image

99

FR

MANUEL TECHNIQUE D’UTILISATION

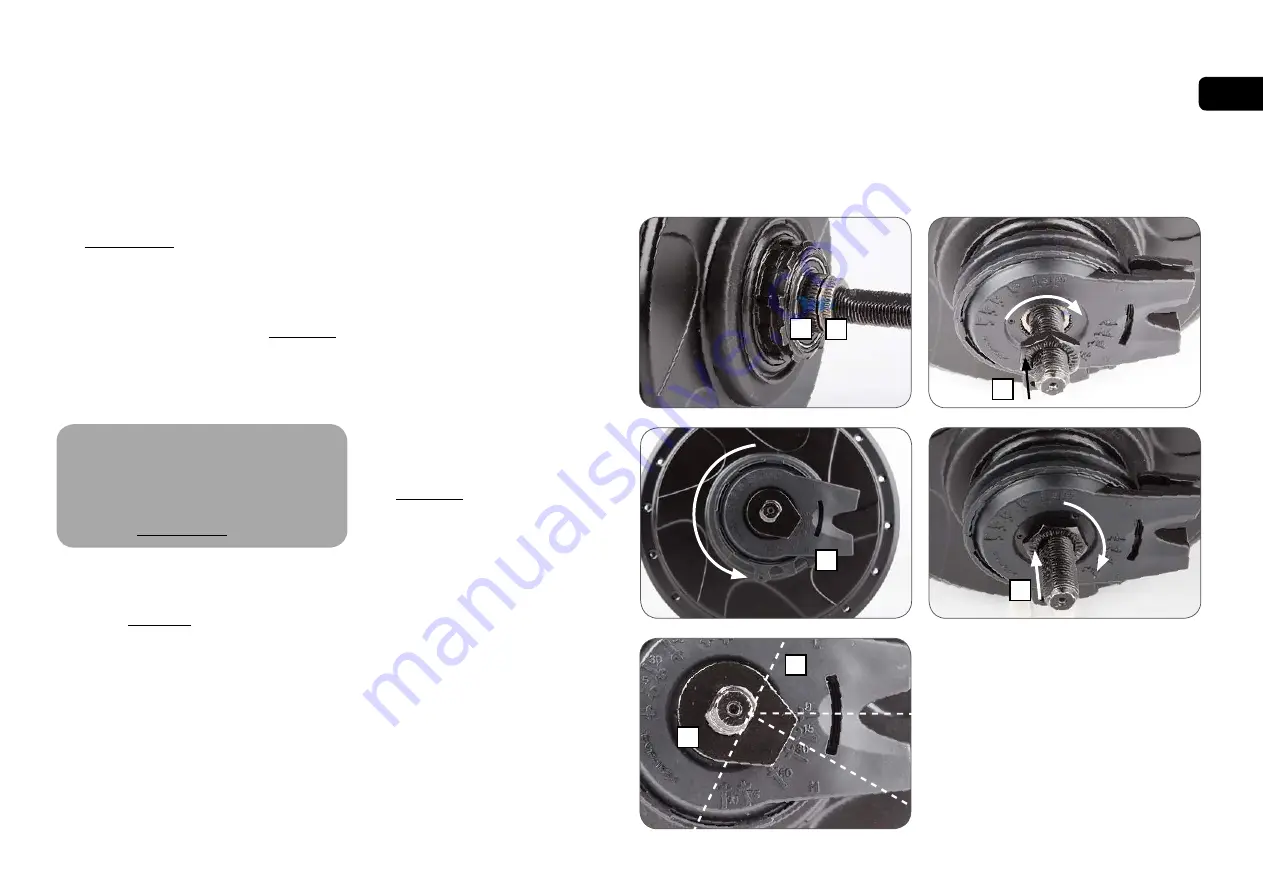
3.4 Installation de l'interface de moyeu 

Nfinity

1. 

Enlevez la cale de blocage le cas échéant 
(

voir section 3.2

).

2. 

Assurez-vous que les repères entre l'écrou 
de clavette 

(A)

 et la commande de 

changement de vitesses 

(B)

 sont alignés. Si 

ce n'est pas le cas, consultez la 

section 4.2.

3. 

Avant l'installation, placez l'interface de 
moyeu Nfinity dans la position « H » de 
surmultiplication maximale 

(C)

Les CVP des gammes 

N330

 et 

N360/

N380

 présentent des configurations 

différentes en termes de commande 

de changement de vitesses, et sont uniquement 
compatibles avec l'interface de moyeu 

Nfinity


appropriée (

voir section 3.3

).

4. 

Suspendez l'interface de moyeu 

Nfinity

 sur 

l'axe de droite et alignez les parties planes 
de l'axe 

(D)

 sur l'angle d'installation défini 

dans la 

section 3.3

.

• 

Il est également possible de placer une 
rondelle fixe 

(B)

 sur l'interface de moyeu 

Nfinity

 pour ajuster l'angle d'installation.

5. 

Lorsque l'angle d'installation est aligné, 
vérifiez que l'interface de moyeu 

Nfinity


est en position « H » de surmultiplication 
maximale, puis enfilez entièrement 
l'interface de moyeu sur la commande 
de changement de vitesses et l'écrou de 
clavette jusqu'à ce qu'elle soit au même 
niveau que l'écrou.

6.

 Vissez l'écrou côté droit 

(F) 

sur l'axe, les 

dentelures vers l'extérieur, en appliquant 
un couple de serrage de 10-15 Nm (7-11 
pi-lbs).

7.

 Installez la roue arrière conformément

  à la 

section 2.5.

C

D

E

B

A

H

F

F

!

NFINITY - 

ASSEMBLAGE DES COMPOSANTS

Summary of Contents for Nfinity 330

Page 1: ...1 EN TECHNICAL OWNER MANUAL TECHNICAL OWNER MANUAL NUVINCI OPTIMIZED CVP WITH NFINITY CABLE SHIFT SYSTEM MANU NFIN 00 EN DE 30 58 1 29 59 88 89 116 NL FR ...

Page 2: ...lling the Sprocket 10 3 3 Nfinity Hub Interface Compatibility Orientation 11 3 4 Installing the Nfinity Hub Interface 12 3 5 Installing the Shifter 13 3 6 Installing Shift Cable Housing 14 3 7 Installing Shift Cables and Hardware 15 4 Nfinity service instructions 16 4 1 Replacing Shifter Cables 16 4 2 Resetting CVP to Full Overdrive 18 4 3 Servicing or Replacing Freewheel 20 4 4 Removing Brake Con...

Page 3: ...io is determined by the rider s comfort level Ratio changes can be made even while pedaling under high torque 1 NuVinci Optimized products 1 2 The NuVinci Optimized CVP The NuVinci Optimized technology is a continuously variable planetary CVP drivetrain offering an infinite number of ratios inside its wide ratio range Ratio changes occur within the hub smoothly via internals that are sealed for li...

Page 4: ...re of a hill A Shifting into high ratios for higher speeds Using the Nfinity grip rotate in the direction indicating more of a flat B 2 2 Shifting Nfinity Systems While Stopped NuVinci Cycling CVPs cannot be shifted completely through the ratio range while stopped 50 70 of the shift range is typically accessible with the remainder accessible with very little pedal rotation NFINITY OPERATION CARE A...

Page 5: ...arrel adjusters C at the shifter Cable slack can be determined by pulling lightly on the cable housing D at the shifter and noticing any slack 0 5mm of slack is ideal Cable slack of more than 2 0mm may cause decreased shift performance and shift cable durability For rear wheel removal additional cable slack may be desired to ease shift cable hardware removal which can be obtained with the barrel a...

Page 6: ...s easy access to the shift cable hardware 2 Remove shift cable hardware following steps and 3 Loosen and or remove the axle nuts A and the no turn washers B on both sides For rim or roller brake applications disconnect the rear brake according to the manufacturer s instructions 4 Remove the rear wheel 1 2 3 1 2 3 A B ...

Page 7: ...e The rectangular boss must engage in the dropout of the frame 3 Mount the axle nuts B Tightening torque 30 40 Nm 266 350 in lbs For rim and roller brake applications connect the rear brake according to the manufacturer s instructions Improper installation of the no turn washer may result in damage to the dropout and the hub Over tightening may damage parts Under tightening can result in the axle ...

Page 8: ...e for the life of the product The NuVinci Optimized CVP internal freewheel mechanism is serviceable Regular lubrication will extend the chain s service life 2 7 Wear Parts Repair Work Handlebar grips sprockets and bike chains are wear parts Please check these parts regularly and replace them as necessary Only a qualified bike dealer should perform any necessary work on the NuVinci Optimized CVP Nf...

Page 9: ... is 14 2 00mm Suggested lacing is a 2 cross pattern for 26 inch and 700c wheels Use a 2 cross pattern only if the rim allows the nipples to be effectively in line with the spokes For 24 inch or smaller wheels a 1 cross pattern is suggested Radial lacing is not recommended A Installation and repairs must be made by a qualified bicycle mechanic This section assumes a level of knowledge and skill con...

Page 10: ...re 3 32 inch 2 3mm thick at the inner diameter If the inner diameter is 0 17 0 18 inch 4 3 4 5mm thick the spacer should not be used Use of incompatible chains can result in interference with the Nfinity Hub Interface and damage to CVP components and may result in a dangerous condition for the rider NuVinci Optimized CVPs are incompatible with 1 8 inch 3 18mm single speed chains and sprockets that...

Page 11: ... seat stay cable routing Move the Nfinity Hub Interface along the dropout to ensure clearance at different axle positions 3 With the Nfinity Hub Interface oriented correctly inside the right dropout the installation angle F is the indicated angle of the dropout 20 degrees in this example Use the markings on the Nfinity Hub Interface to determine your approximate installation angle 3 3 NfinityTM Hu...

Page 12: ...nce section 3 3 4 Suspend the Nfinity Hub Interface over the right hand axle and align the axle flats D with the installation angle determined in section 3 3 Alternatively a no turn washer E can be installed over the Nfinity Hub Interface to align the installation angle 5 When the installation angle is aligned ensure the Nfinity Hub Interface is set to full overdrive H and seat the Nfinity Hub Int...

Page 13: ...e shifter such that the display C is visible to the rider and the cable will be unobstructed Tighten the clamp bolt to 2 0 2 5 Nm 18 22 in lbs Never use lubricants or solvents to install handlebar grips Make sure that the shifter and the brake lever function properly and are unobstructed re adjust if necessary Never ride without the handlebar grips The turning grip of the shifter could become loos...

Page 14: ...ent to allow an extreme turning angle Also consider the influence of adjustable handlebars and stems on the cable housing lengths 3 Secure cable housing to the frame The cable housing must remain moveable for axle adjustment Avoid tight bends when installing the shift cable housing Leave at least 150mm of housing unsupported at the Nfinity Hub Interface to ease installation and removal of the shif...

Page 15: ...t the shifter Using a 2mm allen secure the cable and torque to 1 5 2 0 Nm 13 18 in lbs NFINITY ASSEMBLY OF COMPONENTS 4 Cut the excess cable at a maximum of 2 0mm from the end of the UD cable stop G 5 Pull the overdrive shift cable H firmly at the Nfinity Hub Interface until it stops checking to make sure that the shift indicator I goes into a steep hill Nfinity C8 and Nfinity C8s shifters or that...

Page 16: ... remove shift cables from housing 2 Remove the phillips screw A on the bottom of the Nfinity shifter and remove the bottom cover B by pulling lightly on the access tab 3 Using a small flat screwdriver or pointed object extract the cable anchors C and shift cables D from the grip pulley Rotate the grip to access individual cable anchors For installing shifter cables see page 17 A B C D ...

Page 17: ...s until it comes out the other side Guide the cable through the closest barrel adjuster F 5 Pull the cable through the barrel adjuster until the cable anchor seats fully into the grip pulley G 6 Rotate the grip to position the next cable for installation and repeat step 4 and step 5 7 Reinstall the bottom cover and screw A Torque to 0 2 0 3 Nm 2 3 in lbs A ...

Page 18: ...ve will need to be reset If the markings are not obvious full overdrive should result in the hub wheel rotating 1 6 2 times for every 1 rotation of the CVP sprocket 6 Set the Nfinity Hub Interface to the full underdrive L position note this is opposite of normal installation Reinstall the Nfinity Hub Interface angular position is unimportant leaving the r h nut uninstalled NFINITY SERVICE INSTRUCT...

Page 19: ...l overdrive H position The indicated position of the Nfinity Hub Interface is unimportant in this step When in full overdrive the hub wheel should rotate approximately 1 6 2 times for every 1 rotation of the CVP sprocket When full overdrive is found remove the Nfinity Hub Interface per step 4 in this section Check to make sure the mark on the Spline nut and shift driver align per step 5 in this se...

Page 20: ...ove the snap ring 15 on the shift driver and remove the freewheel assembly 16 If servicing or replacing use a medium weight oil or very lightweight water resistant grease and check pawl and spring function 5 Remove the Interior snap ring 17 needle bearing 18 and r h shield 19 if these components are being replaced 6 Install the serviced new freewheel components according to the exploded view in se...

Page 21: ...BKAD 01 to remove the brake lock ring 6 and remove the roller brake adapter 7 from the CVP Removing Rim Brake Hardware 1 Remove left hand axle nut 1 left hand no turn washer 2 left hand nut 3 and cupped washer 4 2 Using a thin flat device pry and remove the rim brake cover 5 Removing Disc Brake Hardware 1 Remove left hand axle nut 1 left hand no turn washer 2 left hand nut 3 and cupped washer 4 2 ...

Page 22: ...t lbs 3 After installing roller brake install and torque left hand nut 3 to 30 35 Nm 22 26 ft lbs Installing Rim Brake Hardware 1 Press rim brake cover 5 into position until if seats fully followed by the cupped washer 4 2 Install and torque left hand nut 3 to 30 35 Nm 22 26 ft lbs Installing Disc Brake Hardware 1 Install the disc brake adapter 9 and brake shield 8 and apply a high strength thread...

Page 23: ...e 26 0 mm Nfinity 330 Hub N380 Hub Colors Silver or black CVP weight 2 450 grams Speed ratio Infinitely variable within ratio range Ratio Range 380 nominal 0 5 underdrive to 1 9 overdrive Controller C8 Other compatible controller C3 C8s and N360 shifter all MY Shifting Variable twist grip turn Hub Interface Nfinity Hub Interface 380 Other compatible HI s Spoke Configurations 32 or 36 hole Brake Co...

Page 24: ... 8 1 7 1 6 2 6 2 5 2 3 2 2 2 1 2 0 1 9 1 8 1 8 1 6 1 5 2 5 2 4 2 2 2 1 2 0 1 9 1 8 1 7 1 7 1 5 1 4 2 4 2 3 2 2 2 1 2 0 1 9 1 8 1 7 1 6 1 5 1 4 2 4 2 2 2 1 2 0 1 9 1 8 1 7 1 7 1 6 1 5 1 4 2 3 2 1 2 0 1 9 1 8 1 7 1 6 1 6 1 5 1 4 1 3 2 1 2 0 1 9 1 8 1 7 1 6 1 5 1 5 1 4 1 3 1 2 2 1 1 9 1 8 1 7 1 7 1 6 1 5 1 4 1 4 1 3 1 2 2 0 1 9 1 8 1 7 1 6 1 5 1 5 1 4 1 3 1 2 1 1 1 9 1 8 1 7 1 6 1 5 1 4 1 4 1 3 1 3 1...

Page 25: ...n Roller brake configuration Disc brake configuration Axle nut No turn washer Left hand nut Cupped washer Rim brake cover Brake lock ring Roller brake adapter Brake shield Disc brake adapter R h nut Hub Interface Sprocket snap ring Sprocket spacer Sprocket Snap ring freewheel Freewheel assy Snap ring interior Needle bearing R h shield Optional to be used with 2 3 mm thick sprockets Left non drive ...

Page 26: ...ponents and or the bicycle incorporating them you agree to the following terms and conditions If you do not want to be bound by these terms and conditions you must return the NuVinci Technology components to your vendor within three 3 days for a full refund The NuVinci Technology components sold herewith are to be used only in the rear wheel of a bicycle for usual and customary rear hub purposes a...

Page 27: ... NuVinci Optimized components sold herewith including but not limited to the rearHub controller and gear shifter are protected by U S patents 7 871 353 7 885 747 7 959 533 8 321 097 8 376 903 8 398 518 8 506 452 8 626 409 and European Patents EP2171312 EP2234869 Dansk Patent No 1954959 Spanish Patent ES2424652 as well as other patents Other U S and foreign patent applications are pending for Fallb...

Page 28: ...stallation manual which can be found at www nuvincicycling com downloads A product that has been disassembled into its components beyond the scope of service documentation Technical Owner Manuals for NuVinci Optimized CVP with Harmony or Nfinity shift system A product that has been modified or where the serial number or date code has been altered defaced or removed Except as pre approved in writin...

Page 29: ...LIMITED WARRANTY SHOULD BE OR BECOME INVALID OR UNENFORCEABLE UNDER APPLICABLE LAW THE REMAINING TERMS AND CONDITIONS HEREOF SHALL REMAIN IN FULL FORCE AND EFFECT AND SUCH INVALID OR UNENFORCEABLE PROVISION SHALL BE CONSTRUED IN SUCH A MANNER AS TO BE VALID AND ENFORCEABLE Fallbrook reserves the right to revise this limited warranty without notice NuVinci CYCLING European Support and Service Popov...

Page 30: ...30 DE TECHNISCHES BENUTZERHANDBUCH TECHNISCHES BENUTZERHANDBUCH NUVINCI OPTIMIZEDTM GETRIEBENABE MIT NFINITY BOWDENZUG SCHALTSYSTEM MANU NFIN 00 EN DE NL FR 30 58 1 29 59 88 89 116 ...

Page 31: ... Nfinity Naben Interface Kompatibilität Ausrichtung 40 3 4 Nfinity Naben Interface montieren 41 3 5 Controller montieren 42 3 6 Außenhüllen für die Schaltzüge montieren 43 3 7 Schaltzüge montieren 44 4 Nfinity Wartungsanweisungen 45 4 1 Schaltzüge austauschen 45 4 2 Nabe auf größte Übersetzung einstellen 47 4 3 Freilauf warten oder austauschen 49 4 4 Bremsen Konfigurationen entfernen 50 4 5 Bremse...

Page 32: ...tets ungehindert und exakt auf sein persönliches Komfortempfinden hin anpassen Das Übersetzungsverhältnis kann auch unter Last geändert werden d h während der Fahrt beim Pedalieren 1 NuVinci Optimized Produkte 1 2 Stufenlos verstellbares Planetengetriebe Continuously Variable Planetary CVP Die NuVinci Optimized Technologie besteht aus einem stufenlos verstellbaren Planetengetriebe CVP das eine unb...

Page 33: ... höhere Geschwindigkeiten in ein hohes Übersetzungsverhältnis schalten Den Drehgriff des Nfinity Controllers in die Richtung drehen die eine Ebene anzeigt B 2 2 Im Stilstand schalten NuVinci Optimized Naben lassen sich im Stillstand nicht über die gesamte Übersetzungsbandbreite schalten Gewöhnlich können 50 70 der Übersetzungsbandbreite im Stillstand geschaltet werden Die übrigen Übersetzungen sin...

Page 34: ...tzug lässt durch leichtes Ziehen an den Zugaußenhüllen im Bereich der Stellschrauben D feststellen Ein Spiel von 0 5 mm ist ideal Dahingegen kann ein Schaltzug Spiel von mehr als 2 mm die Schaltqualität negativ beinflussen und die Lebensdauer des Schaltzugs verringern Für den Aus und Einbau des Hinterrades kann es hilfreich sein durch Eindrehen der Stellschrauben ein gößeres Schaltzug Spiel zu erz...

Page 35: ...nen Seilzugenden vom Nfinity Naben nterface gemäß den Schritten und 3 Lösen und oder entfernen Sie die Achsmuttern A und die Nasenscheiben B an beiden Seiten Bei Felgen und Rollenbremsen trennen Sie die Hinterradbremse entsprechend der Herstelleranleitung 4 Nach Abheben der Kette bzw des Antriebsriemens vom Ritzel bzw von der hinteren Riemenscheibe können Sie das Hinterrad entnehmen 1 2 3 1 2 3 A ...

Page 36: ...greifen 3 Montieren Sie die Achsmuttern B auf beiden Seiten jeweils mit einem Anzugsdrehmoment von 30 40 Nm Sofern am betreffenden Fahrrad Felgen oder Rollenbremsen eingesetzt werden müssen diese entsprechend der jeweiligen Herstelleranweisungen wieder mit der Nabe bzw dem Hinterrad verbunden werden Ein falscher Einbau der Nasenscheiben kann zu Schäden an den Ausfallenden und an der Nabe führen Zu...

Page 37: ...zwecke ausgebaut und zerlegt werden Bei Verwendung eines Kettenantriebs erhöht regelmäßiges Schmieren die Lebensdauer der Kette 2 7 Verschleißteile Reparaturarbeit Lenkergriffe Ritzel und Fahrradketten sind Verschleißteile Bitte überprüfen Sie diese Teile regelmäßig und ersetzen Sie sie wenn nötig Nur ein qualifizierter Fahrradhändler sollte etwaige notwendige Arbeiten an der NuVinci Optimized Nab...

Page 38: ... Zoll und 28 Zoll Räder Verwenden Sie eine 2 fache Kreuzung nur wenn es die Felge ermöglicht dass sich die Nippel mit den Speichen faktisch auf einer Linie befinden Für 24 Zoll oder kleinere Räder wird als Einspeich Methode eine 1 fache Kreuzung empfohlen Radiale Einspeichung wird nicht empfohlen 3 Nfinity Montage von Bauteilen NFINITY MONTAGE VON BAUTEILEN Laufradbau und Laufradreparaturen müssen...

Page 39: ... 8 Zoll 4 3 4 5 mm beträgt sollte der Spacer nicht verwendet werden Siehe Abschnitt 5 1 für Spezifikationen zu Ketten bzw Riemenlinie Die Verwendung nichtkompatiber Ketten kann zu Beeinträchtigungen des Nfinity Naben Interface führen Schäden am Getriebe verursachen und und infolgedessen zu einer Gefährdung des Fahrers führen NuVinci Optimized Naben sind nicht mit 1 8 Zoll 3 18mm Single Speed Kette...

Page 40: ...ch einen hellgrauen Ring B im Innenteil gekennzeichnet N360 und N380 Naben haben keinen gelben Punkt C und sind nur mit einem Nfinity 380 Naben Interface kompatibel das durch einem schwarzen Ring im Innenteil gekennzeichnet ist D 2 Verwenden Sie das noch nicht montierte Nfinity Naben Interface E um die gewünschte Ausrichtung zu bestimmen Die übliche Ausrichtung ist nach vorne gerichtet parallel zu...

Page 41: ...finity Naben Interface kompatibel Siehe Abschnitt 3 3 4 Schieben Sie das Nfinity Naben Interface auf die rechte Achse und richten Sie die Abflachungen an der Achse D an dem in Abschnitt 3 3 bestimmten Einbauwinkel aus Alternativ kann eine Nasenscheibe E auf die Achse geschoben werden um den Einbauwinkel auszurichten 5 Wenn der Einbauwinkel ausgerichtet ist achten Sie darauf dass das Nfinity Naben ...

Page 42: ...t und die Funktion der Schaltzüge nicht behindert wird Ziehen Sie die Klemmschraube mit 2 0 2 5 Nm an um den Controller in der gewählten Position am Lenker zu fixieren Verwenden Sie beim Montieren der Lenkergriffe niemals Schmier oder Lösungsmittel Achten Sie darauf dass der Controller und der Bremshebel einwandfrei funktionieren und nicht behindert werden wenn nötig anpassen Fahren Sie niemals oh...

Page 43: ...enkeinschlag zu beiden Seiten möglich ist Berücksichtigen Sie auch verstellbare Lenker und Vorbauten bei der Bemessung der Länge für die Außenhüllen 3 Befestigen Sie die Außenhüllen am Rahmen Die Zughüllen müssen für etwaige Achsanpassungen hinreichend beweglich bleiben Vermeiden Sie enge Radien bzw starkes Biegen beim Verlegen der Außenhüllen Lassen Sie die Außenhüllen an ihrem Ende zum Nfinity N...

Page 44: ...Sie das Hinterrad mit CVP gemäß Abschnitt 2 5 und stellen Sie das Schaltzug Spiel gemäß Abschnitt 2 3 ein E C B F G A D 120 mm H I J L K M 114 mm NFINITY MONTAGE VON BAUTEILEN 3 7 Schaltzüge montieren einstellen Achten Sie beim Montieren und Einstellen der Schaltzüge darauf dass Sie die Schaltzüge nur an den herausstehende Enden A aus der Zughülle ziehen Drehen Sie niemals den Controller B mit los...

Page 45: ...hraube A auf der Unterseite des Controllers und heben Sie die Abdeckung B durch leichtes Ziehen an der Lasche vom Gehäuse ab 3 Hebeln Sie die Endstücke C der Schaltzüge mit einem kleinen flachen Schraubenzieher oder einem spitzen Gegenstand aus der Zugführung und schieben Sie dabei mit der anderen Hand den Schaltzug in Richtung Gehäuse des Controllers D Drehen Sie den Griff um an die einzelnen End...

Page 46: ...gs über die nächstliegende Stellschraube aus dem Gehäuse heraus F 5 Ziehen Sie das Ende des Schaltzugs durch die Stellschraube bis der Nippel vollständig in der Führung des Griffs sitzt G 6 Drehen Sie die Griffrolle um den nächsten Seilzug einzufädeln und wiederholen Sie Schritt 4 und 5 7 Bringen Sie die Abdeckung A und die Kreuzschlitzschraube wieder an Ziehen Sie die Kreuzschlitzschraube mit ein...

Page 47: ...en mit einem Schraubenzieher das Interface vorsichtig von der Achse hebeln 5 Wenn die Markierung auf der gekerbten Mutter C mit der Markierung auf dem Kerbzahnprofil der Achse D nicht auf einer Linie liegen muss die volle Übersetzungsbandbreite neu eingestellt werden Wenn die Markierungen nicht deutlich zu erkennen sind sollte sich die Nabe bzw das Hinterad bei größter Übersetzung H 1 6 bis 2 Mal ...

Page 48: ...n für die größtmögliche Übersetzung H bis ein fester Widerstand spürbar ist Wiederholen Sie diesen Vorgang 2 3 mal Die angezeigte Position der Nfinity Naben Interface ist in diesem Schritt nicht relevant Wenn die größte Übersetzung eingestellt ist sollte sich die Nabe bzw das Hinterrad ca 1 6 bis 2 mal pro Ritzelumdrehung drehen 9 Wenn die größte Übersetzung erreicht ist entfernen Sie das Nfinity ...

Page 49: ... den äußeren Schnappring 15 und dann den Freilaufkörper 16 Verwenden Sie beim Warten oder beim Ausbau ein mittelschweres Öl oder leichtes wasserabweisendes Schmierfett undüberprüfen Sie die Rast und Federfunk tion der Freilauf Sperrklinken 5 Entfernen Sie den inneren Schnappring 17 das Nadellager 18 und die rechte Abdeckung 19 falls diese Bauteile ausgetauscht werden sollen 6 Montieren Sie die gew...

Page 50: ...sring 6 zu lösen und entfernen Sie dann den Rollbremsen Adapter 7 von der Nabe Entfernen der Felgenbremsen Teile 1 Entfernen Sie die Achsmutter 1 die linke Nasenscheibe 2 die linke Mutter 3 und die Tellerscheibe 4 2 Hebeln Sie den Staubschutzdeckel 5 der Felgenbremse mit einem kleinen flachen Werkzeug ab und entfernen Sie diesen Entfernen der Scheibenbremsen Teile 1 Entfernen Sie die Achsmutter 1 ...

Page 51: ...tieren Sie danach die linke Mutter 3 nd ziehen Sie sie mit einem Drehmoment von 30 35 Nm an Montieren der Felgenbremsen Teile 1 Drücken Sie den Stabschutzdeckel Felgenbremse 5 an seine vorgesehene Position bis er rundherum gleichmäßig sitzt Installieren Sie danach die Tellerscheibe 4 2 Montieren Sie die linke Mutter 3 und ziehen Sie sie mit einem Drehmoment von 30 35 Nm an Montieren der Scheibenbr...

Page 52: ...er Speichenflansch 26 0 mm Nabe Getriebe N380 Farbe Silber oder schwarz Gewicht Nabe 2 450 g Übersetzung der Geschwindigkeit Stufenlos variabel innerhalb der Bandbreite der Gänge Übersetzungsbandbreite 380 nominal 0 5 Untersetzung 1 9 Übersetzung Controller C8 Andere kompatible Controller C3 C8s und N360 Contoller alle MYs Schalten Variabler Drehgriff 3 4 Drehung Naben Interface Nfinity Naben Inte...

Page 53: ... 1 6 1 5 1 4 1 4 1 3 1 2 2 0 1 9 1 8 1 7 1 6 1 5 1 5 1 4 1 3 1 2 1 1 1 9 1 8 1 7 1 6 1 5 1 4 1 4 1 3 1 3 1 2 1 1 1 8 1 6 1 6 1 5 1 4 1 3 1 3 1 2 1 2 1 1 1 0 1 7 1 6 1 5 1 4 1 4 1 3 1 2 1 2 1 1 1 0 1 0 1 50 1 41 1 33 1 26 1 20 1 14 1 09 1 04 1 00 0 92 0 86 1 44 1 35 1 28 1 21 1 15 1 10 1 05 1 00 0 96 0 88 0 82 1 38 1 29 1 22 1 16 1 10 1 05 1 00 0 96 0 92 0 85 0 79 1 31 1 24 1 17 1 11 1 05 1 00 0 95...

Page 54: ...mmrollen Adapter Bremsen Abdeckung Scheibenbremsen Adapter Rechte Mutter Nfinity Naben Interface Sprengring Ritzel Ritzel Distanzring Ritzel Sprengring Freilauf Freilaufkörper Sprengring innen Nadellager Rechte Abdeckung A B C 1 2 3 4 5 6 7 8 9 10 11 12 13 14 15 16 17 18 19 Optional wird mit 2 3 mm breiten Ritzeln verwendet Nicht im Lieferumpfang enthalten Linke Seite Nicht Antreibsseite Rechte Se...

Page 55: ... NuVinci Technology components and or the bicycle incorporating them you agree to the following terms and conditions If you do not want to be bound by these terms and conditions you must return the NuVinci Technology components to your vendor within three 3 days for a full refund The NuVinci Technology components sold herewith are to be used only in the rear wheel of a bicycle for usual and custom...

Page 56: ...rmit verkauften NuVinci Optimized Komponenten einschließlich aber nicht beschränkt auf hintere Nabe Controller und Naben Interface werden durch die US Patente 7 871 353 7 885 747 7 959 533 8 321 097 8 376 903 8 398 518 8 506 452 8 626 409 und die europäischen Patente EP2171312 EP2234869 Dansk Patent N 1954959 Spanisches Patent ES2424652 wie auch andere Patente geschützt Weitere Patentanträge in de...

Page 57: ...downloads zu finden Ein Produkt das über den in den technischen Handbüchern der NuVinci Optimized Harmony or Nfinity Gruppen vorgesehenen Umfang zerlegt wurde Ein Produkt das verändert wurde oder an dem die Seriennummer oder der Datumscode verändert entstellt oder entfernt wurde Ein für kommerzielle Zwecke verwendetes Produkt außer wenn vorab schriftlich von Fallbrook genehmigt Schäden am Produkt ...

Page 58: ...E DER BESTIMMUNGEN DIESER EINGESCHRÄNKTEN GARANTIE GEMÄSS GELTENDEM GESETZ UNGÜLTIG ODER NICHT DURCHSETZBAR IST ODER WIRD BLEIBEN DIE RESTLICHEN BESTIMMUNGEN VOLLUMFÄNGLICH IN KRAFT UND DIE UNGÜLTIGEN ODER NICHT DURCHSETZBAREN BESTIMMUNGEN WERDEN SO AUSGELEGT DASS SIE GÜLTIG UND DURCHSETZBAR SIND Fallbrook behält sich das Recht vor diese begrenzte Garantie ohne vorherige Benachrichtigung zu ändern...

Page 59: ...59 NL TECHNISCHE GEBRUIKERSHANDLEIDING TECHNISCHE GEBRUIKERSHANDLEIDING NUVINCI OPTIMIZEDTM CVP MET NFINITY KABELSCHAKELSYSTEEM MANU NFIN 00 EN DE NL FR 30 58 1 29 59 88 89 116 ...

Page 60: ...8 3 3 Compatibiliteit Nfinity naafinterface 69 3 4 Installeren van de Nfinity naafinterface 70 3 5 Installatie van de draaischakelaar 71 3 6 Installatie van de buitenkabels 72 3 7 Installatie van de binnenkabels en bevestiging 73 4 Nfinity onderhoudsinstructies 74 4 1 Vervanging van de schakelkabels 74 4 2 Terugzetten van de CVP in Full Overdrive 76 4 3 Onderhoud of vervanging van het freewheel 78...

Page 61: ...gsverhouding bepaald door het comfortniveau van de rijder Veranderingen in de overbrengingsverhouding kunnen plaatsvinden tijdens het trappen op een hoog aandraaimoment 1 NuVinci Cycling producten 1 2 De NuVinci Optimized CVP De NuVinci Optimized technologie is een continu variabele planetaire CVP versnellingsnaaf die een oneindig aantal overbrengingsverhoudingen binnen haar brede overbrengingsber...

Page 62: ... heuvel lijkt A Schakel naar een hoge overbrengingsverhouding voor hogere snelheden Gebruik de Nfinity greep draai in de richting die plat aangeeft B 2 2 Nfinity systemen schakelen als u gestopt bent NuVinci Cycling CVP S kunnen niet volledig door het versnellingsbereik geschakeld worden als u stopt 50 70 van het schakelbereik is meestal toegankelijk terwijl de rest toegankelijk is door een heel k...

Page 63: ... kan worden ingesteld door licht aan de buitenkabels te trekken D op de schakelaar waarna speling ontstaat 0 5 mm speling is ideaal Kabelspeling van meer dan 2 0 mm kan leiden tot verminderd schakelvermogen en duurzaamheid van de kabel Voor het verwijderen van het achterwiel kan extra kabelspeling nodig zijn om verwijdering van de schakelkabelbevestiging eenvoudiger te maken Dit kan met de kabelsp...

Page 64: ...e schakelkabelbevestiging 2 Verwijder de binnenkabelbevestiging in de volgende stappen en 3 Draai de asmoeren los en verwijder ze A en de onderlegringen B aan beide zijden Bij velg en rollerremapplicaties maakt u de achterrem los volgens de instructies van de fabrikant 4 Verwijder het achterwiel 1 2 3 1 2 3 A B NFINITY BEDIENING ONDERHOUD ...

Page 65: ...hoekige opstaande rand moet in het uitvaleinde van het frame vallen 3 Monteer de asmoeren B Draai ze aan met 30 40 Nm 266 350 in lb Bij velg en rollerremapplicaties maakt u de achterrem los volgens de instructies van de fabrikant Onjuiste installatie van de onderleg ring kan tot schade leiden aan het uiteinde en de naaf Te veel aanhalen kan onderdelen beschadigen Te weinig aanhalen kan ertoe leide...

Page 66: ...ized CVP interne freewheelmechanisme Regelmatig smeren zal de levensduur van de ketting verlengen 2 7 Slijtage van onderdelen en reparaties Handvatten tandwielen en fietskettingen zijn onderdelen die aan slijtage onderhevig zijn Controleer deze onderdelen regelmatig en vervang ze indien nodig Noodzakelijke werkzaamheden aan de NuVinci Optimized CVP het Nfinity schakelsysteem of het Harmony schakel...

Page 67: ...n 700c wielen Gebruik alleen een patroon met 2 kruizen als de velg het toestaat dat de verbindingsstukken effectief in lijn zijn met de spaken Voor 24 inch of kleinere wielen wordt een 1 kruis patroon aanbevolen Radiaal spaken wordt niet aanbevolen 3 Nfinity assemblage van de componenten NFINITY BEDIENING ONDERHOUD A Installaties en reparaties moeten door een gekwalificeerde fietsenmaker worden ui...

Page 68: ...voor spaken die 3 32 inch 2 3mm dik zijn aan de binnenste doorsnede Als de binnenste doorsnede 0 17 0 18 inch 4 3 4 5mm dik is mag de spacer niet gebruikt worden A B C D Gebruik van incompatibele CVP s kettingen kan de Harmony naafinterface en de CVP beschadigen CVP componenten beschadigen en kan er een gevaarlijke situatie voor de rijder ontstaan NuVinci Optimized zijn incompatibel met 1 8 inch 3...

Page 69: ... de Nfinity naafinterface langs het uiteinde om speling te hebben op verschillende asposities 3 Bij een correcte oriëntatie van de Nfinity naafinterface in het rechtertuitvaleinde is de installatiehoek F gelijk aan de aangegeven hoek ten opzichte van de dropout 20 graden in dit voorbeeld Gebruik de markeringen op de Nfinity naafinterface om bij benadering de installatiehoek te bepalen 3 3 Compatib...

Page 70: ...d de Nfinity naafinterface met de rechterkant omhoog en zet de platte zijden van de as D in lijn met de bepaalde installatiehoek in paragraaf 3 3 Er kan ook een onderlegring E op de Nfinity naafinterface geïnstalleerd worden om de installatiehoek uit te lijnen 5 Als de installatiehoek is uitgelijnd let er dan op dat de Nfinity naafinterface in de hoogste versnelling H staat en schuif de Nfinity na...

Page 71: ...nig dat de display C zichtbaar is voor de rijder en de kabels volledig vrij lopen Draai de klembout vast met 2 0 2 5 Nm 18 22 in lbs Gebruik nooit smeermiddelen of oplosmiddelen om de handvatten te monteren Controleer of de draaischakelaar en de remhendel correct werken en niet geblokkeerd worden indien nodig opnieuw afstellen Rijd nooit zonder handvatten De draaigreep van de draaischakelaar zou e...

Page 72: ... in hoogte verstelbare sturen en stuurpennen bij het op maat maken van de buitenkabels 3 Zet de buitenkabels vast op het frame De buitenkabel moet kunnen schuiven om aanpassingen bij de assen te kunnen opvangen Vermijd scherpe bochten in de bekabeling tijdens de montage van de buitenkabels Laat minimaal 150 mm buitenkabel over bij de Nfinity naafinterface om iedere installatie en verwijdering van ...

Page 73: ...laar zit Gebruik een 2 mm inbus zet de kabel vast met een aandraaimoment van 1 5 2 0 Nm 13 18 in lbs 4 Snijd het kabeloverschot af op maximaal 2 0 mm van het einde van de UD kabelstop G 5 Trek de overdrive schakelkabel H stevig naar de Nfinity naafinterface totdat deze niet verder gaat Indicator I steil oploopt Nfinity C8 en Nfinity C8 draaischakelaars of dat de greep volledig met de klok mee draa...

Page 74: ...bels uit de buitenkabels 2 Verwijder de kruiskopschroef A aan de onderzijde van de Nfinity draaischakelaar en verwijder de onderste afdekplaat B door voorzichtig aan het lipje te trekken 3 Gebruik een smalle platte schroevendraaier of een scherp voorwerp en haal de kabelankers C en de binnenkabels D uit de draaigreep Draai de greep om de verschillende kabelankers te kunnen bereiken Voor het instal...

Page 75: ... kant weer uit komt Leid de kabel door de dichtstbijzijnde kabelspanner F 5 Trek de kabel door de kabelspanner tot het kabelanker volledig in de kabelgreep valt G 6 Draai de greep om de volgende kabel voor installatie te kunnen plaatsen en herhaal stap 4 en stap 5 7 Installeer de onderste cover opnieuw en schroef deze aan A Aandraaimoment van 0 2 0 3 Nm 2 3 in lbs A NFINITY ONDERHOUDSINSTRUCTIES ...

Page 76: ...oet de full overdrive positie opnieuw worden ingesteld Als de markeringen niet duidelijk zijn full overdrive komt overeen met 1 6 2 omwentelingen van de naaf wiel bij een rotatie van het CVP tandwiel 6 Zet de Nfinity naafinterface in de full underdrive L positie let erop dat dit het tegenovergestelde van de normale installatie Installeer de Nfinity naafinterface opnieuw hoekpositie is onbelangrijk...

Page 77: ...positie van de Nfinity naafinterface is niet belangrijk bij deze stap In de full drive positie moet de naaf het wiel 1 6 2 omwentelingen maken voor elke omwenteling van het CVP tandwiel Als de full overdrive is gevonden verwijder dan de Nfinity naafinterface zoals weergegeven in stap 4 in deze paragraaf Controleer of de markeringen op de schakelmoer en de schakelaandrijving in lijn staan met elkaa...

Page 78: ...4 Verwijder de klemring 15 op de draaischakelaar en verwijder de freewheelconstructie 16 Bij vervanging of onderhoud van het freewheel moet een u een medium olie of licht waterbestendig vet gebruiken en de werking van de pen en de vering controleren 5 Verwijder de binnenste klemring 17 de naaldlager 18 en de rechter afdekplaat 19 als deze componenten vervangen worden 6 Installeer de onderhouden ni...

Page 79: ...de klemring van de rem 6 te verwijderen en verwijder de remadapter 7 van de CVP Verwijder de velgrembevestiging 1 Verwijder de linkerasmoer 1 de linker no turn onderlegring 2 de linkermoer 3 en de schuin toelopende vulring 4 2 Gebruik een dun plat voorwerp en wrik hiermee de velremcover los 5 Verwijderen van de schrijfrembevestiging 1 Verwijder de linkerasmoer 1 de linker no turn onderlegring 2 de...

Page 80: ...a installatie van de roller brake de linkermoer 3 vastdraaien met 30 35 Nm 22 26 ft lbs Installeren van velgrembevestiging 1 Druk de velgremcover 5 op zijn plek totdat hij vastklemt en installeer vervolgens de schuin toelopende vulring 4 2 Installeer en zet de linkermoer 3 vast met 30 35 Nm 22 26 ft lbs Installeren van de schrijfrembevestiging 1 Installeer de schrijfremadapter 9 en remcover 8 en g...

Page 81: ...0 Naaf N380 Naafkleuren Zilver of Zwart Gewicht CVP 2 450 gram Versnellingen Oneindig binnen het versnellingsbereik Versnellingsbereik 380 nominaal 0 5 underdrive tot 1 9 overdrive Controller C8 Andere compatibele controller C3 C8s and N360 shifter all MY Schakelen Variable draaigreep draai Naafinterface Nfinity naafinterface 380 Andere compatibele HI s Spaakconfiguraties 32 of 36 gaats Remconfigu...

Page 82: ...5 1 4 2 4 2 2 2 1 2 0 1 9 1 8 1 7 1 7 1 6 1 5 1 4 2 3 2 1 2 0 1 9 1 8 1 7 1 6 1 6 1 5 1 4 1 3 2 1 2 0 1 9 1 8 1 7 1 6 1 5 1 5 1 4 1 3 1 2 2 1 1 9 1 8 1 7 1 7 1 6 1 5 1 4 1 4 1 3 1 2 2 0 1 9 1 8 1 7 1 6 1 5 1 5 1 4 1 3 1 2 1 1 1 9 1 8 1 7 1 6 1 5 1 4 1 4 1 3 1 3 1 2 1 1 1 8 1 6 1 6 1 5 1 4 1 3 1 3 1 2 1 2 1 1 1 0 1 7 1 6 1 5 1 4 1 4 1 3 1 2 1 2 1 1 1 0 1 0 1 50 1 41 1 33 1 26 1 20 1 14 1 09 1 04 1 ...

Page 83: ...ikte van 2 3 mm Niet meegeleverd Velgremonfiguratie Roller brake configuratie Schijfremconfiguratie Asmoer No turn onderlegring Linkerasmoer Schuin toelopende vulring Velgremcover Klemring voor rem Roller brake adapter Remcover Schijfremcover Rechtermoer Naafinterface Tandwielklemring Tandwielspacer Tandwiel Klemring freewheel Freewheelconstructie Klemring binnenkant Naaldlager Rechterafdekkap A B...

Page 84: ...onents and or the bicycle incorporating them you agree to the following terms and conditions If you do not want to be bound by these terms and conditions you must return the NuVinci Technology components to your vendor within three 3 days for a full refund The NuVinci Technology components sold herewith are to be used only in the rear wheel of a bicycle for usual and customary rear hub purposes an...

Page 85: ...ingen of verbeteringen die aan deze componenten worden uitgevoerd De hierbij verkochte NuVinci Optimized componenten inclusief maar niet beperkt tot de achternaaf controller en versnellingshendel zijn beschermd door Amerikaanse octrooien 7 871 353 7 885 747 7 959 533 8 321 097 8 376 903 8 398 518 8 506 452 8 626 409 Europese octrooien EP2171312 EP2234869 Deens octrooinr 1954959 Spaans octrooinr ES...

Page 86: ...orden gevonden op www nuvincicycling com downloads Een product dat in strijd met de onderhoudsdocumentatie gedemonteerd is Technische handleidingen voor NuVinci Optimized CVP met Harmony of Nfinity shift system Een product dat is gewijzigd of waarvan het serienummer of de datumcode is gewijzigd uitgewist of verwijderd Tenzij vooraf schriftelijk door Fallbrook geaccepteerd een product dat gebruikt ...

Page 87: ...GE BEPALING VAN DEZE BEPERKTE GARANTIE ONGELDIG OF ONAFDWINGBAAR IS OF WORDT ONDER DE TOEPASSELIJKE WETEGEVING ZULLEN DE RESTERENDE VOORWAARDEN ERVAN VOLLEDIG VAN KRACHT BLIJVEN EN ZULLEN DEZE ONGELDIGE OF ONAFDWINGBARE BEPALINGEN ZODANIG WORDEN GEINTERPRETEERD ALS ZIJNDE GELDIG EN AFDWINGBAAR Fallbrook behoudt zich het recht voor om de beperkende garantievoorwaarden zonder voorgaande kennisgeving...

Page 88: ...IQUE D UTILISATION MANUEL TECHNIQUE D UTILISATION ENGRENAGE PLANÉTAIRE À VARIATION CONTINUE CVP NUVINCI OPTIMIZED AVEC SYSTÈME DE CHANGEMENT DE VITESSES PAR CÂBLE NFINITY MANU NFIN 00 EN DE NL FR 30 58 1 29 59 88 89 116 ...

Page 89: ... Interface de moyeu Nfinity Compatibilité orientation 98 3 4 Installation de l interface de moyeu Nfinity 99 3 5 Installation du dérailleur 100 3 6 Installation de la gaine du câble du dérailleur 101 3 7 Installation des câbles et du matériel du dérailleur 102 4 Nfinity Instructions d entretien 103 4 1 Remplacement des câbles du dérailleur 103 4 2 Rétablissement du CVP en position de surmultiplica...

Page 90: ...rminé par le niveau de confort du cycliste Les changements de rapports peuvent être effectués même lorsque le pédalage affiche un couple élevé 1 Produits NuVinci Cycling 1 2 Le CVP NuVinci Optimized La technologie NuVinci Optimized est une transmission à engrenage planétaire à variation continue CVP offrant un nombre illimité de rapports au sein de sa vaste plage de rapports Les passages de vitess...

Page 91: ...ant la côte A Passer aux rapports supérieurs pour une vitesse accrue Faites pivoter la poignée Nfinity dans la direction indiquant un terrain plat B 2 2 Changement des vitesses sur les systèmes Nfinity à l arrêt Les CVP NuVinci ne peuvent parcourir toute la plage de rapports lorsqu ils sont à l arrêt 50 à 70 de la plage de rapports est en général accessible le reste peut être activé en tournant lé...

Page 92: ... un câble mal réglé en tirant légèrement sur la gaine D au niveau du dérailleur pour dévoiler tout relâchement un mou de 0 5 mm est suffisant plus de 2 0 mm de mou au niveau du câble peut réduire la performance du dérailleur et la durée de vie du câble Pour démonter la roue arrière il peut s avérer nécessaire d ajouter un peu de mou au câble afin d enlever plus facilement le matériel relié au câbl...

Page 93: ...r 2 Retirez le matériel du câble du dérailleur en suivant les étapes et 3 Desserrez et ou enlevez les écrous d axe A ainsi que les rondelles fixes B des deux côtés Pour les modèles dotés de freins sur jante ou de freins à rouleau déconnectez le frein arrière conformément aux instructions du fabricant 4 Enlevez la roue arrière 1 2 3 1 2 3 A B NFINITY UTILISATION ENTRETIEN ...

Page 94: ...ans les pattes du cadre 3 Montez les écrous d axe B Appliquez un couple de serrage de 30 40 Nm 266 350 po lbs Pour les modèles dotés de freins sur jante ou de freins à rouleau connectez le frein arrière conformément aux instructions du fabricant Une rondelle fixe mal installée peut endommager la patte et le moyeu Un serrage excessif peut endommager des pièces Un serrage trop lâche peut entraîner u...

Page 95: ...re interne du CVP NuVinci Optimized est réparable Une lubrification régulière prolongera la durée de vie de la chaîne 2 7 Pièces d usure travaux de réparation Les poignées du guidon les pignons et les chaînes de vélo sont des pièces d usure Veuillez les contrôler régulièrement et les remplacer le cas échéant Seul un revendeur qualifié est habilité à effectuer les travaux requis sur le CVP NuVinci ...

Page 96: ... modèle à double croisement uniquement si la jante permet aux écrous d être effectivement alignés sur les rayons Pour les roues de 24 pouces ou moins il est conseillé d utiliser un modèle à simple croisement Le rayonnage radial n est pas recommandé 3 Nfinity Assemblage des composants NFINITY ASSEMBLAGE DES COMPOSANTS A L installation et les réparations doivent être effectuées par un mécanicien spé...

Page 97: ... 32 pouces 2 3 mm Si l épaisseur du diamètre intérieur équivaut à 0 17 0 18 pouce 4 3 4 5 mm l entretoise ne doit pas être utilisée A B C D L emploi de chaînes incompatibles peut interférer avec l interface de moyeu Nfinity et endommager les composants du CVP mettant dès lors le cycliste en danger Les CVP NuVinci Optimized ne sont pas compatibles avec les chaînes et pignons de 1 8 pouce 3 18 mm à ...

Page 98: ... l interface de moyeu Nfinity le long de la patte pour maintenir un dégagement approprié dans diverses positions d axe 3 Une fois que l interface de moyeu Nfinity est correctement orientée dans la patte droite l angle d installation F est celui indiqué par la patte 20 dans ce cas ci Utilisez les repères figurant sur l interface de moyeu Nfinity pour déterminer votre angle d installation approximat...

Page 99: ... section 3 3 4 Suspendez l interface de moyeu Nfinity sur l axe de droite et alignez les parties planes de l axe D sur l angle d installation défini dans la section 3 3 Il est également possible de placer une rondelle fixe B sur l interface de moyeu Nfinity pour ajuster l angle d installation 5 Lorsque l angle d installation est aligné vérifiez que l interface de moyeu Nfinity est en position H de...

Page 100: ...ble pour le cycliste et le câble dégagé Vissez le boulon de serrage selon un couple de 2 0 2 5 Nm 18 22 po lbs N utilisez jamais de lubrifiants ou de solvants pour installer les poignées du guidon Veillez au bon fonctionnement du régulateur et du levier de freinage et assurez vous qu ils ne sont pas entravés procédez à un réajustement le cas échéant Ne circulez jamais à vélo sans les poignées du g...

Page 101: ...ffectuer un angle de braquage extrême Tenez également compte de l influence des guidons et potences réglables sur la longueur de la gaine du câble 3 Fixez la gaine du câble au cadre La gaine du câble doit demeurer mobile pour pouvoir l ajuster à l axe Évitez les rayons de courbure serrés lorsque vous placez la gaine du câble du dérailleur Laissez au moins 150 mm de gaine sans support sur l interfa...

Page 102: ...ble et appliquez un couple de serrage de 1 5 2 0 Nm 13 18 po lbs 4 Coupez la longueur de câble superflue à 2 0 mm maximum de l extrémité de la butée du câble de sous multiplication G 5 Tirez fermement sur le câble de surmultiplication H au niveau de l interface de moyeu Nfinity jusqu à la butée en vous assurant que l indicateur du dérailleur I affiche une côte escarpée dérailleurs Nfinity C8 et Nf...

Page 103: ... de leur gaine 2 Retirez la vis cruciforme A en dessous du dérailleur Nfinity et le couvercle inférieur B en tirant légèrement sur la languette d accès 3 À l aide d un petit tournevis plat ou d un objet pointu extrayez les ancrages des câbles C ainsi que les câbles du dérailleur D hors de la poulie de la poignée Faites tourner la poignée pour accéder aux ancrages de chaque câble Pour installer les...

Page 104: ...illet d ajustement le plus proche F 5 Tirez le câble à travers le barillet d ajustement jusqu à ce que son ancrage soit complètement inséré dans la poulie de la poignée G 6 Faites tourner la poignée afin de la placer dans la position adéquate pour installer le câble suivant et répétez les étapes 4 et 5 7 Remettez le couvercle inférieur et la vis A Appliquez un couple de serrage de 0 2 0 3 Nm 2 3 p...

Page 105: ...ultiplication maximale devra être réinitialisée Si les repères n apparaissent pas clairement la surmultiplication maximale devrait être obtenue lorsque le moyeu la roue tourne 1 6 à 2 fois pour chaque rotation du pignon CVP 6 Réglez l interface de moyeu Nfinity en position de sous multiplication maximale L notez qu il s agit du contraire de l installation normale Réinstallez l interface de moyeu N...

Page 106: ...on de l interface de moyeu Nfinity indiquée n a aucune importance dans cette étape En surmultiplication maximale le moyeu la roue devrait tourner 1 6 à 2 fois pour chaque rotation du pignon CVP Lorsque vous atteignez la surmultiplication maximale enlevez l interface de moyeu Nfinity conformément à l étape 4 de cette section Vérifiez que le repère figurant sur l écrou de clavette et la commande de ...

Page 107: ...ande de changement de vitesses et retirez l assemblage de la roue libre 16 Lors d une réparation ou d un remplacement utilisez de l huile de viscosité moyenne ou de la graisse légère résistante à l eau et vérifiez le fonctionnement du cliquet ainsi que du ressort 5 Enlevez la bague de serrage intérieure 17 le roulement à aiguilles 18 et la protection côté droit 19 si ces composants doivent être re...

Page 108: ... jonc d arrêt du frein 6 puis enlevez l adaptateur du frein à rouleau 7 du CVP Démontage du matériel d un frein sur jante 1 Enlevez l écrou d axe gauche 1 la rondelle fixe gauche 2 l écrou gauche 3 et la rondelle bombée 4 2 À l aide d un instrument mince et plat soulevez puis retirez le couvercle du frein sur jante 5 Démontage du matériel d un frein à disque 1 Enlevez l écrou d axe gauche 1 la ron...

Page 109: ...elon un couple de 30 35 Nm 22 26 pi lbs Montage du matériel d un frein sur jante 1 Une fois que le couvercle du frein sur jante 5 est dans la bonne position appuyez dessus jusqu à ce qu il s intègre parfaitement puis procédez de même avec la rondelle bombée 4 2 Disposez l écrou gauche 3 et serrez le selon un couple de 30 35 Nm 22 26 pi lbs Montage du matériel d un frein à disque 1 Installez l adap...

Page 110: ...0 Moyeu N380 Couleur du moyeu Argenté ou noir Poids du CVP 2 450 grammes Rapport de vitesse À variation continue au sein de la plage de rapports Plage de rapports 380 de valeur nominale de 0 5 en sous multiplication à 1 9 en surmultiplication Régulateur C8 Autre régulateur compatible Dérailleur C3 C8s et N360 tous les MY Changement de vitesses Poignée rotative variable tour Interface de moyeu Nfin...

Page 111: ... 1 5 1 5 1 4 1 3 1 2 2 1 1 9 1 8 1 7 1 7 1 6 1 5 1 4 1 4 1 3 1 2 2 0 1 9 1 8 1 7 1 6 1 5 1 5 1 4 1 3 1 2 1 1 1 9 1 8 1 7 1 6 1 5 1 4 1 4 1 3 1 3 1 2 1 1 1 8 1 6 1 6 1 5 1 4 1 3 1 3 1 2 1 2 1 1 1 0 1 7 1 6 1 5 1 4 1 4 1 3 1 2 1 2 1 1 1 0 1 0 1 50 1 41 1 33 1 26 1 20 1 14 1 09 1 04 1 00 0 92 0 86 1 44 1 35 1 28 1 21 1 15 1 10 1 05 1 00 0 96 0 88 0 82 1 38 1 29 1 22 1 16 1 10 1 05 1 00 0 96 0 92 0 85...

Page 112: ...n Adaptateur du frein à rouleau Protection du frein Adaptateur du frein à disque Écrou droit Interface de moyeu Bague de serrage du pignon Entretoise du pignon Pignon Bague de serrage roue libre Assemblage de la roue libre Bague de serrage intérieure Roulement à aiguilles Protection côté droit A B C 1 2 3 4 5 6 7 8 9 10 11 12 13 14 15 16 17 18 19 facultatif á utiliser avec des pignons deto 2 3 mm ...

Page 113: ... these NuVinci Technology components and or the bicycle incorporating them you agree to the following terms and conditions If you do not want to be bound by these terms and conditions you must return the NuVinci Technology components to your vendor within three 3 days for a full refund The NuVinci Technology components sold herewith are to be used only in the rear wheel of a bicycle for usual and ...

Page 114: ...entions et améliorations Les composants NuVinci Optimized vendus comprenant notamment le moyeu arrière le régulateur et le dérailleur sans toutefois s y limiter sont protégés par les brevets américains 7 871 353 7 885 747 7 959 533 8 321 097 8 376 903 8 398 518 8 506 452 8 626 409 les brevets européens EP2171312 EP2234869 le brevet danois 1954959 le brevet espagnol ES2424652 ainsi que par d autres...

Page 115: ...cling com en downloads html Tout produit qui a été démantelé en pièces détachées au delà du cadre prévu par la documentation d entretien manuel technique de l utilisateur du NuVinci Optimized CVP avec système de changement de Harmony or Nfinity Tout produit ayant été modifié ou dans lequel le numéro de série ou le code de date a été modifié dégradé ou enlevé Sauf autorisation écrite préalable de F...

Page 116: ...CONQUE DE CETTE GARANTIE LIMITÉE SERAIT OU DEVIENDRAIT CADUQUE OU INAPPLICABLE DU FAIT DE LA LOI EN VIGUEUR LES AUTRES DISPOSITIONS ET CONDITIONS DE CELLE CI RESTERONT ENTIÈREMENT APPLICABLES ET EFFECTIVES ET LA DISPOSITION CADUQUE OU INAPPLICABLE SERA REMANIÉE DE MANIÈRE À ÊTRE VALABLE ET APPLICABLE Fallbrook se réserve le droit de réviser cette garantie limitée sans préavis NuVinci CYCLING Servi...

Reviews: