background image


EasyGrid User Guide 


10


5


System Overview 

5.1


System Overview  

The Nortech EasyGrid signal conditioner is design to monitor fiber optic temperature sensors installed 

inside high voltage power transformers.  Immunity to electrical interference and high dielectric constant 

procured by fiber optic sensors allow direct contact with high voltage components.  It is the only 

technology that monitors the true winding temperature in real-time.   


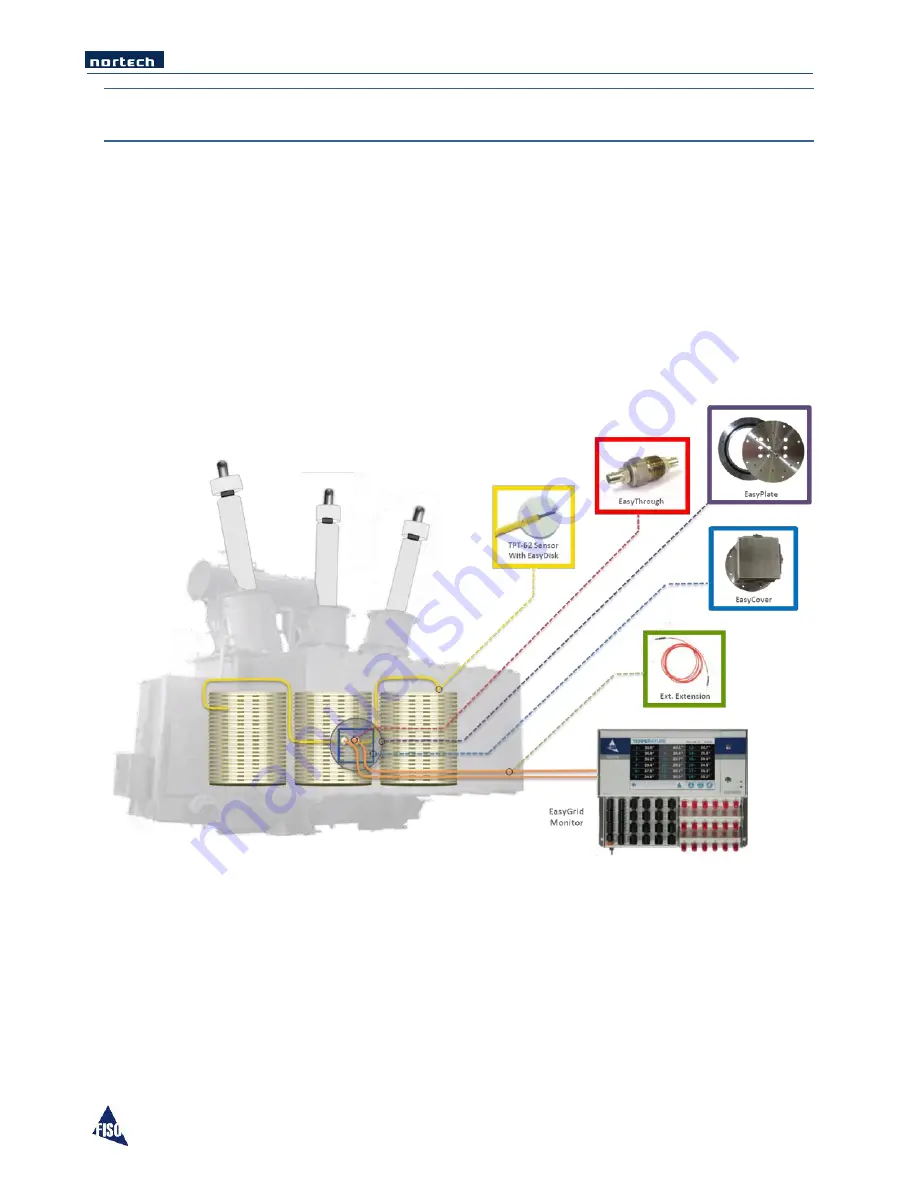
To be functional in its target environment, the Nortech EasyGrid is part of a system that includes the 

fiber optic sensors and all the components in between.  The figure below gives you a general idea of a 

typical installation. 


In this section we will describe the different component required to have a complete winding 

temperature measurement system.  Note that all components specified in this document are available at 

FISO; contact your sales representative if you need more details.  


Summary of Contents for EasyGrid V1

Page 1: ...EasyGrid User Guide i Nortech EasyGrid User Guide MAN 00084 R 10 0 ...

Page 2: ... its use No license is granted by implication or otherwise under any patent rights of FISO FISO s Commerce and Government Entities CAGE code under the North Atlantic Treaty Organization NATO is L0294 The information contained in this publication is subject to change without notice 2011 FISO Technologies Inc Words that FISO considers trademarks have been identified as such However neither the prese...

Page 3: ...nding 12 5 2 2 MiniDisk 12 5 3 EasyThrough 13 5 3 1 EasyPlate 14 5 4 EasyRing 15 5 5 EasyCover 16 5 6 Fiber Optic Extension 17 5 7 Signal Conditioner Protection Enclosure 18 6 Hardware Configuration 19 6 1 Dimensions 19 6 2 Front Panel Overview 20 6 3 Bottom Panel Overview 21 6 4 Maintenance Panel Overview 21 6 5 TFT Display 22 6 6 System and Communication Status LED 23 6 7 USB Communication Port ...

Page 4: ...on Configuration 73 10 2 2 Supported Functions 74 10 2 3 Modbus Data Format Description 74 10 2 4 Modbus Register map 75 10 2 5 Modbus Message Description 79 10 2 6 Modbus Example 82 10 3 Ethernet Protocol Configuration 83 10 4 IEC 61850 86 10 5 IEC 60870 5 104 87 10 6 DNP 3 0 88 11 System Installation 89 11 1 General 89 11 2 Handling Optical Cable 90 11 3 Assembly Diagram 92 11 4 Sensor Installat...

Page 5: ...s 104 14 Gallium Arsenide Principle 105 14 1 Gallium Arsenide Theory 105 14 1 1 The Principle 105 14 1 2 The Temperature Sensor 106 15 Warranty 107 15 1 General Information 107 15 2 Liability 107 15 3 Exclusions 107 15 4 Certification 107 15 5 Service and Repairs 108 15 6 Transportation 109 15 7 FISO Service Center 109 ...

Page 6: ...t to the EMC Directive in the European Union The EN61326 standard prescribes both emission and immunity requirements for laboratory measurement and control equipment This unit has been tested and found to comply with the limits for a Class A digital device Please refer to the Declaration of Conformity ...

Page 7: ...1 2009 Group 1 Class A Radiated Emissions CISPR 11 2009 Group 1 Class A Vibration Response IEC 60255 21 1 1988 Severity Class 2 Shock Response IEC 60255 21 2 1988 Severity Class 2 Seismic Test IEC 60255 21 3 1993 09 Severity Class 2 Method A Bump Test IEC 60255 21 2 1988 Severity Class 2 Vibration Endurance IEC 60255 21 1 1988 Severity Class 2 Shock Withstand IEC 60255 21 2 1988 Severity Class 2 B...

Page 8: ...on is below the level known to cause eye injury through accidental short term exposure However avoid prolonged exposure to light emitted from the fiber and do not stare directly at a light beam visible or not The following safety instructions must be observed whenever the Nortech EasyGrid is operated Failure to comply with any of these instructions or with any precaution or warning contained in th...

Page 9: ...e atmosphere Keep product surfaces clean and dry WARNING This equipment must be used as specified or the protection provided by the equipment may be compromised You must use this product in a normal mode and should not deviate from the written instructions provided CAUTION There are no user serviceable parts inside the Nortech EasyGrid other than the ones specified in the Maintenance Section Adjus...

Page 10: ... If the shipping box is not damaged carefully remove and identify all of the components listed below Contact FISO or your local representative if any of the components are missing We recommend you save the shipping box for future storage or transportation The Nortech EasyGrid package should include the following components Nortech EasyGrid USB interface cable Nortech Client software installation C...

Page 11: ...lays 0 8 or 16 form C with user configurable set points 5A 250VAC 5A 30VDC Relay System 1 form C for fail safe system fault 3A 250VAC 3A 30VDC Power requirement 24VDC 10 40W Number of Channels 4 to 18 Sensing range 40 C to 225 C Resolution 0 1 C Accuracy 1 C Sampling Rate 1 Hz Display 7 TFT Serial port USB and RS 485 422 Standard Communication Protocol MODBUS ASCII RTU Nortech Proprietary Protocol...

Page 12: ... a power supply providing the specified power and compatible with your local power outlet 1 Make sure that power switch is off when connecting the power supply to the unit 2 Wire the power input terminal block to a power supply providing the required voltage and respect polarity 3 Power up the unit using the ON OFF switch located on the panel above the relay terminal block Power Input ON OFF Switc...

Page 13: ... factor or calibration procedures are required to get accurate temperature measurements 1 Remove the protective cap from the Male ST Connector and ST Mating 2 Using the One Click tool clean the Male ST connector and the ST Mating 3 Align the male connector key with the mating slot 4 Insert the connector in the mating 5 Twist to lock ...

Page 14: ...EasyGrid User Guide 9 4 2 3 Reading Temperature Measurements With the power switch to ON and sensors connected you can read the temperature of each sensor on the EasyGrid display ...

Page 15: ... the only technology that monitors the true winding temperature in real time To be functional in its target environment the Nortech EasyGrid is part of a system that includes the fiber optic sensors and all the components in between The figure below gives you a general idea of a typical installation In this section we will describe the different component required to have a complete winding temper...

Page 16: ...nd has dielectric resistant materials featuring complete immunity to EMI and RFI environments The construction of the cable is specially designed for permanent installation in oil filled transformer Temperature Range 40 C to 225 C Resolution 0 1 C Accuracy 1 C Sensor dimension 1 1mm Certification ASTM D 3426 ASTM D 149 IEC 243 1 IEC 243 3 There are 3 tip types available for the TPT 62 ...

Page 17: ...he spacer Sensor tip protection Quick and easy installation in a winding spacer Increased protection during installation Spiral wrap inserted in and locked on the disk Increased protection at the winding exit 5 2 2 MiniDisk The MiniDisk is another option for the TPT 62 Designed for areas where the EasyDisk is to large but when the customer needs to quickly lock the sensor in place Installation of ...

Page 18: ...l The EasyThrough consists of two ST type mating sleeves a 3 8 NPT stainless steel fitting with an optical fiber inside the fitting Maximum Operating Temperature 150 C Maximum Pressure 20 bar 2000 kPA 390 psi Fitting Type 3 8 NPT Thread ASPT 60 thread angle taper angle of 1 47 truncation crest are flat Material Stainless Steel ...

Page 19: ... EasyPlate The EasyPlate is a stainless steel circular plate that completes the integration of the Nortech direct winding temperature measurement system NPT Type 3 8 NPT pipe thread NPT holes 1 43 cm 0 56 Material Stainless Steel ...

Page 20: ...asyRing is a carbon steel circular ring that can be welded to the tank wall to interface perfectly with the EasyPlate Its Viton O ring ensures that no leak is possible between the ring and the plate Material Carbon Steel O Ring Material Viton ...

Page 21: ...EasyCover The EasyCover is a stainless steel square cover that can be bolted to the EasyPlate It is provided with the appropriate bolts and seal for installation on the EasyPlate Material Stainless Steel Compatible With SEN ESP2 ...

Page 22: ...re specifically designed for harsh environments without compromising performance They are made of polyurethane and Kevlar Cable diameter 3mm OD Cable Length 1 to 100 meters Cable Jacketing Polyurethane Connectors ST Others Fungus Resistant UV Resistant Water Resistant High Flexibility ...

Page 23: ...ared to receive your EasyGrid Unit Standards UL 508 Type 1 2 3 4 4X 12 and 13 CSA Type 1 2 3 4 4X 12 and 13 NEMA Type 1 2 3 4 4X 12 and 13 IEC 529 IP 66 Material Moulded fiberglass polyester Finish Color Medium gray Operating Temperature 130 C to 40 C Impact index 6 78J 5ft lb Front Panel Clear Window ...

Page 24: ...EasyGrid User Guide 19 6 Hardware Configuration 6 1 Dimensions ...

Page 25: ...d User Guide 20 6 2 Front Panel Overview Optical Connector s Relays Terminal Block RS 485 422 Serial Port Communication LED System Status LED TFT Display Analog Outputs System Relay Power Input Ground Terminal ...

Page 26: ...EasyGrid User Guide 21 6 3 Bottom Panel Overview 6 4 Maintenance Panel Overview Power Switch Optional Ethernet Port Dip Switch Memory Card Access USB Port Communication Led System Led ...

Page 27: ...re Display Screens Monitoring Menu or Setting Menu Control Button Back to the last page Scroll Up Down in the displayed information Enable Disable Scrolling mode Information Bar located at the top of the display YYYY MM DD HH MM SS Date and Time or System Relay Status Menu Icons Go to Temperature Display Screen Go to Monitoring Menu Go to Setting Menu Go to Statistics Menu ...

Page 28: ...sor is Faulty Any Blink Memory card synchronisation in progress Communication Status The different LED modes and their meanings are Color State Description Off Any No activity on the communication bus Amber Blink Activity on the communication bus 6 7 USB Communication Port The USB communication interface is accessible in the maintenance panel The port serves three purposes Communicating to a PC wh...

Page 29: ...age level or range is accepted Connect the unit to the power supply using terminal block connectors 24VDC and ground Please refer to the power supply operating manual for important notices and installation information 6 9 Power Switch The power ON OFF switch is located above the relay terminal blocks Once all wires are connected press I on the switch to power ON the unit To power OFF press the O o...

Page 30: ...iption Label Channel Description GND1 1 Analog Output Ground GND10 10 Analog Output Ground A1 1 Analog Output A10 10 Analog Output GND2 2 Analog Output Ground GND11 11 Analog Output Ground A2 2 Analog Output A11 11 Analog Output GND3 3 Analog Output Ground GND12 12 Analog Output Ground A3 3 Analog Output A12 12 Analog Output GND4 4 Analog Output Ground GND13 13 Analog Output Ground A4 4 Analog Out...

Page 31: ...ible using the dedicated terminal block The pin layout is the following A set of dip switches are used to configure the port They are located behind the access plate on the right of the screen Switch RS 422 Mode RS 485 Mode 7 Must be Left Must be Right 6 Must be Left Must be Right 5 Must be Left Right Adds a 120Ω End of Line resistor Left No end of line resistor 4 Must be Left Right Adds a 1kΩ pul...

Page 32: ...on failure You must identify the host device on the RS 485 network and then proceed with its 485 BUS line biasing as figured above Two termination resistors must be installed and have the same characteristic impedance value as the twisted wire used on the 485 network RS485 network termination resistors typical values are respectively 120Ω and Watt In Nortech mode it is possible to connect up to 32...

Page 33: ...s are form C relay interfaces Relays 1 to 16 are programmable The programming of the relay is done with the EasyGrid display or with the Nortech Client software Mode Power Off Normal Cond Met Exerciser Normal NC COM NO NC COM NO NC COM NO NC COM NO Fail Safe NC COM NO NC COM NO NC COM NO NC COM NO ...

Page 34: ...igured in Fail Safe mode Mode Power Off Normal Cond Met Fail Safe NC COM NO NC COM NO NC COM NO 6 14 Protective Conductor Terminal This terminal provides an additional level of immunity against electromagnetic interferences It should always be grounded trough a low inductive conductor we suggest multiple braid 12 or 10 AWG copper wire to insure adequate grounding ...

Page 35: ...andling fiber optic connectors Always clean the fiber tip prior the insertion into the connector for optimum performance For details on connector handling and maintenance please refer to Handling the Sensors section To connect a ST connector follow these 5 steps 1 Remove the protective cap from the Male ST Connector and ST Mating 2 Using the One Click tool clean the Male ST connector and the ST Ma...

Page 36: ...hernet port above the analog output terminal block The port is dedicated to the selected communication protocol For more information on those protocols consult the digital communication protocol section Ethernet Specification Standard IEEE 802 3 Physical Layer 10 100Base T Data Rate 10 100 Mbps auto sensing Mode Half duplex and full duplex support auto sensing Connector RJ 45 ...

Page 37: ...m any other screen the user can access the last temperature page viewed and scroll through the different possible temperature views Pressing brings the monitoring menu page from where you can select between 6 categories of information Temperature Relay Statistics Diagnostics General Information Transformer Info 1 Channel 2 Channels 4 Channels 8 Channels 12 Channels 18 Channels Temperature Statisti...

Page 38: ...To view the measured temperature values there is 6 different options The main difference from page to page is the number of channels that are displayed at the same time In each page the status of all 16 possible relays is displayed on the right hand side ...

Page 39: ...tation of the physical position of the relay The Show All icon allows a view of all relays on a single screen Relay Icons allow easy understanding of the relay status Mode Power Off Normal Cond Met Exerciser Normal NC COM NO NC COM NO NC COM NO NC COM NO Fail Safe NC COM NO NC COM NO NC COM NO NC COM NO Exerciser mode will be defined in the setting menu ...

Page 40: ...alization of statistics gathered on each channel The following information is also stored in the EasyGrid memory Maximum Temperature Date Time of the Maximum Minimum Temperature Date Time of the Minimum Average Temperature Statistics reset is available in the setting menu ...

Page 41: ...the installation of the system The Light is related to the strength of the light required to make an accurate reading on a sensor A sharp increase of the light value could indicate one of the following problems Contaminated or Dirty connection Over bent cable along the sensor cable routing Broken Sensor or Extension Cable Damaged Sensor Tip ...

Page 42: ...signal required to make an accurate reading on a sensor A sharp decrease of the signal value could indicate one of the following problems Contaminated or Dirty connection Over bent cable along the sensor cable routing Broken Sensor or Extension Cable Damaged Sensor Tip ...

Page 43: ...Grid system Model Number Serial Number Embedded Software Version Number of Temperature Channels Number of Programmable Relays EasyGrid Internal Temperature HTML Software Version Data Logger State Mode Internal Data Logger Memory Usage Memory Card Used Capacity and Total Capacity System Relay Status ...

Page 44: ...er Guide 39 7 6 Transformer Information This displays general information about the transformer Three fields are available to provide the end users with information about the transformer Name Type and Description ...

Page 45: ...figuration menu can be accessed at all time using the button Pressing brings the setting menu page from where you can select between 8 categories Temperature Relays Statistics Analog Output Display Data Logging General Parameters Communication Channel Settings Statistics Settings Display Settings General Settings Relay Settings Analog Output Data Logging Communication ...

Page 46: ...tion Allows activation of a channel Click on Icon to Enable or Disable a channel Range Enable Channel is activated Disable Channel is deactivated The channel is not scanned Description Description Associates a description to the channel Click in the field to customize the description Range Any string of characters max 18 characters ...

Page 47: ... the unit Click on the field to change the offset Range 40 C to 225 C Set All Description Allows activation of one multiple or all channels at the same time Click on Icon to Enable or Disable a channel Range Enable Channel is activated Disable Channel is deactivated The channel is not scanned ...

Page 48: ...ion explains the different parameters and their functionality Description Description Associates a description to the relay Range Any string of characters max 18 characters Function Description Allows the relay logic to be activated Range Enable Relay is activated Disable Relay is deactivated ...

Page 49: ...l Cond Met Exerciser Normal NC COM NO NC COM NO NC COM NO NC COM NO Fail Safe NC COM NO NC COM NO NC COM NO NC COM NO Trig On Description Select relay Trig On conditions Range T Only Relay will Trig On only from the Temperature Setpoint parameters T Channel Fault Relay will Trig On from the Temperature Setpoint parameters or a Channel Fault Test Description Allows relay testing in test option scre...

Page 50: ...ample Setpoint may be increased by 5 C for the summer period This function is inactive when the offset is 0 C Range Resulting range 40 C to 225 C Channels List Description Selects channels used for the logic Range All possible temperature channel Setpoint Description Sets the temperature limit used in the selected logic Range 40 C to 225 C ...

Page 51: ...n ANY of the selected channels are ABOVE the Setpoint AND Condition is met when ALL of the selected channels are ABOVE the Setpoint AVERAGE Condition is met when the AVERAGE temperature of the selected channels is ABOVE the setpoint HEATER CONTROL Condition is met when the EasyGrid Internal temperature is BELOW the Setpoint COOLER CONTROL Condition is met when the EasyGrid Internal temperature is ...

Page 52: ...between the conditions met time and the relay operation Range 0 to 60 minutes The graphic below helps understanding the concepts of Hysteresis and Activation delay Activation Delay 0 min Activation Delay 0 min Setpoint Setpoint Hysteresis Normal Relay Fail Safe Relay ...

Page 53: ...ion Range Enable Exerciser function is active Disable Exerciser function is inactive Exerciser Duration Description Selects duration time of the exercising session Range 1 to 60 minutes Exerciser Cycle Description Sets the number of days between exercising sessions Range 1 to 31 days ...

Page 54: ...configuration of the period It is important to know that the season period will be the SAME for all relays Start Month Description Defines the first month of the period Same for ALL relays Range 1 to 12 January to December Start Day Description Defines the first day of the period Same for ALL relays Range 1 to 31 ...

Page 55: ...ber End Day Description Defines the last day of the period Same for ALL relays Range 1 to 31 Test Description Test Go to Relay Testing window Relay Testing Test relay operation Range Open Changes the Status to NO Normally Open Close Changes the Status to NC Normally Close See section 8 2 Relay Settings Operation for more information ...

Page 56: ... allows you to reset statistics associated to a single channel or for all channels at the same time Reset Description Resets the statistics per channel Reset All Description Resets the statistics for all channels Reset for All Channels Reset for Channel 1 ...

Page 57: ...page allows you to customize the analog output scale For each channel you will find 5 parameters Set Min T Description Temperature value at a 4mA output Range 40 C to 225 C Set Max T Description Temperature value at a 20mA output Range 40 C to 225 C ...

Page 58: ...EasyGrid User Guide 53 Reset All Description Resets all analog outputs to default values Min T 40 0 C Max T 225 0 C Set All Description Sets all analog outputs to the same values for Min T and Max T ...

Page 59: ...l channels share the same original factory set configuration the scale factor is 16 56 C mA This setting results in the 0 C offset to be at 6 41 mA the minimum 4 mA scale limit to be at 40 C and the maximum 20 mA scale limit to be at 225 C For example as for channel 1 in the Analog Output screen shoots below if the loop reads 7 69 mA the corresponding temperature for that channel is then 21 19 C 7...

Page 60: ...ives access to the parameters related to the EasyGrid display T Unit Description Select Temperature unit Range C Celsius F Fahrenheit Scroll Description Speed of the Auto Scroll function Range Fast every 1 second Medium every 2 seconds Slow every 4 seconds ...

Page 61: ...of the 6 temperature pages Display Calibration Description Runs touch screen calibration returns to Display Settings page when calibration completed Range N A Screen Saver Description Time before the screen saver kicks in If set to NEVER there is no screen saver Range Never 1 minute 5 minutes 10 minutes ...

Page 62: ...Maximum Temperature for each channel Minimum Temperature for each channel Average Temperature for each channel Sensor status and light value Status of each Relay Timestamp The data is saved in the EasyGrid 16MB internal memory at the defined period Every hour the data is stored in the external memory card when available If memory card is removed for an extended time the data will be synchronized w...

Page 63: ...tus Description Enable or Disable the data logging function by using the Start and Stop button Range Running Data is logged for the defined period Stopped Nothing is being logged Overflow Mode Description Action to be taken when the internal memory is full Range Auto Erase Older data is erased to make room for newer data Stop Logging is stopped when the memory is full ...

Page 64: ...ion Internal memory currently used in percentage The memory is emptied by pressing the Clear button Range 0 to 100 Memory Card Capacity Description Total capacity of the memory card inserted in the unit in GB Range 0 00GB 0 00 GB No Memory Card ...

Page 65: ...ion Amount of data written in the memory card in GB Range 0 00GB Sync In Progress Description Indicates when the unit is writing on the memory card The synchronization can be forced by pressing the Sync button Range Gray No Sync Red Sync in Progress ...

Page 66: ... 8 7 General Settings This page allows modification of general parameters Date Time Description Date and Time for the EasyGrid Real Time Clock Important Apply button must be press to confirm the changes Range Any day or Time ...

Page 67: ...peration mode is ALWAYS Fail Safe Range Not Applicable Password Protection Description Allows the User to Enable or Disable the password protection for the setting section Range Password length is 4 Factory Setting Description Allows setting back to the EasyGrid Factory Settings Range Not Applicable ...

Page 68: ...Any string of characters Maximum length is 18 Transformer Type Description Variable to store the transformer type Range Any string of characters Maximum length is 18 Transformer Description Description Variable to store the transformer description Range Any string of characters Maximum length is 18 ...

Page 69: ...i Modbus TCP IP IEC 61850 IEC 60870 5 104 DNP 3 0 Users can select one of the 7 COM configurations Nortech MODBUS RTU MODBUS ASCII MODBUS TCP IP IEC 61850 available with optional gateway IEC 60870 5 104 available with optional gateway DNP 3 0 available with optional gateway IMPORTANT Apply button must be pressed to save your update ...

Page 70: ...quested Nortech Address Description Current Nortech Address for Nortech protocol Range 1 to 32 Modbus Address Description Current Modbus Address for the Other protocols than Nortech Range 1 to 247 Baud Rate Description Communication speed for Modbus RTU and Modbus Ascii Range 9 600 19 200 ...

Page 71: ...ne Odd Even Character Interval Description Communication Character Interval in millisecond ms for Modbus Ascii Range 5 to 100 End of Frame Character Description Communication End Of Frame Character EOF for Modbus Ascii Range 0 to 127 Parameters are described in the Digital Communication Protocol section ...

Page 72: ...olution at 800 600 At least 512 MB of RAM and 100 MB of available hard disk space CD ROM or DVD ROM drive A mouse or similar pointing device USB interface 9 1 Getting Started 9 1 1 Installing the Program To install the software for the first time on the computer Place the CD ROM provided with the Nortech Unit on the CD ROM drive If auto run does not start open Windows Explorer to view the CD ROM s...

Page 73: ... detected units on the network This list can be refreshed with the Refresh network button The Selected Device Information section presents detailed information about the instrument that is highlighted in the device list The Information Tabs controls the right side of the window These tabs organize and provide all the information available for the selected EasyGrid unit Toolbar Information Tabs Dev...

Page 74: ...p www ftdichip com Drivers VCP htm 3 Device serial number should appear in the port list select the USB port that was created after you have connected the unit to one of your PC USB ports 4 Click Connect to establish communication 5 Once connected a list of devices is displayed on the left of the main window To refresh network detection click Refresh network This will scan the network to detect al...

Page 75: ...firmware button 3 Watch progression and wait for completion message 4 Unit reboots and new firmware version is displayed Nortech Client EasyGrid Display If a problem occurred while uploading firmware bad communication bad firmware file power lost etc the unit might end up with a corrupted firmware The software is for firmware update so you can upload it again When soft sector is corrupted the unit...

Page 76: ...onal Ethernet 10 1 Nortech Your configuration for communication protocol should be set to Nortech The Nortech Client application exchanges configuration and monitoring information with the EasyGrid using the Nortech protocol If you intend to connect multiple units to a RS 485 bus a unique network address must be set to each unit before installation Otherwise you will have to go to each unit locati...

Page 77: ...the layout and contents of message fields The Modbus protocol provides the internal standard that the Nortech EasyGrid unit uses for parsing messages During communications on a Modbus network the protocol determines how each controller will know its device address recognize a message addressed to it determine the kind of action to be taken and extract any data or other information contained in the...

Page 78: ...ts Even 1 Stop Bit Odd 1 Stop Bit Stop Bits Baud Rate 9 600 or 19 200 End of Frame Character Configurable LF default value equivalent to 0x10 hex Line Feed N A By default Modbus TCP IP is configured to automatically obtain network settings via DHCP server For more information on how to set a static address See section 10 3 Ethernet Protocol Configuration Communication Mode TCP IP Example IP Addres...

Page 79: ...te Single Coil 5 Write Only Write One Coil 10 2 3 Modbus Data Format Description Name Size bits Size Integer Description Bit 1 1 For Single Coils and Discrete Inputs Int16 16 1 Signed Integer values are represented in 2 s complement notation UInt16 16 1 Unsigned Integer Int32 32 2 Signed Long values are represented in 2 s complement notation UInt32 32 2 Unsigned Long Float IEEE 754 32 2 The Lowest...

Page 80: ...ition not met 1 Condition met 24608 24608 1 Bit 1 Relay System 32768 32768 1 Bit 1 System Unit 0 C 1 F Data Type Write Single Coil Address Data Size Data Format Max Count Name Value Start End 12288 12319 1 Bit 32 Channel Enable 0 Disable 1 Enable 12320 12351 1 Bit 32 Erase Temp Minimum Stats 0 No Action 1 Clear 12352 12383 1 Bit 32 Erase Temp Average Stats 12384 12415 1 Bit 32 Erase Temp Maximum S...

Page 81: ...6392 16392 1 UInt16 1 Com Modbus Parity 0 None 1 Odd 2 Even 16393 16393 1 UInt16 1 Com Modbus Stop Bits 1 2 16394 16394 1 UInt16 1 Com Modbus Type 0 RTU 1 ASCII 16395 16395 1 UInt16 1 Com Modbus Ascii EOF 0 127 16396 16396 1 UInt16 1 Com Modbus Ascii Char Interval 5 100 ms 16397 16397 1 UInt16 1 Com Protocol 0 Nortech 1 Modbus ASCII 2 Modbus RTU 3 IEC 61850 4 IEC 60870 5 104 5 DNP3 32768 32768 1 U...

Page 82: ...tart End 8192 8255 2 Float 32 Analog Output Value 0 0 to 20 0 mA 12320 12383 2 Float 32 Channel Temp 40 0 C to 225 0 C 12384 12447 2 Float 32 Channel Temp Min 40 0 C to 225 0 C 12448 12511 2 Float 32 Channel Temp Avg 40 0 C to 225 0 C 12512 12575 2 Float 32 Channel Temp Max 40 0 C to 225 0 C 12576 12639 2 Float 32 Channel Signal 0 0 to 100 0 12640 12703 2 Float 32 Channel Light 0 to 100 12704 1276...

Page 83: ...0 32791 12 String 1 System Model SEN XX 32792 32801 10 String 1 System Serial 00000000 32802 32811 10 String 1 System Firmware X X X X 32812 32822 11 String 1 System Manufacturing Date YYYY MM DD 32823 32833 11 String 1 System Servicing Date YYYY MM DD 32834 32853 20 String 1 System Date Time YYYY MM DD HH MM SS 36864 36882 19 String 1 Transformer Name N A 36883 36901 19 String 1 Transformer Type ...

Page 84: ... n Result Type Start Slave Address Function Code Data Checksum Type End RTU Address Function Data CRC ASCII Address Function Data LRC r n Read Coils Request Size Value Function Code 1 Byte 0x01 Starting Address 2 Bytes 0x0000 to 0xFFFF Quantity of Coils 2 Bytes 0x0000 to 0x07D0 1 to 2000 Response Size Value Function Code 1 Byte 0x01 Byte Count 1 Byte N Coil Status N x 1 Byte N Quantity of Outputs ...

Page 85: ...s different of 0 N N 1 Error Size Value Error Code 1 Byte Function Code 0x80 0x82 Exception Code 1 Byte 0x01 0x02 0x03 0x04 Read Holding Registers Format Request Size Value Function Code 1 Byte 0x03 Starting Address 2 Bytes 0x0000 to 0xFFFF Quantity of Registers 2 Bytes 0x0001 to 0x007D 1 to 125 Response Size Value Function Code 1 Byte 0x03 Byte Count 1 Byte 2 x N Register Value N x 2 Bytes N Quan...

Page 86: ...ntity of Input Registers Error Size Value Error Code 1 Byte Function Code 0x80 0x84 Exception Code 1 Byte 0x01 0x02 0x03 0x04 Write Single Coil Request Size Value Function Code 1 Byte 0x05 Output Address 2 Bytes 0x0000 to 0xFFFF Output Value 2 Bytes 0x0000 or 0xFF00 Off On Response Size Value Function Code 1 Byte 0x05 Output Address 2 Bytes 0x0000 to 0xFFFF Output Value 2 Bytes 0x0000 or 0xFF00 Of...

Page 87: ...r n Description Channel 1 Error 3 Channel 2 OK Channel 3 Off Channel 4 Off Read Holding Registers for Channel Temperature 1 to 4 RTU TX 01 03 3020 0008 4AC6 RX 01 03 10 00000000 41B8CB48 4479C000 4479C000 2FF0 ASCII TX 01 03 3020 0008 A4 r n RX 01 03 10 00000000 41B8CB48 4479C000 4479C000 E6 r n Description Channel 1 0x00000000 0 0 C IEEE 754 Channel 2 0x41B8CB48 23 1 C IEEE 754 Channel 3 0x4479C0...

Page 88: ...nder provided by us This software can be found into the Nortech Client installation folder By default this folder is C Program Files FISO Technologies Nortech Client To configure the EasyGrid for your network follow these steps 1 Connect the unit to your network with a RJ 45 connector cable 2 Verify your network connection If no link is detected it could mean this The Ethernet cable is not connect...

Page 89: ...r Firewall on your Windows base PC is deactivated To verify this is the good one just compare the MAC Address with the one on your EasyGrid After you have identified your device select it and click on Configure IP Setting 4 In the Set IP Address dialog box select Manually configure network settings and enter the desired parameters for IP Address Subnet Mask and Default Gateway Finally enter the pa...

Page 90: ...evice dialog box enter again the password Netsilicon and click on Reboot The status should be Rebooting Wait for about 60 seconds and the status should be Ready Now you can close this dialog box by clicking on Close 6 Finally to see if your EasyGrid is well configured click on Refresh List and your EasyGrid should appear with its new IP Address ...

Page 91: ...ay State Sys_ GGIO MX AnIn mag f Float 1 System Temperature 40 0 C to 225 0 C Ch x _STMP MX Tmp mag f Float 32 Channel Temperature 40 0 C to 225 0 C Ch x _GGIO MX AnIn3 mag f Float 32 Channel Temperature Minimum 40 0 C to 225 0 C Ch x _GGIO MX AnIn1 mag f Float 32 Channel Temperature Maximum 40 0 C to 225 0 C Ch x _GGIO MX AnIn2 mag f Float 32 Channel Temperature Average 40 0 C to 225 0 C Ch x _GG...

Page 92: ...met 1 Condition met 100 131 Bit 32 Relay State 1 1 Float 1 System Temperature 40 0 C to 225 0 C 100 131 Float 32 Channel Temperature 40 0 C to 225 0 C 132 163 Float 32 Channel Temperature Minimum 40 0 C to 225 0 C 164 195 Float 32 Channel Temperature Maximum 40 0 C to 225 0 C 196 227 Float 32 Channel Temperature Average 40 0 C to 225 0 C 228 259 Float 32 Channel Offset 270 0 C to 270 0 C 300 331 U...

Page 93: ...ion met 100 131 Bit 32 Relay State 1 1 Float 1 System Temperature 40 0 C to 225 0 C 100 131 Float 32 Channel Temperature 40 0 C to 225 0 C 132 163 Float 32 Channel Temperature Minimum 40 0 C to 225 0 C 164 195 Float 32 Channel Temperature Maximum 40 0 C to 225 0 C 196 227 Float 32 Channel Temperature Average 40 0 C to 225 0 C 228 259 Float 32 Channel Offset 270 0 C to 270 0 C 300 331 UInt16 32 Cha...

Page 94: ...yDisk inside radial winding spacers as described below but should it be necessary for any reason to attach the sensor directly to the connector it is preferable to tape the sensor side on against the conductor The thermal contact between the sensor and the winding is better with a side on attachment than an end on attachment In this case use epoxy resin with crepe paper or insulation paper to hold...

Page 95: ... coil should be manufactured as if no sensors were to be installed i e all radial spacers should be put in place It is easier and more efficient simply to remove normal spacers and replace them with spacers to which sensors have been attached when it is time to do the installation 11 2 Handling Optical Cable The core of any fiber optic cable is glass For this reason it should be handled with care ...

Page 96: ...n the Maintenance Section of this manual Keep the connector free of nicks burrs or scratches When the surface of a connector is damaged the only way to repair it is to polish it Polishing a connector is not easy and should be avoided The best way to prevent this situation is by keeping the protective cap provided on the sensor when not in use Always keep the protective cap on ...

Page 97: ...EasyGrid User Guide 92 11 3 Assembly Diagram ...

Page 98: ... spacer Additionally to the following steps a video that shows an EasyDisk installation is available Ask your FISO representative to get a copy 11 4 1 1 Required Tools The following tools are recommended to proceed with the installation 19 mm Round Knockout Punch Drill wrench or ratchet with a 25mm Box 10 mm Drill Bit 3 Blade Metal Snips with a 3mm to 3 5mm Trace if not available use a saw ...

Page 99: ...EasyGrid User Guide 94 11 4 1 2 Pre Drilling 11 4 1 3 Using the Knockout Punch ...

Page 100: ...EasyGrid User Guide 95 11 4 1 4 Cutting the Cable Slot 11 4 1 5 Inserting the Easy Disk ...

Page 101: ...sible and do not allow the connectors to swing freely during dry out and assembly as this puts unnecessary strain on the fibers 11 6 During Dry out Phase The winding vapor phase drying is an important step in the transformer manufacturing process At this step it is important to protect the surface of all optical connectors FISO provides protective caps with all TPT 62 sensors and EasyThrough matin...

Page 102: ...cation steps have been done Whenever the sensor needs to be kept out of the way during a manufacturing step for example when the pressboard cylinder is being put around the winding or during dry out secure the coiled sensor cables loosely using cotton straps CAUTION Avoid using tubing that is flexible but stiff When it bends it can make sharp edges which can damage the sensor if jerked this type o...

Page 103: ... Good planning for this phase means determining the following beforehand How the sensor cable will be routed from the hottest spots to the EasyThrough Where the EasyThrough will be installed in the tank wall consider having access to the end of the fiber in a splice box or control cabinet Where the electronics will be located can be located up to 500 meters from the transformer The EasyThrough use...

Page 104: ... the extension cable can be up to 1000 m due to the tremendous dynamic range of the Nortech EasyGrid This allows installation of the electronics at the most advantageous location To route the cable you may use existing electrical conduits The presence of an electric field does not affect the operation of the temperature sensor Since long term exposure to sun rain and dust may cause premature aging...

Page 105: ...ution No power Not powered up Turn the ON OFF switch located in the access panel behind the optical connectors to the ON position Main power Try another main outlet Power supply Verify the power supply connection orange terminal block If possible try another power supply with the same polarity or test the voltage of the power supply If the power supply is faulty call FISO One or more units not det...

Page 106: ...oo high Clean connectors check connectors for scratches Error 4 Unknown signal Incorrect reference Make sure sensor is operating within temperature specifications Error 5 Initialization System is starting up Wait a few seconds Error 6 Signal Shape Not enough light due to bad connections dirty connections weak sensor weak light source Make sure that all connections are clean Make sure sensor is pro...

Page 107: ...ap on when not in use to avoid contamination 13 1 1 General Operation The One Click cleaner is easy to use but you need to be careful not to do the following Do not attempt to dissemble as this can cause damage to the device and void the warranty Do not try to re use the cleaning cloth as this will eliminate the cleaner s effectiveness and void the warranty Do not touch the cleaning cloth as this ...

Page 108: ... Step 1 Open the end cover on the Guide Cap Step 2 Insert the Connector Ferule into the Guide Cap Step 3 Push the Outer Shell to Clean the Connector Face Step 4 Turn the Cleaner body by 90 Step 5 Push the Outer Shell to Clean the Connector Face for a second time ...

Page 109: ...Device Step 2 Step 3 Step 4 Step 5 Insert the cleaner tip in the mating Push the outer shell to clean the connector face Turn the cleaner body by 90 Push the outer shell a second time to clean the connector face 13 1 4 Typical Results Before Cleaning First click cleaning Second Click cleaning ...

Page 110: ... gap This gap refers to the energy required to bump the electrons in the material into an excited state as opposed to the relaxed steady state As more energy enters the semiconductor in the form of heat as its temperature rises this gap gets narrower less additional energy is needed to excite an electron The photons particles of light entering the semiconductor are what actually excite the electro...

Page 111: ...al fiber is covered with a PTFE Teflon sheath making it very resistant to aggressive chemical environments as well as an additional perforated PTFE sheath spiral wrap for added ruggedness and even oil circulation The entire end assembly semiconductor and end of the fiber is then embedded in high temperature adhesive to protect the sensor the semiconductor from chemical and mechanical aggression Co...

Page 112: ...removed The case has been opened The equipment serial number has been altered erased or removed The equipment has been misused neglected or damaged by accident 15 2 Liability FISO shall not be liable for damages resulting from the use of the purchased product nor shall be responsible for any failure in the performance of other items to which the purchased product is connected or the operation of a...

Page 113: ...tion RMA number will issue Detailed instruction sheet and provide an address for return Does the unit has an internal storage NO Yes Perform a data backup before sending the unit for repairs Pack the equipment in its original shipping material Be sure to include a statement or report fully detailing the defect and the conditions under which it was observed Return the equipment prepaid to the addre...

Page 114: ...unit in its original packing material when shipping Avoid high humidity or large temperature fluctuations Keep the unit out of direct sunlight Avoid unnecessary shock and vibration 15 7 FISO Service Center If your product requires servicing contact the authorized service center nearest to you FISO Headquarters Service Center 500 St Jean Baptiste Avenue Suite 195 Quebec City Quebec CANADA G2E 5R9 T...

Reviews: