background image

38

Refer

ence—Flash Sync Mode

Flash Compensation (P, S, A, and M Modes Only)

Controls used:   and 

 b command dial

Flash compensation can be used to increase or reduce fl ash  output  from 
the level chosen by the camera’s fl ash control system.  Flash output can be 
increased to make the main subject appear brighter, or reduced to prevent 
unwanted highlights or refl ections.

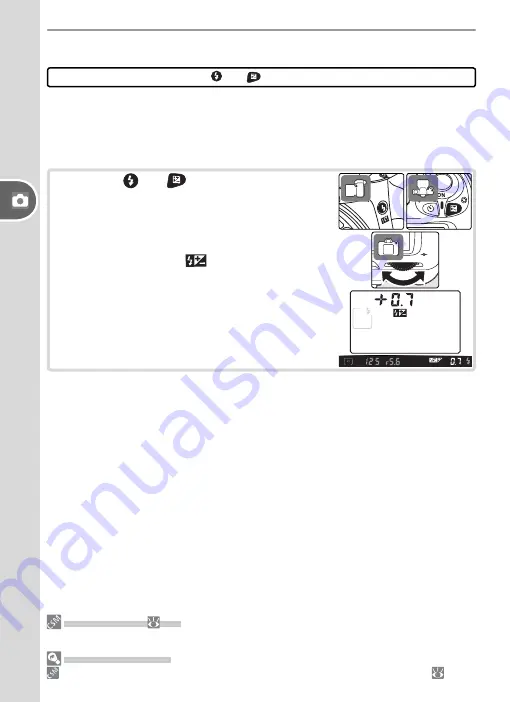
Pressing the 

 and 

 buttons, rotate the com-

mand dial and confi rm fl ash compensation in the 
control panel or viewfi nder.  Flash compensation 
can be set to values between –3 EV (darker) and 
+1 EV (brighter) in increments of 

1

/

3

 or ½ EV.  At 

values other than ±0, a 

 icon will be displayed 

in the control panel and viewfi nder after the but-
tons are released.

Normal fl ash output can be restored by setting 
fl ash compensation to ±0.0.  Flash compensation 
is not reset when the camera is turned off.

 6: Flash Level (

 90)

This option can be used to select a value for fl ash compensation from a menu.

 Advanced Settings


11: EV Step

 controls the size of the increments for fl ash compensation (

 92).

Summary of Contents for 25233 - D50 6.1MP Digital SLR Camera

Page 1: ...En The Nikon Guide to Digital Photography with the DIGITAL CAMERA ...

Page 2: ... and playback options Reference More on Playback pages 51 67 Learn more about camera playback transferring photo graphs to a computer and printing photographs Reference More on Photography pages 30 50 Play with exposure and explore the creative possibilities of some of the camera s more advanced settings Tutorial Photography and Playback pages 14 24 The basic operations involved in taking photogra...

Page 3: ...utorial More on Photography More on Playback Basic Camera Settings The Setup Menu Shooting Options The Shooting Menu Playback Options The Playback Menu Custom Settings The Custom Settings Menu Technical Notes Photography and Playback ...

Page 4: ...electronic equipment in the presence of flammable gas as this could result in explosion or fire Do not place strap around the neck of an infant or child Placing the camera strap around the neck of an infant or child could result in strangulation Do not disassemble Touching the product s internal parts could result in injury In the event of a malfunction the product should be repaired only by a qua...

Page 5: ...nfants from putting the battery or other small parts into their mouths CD ROMs The CD ROMs on which the software and manuals are distributed should not be played back on audio CD equipment Playing CD ROMs on an audio CD player could cause hearing loss or damage the equipment Observe caution when using the flash Do not operate the flash with the flash window touching a person or object Failure to o...

Page 6: ...interference to radio communications However there is no guarantee that interference will not occur in a particular installation If this equip ment does cause harmful interference to radio or television reception which can be determined by turning the equipment off and on the user is encouraged to try to correct the interference by one or more of the following measures Reorient or relocate the rec...

Page 7: ... is prohibited Cautions on certain copies and re productions The government has issued cautions on copies or reproductions of securities is sued by private companies shares bills checks gift certificates etc commuter passes or coupon tickets except when a minimum of necessary copies are to be provided for business use by a com pany Also do not copy or reproduce passports issued by the government l...

Page 8: ...ence 25 Using Camera Menus 26 Reference More on Photography 30 Image Quality and Size 30 Image Quality 31 Image Size 32 Choosing the Focus Area 33 Manual Focus 35 Flash Sync Mode 36 Sensitivity ISO Equivalency 39 P S A and M Modes 40 Choosing an Exposure Mode 40 P Programmed Auto 42 S Shutter Priority Auto 43 A Aperture Priority Auto 44 M Manual 45 Exposure Compensation P S A and M Modes Only 47 O...

Page 9: ...age Comment 70 USB 71 Folders 71 File No Seq 73 Mirror Lock up 73 Dust Ref Photo 74 Firmware Ver 75 Image Rotation 75 Shooting Options 76 Optimize Image 76 Long Exp NR 78 Image Quality 78 Image Size 78 White Balance 79 ISO 82 Playback Options 83 Delete 84 Playback Fldr 84 Rotate Tall 84 Slide Show 85 Print Set 86 Small Picture 86 Custom Settings 87 Technical Notes 101 Camera Settings 101 Optional ...

Page 10: ...retouched using Nikon Capture 4 version 4 3 or later available separately or the clean image options available in some third party imaging software Take Test Shots Before taking pictures on important occasions for example at weddings or before taking the camera with you on a trip take a test shot to ensure that the camera is functioning normally Nikon will not be held liable for damages or lost pr...

Page 11: ...h your camera For information on viewing the reference manual see the Quick Start Guide To make it easier to find the information you need the following symbols and conventions are used This icon indicates that more infor mation is available elsewhere in this manual or in the Quick Start Guide This icon marks notes information that should be read before using the camera This icon marks tips additi...

Page 12: ...8 36 Flash compen sation 38 Eyelet for camera strap 7 Lens release button 7 Focus mode selector 15 35 Infrared receiver 28 Power switch 14 exposure compensation button 47 Aperture button 45 Flash compen sation 38 self timer remote control button 28 Reset button 50 AF assist illuminator 34 Self timer lamp 22 Red eye reduction lamp 36 Control panel 4 Built in flash 109 Accessory shoe cover 109 Shutt...

Page 13: ...ck zoom button 55 shooting mode button 21 Reset button 50 Monitor 24 26 Viewfinder eyepiece cup 13 Viewfinder eyepiece 5 13 16 Diopter adjustment control 13 Hide display photo information Move cursor down Display previous page Return to previous menu Cancel Display next page Display sub menu Make selection Hide display photo information Move cursor up Battery chamber cover latch 9 Memory card ac c...

Page 14: ...exposures remaining 14 Number of shots remaining before memory buffer fills 21 Preset white balance recording indicator 79 PC mode indicator 59 9 K appears when memory remains for over 1000 exposures 5 10 Beep indicator 88 11 Aperture f number 40 45 PC mode indicator 60 12 Flash compensation indicator 38 13 Exposure compensation indicator 47 14 Flexible program indicator 42 15 Focus area 16 33 AF ...

Page 15: ...mal when a fully charged battery is inserted 5 6 7 8 9 10 11 12 13 14 15 16 17 1 2 3 2 4 1 Reference circle for center weighted metering 96 2 Focus brackets focus areas 16 33 3 No memory card warning 11 123 4 Battery indicator 14 5 Focus indicator 17 35 123 6 Focus area 16 33 AF area mode 89 7 Flash value FV lock 98 8 Shutter speed 40 45 9 Aperture f number 40 45 10 Flash compensation indicator 38...

Page 16: ...d and aperture P Programmed auto 42 A Aperture priority auto 44 S Shutter priority auto 43 M Manual 45 Point and Shoot Modes Digital Vari Programs Point and Shoot Modes Digital Vari Programs Selecting a Digital Vari Program automatically optimizes set tings to suit the selected scene making creative photography as simple as rotating the mode dial Auto 14 Landscape 20 Sports 20 Night portrait 20 Po...

Page 17: ...x on the camera body position the lens in the cam era s bayonet mount Being careful not to press the lens release button rotate the lens counter clockwise until it clicks into place Attaching a Lens Care should be taken to prevent dust from entering the camera when the lens is removed 1Turn the camera off and remove the body cap Remove the rear lens cap from the lens First Steps Aperture Ring If t...

Page 18: ...utions on pages ii iii and 118 119 of this manual together with any warnings and instructions provided by the battery manufacturer Do not use the battery at ambient temperatures below 0 C 32 F or above 40 C 104 F During charging the temperature should be in the vicinity of 5 35 C 41 95 F Note that the battery may become hot during use wait for the battery to cool before charging Failure to observe...

Page 19: ...g that the camera is off open the battery chamber cover 2 2 Insert a fully charged battery as shown at right Close the battery chamber cover Removing the Battery Turn the camera off before removing the battery Replace the terminal cover when the battery is not in use ...

Page 20: ...splay DATE menu 2 Select language 5 Exit DATE menu Monitor turns off Choosing a Language from the Setup Menu 68 Selecting Language LANG in the setup menu displays the menu shown in Step 1 Highlight an option with the multi selector and press the button to return to the setup menu Changing the Time and Date 68 Selecting Date in the setup menu displays the menu shown in Step 3 Set the time and date ...

Page 21: ...e the memory card slot cover Front The Write Protect Switch SD cards are equipped with a write protect switch to prevent accidental loss of data When this switch is in the lock position the camera will display a message to warn that photos can not be recorded or deleted and the memory card can not be formatted Write protect switch 1 3 Turn the camera on If the control panel shows the number of exp...

Page 22: ...egin formatting Do not turn camera off or remove battery or memory card until formatting is complete 2 3 Monitor turns off when formatting is complete Formatting Memory Cards Use the camera Format option to format memory cards Performance may drop if cards are formatted in a computer Removing Memory Cards 1 Confirm that the access lamp is off 2 Turn the camera off and open the memory card slot cov...

Page 23: ...ar focus 1Remove the lens cap and turn the camera on 2Slide the diopter adjustment control up and down until the focus brackets are in sharp fo cus When operating the diopter adjustment control with your eye to the viewfinder be careful not to put your fingers or fingernails in your eye Focus brackets The eyepiece cup can be removed when ad justing viewfinder focus ...

Page 24: ...he battery level in the viewfinder or control panel Control panel View finder Description Battery fully charged Battery partially discharged Low battery Ready fully charged spare battery blinks blinks Shutter release disabled Change battery 1 3 The exposure count displays in the con trol panel and viewfinder show the num ber of photographs that can be stored on the memory card Check the number of ...

Page 25: ...indicators in the control panel and viewfinder are relevant to the explanation in accompanying text are shown in black Indicators not mentioned in the text are shown in gray 2 1 Rotate the mode dial to 2 2 Rotate the focus mode selector to AF autofocus 2 3 Slide the lens A M mode switch to A autofocus See the lens manual for details ...

Page 26: ...s with your left Keep your elbows propped lightly against your torso for support 3 2 Frame a photo in the viewfinder with the main subject positioned in any of the five focus areas Focus area Using a Zoom Lens Use the zoom ring to zoom in on the subject so that it fills a larger area of the frame or zoom out to increase the area visible in the final photograph Zoom in Zoom out ...

Page 27: ...ght to assist the focus operation and the flash may pop up The Shutter Release Button The camera has a two stage shutter release button The camera focuses when the button is pressed halfway focus locks until the button is released To take the picture press the shutter release button the rest of the way down Lock focus Take photograph 4 2 Smoothly press the shutter release button the rest of the wa...

Page 28: ...can only be taken when the flash ready indicator is displayed Wait until the flash ready indi cator is displayed before shooting Flash off Auto with red eye reduction see Reference Flash fires when lighting is poor If desired the flash can be turned off so that it will not fire even when lighting is poor Press the button and rotate the command dial until is displayed in the control panel To turn t...

Page 29: ...rogram modes 2Frame a photograph focus and shoot as described for mode 1Rotate the mode dial to select a Digital Vari Program mode Portrait Bringing out a Portrait Subject Use for portraits Camera selects focus area containing subject closest to camera this subject stands out clearly while background details are softened lending composition sense of depth Colors are processed for soft natural look...

Page 30: ...speedsfreezemotionfordynamicsports shots in which main subject stands out clearly Camera focuses continuously on subject in center focus area while shutter release button is pressed halfway Beep does not sound when camera focuses Built in flash and AF assist illuminator turn off automatically Close up Photographing Small Objects Use for close up shots of flowers insects and other small objects Cam...

Page 31: ...layed in the control panel Choosing a Shooting Mode The Memory Buffer The camera is equipped with a memory buffer for temporary storage allowing shooting to continue while photographs are being saved to the memory card When the buffer is full the shutter is disabled until enough data have been trans ferred to the memory card to make room for another photograph In continuous mode shooting will cont...

Page 32: ...ion NO ICON Timer off Photos are taken when shutter release button is pressed Self timer Photos are taken about 10s after shutter release button is pressed Delayed remote Photos are taken about 2s after shutter release button on re mote control is pressed Quick response remote Photos are taken when shut ter release button on remote control is pressed Mode Selection The self timer remote control mo...

Page 33: ...seconds The lamp stops blinking two seconds before the pho tograph is taken and remains lit until the shutter is released Remote control From a distance of 5m 16 or less point the remote control at the in frared receiver on the front of the camera and press the shutter release button on the remote control In delayed remote mode the shutter will be released about two seconds after the shutter relea...

Page 34: ...g the command dial or pressing the multi selector left or right Basic Playback To end playback and return to shooting mode press the shutter release button halfway To delete the photograph currently displayed in the monitor press the button A confir mation dialog will be displayed Press the button again to delete the image and return to playback Press any other button to exit without deleting the ...

Page 35: ...er speed and aperture manually Exposure Mode M Manual 45 Make photographs brighter or darker or enhance contrast Exposure Compensation 47 Make colors look natural Take photos under unusual lighting White Balance 49 Viewing Photographs 51 Take photographs where lighting is poor Flash Sync Mode 36 Flash Compensation 38 Sensitivity ISO Equivalency 39 Let the camera choose shutter speed and aperture E...

Page 36: ...urrent menu item is highlighted Current setting for each option is shown by icon This icon indicates that help is avail able for current menu item Press button to view help Slider is displayed if more options are available in current menu Menu Description Playback Adjust playback settings and manage photos Shooting Adjust shooting settings Custom Settings Personalize camera settings Setup Format m...

Page 37: ... To make changes to a menu item first select the menu from the playback shooting Custom Settings and setup menus 1 then select the menu item 2 and finally select an option 3 Some menus may contain multiple pages The selection for some options is made from a sub menu 1 Choose menu 2 Highlight item 3 Choose option ...

Page 38: ... settings Move cursor up Increase number Return to previous menu Cancel can also be per formed with button Display sub menu Make selection selection can also be made with button Move cursor down Decrease number 2 Highlight icon for current menu 1 Display menus 3 Select menu 5 Highlight menu item 4 Position cursor in selected menu ...

Page 39: ...memory cards and in other cases in which user confirmation is required a selection can only be made by pressing the button A message to this effect will appear in the display To exit the menus and return to shooting mode press the shutter release button halfway 7 Highlight option 6 Display options 8 Make selection ...

Page 40: ...equire more memory meaning that fewer such images can be stored on the memory card Image Quality Image Size and File Size See the Appendix 126 for information on the number of pictures that can be stored on a memory card S M L Image Quality and Size Shooting menu Image Quality Shooting menu Image Size Controls used Large file size FINE NORMAL BASIC Sm all file size Small Image size Large High Imag...

Page 41: ...n by e mail or use in web pages High 1 16 NEF JPEG Basic RAW BASIC NEF JPEG Two images are recorded one NEF RAW image and one basic quality JPEG image Image size automatically set to L JPEG image is 3 008 2 000 pixels in size The current image quality setting is displayed in the control panel Image Quality NEF Raw NEF JPEG NEF images can only be viewed using Nikon Capture 4 version 4 3 or later av...

Page 42: ...ile Names Photographs are stored as image files with names of the form DSC_nnnn xxx where nnnn is a four digit number between 0001 and 9999 assigned automati cally in ascending order by the camera and xxx is one of the following three letter extensions NEF for NEF images JPG for JPEG images and NDF for Dust Off ref photos The NEF and JPEG files recorded at a setting of NEF JPEG Basic have the same...

Page 43: ...ult the camera selects the focus area automatically or focuses on the subject in the center focus area The focus area can also be selected manually to allow photographs to be composed with the main subject almost anywhere in the frame Manual Focus Area Selection Choosing the Focus Area Controls used Multi selector 1Select Single Area or Dynamic Area for Custom Setting 3 AF Area Mode Man ual focus ...

Page 44: ...ved 1Position the subject in the center focus area and press the shutter release button halfway 2Check that the in focus indicator appears in the viewfinder Focus will lock when the in focus indicator appears and remain locked while the shutter release button is pressed halfway Focus can also be locked by pressing the AE L AF L but ton while the shutter release button is pressed halfway Focus will...

Page 45: ...amera body Manual focus is available for manual focus lenses or when autofocus does not produce the desired results To focus manually set the focus mode selector to M and rotate the lens focus ring until the image displayed on the clear matte field in the viewfinder is in focus Photographs can be taken at any time even when the image is not in focus A M Selection Autofocus with Manual Priority Whe...

Page 46: ...s just before shutter closes cre ating stream of light effect behind moving subjects If this icon is not displayed flash will fire immediately after shutter opens REAR Rear curtain sync When lighting is poor or subject is back lit flash pops up automatically when shutter release button is pressed halfway and fires as required If this icon is not dis played flash will only pop up when button is pre...

Page 47: ... built in flash is used with non CPU lenses is 200mm and remove lens hoods to prevent them from casting shadows on the subject The flash has a minimum range of 60cm 2 and can not be used in the macro range of macro zoom lenses See Optional Accessories 108 for details If the flash is used in continuous shooting mode 21 only one picture will be taken each time the shutter release button is pressed A...

Page 48: ...dial and confirm flash compensation in the control panel or viewfinder Flash compensation can be set to values between 3EV darker and 1EV brighter in increments of 1 3 or EV At values other than 0 a icon will be displayed in the control panel and viewfinder after the but tons are released Normal flash output can be restored by setting flash compensation to 0 0 Flash compensation is not reset when ...

Page 49: ... set by press ing the ISO button and rotating the command dial until the desired value is displayed in the control panel Sensitivity Sensitivity is the digital equivalent of film speed The higher the sensitivity the less light needed to make an exposure allowing higher shutter speeds or smaller apertures Just as higher speed films tend to be grainy pictures taken at high sensitivities are prone to...

Page 50: ...anced settings in cluding shutter speed aperture and white balance Choosing an Exposure Mode P S A and M Modes Controls used Mode dial P S A and M Modes When using a CPU lens equipped with an aperture ring lock the aperture ring at the minimum aperture highest f number Non CPU lenses can only be used in mode M when aperture can be adjusted manually using the lens aperture ring The cam era exposure...

Page 51: ...different combinations of shutter speed and aperture allowing you to blur or freeze motion or control depth of field The following figure shows how shutter speed and aperture affect exposure O v e r e x p o s e d b r i g h t U n d e r e x p o s e d d a r k Slow Shutter speed Fast Small high f numbers Aperture Wide low f numbers ...

Page 52: ... settings 1Rotate the mode dial to P 2Frame a photograph focus and shoot Flexible Program In mode P different combinations of shutter speed and aperture can be selected by rotating the com mand dial flexible program All combinations produce the same exposure While flexible program is in effect a icon appears in the control panel To restore the default shutter speed and aperture rotate the command ...

Page 53: ... choose a shutter speed between 30s and 000 s 3Frame a photograph focus and shoot Shutter Speed and Camera Shake To prevent blurring caused by camera shake the shutter speed should be faster than the inverse of the focal length of the lens in seconds for example if a lens has a focal length of 300mm shutter speed should be faster than 1 300 s Use of a tripod is recommended when shooting at slower ...

Page 54: ...rs increase depth of field bringing both the main subject and background into focus Large apertures low f numbers soften background details and let more light into the camera increasing the range of the flash and making photo graphs less susceptible to blurring 1Rotate the mode dial to A 2Rotate the command dial to choose the de sired aperture 3Frame a photograph focus and shoot ...

Page 55: ... Aperture can be set to values between the minimum and maximum values for the lens 1Rotate the mode dial to M 2Rotate the command dial to choose a shutter speed To set aperture rotate the command dial while pressing the button Check exposure in the electronic analog exposure display see following page and continue to adjust shutter speed and aperture until the desired exposure is achieved 3Frame a...

Page 56: ... setting noise in the form of randomly spaced brightly colored pixels may appear in the final photograph Noise can be reduced by turning long exposure noise reduction on before taking photographs 78 Electronic Analog Exposure Display The electronic analog exposure display in the viewfinder shows whether the pho tograph would be under or over exposed at current settings Depending on the option chos...

Page 57: ... metering is recommended when using exposure compensation Pressing the button rotate the main com mand dial and confirm exposure compensation in the control panel or the electronic analog exposure display Exposure compensation can be set to values between 5EV underexposure and 5EV overexposure in increments of 1 3 or EV The current value for exposure compensation is displayed in the control panel ...

Page 58: ...s via direct USB connection 62 Images will be sharp and clear even when enlarged PO Portrait Lowers contrast while lending natural texture and rounded feel to skin of portrait subjects LA Landscape Enhances saturation and sharpness to produce landscapes with vibrant greens and blues Custom Customize sharpness contrast color reproduction saturation and hue 76 Controls used Shooting menu Optimize Im...

Page 59: ... with subjects lit by direct sunlight Flash Use with the built in flash or optional Nikon flash units Cloudy Use in daylight under overcast skies Shade Use in daylight with subjects in the shade Preset Use gray or white object or existing photograph as reference for white balance 79 The current white balance setting is shown in the control panel Controls used Shooting menu White Balance White Bala...

Page 60: ...n Reset Controls used button button Option Description Shooting mode 21 Single Self timer remote control 22 Off Image quality 31 JPEG Normal Image size 32 L Focus area 33 Center Flash sync mode 36 Mode Auto Auto slow sync P S A M Fill flash ISO 39 200 Option Description Flexible program 42 Off Exposure compensation 47 Off 0 0 Optimize image 48 Normal White balance 49 Auto AE lock 97 Off FV lock 98...

Page 61: ...or right or rotate command dial right to view photographs in order recorded Press multi selector left or rotate command dial left to view photographs in reverse order View photo information Press multi selector up or down to view infor mation about current photograph 52 Zoom in on photo Press button for enlarged view of current photograph 55 Delete photo Delete photograph 57 Protect photo Protect ...

Page 62: ...umber of images 3 Camera name 4 Date of recording 10 5 Time of recording 10 6 Metering 96 7 Shutter speed 40 8 Aperture 40 9 Mode 6 Exposure compensation 47 10 Focal length 1 11 Flash control 36 햴 햲 햶 햸 햺 햽 햷 햹 햵 햻 햳 Shooting Data Page 2 1 Protect status 56 2 Frame number total number of images 3 Image optimization 48 4 Sensitivity ISO equivalency 1 39 5 White balance 49 6 Image size 32 Image qual...

Page 63: ...s to the left and bright tones to the right The vertical axis shows the num ber of pixels of each brightness in the image Note that camera histogram is intended as guide only and may differ from histograms displayed in imaging ap plications Advanced Settings Rotate Tall controls whether tall portrait orientation photographs are dis played in tall orientation during playback 84 5 Image Review contr...

Page 64: ...in reverse order Change num ber of images displayed Press button to switch between four thumb nail display nine thumbnail display and single image playback Highlight photographs Press multi selector up right left or down to highlight thumbnails Zoom in on photograph Press button for enlarged view of highlighted photograph 55 Delete photo Delete highlighted photograph 57 Protect photo Protect highl...

Page 65: ...erclockwise to zoom out clockwise to zoom in to maximum of approximately 4 7 large images 3 5 medium images or 2 4 small images Release button to magnify se lected area to fill monitor View other images Rotate command dial to view same area of other im ages at current zoom ratio View other areas of image Use multi selector to view area not visible in monitor Hold multi selector down to scroll rapi...

Page 66: ...y status when viewed on a Windows computer Note that protected images will be deleted when the memory card is for matted 68 To protect a photograph Protecting Photographs from Deletion 1Display the image in full frame playback or highlight it in the thumb nail list 2Press the button The photograph will be marked with a icon To remove protection from the photograph so that it can be deleted display...

Page 67: ...ecovered Deleting Individual Photographs 1Display the image in full frame playback or highlight it in the thumb nail list Note that protected images 56 can not be deleted 2Press the button A confirmation dialog will be displayed 3To delete the photograph press the button again Press any other button to exit without deleting the photograph Advanced Settings Delete can be used to delete multiple pho...

Page 68: ...onnect to video device Connect to camera 4Tune the television to the video channel 5Turn the camera on During playback images will be displayed on the television screen or recorded to video tape the camera monitor will remain off Note that the television may not be able to display the entire image when pictures are played back Use an AC Adapter Use of an EH 5 AC adapter available separately is rec...

Page 69: ...e Connecting the Camera Install PictureProject after reading the manuals and reviewing the system requirements To ensure that data transfer is not interrupted be sure the camera battery is fully charged If in doubt charge the battery before use or use an EH 5 AC adapter available separately Before connecting the camera choose a camera USB option 71 according to the computer operating system Viewin...

Page 70: ...play the icons shown at right this display is not shown when PTP is selected Photographs can be transferred to the computer as described in the PicturePro ject Reference Manual on the silver CD 2Turn the camera off and connect the supplied USB cable as shown Do not use force or at tempt to insert the connectors at an angle Connect the camera directly to the comput er do not connect the cable via a...

Page 71: ...e Edition Windows XP Professional Click the Safely Remove Hardware icon in the taskbar and select Safely remove USB Mass Storage Device from the menu that appears Windows 2000 Professional Click the Unplug or Eject Hardware icon in the taskbar and select Stop USB Mass Storage Device from the menu that appears Windows Millennium Edition Me Click the Unplug or Eject Hardware icon in the taskbar and ...

Page 72: ... can only be printed by transferring them to a computer and printing them using Nikon Capture 4 version 4 3 or later available separately or PictureProject Printing Via Direct USB Connection When the camera is connected to a printer that supports PictBridge 128 photographs can be printed directly from the camera Printing Photographs Select PTP in camera USB menu and connect camera to printer 63 Se...

Page 73: ...the cable via a USB hub 4Turn the camera on A welcome screen will be displayed followed by the PictBridge playback display Proceed to Printing Pho tographs One at a Time 64 or Printing Multiple Photographs 65 Press the multi selector left or right to view additional photographs or press and hold the button to zoom in on the current photo 66 To view six photographs at a time press the button Use th...

Page 74: ...t menu Border Menu shown at right will be displayed Press multi selector up or down to highlight Printer Default default setting for current printer Print with Border print photo with white border or No Border then press multi selector to right to select and return to print menu Time Stamp Menu shown at right will be displayed Press multi selector up or down to highlight Printer Default default se...

Page 75: ...hs as small thumbnail images press the button The menu shown at right will be displayed Press the multi selector up or down to highlight an option and press to the right to select Option Description Print Select Print selected pictures 66 Print DPOF Print current DPOF print order 67 Index Print Create index print of all JPEG photos if memory card contains more than 256 pho tos only 256 photos will...

Page 76: ...ption 86 are displayed in the Print Selected menu but can not be selected for printing 2 Select current picture and set num ber of prints to 1 Selected pictures marked by icon 1 Scroll through pictures To display current picture full screen press button 3 Specify number of prints up to 99 To deselect picture press multi selec tor down when number of prints is 1 Repeat steps 1 3 to select additiona...

Page 77: ...Imprint Print shutter speed and aperture on all pictures in print or der Imprint Date Print date of recording on all pictures in print order To complete print order and return to playback highlight Done and press multi selector right To exit without altering print order press button Print Set NEF RAW photos and pictures created using the small picture option 86 are displayed in the Print Set menu ...

Page 78: ...elect Detailed 69 to display the following additional options Option Folders 71 File No Seq 73 Mirror Lock Up 116 Dust Ref Photo 74 Firmware Ver 75 Image Rotation 75 Format Formats the memory card Note that this perma nently deletes all photographs and any other data the card may contain Copy all required files to a computer before formatting Formatting Memory Cards Do not turn the camera off or r...

Page 79: ... video device such as a television or VCR choose a video mode setting that matches the video standard used in the device The Clock Battery The clock calendar is powered by an independent rechargeable power source which is charged as necessary when the main battery is installed or the camera is powered by an optional EH 5 AC adapter Three days of charging will power the clock for about one month If...

Page 80: ...t Comment area Comment appears here To move cur sor press button and use multi selector To delete the character at the current cursor position press the button To return to the setup menu without changing the comment press the button Comments can be up to thirty six characters long Any additional characters will be deleted After editing the comment press to return to the image comment menu Attach ...

Page 81: ...al order Folder Names On the memory card folder names are preceded by a three digit folder number as signed automatically by the camera e g 100NCD50 Each folder can contain up to 999 photographs If a photograph is taken when the current folder contains 999 files or a picture numbered 9999 the camera will create a new folder by adding one to the current folder number e g 101NCD50 For the purposes o...

Page 82: ...ers on the memory card Naming Folders Keyboard area Use multi selector to highlight letters press button to select Name area Folder name appears here To move cur sor press button and use multi selector To delete the character at the current cursor position press the button To exit without changing the folder name press the button Folder names can be up to five characters long Any additional charac...

Page 83: ...t another memory card in the camera On When a new folder is created the memory card is formatted or a new memory card is inserted in the camera file numbering continues from the last number used If a photograph is taken when the current folder contains a photograph numbered 9999 a new folder will be cre ated and file numbering will begin again from 0001 Reset As for On except that file numbering i...

Page 84: ...s from a bright featureless white object frame the object so that nothing else is visible in the viewfinder and press the shutter release button halfway In autofo cus mode focus will automatically be set to infinity in manual focus mode set focus to infinity manually before pressing the shutter re lease button 3Press the shutter release button the rest of the way down to acquire Image Dust Off ref...

Page 85: ... firmware version Image Rotation Photographs taken while Automatic the default option is selected contain information on camera orientation allowing them to be rotated auto matically during playback 84 or when viewed in PictureProject or Nikon Capture 4 version 4 3 or later available separately The following orientations are recorded Landscape wide orientation Camera rotated 90 clockwise Camera ro...

Page 86: ...2 White Balance1 Adjust colors according to color of light source 49 79 ISO2 Raise sensitivity when lighting is poor 39 1 Available in P S A and M modes only 2 Available in P S A and M modes and when Off is selected for Custom Setting 9 ISO Control in and modes Optimize Image See Optimizing Images 48 for more infor mation Optimize Image Custom To make separate adjustments to sharpening contrast co...

Page 87: ...ware documentation for details Modes IIIa and Ia are recommended for photographs that will be printed without modification or viewed in applications that do not support color management Color Mode Choose from the following options for color reproduction Option Description III a sRGB default Produces nature and landscape shots with vivid colors Photo graphs are adapted to sRGB color space Ia sRGB P...

Page 88: ...ls that tend to appear predominantly in shadows If On is selected photos taken at shutter speeds slower than about 1s will be pro cessed to reduce noise before being recorded to the memory card the default setting is Off Note that the time required to process images more than doubles when noise reduction is on during processing the display shown at right appears in the control panel and viewfinder...

Page 89: ...ray or white object is placed under lighting that will be used in final photograph and white balance is measured by camera Use Photo White balance value is copied from photo on memory card note that Nikon Capture 4 version 4 3 or later can be used to adjust white bal ance of existing pictures if desired Measuring a Value for White Balance The existing measured value is lost when a new value is mea...

Page 90: ...rately even when the camera is not in focus To exit without measuring a new value for white balance press the WB button 6If the camera was able to measure a value for white balance will flash in the con trol panel while the viewfinder will show a flashing White balance is set to the new value and the new value will be used when ever Preset Measure is selected for white balance If lighting is too d...

Page 91: ...urrent source photo 1 Highlight Use photo Select This Image to use white balance value for current photo 4 Display folder list 3 Highlight Select Image 6 Display images in selected folder 5 Highlight folder Images displayed may include those created by other cameras but only photo graphs created with D50 can be used as source for preset white balance 7 Highlight photograph 8 Set preset white balan...

Page 92: ...82 Setup Shooting Options The Shooting Menu ISO See Sensitivity ISO Equivalency 39 for more information ...

Page 93: ...k 84 Slide Show Play photos back in automatic slide show 85 Print Set Select photos for printing 67 86 Small Picture Create small copies of photos 86 Selecting Multiple Pictures To select multiple pictures in the Delete Selected 84 Print Set Select Set 67 86 Small Picture 86 or Print Select 66 menus 2 Select photo Selection shown by icon 1 Highlight photo 3Repeat steps 1 2 to select addi tional ph...

Page 94: ...rrent Only images in folder currently selected for storage in setup Folders menu are displayed during playback 51 This option is selected automatically when photo is taken If memory card is inserted and this option selected before photos have been taken message stating that folder contains no images will be displayed during playback Select All to begin playback All View photos in all folders Rotat...

Page 95: ... frame View photo info Change photo info displayed during slide show Pause Pause slide show see below Exit to playback menu End slide show and display playback menu Exit to playback mode End slide show and return to single image or thumb nail playback Exit to shooting mode Press shutter release button halfway to turn monitor off and return to shooting mode The dialog shown at right is displayed wh...

Page 96: ... of selected pictures for e mail or the web Choose Select Pictures to select the pictures 83 and select Choose Size to choose a size from 640 480 320 240 160 120 A 640 480 pixel copy is about one twentieth the size of a Large 3 008 2 000 photo Small Picture During playback small copies are indicated by a gray border Copies can only be created if sufficient memory is available Small copies may not ...

Page 97: ...ns select Detailed for the CSM Setup Menu option in the setup menu 69 Option 7 AF Assist 90 8 AF Area Illm 91 9 ISO Control 91 10 ISO Auto 92 11 EV Step 92 12 BKT Set 93 13 Metering 96 Option 14 AE L AF L 98 15 AE Lock 99 16 Flash Mode 99 17 Monitor Off 100 18 Meter Off 100 19 Self Timer 100 20 Remote 100 R Menu Reset Select Reset to restore all Custom Settings including those that are not affecte...

Page 98: ...mera selects AF S or AF C mode automatically according to shoot ing conditions and whether the subject is moving AF S Single servo AF Focus locks when shutter release button is pressed halfway Use with stationary subjects AF C Continuous servo AF Camera focuses continuously while shutter re lease button is pressed halfway AF assist illuminator turns off Use with moving subjects This option takes e...

Page 99: ...reas Use with erratically moving subjects Closest Subjct3 Camera automatically selects focus area containing subject closest to camera If subject leaves active focus area camera will focus based on information from other focus areas Works best when there is contrast between subject and background 1 Default for P S A M and modes 2 Default for mode 3 Default for and modes The current AF area mode is...

Page 100: ...option determines whether photographs are automatically displayed in the monitor after shooting On the default option or only when the button is pressed Off 6 Flash Level Adjust flash level P S A and M modes only 38 The default setting is 0 7 AF Assist At the default setting of On the AF assist lamp lights automatically when required to assist the focus operation The AF assist lamp will not light ...

Page 101: ...O equivalency to help achieve optimal exposure in and modes ISO AUTO will be displayed in the control panel and viewfinder Select Off to choose a value for sensitivity using the ISO option in the shooting menu 39 This option is not available in P S A and M modes ISO Control ISO Auto These settings determine how sensitivity is set Mode P S A M Camera sets sensitivity 9 ISO Control On User sets sens...

Page 102: ...her the camera makes adjustments to shutter speed aperture exposure compensa tion bracketing and flash compensation in incre ments equivalent to 1 3 EV 1 3 Step the default option or EV 10 ISO Auto At the default setting of Off sensitivity ISO equivalency will remain fixed at the value selected by the user 39 If On is selected the camera will automatically choose a sensitivity between ISO 200 and ...

Page 103: ...shutter is released bracket ing current white balance setting Not available at image qualities of NEF Raw or NEF JPEG Basic Exposure and Flash Bracketing 1Highlight AE Flash and press the multi selector to the right 2Highlight a bracketing increment and press the multi selector to the right The settings available depend on the option selected for Custom Setting 11 EV Step 3Press the shutter releas...

Page 104: ...r each shot Repeat Steps 3 4 to record additional bracketing sequences To end bracketing when shooting is com plete select Off for Custom Setting 12 Start After 2nd shot Series complete After 3rd shot After 1st shot Exposure and Flash Bracketing In continuous mode shooting will stop after each series of three photographs Bracketing is not cancelled when the camera is turned off or the memory card ...

Page 105: ...Compose a photograph focus and shoot Each photograph will be processed to create three images the first with unmodified white balance the second with slightly warmer colors and the third with slightly colder colors Repeat Steps 3 4 to record additional bracket ing sequences To end bracketing when shooting is complete select Off for Custom Setting 12 White Balance Bracketing The shutter is released...

Page 106: ... only if Closest Subjct is selected for AF Area Mode camera meters center focus area Ensures that main subject will be correctly exposed even when background is much brighter or darker 13 Metering In P S A and M modes metering determines how the camera sets exposure Metering Metering is available with CPU lenses only If a type G and D lens is used when matrix metering is selected the camera will s...

Page 107: ...e viewfinder 3Without releasing the AE L AF L button re compose the photograph and shoot Adjusting Shutter Speed and Aperture While exposure lock is in effect the following settings can be changed without alter ing the metered value for exposure Mode Description P Shutter speed and aperture flexible program 42 S Shutter speed A Aperture Advanced Settings 14 AE L AF L controls the function performe...

Page 108: ...level locks when button is pressed and remains locked until button is pressed again see below FV Lock This feature is used to recompose photographs without changing the me tered flash value ensuring that flash level is appropriate to the subject even when the subject is not in the center of the frame 14 AE L AF L Choose the function performed by the AE L AF L button 1Highlight FV Lock and press th...

Page 109: ... AE L AF L button to release FV lock 15 AE Lock At the default setting of AE L Button exposure can only be locked by pressing the AE L AF L button 97 If Release Bttn is selected exposure will also lock when the shutter release button is pressed halfway 16 Flash Mode At the default setting of TLL the camera adjusts flash level automatically in response to shooting conditions Selecting Manual allows...

Page 110: ...fway to reactivate the display 19 Self Timer Choose the length of the shutter release delay in self timer mode 22 The default setting is 10s 20 Remote Choose how long the camera will wait for a signal from the remote control when no operations are performed in delayed or quick response remote modes 22 The default setting is one minute Remote mode will end if no signal is received in the specified ...

Page 111: ...nc mode 36 1 3 3 3 3 3 Custom Settings 1 Beep 88 4 2 Autofocus 88 4 3 AF Area Mode 89 4 3 3 3 3 3 3 3 4 No SD Card 90 4 5 Image Review 90 4 6 Flash Level 38 90 1 4 7 AF Assist 90 4 8 AF Area Illm 91 4 9 ISO Control 91 4 10 ISO Auto 92 4 2 2 2 2 2 2 2 11 EV Step 92 4 12 BKT Set 93 1 4 13 Metering 96 1 4 14 AE L AF L 98 4 15 AE Lock 99 4 16 Flash Mode 99 4 17 Monitor Off 100 4 18 Meter Off 100 4 19 ...

Page 112: ...vel 38 90 Off 0 0 12 BKT Set 93 Off 13 Metering 96 Matrix The following defaults are restored with Custom Setting R Menu Reset P S A M Custom Settings 1 Beep 88 On 2 Autofocus 88 AF A 3 AF Area Mode 89 Closest Subjct DA SA CS Single Area 4 No SD Card 90 Release Locked 5 Image Review 90 On 6 Flash Level 38 90 0 0 7 AF Assist 90 On Off On Off On 8 AF Area Illm 91 Auto 9 ISO Control 91 On 10 ISO Auto...

Page 113: ... Custom Setting R Menu Reset Shooting menu Long Exp NR 78 Off Playback menu Playback Fldr 84 Current Rotate Tall 84 Yes Setup menu CSM Setup Menu 69 Simple LCD Brightness 69 0 Video Mode 69 Varies with region of sale Language LANG 70 Varies with region of sale Image Comment 70 None USB 71 Mass Storage File No Seq 73 Off Image Rotation 75 Automatic ...

Page 114: ...ble for the D50 ML L3 remote control Batteries AC adapters Flash units Speedlights Filters Software Viewfinder accessories Lenses Use Only Nikon Brand Accessories Only Nikon brand accessories certified by Nikon specifically for use with your Nikon digital camera are engineered and proven to operate within its operational and safety requirements THE USE OF NON NIKON ACCESSORIES COULD DAMAGE YOUR CA...

Page 115: ...d with a G on the lens barrel Type D lenses are indicated by a D CPU lens Type G lens Type D lens Calculating Picture Angle The size of the area exposed by a 35 mm camera is 36 24mm The size of the area exposed by the D50 in con trast is 23 7 15 6mm meaning that the diagonal picture angle of a 35 mm camera is approximately 1 5 times that of the D50 Picture size D50 Picture size 35 mm format Lens 2...

Page 116: ...ng the lens or when an aperture other than the maximum aperture is used 5 Electronic range finder can not be used with shifting or tilting 6 Compatible with AF I Nikkor lenses and with all AF S lenses except DX 12 24mm f 4G ED 17 35mm f 2 8D DX ED 17 55mm f 2 8G DX ED 18 70mm f3 5 4 5G ED 24 85mm f 3 5 4 5G VR ED 24 120mm f 3 5 5 6G and ED 28 70mm f 2 8D 7 With maximum effective aperture of f 5 6 ...

Page 117: ...le Non CPU Lenses Non CPU lenses not included in the list above can be used but only in mode M Aperture must be adjusted manually using the lens aperture ring and the camera exposure meter and TTL flash control can not be used If another mode is selected when a non CPU lens is attached the shutter release will be disabled AF Assist Illumination The following lenses may block the AF assist illumina...

Page 118: ... 3 3 35mm 0 6m 2 AF S DX IF ED 17 55mm f 2 8G 20mm 24mm 2 5m 8 2 28mm 1 5m 4 11 35mm 0 7m 2 4 45 55mm 0 6m 2 AF ED 18 35mm f 3 5 4 5D 18mm 21mm 2 0m 6 7 24mm 0 7m 2 4 28 35mm 0 6m 2 AF 20 35mm f 2 8D 20mm 1 5m 4 11 24mm 1 0m 3 3 28 35mm 0 6m 2 AF S VR ED 24 120mm f 3 5 5 6G 24mm 0 8m 2 7 28 120mm 0 6m 2 AF S ED 28 70mm f 2 8D 28mm 3 0m 9 10 35mm 1 0m 3 3 50 70mm 0 6m 2 AF S VR 200 400mm f 4G 200mm...

Page 119: ...gth The built in wide panel can be used for an angle of 14mm the SB 800 also supports 17mm An illuminator is included to assist in adjusting settings in the dark Use Only Nikon Flash Accessories Use only Nikon Speedlights Negative voltages or voltages over 250V applied to the accessory shoe could not only prevent normal operation but damage the sync circuitry of the camera or flash Before using a ...

Page 120: ...ion 3 FV lock1 AF assist for multi area AF6 Auto zoom1 ISO Auto Custom Setting 10 1 1Available only with CPU lenses IX Nikkor lenses excluded 2Standard i TTL Flash for Digital SLR is used when spot metering is selected Otherwise i TTL Balanced Fill Flash for Digital SLR is used 3Use Speedlight controls to select flash mode 4Available only with non CPU lenses 5Adjusted automatically according to ca...

Page 121: ...Autofocus is only available with AF Micro lenses 60mm 105mm 200mm or 70 180mm and Modes When an optional Speedlight is attached in and modes the flash fires whenever a photograph is taken The following flash modes are avail able and modes Front curtain sync and red eye reduction If off or auto front curtain sync is selected when an optional Speedlight is attached the flash sync mode selection will...

Page 122: ...ction are performed by the optional Speedlight With other Speedlights AF assist illumination is performed using the AF assist illuminator on the camera 34 Auto power zoom is available only with SB 800 and SB 600 Speedlights In P and modes the maximum aperture minimum f number is limited according to sensitivity ISO equivalency as shown below Mode Maximum aperture at ISO equivalent of 200 400 800 1...

Page 123: ...ment Viewfinder Lenses Lenses are available with diopters of 5 4 3 2 0 0 5 1 2 and 3m 1 Use diopter adjustment lenses only if the desired focus can not be achieved with the built in diopter adjustment control 1 6 to 0 5m 1 Test diopter adjustment lenses before purchase to ensure that the desired focus can be achieved DG 2 Magnifier Magnify the scene displayed in the center of the viewfinder for cl...

Page 124: ...r and to edit and save RAW images in other formats Approved Memory Cards The following cards have been tested and approved for use in the D50 SanDisk 64MB 128MB 256MB 512MB 1GB Toshiba 64MB 128MB 256MB 512MB Panasonic 64MB 128MB 256MB 512MB 1GB Operation is not guaranteed with other makes of card For more details on the above cards please contact the manufacturer Memory Cards Format memory cards i...

Page 125: ...ened in distilled water and dry thoroughly IMPORTANT Dust or other foreign matter inside the camera may cause damage not covered under warranty Lens mirror and viewfinder These elements are made of glass and are easily damaged Remove dust and lint with a blower If using an aerosol blower keep the can vertical to prevent the discharge of liquid To remove fingerprints and other stains apply a small ...

Page 126: ...e Press shutter release button will be dis played 3Press the shutter release button all the way down The mirror will be raised and the shut ter curtain will open revealing the low pass filter and a row of dashes will blink in the control panel 4Holding the camera so that light falls on the low pass filter examine the filter for dust or lint If there are foreign objects on the filter the filter req...

Page 127: ...r sonnel Under no circumstances should you touch or wipe the filter 3Turn the camera off The mirror will return to the down position and the shutter curtain will close Replace the lens or body cap Servicing the Camera and Accessories The D50 is a precision device and requires regular servicing Nikon recommends that the camera be inspected by the original retailer or Nikon service representative on...

Page 128: ...y choosing a slow shutter speed and small aperture or by using an ND filter Do not touch the shutter curtain The shutter curtain is extremely thin and easily damaged Under no circumstances should you exert pressure on the curtain poke it with cleaning tools or subject it to powerful air currents from a blower These actions could scratch deform or tear the curtain Handle all moving parts with care ...

Page 129: ...al from the monitor touching the skin or entering the eyes or mouth Turn the product off before removing or disconnecting the power source Do not unplug the product or remove the battery while the product is on or while images are being recorded or deleted Forc ibly cutting power to the product in these circumstances could result in loss of data or in damage to product memory or internal circuitry...

Page 130: ...enu item is unavailable Choose another mode or insert memory card 11 101 Image size can not be changed NEF Raw or NEF JPEG Basic selected for image quality 31 Shutter release is disabled Aperture not locked at highest f number Memory card is locked Memory card is full Flash is charging 7 11 14 18 Troubleshooting A Note on Electronically Controlled Cameras In extremely rare instances unusual charac...

Page 131: ...raised P S A and M modes 128 Focus does not lock when shutter release button is pressed halfway AF C selected for Autofocus P S A and M modes use button to lock focus 34 88 Area shown in viewfinder is smaller than final photo Viewfinder has vertical and horizontal frame coverage of about 95 Photos are out of focus Rotate focus mode selector to AF Camera unable to focus using autofocus use manual f...

Page 132: ... was taken with Off selected for Im age Rotation Camera orientation was changed while shutter release button was pressed in con tinuous mode Camera was pointed up or down when shot was taken 84 75 75 75 Can not delete photo Photo is protected remove protection Memory card is locked 56 11 Some photos are not displayed during playback Select All for Playback Fldr Note that Current will automatically...

Page 133: ...blinks blinks Memory insufficient to record further photos at current set tings or camera has run out of file or folder numbers Reduce quality or size Delete photographs Insert new memory card 30 84 11 blinks Lens aperture ring is not locked at minimum aperture Lock ring at minimum aperture largest f number 7 blinks No lens attached or non CPU lens attached Attach CPU lens IX Nikkor ex cluded or r...

Page 134: ...ash fires Raise built in flash Check photo in monitor if underexposed adjust settings and try again 36 24 blinks blinks Speedlight that does not support i TTL flash control at tached and set to TTL Change flash mode setting on optional Speedlight 110 127 blinks selected in mode M and mode dial rotated to S Change shutter speed or select mode M 43 45 blinks selected in mode M and mode dial rotated ...

Page 135: ...tailer or Nikon representative Delete files or insert new memory card Format memory card 114 11 84 11 CARD IS NOT FORMATTED blinks Memory card has not been formatted for use in D50 Format memory card 11 FOLDER CONTAINS NO IMAGES Memory card contains no images Current folder is empty Insert another card Set Playback fldr to All 11 84 FILE DOES NOT CONTAIN IMAGE DATA File has been created or modifie...

Page 136: ...NR On NEF Raw 5 0 33 4 3 JPEG Fine L 2 9 70 9 7 M 1 6 123 10 8 S 0 8 258 19 17 JPEG Normal L 1 5 137 12 10 M 0 8 233 16 14 S 0 4 464 27 25 JPEG Basic L 0 8 258 19 17 M 0 4 423 27 25 S 0 2 770 49 47 NEF JPEG Basic L 5 83 29 4 3 1 All figures are approximate File size varies with scene recorded and make of memory card 2 Maximum number of frames that can be stored in memory buffer Actual number of ph...

Page 137: ... built in flash or an optional SB 800 or SB 600 Speedlight i TTL Balanced Fill Flash for Digital SLR Flash output is adjusted for a natural bal ance between the main subject and the background Standard i TTL Flash for Digital SLR Flash output is adjusted for the main subject the brightness of the background is not taken into account Recommended for shots in which the main subject is emphasized at ...

Page 138: ... 0 7 2 2 4 Supported Standards DCF Version 2 0 Design Rule for Camera File System DCF is standard widely used in the digital camera industry to ensure compatibility among different makes of camera DPOF Digital Print Order Format DPOF is an industry wide standard that allows pictures to be printed from print orders stored on the memory card Exif version 2 21 The D50 supports Exif Exchangeable Image...

Page 139: ...an be used if maximum aperture is f 5 6 or faster Picture angle Equivalent in 35 mm format is approximately 1 5 times lens focal length Viewfinder Diopter adjustment 1 6 0 5m 1 Focusing screen Type B BriteView clear matte screen Mark V with superim posed focus brackets Eyepoint 18mm 1 0m 1 Frame coverage Approximately 95 of lens vertical and horizontal Magnification Approximately 0 75 50 mm lens a...

Page 140: ...e about 2 5 of frame centered on active focus area Range ISO 100 equivalent f 1 4 lens 20 C 68 F 0 20EV 3D color matrix or center weighted metering 2 20EV spot metering Exposure meter coupling CPU coupling Exposure control Operating mode Digital Vari Program auto portrait landscape child sports close up night portrait programmed auto P with flexible program shutter priority auto S aperture priorit...

Page 141: ...ction slow sync with red eye reduction Flash control TTL TTL flash control by 420 segment RGB sensor CPU lenses only Built in Speedlight i TTL balanced fill flash for digital SLR or standard i TTL flash for digital SLR spot metering SB 800 or 600 i TTL balanced fill flash for digital SLR or standard i TTL flash for digital SLR spot metering Auto aperture Available with SB 800 with CPU lens Non TTL...

Page 142: ... environment Temperature 0 40 C 32 104 F Humidity Less than 85 no condensation Unless otherwise stated all figures are for a camera with a fully charged battery operating at an ambient temperature of 20 C 68 F Nikon reserves the right to change the specifications of the hardware and software described this manual at any time and without prior notice Nikon will not be held liable for damages that m...

Page 143: ...s W H D Approximately 39 5 56 21mm 1 6 2 2 0 8 MH 18a Quick Charger Rated input AC 100 240V 50 60Hz Weight Approximately 80g 2 8oz excluding power cable Rated output DC 8 4V 900mA Supported batteries EN EL3 rechargeable Li ion batteries Charging time Approximately 120min Operating temperature 0 40 C 32 104 F Length of cord Approximately 1800mm 5 11 Dimensions W H D Approximately 58 90 35mm 2 3 3 5...

Page 144: ...glass element and 1 aspherical element Zoom positions 18 24 35 45 and 55mm Distance information Supplied to camera body Zoom Zoom adjusted by rotating lens zoom ring Focus Autofocus with Silent Wave motor manual focus Min focus distance 0 28m at all zoom positions Aperture Auto aperture Aperture range f 3 5 22 18mm zoom f 5 6 38 55mm zoom Metering Maximum aperture Weight Approximately 210g 7 4oz D...

Page 145: ...e 2 400 shots AF S DX ED 18 55mm f 3 5 5 6G lens single frame shooting mode single servo autofocus image quality set to JPEG Normal image size set to L shutter speed 50 s shutter release pressed halfway for five seconds and focus cycled from infinity to minimum range once with each shot built in Speedlight fired at full power with every other shot AF assist illuminator lights when Speedlight is us...

Page 146: ...Delete 84 Deleting 57 84 See also Memory card formatting all images 84 selected images 84 single frame playback 24 Digital Print Order Format 67 128 Digital Vari Program See mode Diopter 13 DPOF See Digital Print Order Format Dust Ref Photo 74 DVP See mode Digital Vari Program Dynamic area AF See AF area mode E EL See Autoexposure lock Electronic analog exposure display 45 46 Electronic range find...

Page 147: ...PRE See White balance preset Predictive focus tracking 129 Printing photographs 62 67 Print Set 67 Protecting images 56 PTP 59 63 71 R RAW 32 See also Image Quality NEF Red eye reduction 36 Remote 100 Remote control 22 23 Rotate Tall 84 S S See Image Size Mode S See Shooting mode Saturation 77 SD See Memory card Secure Digital See Memory card Self portraits See Remote control Self timer Self timer...

Page 148: ... in any form of this manual in whole or in part except for brief quotation in critical articles or reviews may be made without written authorization from NIKON CORPORATION Printed in Japan SB5E01100201 11 6MBA4211 02 ...

Reviews: