background image

ENGLISH – 

19

Table 11

SIGNALS OF LED (L1..L4) (“

FIGURE


22

”)

Status

Meaning

Possible solution

LEDs L1 - L2

Slow flashing

Change in the number of 

devices connected to the 

“BlueBus” or learning of the 

device not executed.

It is necessary to run the device learning procedure (refer to the “

Learning of 

connected devices

” paragraph)

LEDs L3 - L4

Slow flashing

The positions of the 

mechanical stops were 

never learned or after the 

mechanical stop learning 

procedure, the dip-switch 

configuration changed.

It is necessary to run the device learning procedure (refer to the “

Learning of 

connected devices

” paragraph)

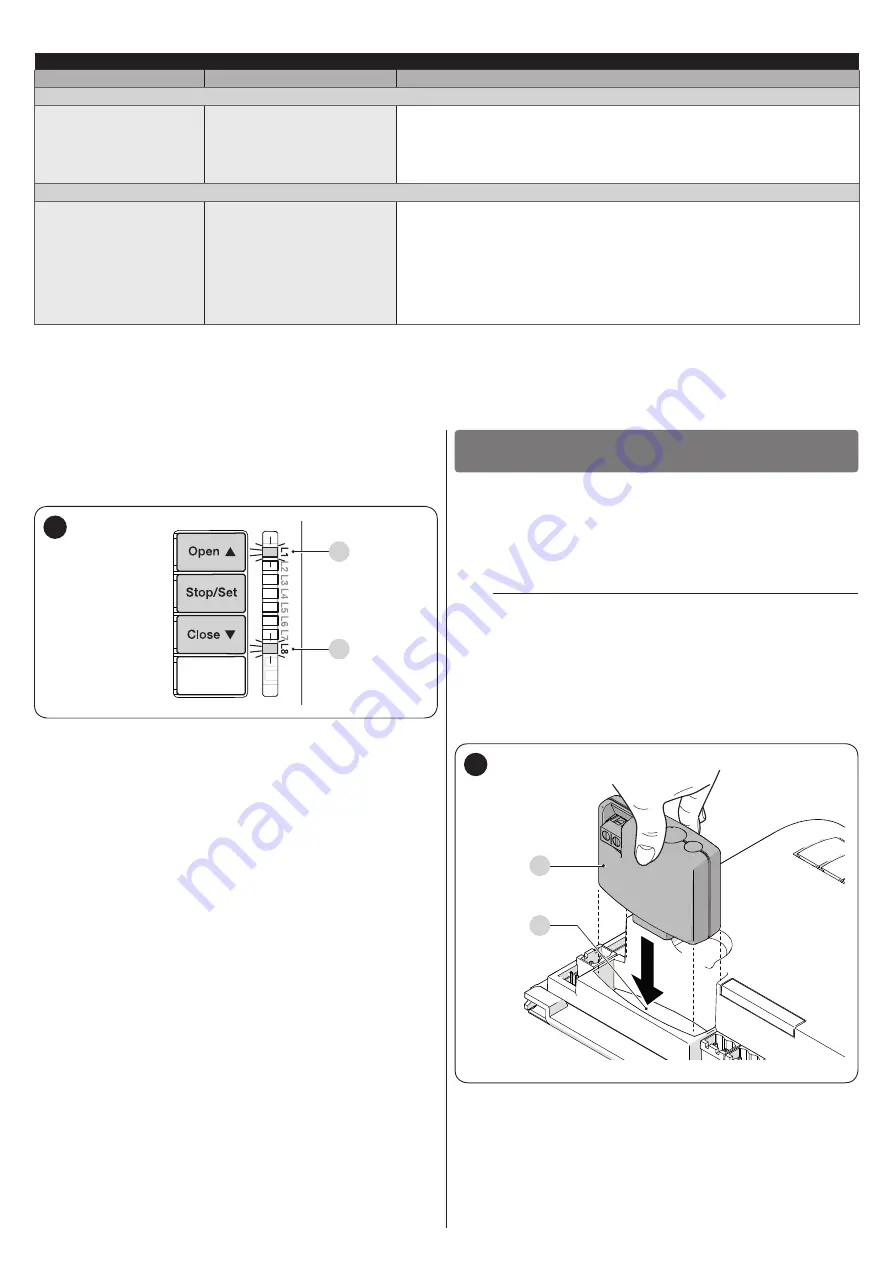
7.3  ANOMALY LOG

The control unit can display any anomalies that have occurred in 

the last 8 manoeuvres (for example, the interruption of a manoeuvre 

due to the intervention of a photocell or sensitive edge).

L1

L8

23

To check the list of anomalies:

1. 

press and hold the 

g

 button for roughly 3 seconds

2. 

release the 

g

 button when the “

L1

”  LED  starts 

flashing

3. 

press and release the 

f

 or 

h

 button to 

shift flashing of the LED to “

L8

” (“Anomaly list” parameter)

4. 

keep the 

g

 button pressed down (it must be kept 

pressed throughout phases 5 and 6)

5. 

wait roughly 3 seconds, after which LED “

L1

” – corresponding 

to the outcome of the last manoeuvre – will light up

6. 

press and hold the 

f

 or 

h

 button to select 

the desired manoeuvre: the corresponding LED will emit the 

same  number  of  flashes  as  those  normally  emitted  by  the 

warning light after an anomaly (see “

Table 9

”)

7. 

release the 

g

 button.

FURTHER INFORMATION 

(Accessories)

8


FURTHER DETAILS (Accessories)

8.1  CONNECTING AN SM-TYPE RADIO RECEIVER

The control unit has a slot for mounting radio receivers with SM 

connector (optional accessories), which can be used to remotely 

control the control unit through transmitters that intervene on the 

unit’s inputs.

Before installing a receiver, disconnect the power 

supply to the control unit.

To install a receiver (“

Figure


24

”):

1. 

remove the cover of the control unit’s containment box

2. 

insert the receiver (

A

) in the appropriate slot (

B

) on the control 

unit’s electronic board

3. 

put the cover of the control unit’s containment box back on.

At this stage, the control unit can be powered again.

B

A

24

Summary of Contents for MC824HHS

Page 1: ...Nice MC824HHS Control unit EN Instructions and warnings for installation and use...

Page 2: ...care by avoiding crushing impacts falls or contact with liquids of any kind Do not place the product near sources of heat nor expose it to open flames All these actions can damage the product and caus...

Page 3: ...type radio receiver paragraph and an IBT4N type connector which through the IBT4N interface can be used to connect BusT4 devices such as the Oview programmer see the Connecting the IBT4N interface pa...

Page 4: ...ENTIFICATION AND OVERALL DIMENSIONS The overall dimensions and label A that allow for identifying the product are shown in Figure 2 232 mm 310 mm 122 mm A 2 3 4 TYPICAL INSTALLATION Figure 3 shows an...

Page 5: ...ectronic circuits 3 5 INSTALLING THE CONTROL UNIT a Secure the control unit to an unmovable vertical flat surface adequately protected against possible impacts The lower part of the control unit must...

Page 6: ...ositioned in sight of the automation If located in a concealed position it must be equipped with a system that prevents inadvertent or unauthorised reconnection of power to avoid potential hazards 4 2...

Page 7: ...open contacts NC normally closed contacts or devices with 8 2 k fixed resistor output such as sensitive edges can be connected to this input Each device connected to this input will be individually r...

Page 8: ...FOTO PHOTO External photocell h 50 activated during the closing phase stops and reverses the gate s movement FOTO II PHOTO II External photocell h 100 activated during the closing phase stops and reve...

Page 9: ...mode to be assigned to the motor see Table 4 Close Open SbS Stop Bluebus 1 2 3 4 5 6 7 8 9 10 11 12 A 13 m The motor selector must be set before activating the mechanical stop learning function m Any...

Page 10: ...trolled by M2 press f or h to stop the learning phase At this point reverse the connections of motors M1 and M2 on the terminals on the control unit and those of the respective encoders Then repeat th...

Page 11: ...button is released LED L7 will start flashing 9 LED L7 flashes position 1 of M1 to command and move motor 1 to position 1 Figure 14 press and hold the f or h button Once the position is reached relea...

Page 12: ...ether the leaves can be opened and closed with a force below 390 N 3 lock the motors as described in the respective instruction manual 4 using the control devices transmitter control button key select...

Page 13: ...ction short flash OFF long flash ON 5 wait 10 seconds maximum time to exit the programming mode l To set other functions to ON or OFF while the procedure is running repeat points 2 and 3 during the ph...

Page 14: ...10 seconds to press the buttons consecutively during the programming procedure after which time the procedure terminates automatically and memorises the changes made up to then To perform Level 2 pro...

Page 15: ...of the movement namely the opening of the gate leaves instead the Close command does not cause any effect If the sent command remains for more than 2 seconds a Stop command is executed L6 STEP BY STEP...

Page 16: ...nsmitter or key selector etc If everything functions properly the gate will move normally otherwise proceed with point 2 2 within 3 seconds press the control again and hold it down 3 after roughly 2 s...

Page 17: ...e cause and increase the motor force if necessary 4 short red flashes 1 second pause 4 short red flashes Intervention of the STOP input At the start of the manoeuvre or during the movement itself the...

Page 18: ...blown verify the cause and replace it with one having the same characteristics Green LED always on Serious anomaly There is a serious problem try disconnecting the power supply to the control unit an...

Page 19: ...ton to shift flashing of the LED to L8 Anomaly list parameter 4 keep the g button pressed down it must be kept pressed throughout phases 5 and 6 5 wait roughly 3 seconds after which LED L1 correspondi...

Page 20: ...mation Unlock or only from Oview the following commands Unlock and close and Unlock and open 12 Lock automation Triggers the stoppage of the manoeuvre and locks the automation the control unit will no...

Page 21: ...CT MAINTENANCE Being an electronic part the control unit does not require any special maintenance Nonetheless the system should be regularly checked to ensure that it works efficiently at least every...

Page 22: ...command SbS input for normally open contacts the closing of the contact triggers the Step by Step command OPEN input for normally open contacts the closing of the contact triggers the OPEN command CLO...

Page 23: ...according to the requirements envisaged for partly completed machinery Annex II part 1 section B Directive 2006 42 EC of the EUROPEAN PARLIAMENT AND COUNCIL of 17 May 2006 related to machinery and am...

Page 24: ...24 ENGLISH NOTES...

Page 25: ...ystem or the programming and adjustment parameters of the control unit your installer is exclusively responsible for these operations Failure or power outage while waiting for your installer to interv...

Page 26: ...26 ENGLISH NOTES...

Page 27: ...ENGLISH 27 NOTES...

Page 28: ...www niceforyou com Nice SpA Via Callalta 1 31046 Oderzo TV Italy info niceforyou com IDV0779A00EN_27 11 2020...

Reviews: