background image

Page 8 / 10 


-


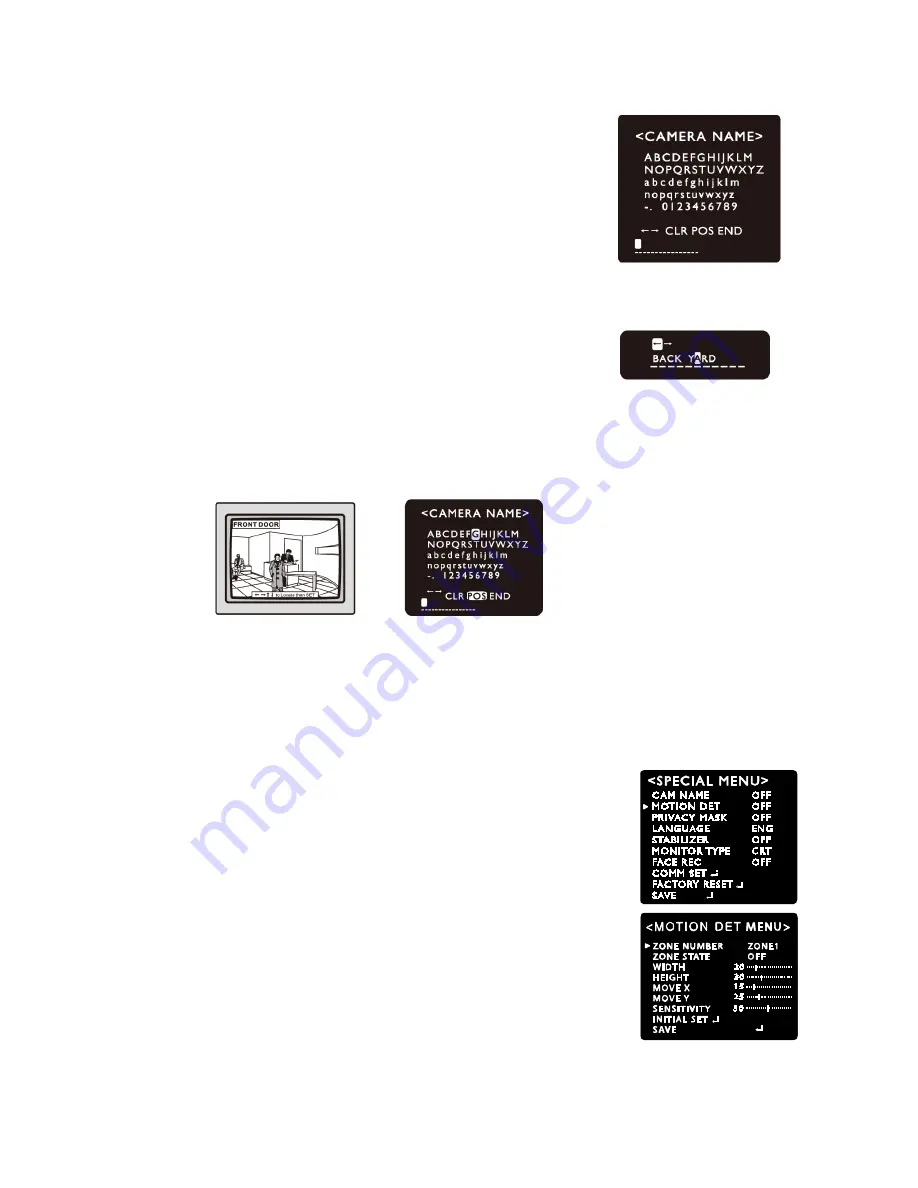
Up to 15 letters are offered for the CAM NAME.


If you enter a title, the 

title will appear on the monitor. 

 Please move the cursor to the letter to choose by using the UP and 

DOWN selections. 

  Set  an  ID  from  A~Z  /a~z  /0~9  by  using  the  UP,  DOWN,  LEFT  and 

RIGHT Selections. 

 Lock in the letters by using the button. 
 — When the letter is locked in, the cursor moves to the next space. 

 Please repeat the above to input CAM NAME. 


 Note 

 When a wrong name has been input, 
- If you press the button after moving the cursor to CLR, all  

letters will be erased. 

- If you want to correct a letter, please move the cursor to the arrow at the bottom left of the 

screen and press the button. 

- Please position the cursor on the letter you wish to correct, and then move the cursor onto 

the letter you wish to choose and press the button. 


-


When a name has been chosen, please select a position for the name to display. 


 Please move the cursor onto ’POS’ and then press the button. 

 The name will appear at the top left hand corner. 


 Please find the position you wish to display the name by using the 4 directional selections, 
 and then press the Button. 
 

-


Please select ‘END’ and then press the Button to complete CAM NAME input. 


MOTION 

(Motion Detection: MD) 

This product has a feature that allows you to observe movement of objects in 
8  different  areas  on  the  screen,  and  the  words  'MOTION'  appear  on  the 
screen when movement is detected. You can monitor activity more effi ciently. 
 
- ZONE NUMBER : You can select up to 8 MD areas.                   
- ZONE STATE : Determines whether to use the MD area selected in ZONE 
  NUMBER. 
- WIDTH : Determines the coordinate of the horizontal size. 
- HEIGHT : Determines the coordinate of the vertical size. 
- MOVE X : Determines the coordinate of the horizontal axis.    
- MOVE Y : Determines the coordinate of the vertical axis. 
- SENSITIVITY : Determines the coordinate of the sensitivity.  
- INITIAL SET : Initialize all setting of MOTION DET menu.  
- SAVE : Select this to save the MOTION menu setting and return to the 

SPECIAL menu. 


Summary of Contents for CB15WPV

Page 1: ...1 version 1 0 1 CB15WPV INSTALLATION MANUAL 1 512 756 1678...

Page 2: ...ce INFORMATION This equipment has been tested and found to comply with limits for a Class A digital device pursuant to part 15 of the FCC Rules These limits are designed to provide reasonable protecti...

Page 3: ...Installation manual 1 Precautions 4 2 Limitation of liability 5 3 Disclaimer of warranty 5 4 Package 6 5 Special features of the model 7 6 Troubleshooting 8 7 Dimension mm 9 8 Specification 10 OSD Ma...

Page 4: ...the camera To avoid electric shock never remove the screws or covers There are no parts inside that need maintenance by the user All maintenance should be carried out by qualified personnel Avoid inst...

Page 5: ...ited to below 1 Any damage and loss including without limitation direct or indirect special consequential or exemplary arising out of or relating to the product 2 Personal injury or any damage caused...

Page 6: ...6 version 1 0 1 4 Package Instruction manual x 1 OSD manual x 1 Camera x 1 Bracket x 1 Mounting screws x3 1 512 756 1678...

Page 7: ...technology it provides a remarkable low light sensitivity of 0 1Lux F2 0 0 0001Lux w Sens up 512x which is at least 3 times better than any other conventional WDR cameras 4 2D 3D Noise Reduction 2D 3...

Page 8: ...ust the contrast feature of the monitor If you have an intermediate device set the 75 Hi Z properly Please check the impedance The camera is not working properly and the surface of the camera is hot P...

Page 9: ...unication setup matches between camera and OSD Controller or DVR RS 485 Communication establishment initial value Item Camera ID BAUD RATE UART MODE RET PKT Initial value 1 9600 8 NONE 1 ENABLE We rec...

Page 10: ...NTSC 1 60 90 000sec PAL 1 50 90 000sec Gamma control Standard 0 45 White Balance 1500 K 11 000 K Auto ATW Cor Roll PUSH MANUAL Gain control Standard 6dB 34dB Auto Maximum by OSD Smear effect 0 005 Po...

Page 11: ...Page 1 10 OSD Manual for WIDELUX Cameras Version 1 0 2 Released on Oct 1 2011...

Page 12: ...hardware installation guide of each model 1 On Screen Display OSD Menu Configuration 2 Setting up the menu 1 Press the Tact SW to enter MAIN MENU 2 Move the arrow to a specific menu by pushing the Tac...

Page 13: ...noise as well indication appears on a selected sub menu press the Tact SW to get into a following indication appears on any sub menu it means the function with this mark is deactivated UP is OFF 3 DN...

Page 14: ...evel between x2 x512 OFF SENS UP is disabled Default setting is x8 Note When the SHUTTER is set to MANUAL mode SENS UP does not operate When the AGC is set to OFF SENS UP does not operate 4 INITIAL SE...

Page 15: ...R function WDR Camera scans both of bright lit background and shaded area distinctively under an extremely contrasted light situation LOW MIDDEL HIGH BLC Enables a user to directly select a desired ar...

Page 16: ...ondition When the color temperature of the environment surrounding the subject is out of the control range e g clear sky or sunset When the ambient illumination of the subject is dim If the camera is...

Page 17: ...At TARGET CROSS function is in operation display shall disappear if MOTION DET function is ON BAD PIXEL BAD PIXEL compensation BP DETECTION Make the screen completely black by covering the camera SEA...

Page 18: ...lay Please move the cursor onto POS and then press the button The name will appear at the top left hand corner Please find the position you wish to display the name by using the 4 directional selectio...

Page 19: ...ct the menu language according to your requirements English Korean Russian Spanish French are available STABILIZER DIS This function mitigates any picture movement due to external factors such as wind...

Page 20: ...38400 57600 bps SAVE REBOOT Select this to save the COMM SET menu setting and return to the main screen PREVIOUS Return to COMM SET menu Note RS 485 cable Please connect firstly and then IF there hap...

Reviews: