background image

Payment Terminals | 

Page 8 of 54

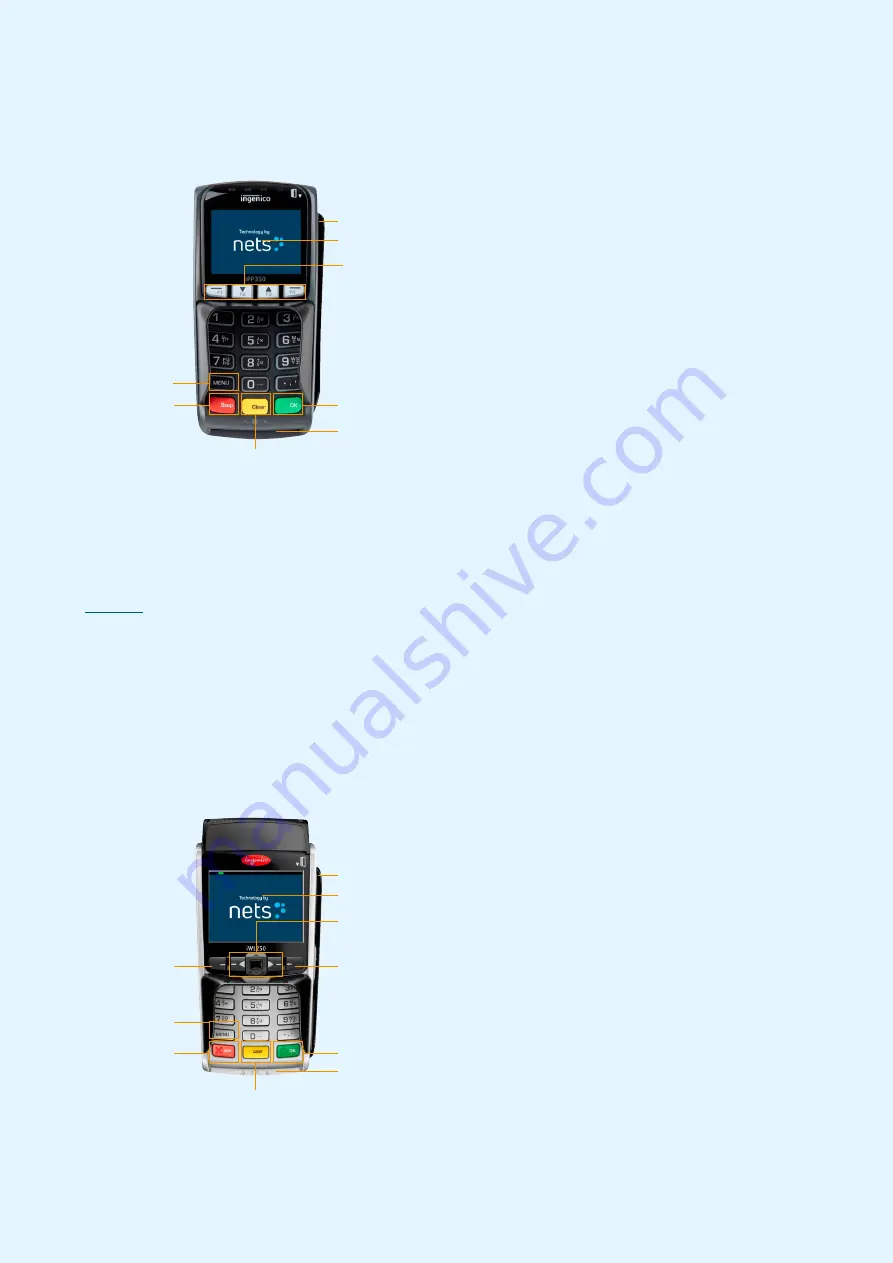
2.5 iPP350

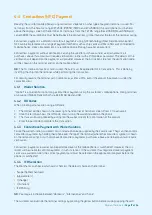
iPP350 is a countertop terminal from the Telium 2 range which is integrated with an ECR.

Accessories include:

 ›

Power supply cable 
(whether integrated via 

MagicBox

, RS232 or 

 powered USB cables)*

 ›

Integration cable 

 ›

Nets Merchant Card

* Accessories may vary from 
country to country

2.6 iWL250B

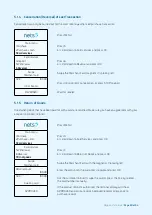
iWL250B is a mobile terminal from the Telium 2 range that allows in-store mobility through a Base Station which 
also serves as a charging station). The terminal communicates over Bluetooth with the Base Station, which is 
 connected via an Ethernet cable to the existing internet connection of the store. It features a receipt printer (refer to 

Section 9

 for information on receipt paper rolls). The communication distance – whilst dependent on the internal 

 configuration of the store – may be up to 100 meters.

Unlike iWL250G, the terminal offers ECR-integration capabilities through its communication via the Base 
 Station. A popular use case for this is Pay@Table and it is typically done via serial cable.

For special purposes, the terminal can also be paired over open Bluetooth with tablet ECRs that then offer 
internet communication.

Accessories include:

 ›

Power supply cable

 ›

Base station

 ›

Network cable

 ›

Receipt roll

 ›

Nets Merchant Card

MENU key

CLEAR (yellow)

CANCEL (red)

VALIDATION key (green)

Navigation keys (F1, F2, F3, F4)

Contactless reader

Magnetic strip reader

Chip reader

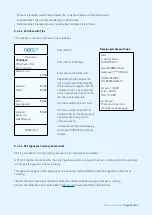
MENU key

CLEAR (yellow)

CANCEL (red)

VALIDATION key (green)

Contactless reader

Magnetic strip reader

Chip reader

Navigation keys to scroll up and 
down in menus

Connecting to base

station (iWL250B)

Used to manually enter card data. 
Used to toggle between upper and 
lower case letters or from letters 
to numbers, and to check balance 

Connecting to base

station (iWL250B)

Summary of Contents for COUNTERTOP iCT250E

Page 1: ...User Guide Payment Terminals Desk 3500 Move 3500 Lane 3000 iCT250E iPP350 iWL250B iWL250G iSMP4 Viking Software...

Page 2: ...4 4 2 QR Codes 17 4 4 3 Contactless Payment with Wallet Solution 17 4 4 4 IFR Selection 17 5 Transactions 18 5 1 Perform a Purchase 18 5 1 1Purchase Standard 18 5 1 2 Purchase with Cash Withdrawal Cas...

Page 3: ...3 Z Tota l 38 11 4 Copy of Last Z Total 38 11 5 Operator X Total 39 11 6 Operator Z Total 40 12 Operators 41 12 1 Create a New Operator 41 12 2 Delete Operator 42 12 3 Print Operator List 43 12 4 Use...

Page 4: ...ter EOT Electronic Offline Transaction GPRS General Packet Radio Service Host Internet server that processes transactions IFR Interchange Fee Regulation EU requirement Integrated Terminals integrated...

Page 5: ...llowing types of Nets payment terminals Mobile Integrated Mobile The information contained herein shall not be used copied or redistributed without the prior written consent of Nets A S Integrated Cou...

Page 6: ...se decrease screen contrast CANCEL red VALIDATION key green Navigation keys F1 F3 F2 F4 Contactless reader Magnetic strip reader Chip reader 2 2 Move 3500 Move 3500 is the Nets premium mobile terminal...

Page 7: ...ffered as a GPRS variant iCT2x0EG where GPRS is used as the sole connection or is activated as a backup in case internet communication fails This model can also act as a standalone terminal with no in...

Page 8: ...dent on the internal configuration of the store may be up to 100 meters Unlike iWL250G the terminal offers ECR integration capabilities through its communication via the Base Station A popular use cas...

Page 9: ...ers to a checkout counter ECR partners may also add payment functionalities to their tablet or smartphone based system It uses open Bluetooth or Wi Fi integration to a host system that can either be a...

Page 10: ...he timer is reset after each read When the reader is active Barcode reader active is displayed To turn on the barcode reader press one of the side buttons on the terminal A beeping sound will verify t...

Page 11: ...rator Admin 1 Add Op 2 Delete Op 3 Print Ops 6 Parameters 1 Change 2 Print 7 Comms 1 Remove Obstruc 2 Ping Host 8 Software 1 Get Software 9 Battery Signal Battery 100 Signal 5 1 Reports 1 Trans List 2...

Page 12: ...be used to arrive at selections NB For integrated terminals all commands must be started with MENU or by swiping the Merchant Card Function Keys does not include Lane 3000 or iPP350 Purchase Enter th...

Page 13: ...DE HU ET PL NL FR ES All these languages are supported by the terminal Tips Total amount Yes No Change Operator Disable After Reconc After Z Total Always After 0 Report This option comes into use when...

Page 14: ...No It allows you to enable disable the header and footer on the terminal display 4 Security Protect Menu Yes No To set whether access can be controlled by pressing the Menu button Access control is d...

Page 15: ...the serial number of the base station to which the terminal is connected The signal strength is indicated with 5 levels where red is the weakest and green is the strongest signal 5 3 GPRS indicates wh...

Page 16: ...ead of the customer using their card his her card data can be entered on the terminal 1 Press MENU 2 Press OK for purchase 3 Enter the purchase amount then press OK 4 Press the F4 key top right of the...

Page 17: ...et Solution Wallet is a solution for confirming a contactless payment using the customer s mobile phone Viking terminals also support Mobile Dankort both via BLE MAB Box and QR 4 4 2 QR Codes When ini...

Page 18: ...ll down using the arrow key to Reconciliation and press OK Print Pending If the reconciliation is initiated from the terminal the terminal will print store the receipt even if integrated If the ECR se...

Page 19: ...al instead of the customer using his her card This feature is only available for credit cards with signature check Press MENU Main menu 1 Purchase Press OK for Purchase Amount OK 100 00 Enter amount o...

Page 20: ...when goods that have been paid for with a card are returned Make sure you have an agreement with your acquirer to process refunds Press MENU Main menu 1 Purchase 2 Purchase C B 3 Card services Press...

Page 21: ...amount of purchase and press OK Print Pending Wait for receipt 5 2 2 Copy of Last Receipt This function is used to extract a copy of the most recently authorised transaction receipt Press MENU Main m...

Page 22: ...al the terminal will request that the customer enters a tips amount or a total amount illustration to the left shows total amount NOK 150 00 Awaiting card Ask the customer to insert card Amount 150 00...

Page 23: ...inal 5 3 1 3 Defective Replacement Gift Card It is possible to create replacement cards for defective Nets prepaid gift cards There may be various reasons that a customer requires a new gift card Thes...

Page 24: ...connecting the payment terminal with the MagicBox shall be disconnected The provided USB integration cable shall then be used to connect the ECR with the terminal NB USB drivers for integration with a...

Page 25: ...integration with an ECR system can be downloaded from https developer ingenico us software list 6 3 1 Security To prevent theft it is important to fix the integration cable to the back of the terminal...

Page 26: ...In this arrangement a MagicBox comes already connected to four ports at the back of the payment terminal It means that the merchant is only required to connect a single network cable RJ45 from the Ma...

Page 27: ...ft under the screen 2 Select 0 Telium manager 3 Enter code 4302 OK 4 Select Initialization Hardware Cradle setup Association 5 Now you can choose to add a new Base Station select a Base Station or del...

Page 28: ...ware Cradle setup Association 5 Now you can choose to add a new Base Station select a Base Station or delete a Base Station Place the terminal on the Base Station The terminal will connect and is then...

Page 29: ...must be connected as follows 6 8 1 Security To prevent theft it is important to fix the integration cable to the back of the terminal using the accompanying M2 5x8 screws 2 of 6 8 2 Download USB Drive...

Page 30: ...phone Connect the phone and terminal via Bluetooth iSMP4 Move 3500 Wi Fi IP Wi Fi ECR and terminal must be connected to the same Wi Fi All terminals via ECR USB Slave USB must be connected to the ter...

Page 31: ...dresses in Ethernet Terminals To choose the parameter location go to Main Menu Merchant Menu Parameters Change Comms Then scroll down through the same Menu to set up all IP addresses Set DHCP Usage to...

Page 32: ...tings 3 Swipe Merchant Card 4 Press 1 to enable Wi Fi 5 Press 2 to Scan network then select the required network 6 Enter your password use F2 F3 for up down and F1 F4 for sideways navigation 7 Select...

Page 33: ...inals are those which are not integrated with an ECR At Nets the models are Desk 3500 Move 3500 iCT250E iWL250B iWL250G NB Desk 3500 and iCT250E can be configured to be either standalone or integrated...

Page 34: ...eceipt roll as shown Then close the cover in the direction of the arrow Approx 5 cm of the roll should stick out when the cover is closed The receipt printer is now ready for use 9 2 Inserting a Recei...

Page 35: ...be called from the ECR and not directly from the payment terminal 10 1 Manual Reconciliation Reconciliation transfers transactions to the settlement account on the following business day The terminal...

Page 36: ...on List Used to print out a list of all transactions stored in the terminal Press MENU Main menu 5 Copy menu 6 Reconciliation 7 Operator menu Press 7 or scroll down to Operator Menu and press OK Opera...

Page 37: ...NB Performing X Total does not perform reconciliation Print out of an X Total will not reconcile the terminal Press MENU Main menu 5 Copy menu 6 Reconciliation 7 Operator menu Press 7 or scroll down...

Page 38: ...OK Operator menu 1 Reports 2 Issuers 3 Term status Press OK for Reports Reports 1 Trans list 2 X Total 3 Z Total Press 2 or scroll down to X Total and press OK Print Pending Wait for report 11 4 Copy...

Page 39: ...of an X Total will not reconcile the terminal Press MENU Main menu 5 Copy menu 6 Reconciliation 7 Operator menu Press 7 or scroll down to Operator Menu and press OK Operator menu 1 Reports 2 Issuers 3...

Page 40: ...y menu 6 Reconciliation 7 Operator menu Press 7 or scroll down to Operator Menu and press OK Operator menu 1 Reports 2 Issuers 3 Term status Press OK for Reports Reports 3 Z Total 4 Op X Total 5 Op Z...

Page 41: ...ECR these functions must be called from the ECR and not directly from the payment terminal 12 1 Create a New Operator Use the instructions in this section to register a new operator on the payment te...

Page 42: ...Issuers 2 EOT 3 Operator admin Press 3 or scroll down to Operator Admin Operator admin 1 Add Op 2 Delete Op 3 Print ops Press 2 or scroll down to Delete Operator then press OK PIN OK Appears only if...

Page 43: ...up to 10 digits and name Each operator must be registered on each terminal that they use It is possible to access protect operators by activating a four digit code The first operator to register with...

Page 44: ...swipe insert a card in the terminal Use the arrow keys to scroll to mark the correct merchant then press OK Confirm that the correct merchant has been selected by pressing OK Follow the below instruct...

Page 45: ...ards the merchant must contact the acquirer If a new card agreement has been created the card agreement list can be updated 14 2 Download Card Agreements Swipe the Merchant Card with the magnetic stri...

Page 46: ...or scroll to Software then press OK Software 1 Get software Press OK to start the software update 14 5 Identify Different Terminal Parameters The different terminal parameters are listed and explaine...

Page 47: ...tact number Who do I contact when I have several terminals with the same error Please contact your network provider or shop chain manager Who do I contact regarding Telenor broadband Refer to Section...

Page 48: ...is still frozen contact Nets Customer Service The terminal stopped working when we were carrying out a transaction Did the purchase go through Take a copy of the last transaction Menu 5 1 to see if t...

Page 49: ...erchant field of the receipt The merchant must keep the receipt with the customer s signature and be able to produce it when required The amount is transferred to Nets automatically when the terminal...

Page 50: ...1 Print 2 Send to host 3 Delete Press OK to start printing the terminal s stored backup solutions 16 1 2 Submit EOT Swipe the Merchant Card with the magnetic strip facing left Merchant menu 1 Issueras...

Page 51: ...ely Remember to include all associated cables and equipment ADSL modems shall not be returned to Nets 17 2 Terminations When terminating the lease of a Nets terminal the terminal must not be returned...

Page 52: ...pad during PIN entry Ensure that no video cameras surveillance equipment is directed towards the keypad during PIN entry Additionally the merchant shall advise the customer of any suspicious behavior...

Page 53: ...ta est v tapah tuma Ethernet 1 DHCP 2 Kiinte IP GPRS 1 GPRS APN 2 GPRS PIN P tteen k ynnist minen uudelleen Jos p te toimii virheellisesti kokeile ensin k ynnist se uudelleen Ingenico p tteill pid kel...

Page 54: ...Bohemian Version EN 09 20...

Reviews: