background image

- ITALIANO - 


- 28 - 

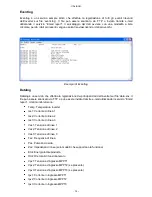
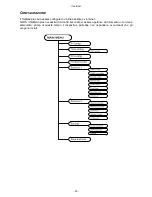
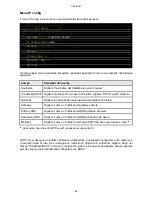
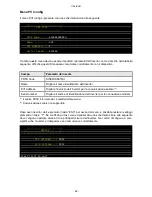
Menù PVI config 

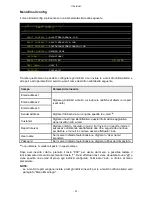
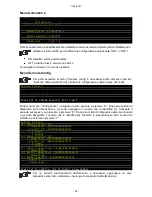
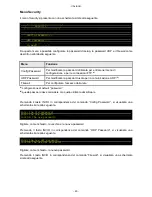
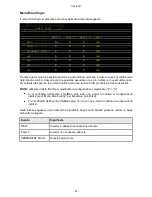
Il menù 

PVI config

 si presenta con una schermata simile alla seguente. 


    /------------------------/ 
   /       PVI conf         / 
  /------------------------/ 
 
 
    PRTK Code......:

SISER19601RU 

 
    Name...........:

PV1 

 
    PVI Address....:

 
    Serial number..:

123456


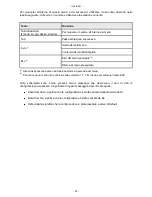
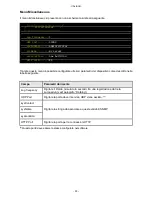
Tramite questo menù devono essere impostati i parametri de

ll‟inverter, come descritto nella tabella 

seguente, affinché quest‟ultimo possa comunicare correttamente con il dispositivo.  


Campo 

Parametri da inserire 

PRTK Code 

SISER19601RU 

Name 

Digitare il nome identificativo de

ll‟inverter 

PVI Address 

Digitare 

l‟indirizzo dell‟inverter per la comunicazione seriale 

(2)


Serial number 

Digitare il 

codice di identificazione dell‟inverter per la connessione modem 

(1) 

 Il codice PRTK è formato da 12 caratteri alfanumerici.


(2) 

 Comunicazione seriale non supportata.


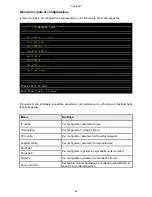
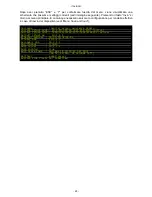
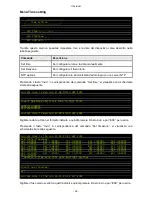
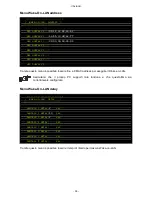
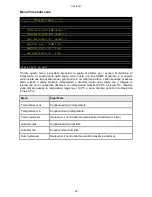
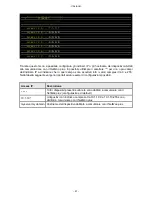
Dopo aver inserito i dati e premuto il tasto “ESC” per uscire dal menù, è possibile testare i settaggi 
premendo il tasto “T”. Se si effettua il test, viene visualizzata una schermata simile alla seguente 
dove  vengono  ripor

tate alcune tra le principali  misure  dell‟inverter.  Se i  valori rimangono a zero, 

significa che l‟inverter e il dispositivo non comunicano correttamente. 
 

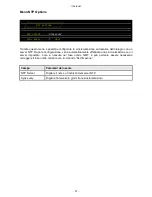
    /------------------------/ 
   /          Status        / 
  /------------------------/ 
 
 
          PV1 voltage....: 

360

 
          Grid Voltage...: 

230


Press [ESC] to quit 
 

Summary of Contents for 102 plus

Page 1: ......

Page 2: ...ICUREZZA Questa parte del manuale contiene precauzioni da seguire scrupolosamente in quanto riguardano la SICUREZZA Il dispositivo stato realizzato per l uso professionale e quindi non adatto per l us...

Page 3: ...rega di separare i differenti materiali costituenti l imballo e smaltire secondo le normative vigenti nel paese di utilizzo del prodotto SMALTIMENTO DEL PRODOTTO Il dispositivo contiene al suo interno...

Page 4: ...________________ 12 Report__________________________________________________________________ 13 Archivio storico di misure ed eventi dell inverter ______________________________ 13 Eventlog___________...

Page 5: ...Wake On LAN delay _________________________________________________ 35 Men Activation 2 ________________________________________________________ 36 Men Sensors Config ________________________________...

Page 6: ...acilmente l inverter in reti di medie e grandi dimensioni NetMan 101 plus un accessorio esterno all inverter da collegare ad esso tramite cavo seriale NetMan 102 plus una scheda di espansione da inser...

Page 7: ...o l apertura dell imballo per prima cosa procedere alla verifica del contenuto L imballo dovr contenere NetMan 101 plus OPPURE NetMan 102 plus Cavo seriale null modem DB9 DB9 Cavo seriale null modem D...

Page 8: ...Man plus rende disponibile una porta di comunicazione seriale attraverso la quale possibile Configurare il NetMan plus vedi paragrafo Configurazione via linea seriale RS 232 SERVIZI DI RETE Il NetMan...

Page 9: ...lizzer una schermata simile alla seguente sulla quale sono presenti i principali dati operativi dell inverter Esempio di visualizzazione tramite HTTP Nel lato sinistro della pagina sono presenti i seg...

Page 10: ...sso livello che garantisce velocit nello scambio dati e bassa congestione di rete E il protocollo utilizzato dal software SunVision per il controllo ed il monitoraggio dell inverter La connessione UDP...

Page 11: ...metri Host hostname o indirizzo IP del NetMan plus Utente root Password password corrente configurazione di default password La connessione pu essere stabilita anche utilizzando un web browser tutti i...

Page 12: ...o essere inviate fino a tre destinatari ed il loro invio pu essere associato a tre diversi livelli di allarme SMTP Simple Mail Transfer Protocol il protocollo utilizzato per inoltrare le e mail Quest...

Page 13: ...report Archivio storico di misure ed eventi dell inverter Il NetMan plus effettua la registrazione su archivio storico di misure Datalog ed eventi Eventlog dell inverter I dati vengono salvati su file...

Page 14: ...file data snv Il file pu essere scaricato via FTP o pu essere inviato tramite e mail utilizzando il servizio Email report I dati monitorati sono Temp Temperatura inverter Iac1 Corrente di linea 1 Iac2...

Page 15: ...ere configurato dall utente vedi paragrafo Men Miscellaneous Il salvataggio dei dati avviene con una modalit a lista circolare perci i dati pi recenti vengono salvati sovrascrivendo i dati pi vecchi p...

Page 16: ...y Temperature rileva l umidit relativa in e la temperatura ambiente in C Digital I O Temperature rileva la temperatura ambiente in C e dispone di un ingresso e di una uscita digitali NetMan sensor int...

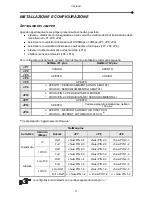
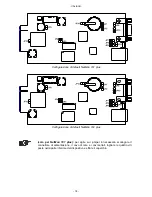
Page 17: ...ABILITATI CHIUSO SENSORI AMBIENTALI ABILITATI JP10 CHIUSI PIN 1 2 PER ABILITARE IL MODEM CHIUSI PIN 2 3 PER ABILITARE I SENSORI AMBIENTALI JP11 APERTO JP12 APERTO Vedere paragrafo installazione netman...

Page 18: ...gurazione di default NetMan 102 plus solo per NetMan 101 plus per agire sui jumper necessario scollegare il connettore di alimentazione il cavo di rete e i cavi seriali togliere le quattro viti poste...

Page 19: ...PHV3K11A D 6PHV4K62A INE 6PHV4K62A IF7 HGT1401BRU HGT1401BRU E HGT1401BRU D 6PHV4K01A 6PHV4K01A D 6PHV6K03A INE 6PHV6K03A IF7 HGT1402ARU HGT1402ARU E HGT1402ARU D 6PHV4K01B 6PHV4K01B D 6PHV10K2XA INE...

Page 20: ...ere configurato via linea seriale o via telnet NOTA il NetMan plus necessita di circa 30 secondi per essere operativo dal momento in cui viene alimentato prima di questo tempo il dispositivo potrebbe...

Page 21: ...ni del NetMan plus vedi paragrafo Men principale di configurazione e successivi Configurazione via telnet Per configurare il NetMan plus via telnet necessario eseguire su un PC collegato in rete al Ne...

Page 22: ...sottomen la cui funzione illustrata nella tabella seguente Menu Funzione IP config Per configurare i parametri di rete Time setting Per configurare l orologio interno PVI config Per configurare i para...

Page 23: ...principale 2 Ritorna al men precedente 1 Alcuni tasti possono avere una funzione diversa a seconda del men 2 Per uscire da un men viene richiesta una conferma Y o N dopo aver premuto il tasto ESC Sull...

Page 24: ...assieme all indirizzo IP statico Gateway Digitare il nome o l indirizzo del gateway di rete Primary DNS Digitare il nome o l indirizzo del DNS preferito da usare Secondary DNS Digitare il nome o l ind...

Page 25: ...riavvio del dispositivo vedi Men Save and load Hostname inverter_server mynetwork domain Current IPlus4 addr 10 1 10 187 16 255 255 0 0 active Current IPlus6 addr fe80 0 0 0 260 35ff fe02 4184 64 acti...

Page 26: ...t date is Wed Jun 15 08 10 00 GMT 2005 Digitare la data e l ora nel formato indicato e quindi premere il tasto invio e poi ESC per uscire Premendo il tasto Invio in corrispondenza del comando Set time...

Page 27: ...Dopo la configurazione verr automaticamente effettuata una sincronizzazione con il server impostato L ora ricevuta nel fuso orario GMT e pu pertanto essere necessario correggere il fuso orario corren...

Page 28: ...tare l indirizzo dell inverter per la comunicazione seriale 2 Serial number Digitare il codice di identificazione dell inverter per la connessione modem 1 Il codice PRTK formato da 12 caratteri alfanu...

Page 29: ...ed Not used Da questo men possibile impostare la remunerazione per kWh di energia prodotta la divisa e il luogo del quale si vogliono ricercare le previsioni meteo come descritto nella tabella seguent...

Page 30: ...abella seguente Men Funzione SNMP config Per configurare il servizio SNMP NON SUPPORTATO SNMP community Modem config Per configurare il servizio modem NON SUPPORTATO Modem logic Email config Per confi...

Page 31: ...1 Customer Digitare una stringa identificativa questa informazione aggiuntiva viene inserita nella e mail Report interval Digitare il ritardo misurato in giorni tra l invio di un report e mail e il su...

Page 32: ...o le e mail di notifica verranno inviate a tutti gli indirizzi ad esso associati NOTA utilizzare il tasto INVIO per modificare la configurazione selezionata X o 0 X al verificarsi dell evento il NetMa...

Page 33: ...parametri del dispositivo come descritto nella tabella seguente Campo Parametri da inserire Log frequency Digitare il ritardo misurato in secondi tra una registrazione dati e la successiva vedi parag...

Page 34: ...servizio non attivo Si consiglia di attivare solo i servizi utilizzati I servizi modem e SNMP non sono supportati Men Services 2 Services 2 WakeOnLan addr WakeOnLan delay Activation 2 Sensors config...

Page 35: ...e inserire fino a 8 MAC address per eseguire il Wake on LAN Assicurarsi che il proprio PC supporti tale funzione e che quest ultima sia correttamente configurata Men Wake On LAN delay Wake on LAN dela...

Page 36: ...e C Dopo alcuni istanti il dispositivo sar riconosciuto e gli verr assegnato il numero che lo identifica 1 Collegare il sensore successivo se presente e premere N Dopo alcuni istanti il dispositivo sa...

Page 37: ...ollegare il secondo Humidity Temperature e premere il tasto N Sensors Devices 1 Sensor Temperature F100000013BE0628 Temperature 2 Sensor Humidity 4D00000083FF3326 Humidity Temperature Press Y to confi...

Page 38: ...ato al relativo sensore in fase di installazione Nella tabella seguente viene descritto il significato degli eventi Questi possono variare in base al PVI collegato Evento Significato WAIT Inverter in...

Page 39: ...ttivo L allarme cessa di essere attivo quando il valore anomalo temperatura o umidit rientra nella soglia con il margine di isteresi che viene configurato Esempio con temperatura massima 100 C e ister...

Page 40: ...accesso dalla rete 1 configurazione di default password 2 questa password deve coincidere con quella utilizzata dal software Premendo il tasto INVIO in corrispondenza del comando Config Password si v...

Page 41: ...o pi campi dell indirizzo IP ad indicare che in quel campo sono accettati tutti i valori compresi tra 0 e 255 Nella tabella seguente vengono riportati alcuni esempi di configurazioni possibili Access...

Page 42: ...h e poi riavvia automaticamente per rendere effettive le modifiche Revert changes Annulla le modifiche e ricarica l ultima configurazione salvata esclusa la configurazione di rete IP Config e dell oro...

Page 43: ...o aver completato la configurazione di un dispositivo salvarla selezionando l opzione Save to file del men Save and load verr creato il file netman config Il file pu essere scaricato dal dispositivo e...

Page 44: ...alla voce next server IP o option 150 Su Windows Server per esempio TFTP server name su code 66 Far partire il server TFTP su questo server deve essere presente il file di aggiornamento Il server TFT...

Page 45: ...P di categoria 5 o superiore Il cavo tra l adattatore e l hub deve essere non superiore a 100m e non inferiore a 2 5m CONNESSIONI CAVO DI RETE Segnale Pin to Pin TX 1 1 TX 2 2 RX 3 3 RX 6 6 NOTA i pin...

Page 46: ...nsiglia di sostituire la batteria ogni 3 anni Se la batteria viene sostituta fare attenzione che il lato positivo sia rivolto verso l alto Tipo di batteria CR1620 3V Lithium SPECIFICHE TECNICHE NetMan...

Page 47: ...47...

Page 48: ...User SAFETY This part of the manual contains SAFETY precautions that must be followed scrupulously The device has been designed for professional use and is therefore not suitable for use in the home T...

Page 49: ...e different material of which the packaging is made and dispose of all material in compliance with applicable standards in the country in which the product is used DISPOSING OF THE PRODUCT The device...

Page 50: ...___________________ 58 Reports_________________________________________________________________ 58 INVERTER VALUES AND EVENTS HISTORY LOG ARCHIVE____________________________59 Eventlog________________...

Page 51: ...________________________________ 82 Wake On LAN delay menu _________________________________________________ 82 Activation 2 menu ________________________________________________________ 83 Sensors Co...

Page 52: ...can therefore be integrated easily into medium and large sized networks NetMan 101 plus is an accessory which is external to the inverter and connected to it by serial cable NetMan 102 plus is an expa...

Page 53: ...CONTENTS After opening the packaging first check the contents The packaging should contain NetMan 101 plus OR NetMan 102 plus DB9 DB9 null modem serial cable DB9 DB9 null modem serial cable 12Vdc 0 3A...

Page 54: ...RT NetMan plus makes available a serial communication port through which it is possible to Configure NetMan plus see paragraph Configuration via RS 232 serial line NETWORK SERVICES NetMan plus impleme...

Page 55: ...our web browser a screen like the one shown below will be displayed with the main inverter operating data Example of display via HTTP The following buttons are found on the left hand side of the page...

Page 56: ...rk protocol that guarantees speed in the exchange of data and low network congestion It is the protocol used by the SunVision software for monitoring and control of the inverter The UDP connection use...

Page 57: ...th these parameters Host hostname or NetMan plus IP address User root Password current password default configuration password The connection can also be established using a web browser all the most p...

Page 58: ...nt to an SMTP server on port 25 For more details see paragraph Configuration Example of notification e mail Reports NetMan plus can send periodic e mails with an attachment containing the files of the...

Page 59: ...the text files can be read either by means of an electronic spreadsheet which allows the data to be ordered chronologically or by any text editor The format used to record the date and time is of the...

Page 60: ...ter Temperature Iac1 Output current line 1 Iac2 Output current line 2 Iac3 Output current line 3 Vac1 Grid voltage 1 Vac2 Grid voltage 2 Vac3 Grid voltage 3 Fac Grid frequency Pac output power Zac Gri...

Page 61: ...t Log frequency can be configured by the user see paragraph Miscellaneous Menu The data are saved in circular list mode thus the most recent data are saved by overwriting the oldest data Data for up t...

Page 62: ...lative humidity in and the environmental temperature in C Digital I O Temperature detects the environmental temperature in C and features a digital input and a digital output NetMan sensor interface t...

Page 63: ...ORS JP10 CLOSED 1 2 TO ENABLE THE MODEM CLOSED 2 3 TO ENABLE THE ENVIRONMENTAL SENSORS JP11 OPEN JP12 OPEN See paragraph INSTALLATION OF NETMAN 102 PLUS JP14 OPEN AUTOMATIC NETBOOT INACTIVE CLOSED AUT...

Page 64: ...plus default configuration only for NetMan 101 plus In order to set the jumpers first disconnect the power supply connector the network cable and the serial cables and then remove the four screws loc...

Page 65: ...D 6PHV3K11A 6PHV3K11A D 6PHV4K62A INE 6PHV4K62A IF7 HGT1401BRU HGT1401BRU E HGT1401BRU D 6PHV4K01A 6PHV4K01A D 6PHV6K03A INE 6PHV6K03A IF7 HGT1402ARU HGT1402ARU E HGT1402ARU D 6PHV4K01B 6PHV4K01B D 6P...

Page 66: ...NetMan plus can be configured via serial line or via telnet NOTE NetMan plus needs approx 30 seconds to become operational from when it is powered up before this time the device may not respond to com...

Page 67: ...gin has been effected the screen of the main configuration menu is displayed From this screen it is possible to access the various menus to change NetMan plus settings see paragraph Main configuration...

Page 68: ...reboot the device see paragraph Menu Save and load Note the clock settings see paragraph Time settings Menu become effective without saving Main configuration menu The main configuration menu display...

Page 69: ...eys as described in the following table the arrow or the cursor shows the current selection Key Function Direction keys Arrow up down right left To move the cursor within the menus Tab Goes on to next...

Page 70: ...t name without blank spaces IP address DHCP Enter the IP address for a static IP enter DHCP for a dynamic IP Netmask Enter the netmask to be used together with the static IP address Gateway Enter the...

Page 71: ...see image below Press the ENTER key to return to the main menu The configuration must however be saved to make it effective in the event of a restart of the device see Save and load menu Hostname inv...

Page 72: ...is Wed Jun 15 08 10 00 GMT 2005 Enter the date and time in the format shown then press the ENTER key and then ESC to exit Pressing the ENTER key corresponding to the Set timezone command displays a sc...

Page 73: ...a NTP server After the configuration will be performer a synchronization with the server The time is received with the GMT time zone thus it may be necessary to correct the current time zone with the...

Page 74: ...ss Enter the inverter address for serial communication 2 Serial number Enter the inverter identification code for modem connection 1 The PRTK code is formed of 12 alphanumeric characters 2 The serial...

Page 75: ...orecast Not used Not used Not used Not used Not used With this menu the feeding parameters must be set as described in the following table Comando Descrizione Remuneration kWh To configure the remuner...

Page 76: ...owing table Menu Function SNMP config To configure the SNMP service NOT SUPPORTED SNMP community Modem config To configure the modem service NOT SUPPORTED Modem logic Email config To configure the e m...

Page 77: ...om which the e mails are sent 1 Customer Enter an identifying string this additional information is included in the e mail Report interval Enter the delay measured in days between the sending of one r...

Page 78: ...notification e mails will be sent to all the addresses associated with it NOTE use the ENTER key to change the selected configuration X or 0 X when the event occurs NetMan plus sends a notification e...

Page 79: ...parameters can be configured as described in the following table Field Parameters to be inserted Log frequency Enter the delay measured in seconds between one data log and the next see paragraph Data...

Page 80: ...uration ON or OFF ON green characters service active OFF red characters service not active It is recommended to activate only the services used The SNMP and Modem services are not supported Services 2...

Page 81: ...ENGLISH 81 as well as being configured the services must also be activated to function correctly see paragraph Activation 2 menu It is recommended to activate only the services used...

Page 82: ...is possible to insert up to 8 MAC address to execute Wake on LAN Please make sure that your PC supports this function and that it is correctly configured Wake On LAN delay menu Wake on LAN delay Addr...

Page 83: ...ome instants the device will be recognized and the device will be given an identifier number 1 Connect the next sensor if present and press N After some instants the device will be recognized and the...

Page 84: ...t the second sensor Humidity Temperature and press N Sensors Devices 1 Sensor Temperature F100000013BE0628 Temperature 2 Sensor Humidity 4D00000083FF3326 Humidity Temperature Press Y to confirm N to i...

Page 85: ...during installation The following table describes the meaning of the events These can vary depending on the PVI connected Evento Significato WAIT The inverter is waiting the connection to the grid FA...

Page 86: ...ases to be active when the outbound value temperature or humidity is under the threshold with the degree of hysteresis that is configured Example with a maximum temperature of 100 C and 5 C hysteresis...

Page 87: ...ed for UDP communication 2 Firewall To configure access from the network 1 default configuration password 2 this password must be the same as the one used by the software Pressing the ENTER key corres...

Page 88: ...an plus can be configured The character can be used for one or more fields of the IP address to indicate that all values between 0 and 255 are accepted in that field The following table provides some...

Page 89: ...and then automatically restarts to make the changes effective Revert changes Cancels the changes and reloads the last saved configuration excluding the network IP Config and the clock Time setting co...

Page 90: ...r completing device configuration save it by selecting the option Save to file from the Save and load menu a netman config file will be created The file can be downloaded from the device and loaded on...

Page 91: ...ext server IP or option 150 On Windows Server for example it is TFTP server name on code 66 Start the TFTP server the update file must be present on this server The TFTP server must have the address c...

Page 92: ...ith 2 pairs of UTP cables of category 5 or higher The cable between the adaptor and the hub must not be more than 100m and not less than 2 5m NETWORK CABLE CONNECTIONS Signal Pin to Pin TX 1 1 TX 2 2...

Page 93: ...s recommended to replace the battery every three years If you have to change the battery ensure that the positive side is facing upwards Battery type CR1620 3V Lithium TECHNICAL SPECIFICATIONS NetMan...

Page 94: ...0MNUSAPNPF...

Reviews: