background image

Optimize Performance 

41

 AC1200 Smart WiFi Router with External Antennas

The BASIC Home screen displays.

4. 

Select 

ADVANCED > Setup > QoS Setup

.

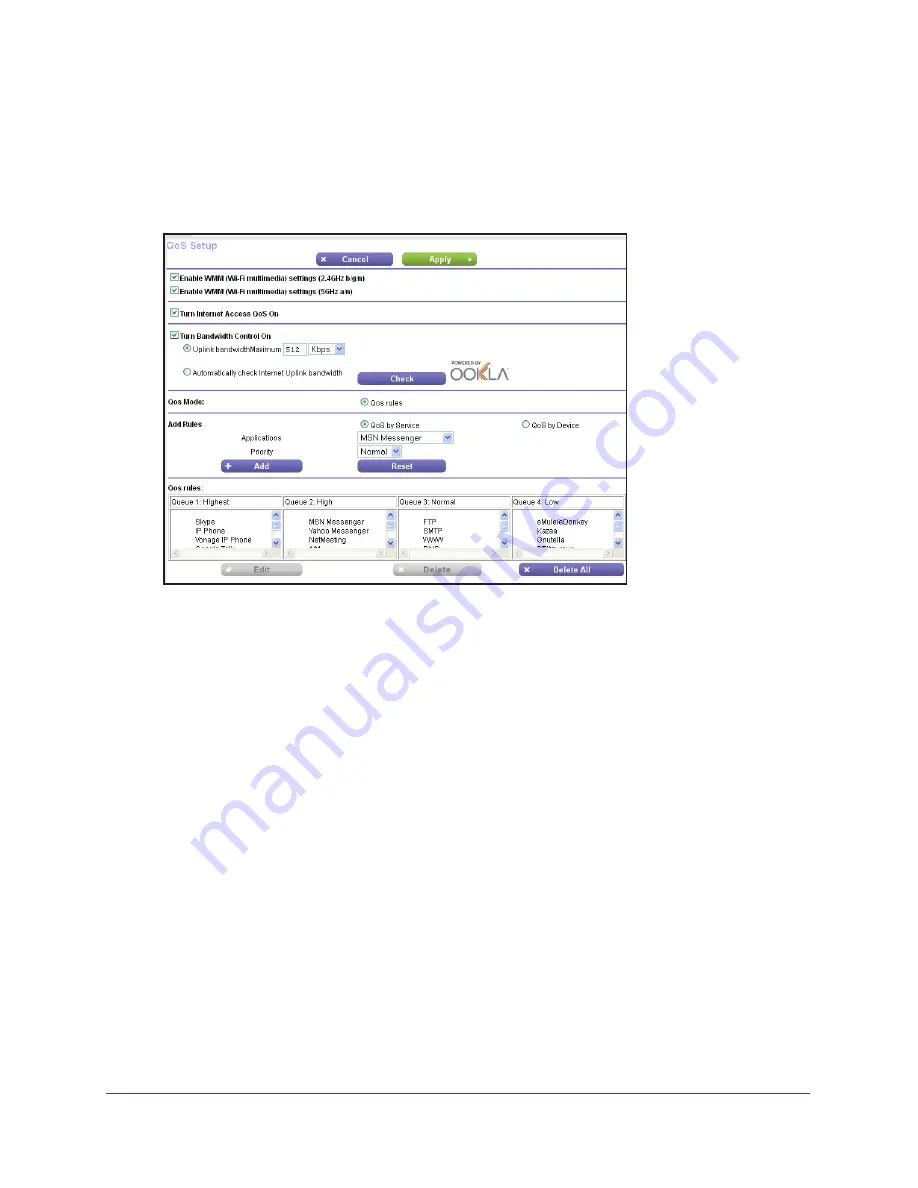
The QoS Setup screen displays.

5. 

Select the 

Turn Internet Access QoS On

 check box.

6. 

Select the Add Rules 

QoS by Service

 radio button.

The screen adjusts.

7. 

In the 

Applications

 list, select an application or service.

8. 

In the 

Priority

 list, select the priority for the rule.

The priority selections correspond to the queues in the QoS rules table.

9. 

Click the 

Add

 button.

The service displays in the QoS rules table.

10. 

Click the 

Apply

 button.

Your settings are saved.

Add a QoS Rule by Device

To add a QoS rule for a device:

1. 

Launch a web browser from a computer or wireless device that is connected to the 
network.

2. 

In the address field of the web browser, 

http://www.routerlogin.net 

or 

http://www.routerlogin.com

.

A login screen displays.

Summary of Contents for AC1200 R6220

Page 1: ...350 East Plumeria Drive San Jose CA 95134 USA November 2014 202 11443 01 AC1200 Smart WiFi Router with External Antennas Model R6220 User Manual...

Page 2: ...support visit http support netgear com Phone US Canada only 1 888 NETGEAR Phone Other Countries Check the list of phone numbers at http support netgear com general contact default aspx Trademarks NETG...

Page 3: ...net Setup Wizard 20 Manually Set Up the Internet Connection 21 Specify an Internet Connection Without a Login 21 Specify an Internet Connection That Uses a Login 22 Specify IPv6 Internet Connections 2...

Page 4: ...an Storage Device Connected to the Router 62 Map a USB Device to a Windows Network Drive 63 Back Up Windows Computers with ReadySHARE Vault 63 Back Up Mac Computers with Time Machine 64 Set Up a USB H...

Page 5: ...the Internet Connection Status 96 View and Manage Logs of Router Activity 97 Monitor Internet Traffic 98 Custom Static Routes 99 Set Up a Static Route 100 Edit a Static Route 101 Delete a Static Rout...

Page 6: ...ss in the Router 135 Use a VPN Tunnel to Access Your Internet Service at Home 136 Chapter 12 Specify Internet Port Settings Set Up Port Forwarding to a Local Server 138 Add a Custom Port Forwarding Se...

Page 7: ...bleshoot PPPoE 151 Troubleshoot Internet Browsing 152 Changes Not Saved 153 Wireless Connectivity 153 Troubleshoot Your Network Using the Ping Utility 153 Test the LAN Path to Your Router 154 Test the...

Page 8: ...ds up to 300 Mbps at 2 4 GHz and 833 Mbps at 5 GHz and avoids interference ensuring top WiFi speeds and reliable connections You can also use the Gigabit Ethernet ports and USB port to connect local d...

Page 9: ...Reset button Off Power is not supplied to the router Internet Solid green The Internet connection is ready Off No Ethernet cable is connected between the router and the modem WiFi Solid green The 2 4...

Page 10: ...ry Settings on page 157 USB port Solid green A USB device is connected and is ready Blinking A USB device is plugged in and is trying to connect Off No USB device is connected or someone clicked the S...

Page 11: ...at emits a wireless signal for network access Position your router according to the following guidelines Place your router near the center of the area where your computers and other devices operate an...

Page 12: ...f your modem uses a battery backup remove the battery 2 Plug in and turn on your modem If your modem uses a battery backup put the battery back in 3 Connect your modem to the Internet port of your rou...

Page 13: ...se a wired Ethernet connection This chapter explains the ways you can connect and how to access the router and log in This chapter contains the following sections Connect to the Network Types of Login...

Page 14: ...message might display on your computer screen to notify you that an Ethernet cable is connected WiFi Connection You can connect to the router s WiFi network with Wi Fi Protected Setup WPS or you can f...

Page 15: ...ord Your router is preset with a unique wireless network name SSID and password for wireless access This information is on the router label Router login This logs you in to the router interface from a...

Page 16: ...and basic setup takes about 15 minutes to complete To use NETGEAR genie to set up your router 1 Turn the router on by pressing the On Off button 2 Make sure that your computer or wireless device is c...

Page 17: ...If problems persist register your NETGEAR product and contact NETGEAR technical support Log In to the Router When you first set up your router NETGEAR genie automatically starts when you launch a web...

Page 18: ...Access the Router with NETGEAR genie Apps The genie app is the easy dashboard for managing monitoring and repairing your home network The genie app can help you with the following Automatically repair...

Page 19: ...ow the genie to detect the Internet connection when you first access the router with a web browser You can also customize or specify your Internet settings This chapter contains the following sections...

Page 20: ...erlogin com A login screen displays 3 Enter the router user name and password The user name is admin The default password is password The user name and password are case sensitive The BASIC Home scree...

Page 21: ...om A login screen displays 3 Enter the router user name and password The user name is admin The default password is password The user name and password are case sensitive The BASIC Home screen display...

Page 22: ...able enter it also 10 Select a Router MAC Address radio button Use Default Address Use the default MAC address Use Computer MAC Address The router captures and uses the MAC address of the computer tha...

Page 23: ...the Connection Mode list select Always On Dial on Demand or Manually Connect 11 To change the number of minutes until the Internet login times out in the Idle Timeout In minutes field type the number...

Page 24: ...nternet connection If the NETGEAR website does not display within one minute see Chapter 13 Troubleshooting Specify IPv6 Internet Connections You can set up an IPv6 Internet connection if genie does n...

Page 25: ...dresses IPv6 addresses are denoted by eight groups of hexadecimal quartets that are separated by colons You can reduce any four digit group of zeros within an IPv6 address to a single zero or omit it...

Page 26: ...ddress that is acquired for the router s LAN interface The number after the slash is the length of the prefix which is also indicated by the underline _ under the IPv6 address If no address is acquire...

Page 27: ...lly detects the information in the following fields Router s IPv6 Address on WAN This field shows the IPv6 address that is acquired for the router s WAN or Internet interface The number after the slas...

Page 28: ...e This Interface ID check box and specify the interface ID to be used for the IPv6 address of the router s LAN interface If you do not specify an ID here the router generates one automatically from it...

Page 29: ...at is available on the Internet This is the default setting Static IP Address Enter the static IPv4 address of the remote relay router Your IPv6 ISP usually provides this address 7 Select an IP Addres...

Page 30: ...word is password The user name and password are case sensitive The BASIC Home screen displays 4 Select ADVANCED Advanced Setup IPv6 The IPv6 screen displays 5 In the Internet Connection Type list sele...

Page 31: ...do not specify the DNS servers the router uses the DNS servers that are configured for the IPv4 Internet connection on the Internet Setup screen See Manually Set Up the Internet Connection on page 21...

Page 32: ...ects the information in the following fields Router s IPv6 Address on WAN This field shows the IPv6 address that is acquired for the router s WAN or Internet interface The number after the slash is th...

Page 33: ...cifies how the router assigns IPv6 addresses to the devices on your home network the LAN 9 Optional Select the Use This Interface ID check box and specify the interface ID to be used for the IPv6 addr...

Page 34: ...displays Not Available 6 In the Login field enter the login information for the ISP connection This is usually the name that you use in your email address For example if your main mail account is JerA...

Page 35: ...evice in the data path uses a lower MTU setting than the other devices the data packets must be split or fragmented to accommodate the device with the smallest MTU The best MTU setting for NETGEAR equ...

Page 36: ...ze field enter a value from 64 to 1500 6 Click the Apply button Your settings are saved If you suspect an MTU problem a common solution is to change the MTU to 1400 If you are willing to experiment yo...

Page 37: ...rnal Antennas 1460 Usable by AOL if you do not send or receive large email attachments for example 1436 Used in PPTP environments or with VPN 1400 Maximum size for AOL DSL 576 Typical value to connect...

Page 38: ...h definition video streaming and VoIP communication By default the router uses Wi Fi Multimedia Quality of Service WMM QoS This chapter contains the following sections Optimize Internet Streaming with...

Page 39: ...to the rest of your Internet traffic That means other tasks like downloading content from the Internet take longer To turn on Internet access QoS 1 Launch a web browser from a computer or wireless dev...

Page 40: ...button Speedtest checks your uplink bandwidth and the Uplink bandwidth Maximum field adjusts 8 Click the Apply button The router assigns a high priority to video streaming from the Internet traffic Ad...

Page 41: ...ication or service 8 In the Priority list select the priority for the rule The priority selections correspond to the queues in the QoS rules table 9 Click the Add button The service displays in the Qo...

Page 42: ...are connected to the network display in the MAC Device List By default each device is assigned a normal priority 7 Select or specify the device To select a device in the MAC Device List select its rad...

Page 43: ...oS Setup The QoS Setup screen displays 5 Select the QoS by Service radio button 6 In the QoS rules table click the application or service to select it 7 Click the Edit button 8 In the Priority list se...

Page 44: ...user name and password The user name is admin The default password is password The user name and password are case sensitive The BASIC Home screen displays 4 Select ADVANCED Setup QoS Setup The QoS S...

Page 45: ...his value can range from 1 to 1440 minutes The default period is 30 minutes Shorter durations ensure that control points receive current device status at the expense of more network traffic Longer dur...

Page 46: ...ort WMM and applications that do not require QoS are assigned to the best effort category which receives a lower priority than voice and video To disable WMM QoS 1 Launch an Internet browser from a co...

Page 47: ...rusions from the Internet This chapter includes the following sections Set Up Parental Controls Allow or Block Access to Your Network Use Keywords to Block Internet Sites Block Services from the Inter...

Page 48: ...that is connected to the network 2 Type http www routerlogin net or http www routerlogin com A login screen displays 3 Enter the router user name and password The user name is admin The default passw...

Page 49: ...ental Controls uses free OpenDNS accounts you are prompted to log in or create a free account 9 Select the radio button that applies to you If you already created an OpenDNS account leave the Yes radi...

Page 50: ...up for the router The dashboard shows Parental Controls as Enabled Allow or Block Access to Your Network You can use access control to block or allow access to your network To set up access control 1...

Page 51: ...ices from connecting With this setting if you add a new device before it can access your network you must enter its MAC address for an Ethernet connection and its MAC address for a WiFi connection in...

Page 52: ...omputer or wireless device that is connected to the network 2 Type http www routerlogin net or http www routerlogin com A login screen displays 3 Enter the router user name and password The user name...

Page 53: ...t is connected to the network 2 Type http www routerlogin net or http www routerlogin com A login screen displays 3 Enter the router user name and password The user name is admin The default password...

Page 54: ...net or http routerlogin com A login screen displays 3 Enter the router user name and password The user name is admin The default password is admin The user name and password are case sensitive The BAS...

Page 55: ...ct the Always radio button To block the services based on a schedule select the Per Schedule radio button For information about how to specify the schedule see Schedule When to Block Internet Sites an...

Page 56: ...Block services for all computers on your network 10 Click the Add button Your changes are saved Schedule When to Block Internet Sites and Services When you schedule blocking the same schedule is used...

Page 57: ...ou live in a region that observes daylight saving time select the Automatically adjust for daylight savings time check box 8 Click the Apply button Your settings are saved Avoid Blocking on a Trusted...

Page 58: ...ck the Apply button Your changes are saved Set Up Security Event Email Notifications The router can email you its logs of router activity The log records router activity and security events such as at...

Page 59: ...and do the following a In the User Name field type the user name for the outgoing email server b In the Password field type the password for the outgoing email server c Optional in the Outgoing Mail S...

Page 60: ...VD drives to the router USB port This chapter contains the following sections USB Device Requirements Connect a USB Device to the Router Access an Storage Device Connected to the Router Map a USB Devi...

Page 61: ...he computer can access the USB device Such USB devices do not work with the router The router supports the following file system types for full read write access FAT16 FAT32 NTFS NTFS with compression...

Page 62: ...nnected to the network select Go Connect to Server 3 In the Server Address field enter smb readyshare 4 When prompted select the Guest radio button Allow or Block Access to Your Network on page 50 If...

Page 63: ...o the network folder 5 To connect to the device as a different user select the Connect using different credentials check box and do the following a Type the user name and password b Click the OK butto...

Page 64: ...up for the first time Use a blank partition to prevent some issues during backup using Time Machine The router supports GUID or MBR partitions To format your USB hard disk drive and specify partitions...

Page 65: ...red Use Time Machine to Back Up onto a Storage Device You can use Time Machine to back up your Mac computers onto a USB hard disk drive that is connected to the router USB port To back up your Mac ont...

Page 66: ...ted to enter your name and password select the Guest radio button and click the Connect button When the setup is complete the Mac automatically schedules a full backup You can back up immediately if y...

Page 67: ...ethods that you want Network Neighborhood MacShare Enabled by default HTTP Enabled by default You can type http readyshare routerlogin net shares to access the storage device HTTP via Internet Disable...

Page 68: ...a computer or wireless device that is connected to the network 2 Type http www routerlogin net or http www routerlogin com A login screen displays 3 Enter the router user name and password The user na...

Page 69: ...ase sensitive The BASIC Home screen displays 4 Select ADVANCED USB Storage Advanced Settings 5 Scroll down to the Available Networks Folder section of the screen and adjust the following settings Shar...

Page 70: ...on a storage device connected to the router USB port To add a network folder 1 Launch a web browser from a computer or wireless device that is connected to the network 2 Type http www routerlogin net...

Page 71: ...to the router By default it is password 8 Click the Apply button The folder is added on the storage device Edit a Network Folder on a Storage Device You can edit network folders on storage devices co...

Page 72: ...ch lets you view movies and photos on DLNA UPnP AV compliant media players such as Xbox360 Playstation and NETGEAR media players To specify media server settings 1 Launch a web browser from a computer...

Page 73: ...http www routerlogin net or http www routerlogin com A login screen displays 3 Enter the router user name and password The user name is admin The default password is password The user name and passwor...

Page 74: ...sically disconnect a USB device from the router USB port log in to the router and take the drive offline To remove a USB disk drive safely 1 Launch a web browser from a computer or wireless device tha...

Page 75: ...the router USB port when you re not home This chapter includes the following sections Access Storage Devices Through the Internet Dynamic DNS Your Personal FTP Server Set Up Your Personal FTP Server F...

Page 76: ...een You can use FTP to share files on a USB device connected to the router Set Up FTP Access Through the Internet To set up FTP access 1 Launch a web browser from a computer or wireless device that is...

Page 77: ...n access it See Control Access to a Storage Device on page 66 The files and folders that your account can access on this USB device display For example you might see share partition1 directory1 Dynami...

Page 78: ...th a VPN tunnel for a secure connection For more information about VPN see Chapter 11 Use VPN to Access Your Network Set Up a New Dynamic DNS Account To set up Dynamic DNS and register for a free NETG...

Page 79: ...count 10 In the Password 6 32 characters field type the password for your account 11 Click the Register button 12 Follow the onscreen instructions to register for your NETGEAR Dynamic DNS service Spec...

Page 80: ...Name field type the user name for your account 10 For a NETGEAR account at No IP in the Email field type the email address for your account 11 In the Password 6 32 characters field type the password f...

Page 81: ...ed Set Up Your Personal FTP Server To set up your personal account and use FTP 1 Get your NETGEAR Dynamic DNS domain name See Set Up FTP Access Through the Internet on page 76 2 Make sure that your In...

Page 82: ...he Windows and Mac computers on your network This chapter contains the following sections Install the Printer Driver and Cable the Printer Download the ReadySHARE Printer Utility Install the ReadySHAR...

Page 83: ...cable the printer 1 On each computer on your network that shares the USB printer install the driver software for the USB printer If the printer driver is not installed contact the printer manufacturer...

Page 84: ...ou install it the utility displays as NETGEAR USB Control Center on your computer To install the utility 1 Double click the ReadySHARE Printer utility setup file that you downloaded The InstallShield...

Page 85: ...ailable Now all computers on the network can use the printer 6 To exit the utility select System Exit Use the Shared Printer For each computer after you click the Connect and Disconnect buttons once t...

Page 86: ...ws the status for each device Available No print jobs are in progress You can use the USB printer from any computer in the network Connected Your computer is connected to the printer and will be relea...

Page 87: ...anning For example the USB printer displayed in the Windows Printers and Faxes window is ready for print jobs To use the scan feature of a multifunction USB printer 1 Click the NETGEAR USB Control Cen...

Page 88: ...fy the time out to release the printer connection To turn off automatic NETGEAR USB Control Center startup 1 Click the NETGEAR USB Control Center icon The main screen displays 2 Select Tools Configura...

Page 89: ...Center starts the language changes Specify the Time out To specify the time out 1 Click the NETGEAR USB Control Center icon The main screen displays 2 Select Tools Configuration The Control Center Con...

Page 90: ...work This chapter includes the following sections Update the Router Firmware Change the admin Password Recover the admin Password View Router Status View and Manage Logs of Router Activity Monitor Int...

Page 91: ...d The user name is admin The default password is password The user name and password are case sensitive The BASIC Home screen displays 4 Select ADVANCED Administration Firmware Update The Router Updat...

Page 92: ...wireless device that is connected to the network 2 Type http www routerlogin net or http www routerlogin com A login screen displays 3 Enter the router user name and password The user name is admin T...

Page 93: ...sword screen displays 5 Select the Enable Password Recovery check box 6 Select two security questions and provide answers to them 7 Click the Apply button Your changes are saved To recover your passwo...

Page 94: ...Enter the router user name and password The user name is admin The default password is password The user name and password are case sensitive The BASIC Home screen displays 4 Click the ADVANCED tab 5...

Page 95: ...rnet ports For each port the screen displays the following information Status The link status of the port TxPkts The number of packets transmitted on this port since reset or manual clear RxPkts The n...

Page 96: ...tton The following information displays IP Address The IP address that is assigned to the router Subnet Mask The subnet mask that is assigned to the router Default Gateway The IP address for the defau...

Page 97: ...cted to the network 2 Type http www routerlogin net or http www routerlogin com A login screen displays 3 Enter the router user name and password The user name is admin The default password is passwor...

Page 98: ...the router user name and password The user name is admin The default password is password The user name and password are case sensitive The BASIC Home screen displays 4 Select ADVANCED Advanced Setup...

Page 99: ...tton 12 To display more information about the data traffic on your router and to change the poll interval click the Traffic Status button Custom Static Routes Typically you do not need to add static r...

Page 100: ...The user name is admin The default password is password The user name and password are case sensitive The BASIC Home screen displays 4 Select ADVANCED Advanced Setup Static Routes The Static Routes sc...

Page 101: ...he default password is password The user name and password are case sensitive The BASIC Home screen displays 4 Select ADVANCED Advanced Setup Static Routes The Static Routes screen displays 5 In the t...

Page 102: ...t or http www routerlogin com A login screen displays 3 Enter the router user name and password The user name is admin The default password is password The user name and password are case sensitive Th...

Page 103: ...or http www routerlogin com A login screen displays 3 Enter the router user name and password The user name is admin The default password is password The user name and password are case sensitive The...

Page 104: ...ration and restore the factory default settings You might want to do this if you move the router to a different network See Factory Settings on page 157 To erase the configuration settings 1 Launch a...

Page 105: ...aracters See Change the admin Password on page 92 To set up remote management 1 Launch a web browser from a computer or wireless device that is connected to the network 2 Type http www routerlogin net...

Page 106: ...owser access uses the standard HTTP service port 80 For greater security enter a custom port number for the remote web management interface Choose a number from 1024 to 65535 but do not use the number...

Page 107: ...s View WAN Settings Set Up a Default DMZ Server Change the Router s Device Name Change the LAN TCP IP Settings Specify the IP Addresses That the Router Assigns Disable the DHCP Server Feature in the R...

Page 108: ...he user name is admin The default password is password The user name and password are case sensitive The BASIC Home screen displays 4 Select ADVANCED Setup WAN Setup The following settings display Dis...

Page 109: ...default DMZ server feature is helpful when you are using some online games and videoconferencing applications that are incompatible with Network Address Translation NAT The router is programmed to re...

Page 110: ...r s Device Name The router s device name is R6220 This device name displays in the file manager when you browse your network To change the router s device name 1 Launch a web browser from a computer o...

Page 111: ...specific IP subnet that one or more devices on the network use or if you use competing subnets with the same IP scheme To change the LAN TCP IP settings 1 Launch a web browser from a computer or wirel...

Page 112: ...dress of the router you are disconnected when this change takes effect 9 To reconnect close your browser relaunch it and log in to the router Specify the IP Addresses That the Router Assigns By defaul...

Page 113: ...t be in the same subnet as the router 7 Click the Apply button Your settings are saved The router delivers the following parameters to any LAN device that requests DHCP An IP address from the range th...

Page 114: ...Reserved LAN IP Addresses When you specify a reserved IP address for a computer on the LAN that computer always receives the same IP address each time it accesses the router s DHCP server Assign rese...

Page 115: ...puter or wireless device that is connected to the network 2 Type http www routerlogin net or http www routerlogin com A login screen displays 3 Enter the router user name and password The user name is...

Page 116: ...mputer or wireless device that is connected to the network 2 Type http www routerlogin net or http www routerlogin com A login screen displays 3 Enter the router user name and password The user name i...

Page 117: ...nge your preset security settings make a note of the new settings and store it in a safe place where you can easily find it If you use a wireless computer to change the SSID or other wireless security...

Page 118: ...32 characters long and it is case sensitive The default SSID is randomly generated and is on the router s label If you change the name make sure to write down the new name and keep it in a safe place...

Page 119: ...u changed the settings If so update the wireless network selection in your computer or wireless device to match the current settings for your network Change the WiFi Mbps Settings The data rate for hi...

Page 120: ...to join the network The other settings are Up to 400 Mbps and Up to 173 Mbps 7 Click the Apply button Your settings are saved Change the WiFi Password or Security Level Your router comes with preset...

Page 121: ...a text string from 8 to 63 characters 7 Write down the new password and keep it in a secure place for future reference 8 Click the Apply button Your changes are saved Set Up a Guest WiFi Network Guest...

Page 122: ...eless network name SSID makes it easier to find your network and connect to it If you clear this check box that creates a hidden network 7 Give the guest network a name The guest network name is case...

Page 123: ...u used the WiFi On Off button to turn off the wireless radios you can t log in to the router to turn them back on You must press the WiFi On Off button again for two seconds to turn the wireless radio...

Page 124: ...n the wireless radios the WiFi On Off LED and the WPS LED light Set Up a Wireless Schedule You can turn off the wireless signal from your router at times when you do not need a wireless connection For...

Page 125: ...off the wireless signal 8 Click the Apply button The Advanced Wireless Settings screen displays 9 To use the new schedule click the Apply button Your settings are saved Specify WPS Settings Wi Fi Pro...

Page 126: ...ox is selected NETGEAR recommends that you leave this check box selected If you clear this check box the next time a new wireless client uses WPS to connect to the router the router wireless settings...

Page 127: ...mended Use this setting if you want to manually assign a specific IP address to this router while it is in AP mode Using this option effectively requires advanced network experience Note To avoid inte...

Page 128: ...ate networking VPN This chapter explains how to set up and use VPN access This chapter includes the following sections Set Up a VPN Connection Specify VPN Service in the Router Install OpenVPN Softwar...

Page 129: ...and you must install and run VPN client software on the computer Note The router currently does not support iOS or Android VPN client software VPN uses DDNS or a static IP address to connect with you...

Page 130: ...t the VPN uses the UDP service type and uses port 12974 If you want to customize the service type and port NETGEAR recommends that you change these settings before you install the OpenVPN software 6 T...

Page 131: ...er click the openVPN install xxx exe file 5 Click the Next button 6 Read the License Agreement and click the I Agree button 7 Leave the check boxes selected as shown and click the Next button 8 To spe...

Page 132: ...l area connection and change its name not its device name to NETGEAR VPN If you do not change the VPN interface name the VPN tunnel connection will fail Use a VPN Tunnel After you set up the router to...

Page 133: ...he Windows taskbar Tip You can create a shortcut to the VPN program then use the shortcut to access the settings and select the run as administrator check box Then every time you use this shortcut Ope...

Page 134: ...network click the R6220 icon Use VPN to Access Your Internet Service at Home When you re away from home and you access the Internet you usually use a local Internet service provider For example at a...

Page 135: ...ead of using a local Internet service you use the Internet service from your home network 7 Click the Apply button Your settings are saved 8 Click the For Windows or For Non Windows button and downloa...

Page 136: ...y button Your settings are saved 8 Click For Windows or For Non Windows button and download the configuration files for your VPN clients 9 Unzip the configuration files and copy them to the folder whe...

Page 137: ...can use port forwarding and port triggering to set up rules for Internet traffic You need networking knowledge to set up these features This chapter includes the following sections Set Up Port Forward...

Page 138: ...ill provide the service You can usually find this information by contacting the publisher of the application or user groups or news groups The server computer must always use the same IP address Assig...

Page 139: ...gin com A login screen displays 4 Enter the router user name and password The user name is admin The default password is password The user name and password are case sensitive The BASIC Home screen di...

Page 140: ...name and password are case sensitive The BASIC Home screen displays 4 Select ADVANCED Advanced Setup Port Forwarding Port Triggering The Port Forwarding Port Triggering screen displays 5 Leave the Por...

Page 141: ...ard the HTTP service to the local address of your web server at 192 168 1 33 HTTP port 80 is the standard protocol for web servers 3 Optional Register a host name with a Dynamic DNS service and specif...

Page 142: ...opens the incoming port or ports that you specify in your rule and forwards that incoming traffic to that destination Port forwarding creates a static mapping of a port number or range of ports to a...

Page 143: ...e outbound traffic port that will open the inbound ports 11 In the Service Type Starting Port and Ending Port fields enter the inbound connection information 12 Optional In the Port Triggering Timeout...

Page 144: ...Relay Chat IRC Your computer connects to an IRC server at destination port 6667 The IRC server not only responds to your originating source port but also sends an identify message to your computer on...

Page 145: ...ession table to see if a session is active for port number 33333 Finding an active session the router restores the original address information replaced by NAT and sends this reply message to your com...

Page 146: ...not find the solution here check the NETGEAR support site at http support netgear com for product and contact information This chapter contains the following sections Quick Tips Troubleshoot with the...

Page 147: ...the router by an Ethernet cable the corresponding numbered router LAN port LED lights Wireless Settings Make sure that the wireless settings in the computer and router match exactly The wireless netw...

Page 148: ...sing the power adapter that NETGEAR supplied for this product If the Power LED blinks slowly and continuously the router firmware is corrupted This can happen if a firmware upgrade is interrupted or i...

Page 149: ...rect cable When connecting the router s Internet port to a cable or DSL modem use the cable that was supplied with the cable or DSL modem This cable can be a standard straight through Ethernet cable o...

Page 150: ...n NETGEAR does not support such a configuration Cannot Access the Internet If you can access your router but not the Internet check to see if the router can obtain an IP address from your Internet ser...

Page 151: ...server is a host on the Internet that translates Internet names such as www addresses to numeric IP addresses Typically your ISP provides the addresses of one or two DNS servers for your use If you en...

Page 152: ...n IP address but your computer is unable to load any web pages from the Internet check the following Your computer might not recognize any DNS server addresses A DNS server is a host on the Internet t...

Page 153: ...idden and does not display in your wireless client s scanning list By default SSID broadcast is enabled Does your wireless device support the security that you are using for your wireless network WPA...

Page 154: ...ical connections For a wired connection make sure that the numbered LAN port LED is lit for the port to which you are connected Check that the appropriate LEDs are on for your network devices If your...

Page 155: ...ee that the network address of your computer the portion of the IP address specified by the subnet mask is different from the network address of the remote device Check that your cable or DSL modem is...

Page 156: ...Troubleshooting 156 AC1200 Smart WiFi Router with External Antennas...

Page 157: ...157 A A Supplemental Information This appendix includes technical information about your router This appendix covers the following topics Factory Settings Technical Specifications...

Page 158: ...sensitive admin Login password case sensitive password Internet connection WAN MAC address Use default hardware address WAN MTU size 1500 Port speed AutoSensing Local network LAN LAN IP 192 168 1 1 Su...

Page 159: ...channel Auto for 2 4 GHz CH 44 for WW SKU and CH 153 for North America SKU Operating mode Up to 300 Mbps at 2 4 GHz 867 Mbps at 5 GHz 1 Maximum wireless signal rate derived from IEEE Standard 802 11...

Page 160: ...IEEE 802 11 standard 1 1 Maximum wireless signal rate derived from IEEE Standard 802 11 specifications Actual throughput can vary Network conditions and environmental factors including volume of netw...

Reviews: