


20
Model 3040 40U Cabinet Installation
3.
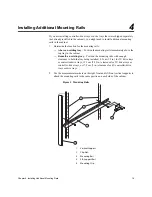
Position the clip nut on the vertical support at the front of the cabinet.
4.
Place the mounting rail on the vertical support, as shown in
on page
.
5.
Align the mounting rail holes in front of the holes in the vertical support.
6.
Position the clip nut on the vertical support at the rear of the cabinet.
7.
Place the mounting rail on the vertical support.
8.
Align the mounting rail holes in front of the holes in the vertical support.
9.
Attach a 10-32x1/2 screw to the front clip nut. Tighten the screw.
10. Attach a 10-32x1/2 screw to the rear clip nut. Tighten the screw.
11. Repeat step
to attach and level the second mounting rail on the
other side of the cabinet.
12. On the EIA support rail at the front of the cabinet, position a clip nut to align with
the mounting holes on the front face of the tray that you are installing.
13. Attach a 10-32x1/2 screw to the clip nut on the EIA support rail. Tighten the
screw.
14. Repeat step
through step
to secure the front of the other side of the tray.
15. Install each tray using the applicable tray installation instructions.
16. Is the cabinet completely filled with trays?
—
Yes
– Refer to the initial setup guide for each tray that is contained in the
cabinet, and complete the power-on procedures described in the guides.
—
No
– Use front panel kits to cover the empty spaces above or below the
installed trays.
Summary of Contents for E-Series 3040 40U
Page 6: ...vi Table of Contents ...
Page 14: ...8 Model 3040 40U Cabinet Installation ...
Page 20: ...14 Model 3040 40U Cabinet Installation ...
Page 31: ......
Page 32: ...Copyright 2013 NetApp Inc All rights reserved ...


