background image

27

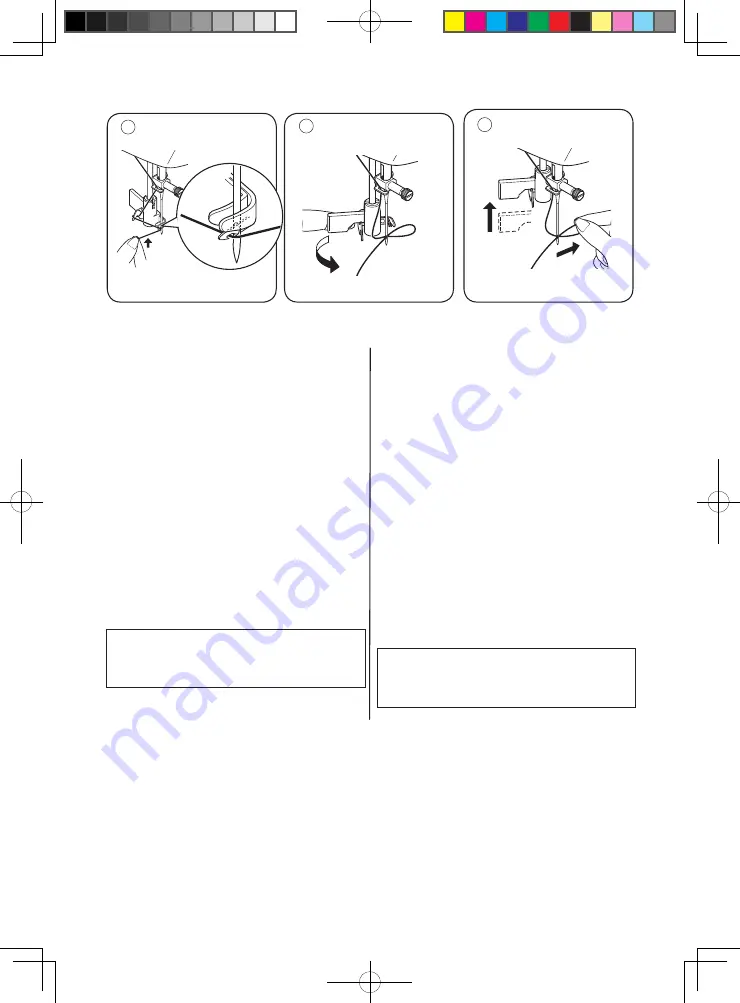
USING AUTOMATIC NEEDLE

THREADER

UTILIZZO DELL'INFILA 

AGO AUTOMATICO

1.  Hook thread into thread guide as illustrated.

2. Pull down lever while holding the end of

thread.

3.  Rotate the lever to the rear of the machine.

4. Guide thread into hooked end and pull the

thread upward.

5. Return the lever and needle will be threaded

automatically.

6. Release the lever and pull thread away from

you.

1.  Appoggiare il filo attraverso il guida filo dell'infila

2.

ago come mostrato in figura.
Abbassare la leva infila ago tenendo tra indice  e 
pollice l'estremità del filo come mostrato in figura.

3. Ruotare la leva infila ago verso il dietro della

macchina come mostrato in figura.

4.  Passare il filo sotto l'uncino dell'infila ago e tirarlo 

leggermente verso l'alto come mostrato in figura.

5. Rilasciare  la  leva  infila  ago  facendola  ruo-

tare verso l'interno  come  mostrato  in  figura.

6. Afferrare con indice e pollice il cappio di filo

dietro la cruna dell'ago; tirare il filo verso

dietro come mostrato in figura.

N OT E :  F o r  s m o o t h  t h r e a d i n g  i t  i s 

recommended you set the machine for 

straight stitch when using the needle 

threader.

NOTA

:

Per facilitare l'utilizzo dell'infila ago 

automatico, si raccomanda di impostare 

la macchina sul punto dritto

.

Raise  the  needle  to  its  highest  position  by 

rotating the hand wheel towards you (counter-

clockwise).

Portare  l'ago  in  posizione  alta  ruotando  il 

volantino verso di voi in senso orario.

5

6

4

Summary of Contents for 590

Page 1: ...F 1 Necchi Modello 590 Necchi Modello 596 MANUEL D INSTRUCTION MANUAL DE INSTRUCCIONES INSTRUCTION MANUAL MANUALE ISTRUZIONI...

Page 2: ...autoris ou un centre de service le plus pr s pour inspection r paration ajustement lectrique ou m canique 5 Si le cordon est endommag il doit tre remplac par le fabricant un repr sentant autoris ou t...

Page 3: ...e CC est de 5 V Si l ampoule DEL est endommag e ne pas utiliser l appareil et l envoyer imm diatement au fabricant ou un repr sentant pour r paration ou remplacement 21 Attention pour viter toute bles...

Page 4: ...el fabricante y que vienen especificados en este manual 4 No trabajar nunca con la m quina en caso de que tenga el cable o el enchufe en malas condiciones si no cose correctamente en caso de que se h...

Page 5: ...mpara LED de potencia m xima es 0 3 W la tensi n m xima es de DC 5V si se da a la l mpara LED que no debe usar el producto y enviarlo a la fabricaci n o el agente de servicio para reparar o reemplazar...

Page 6: ...by the manufacturer its service agent or similarly qualified persons in order to avoid a hazard 6 Never operate the sewing machine with any air openings blocked Keep ventilation openings of the sewing...

Page 7: ...ewing machine off 0 when making any adjustments in the needle area such as threading needle changing needle threading bobbin or changing presser foot etc 18 Always unplug sewing machine from the elect...

Page 8: ...cchio Non consentita la pulizia e la manutenzione da parte di un bambino se non sotto la supervisione di un adulto 3 Non utilizzare mai questa macchina per cucire se il cordone o la spina sono difetto...

Page 9: ...elativa ai prodotti elettrici elettronici In caso di dubbio contattare il vostro rivenditore per ulteriori informazioni 16 Spegnere la macchina per cucire quando o si esegue l infilatura del filo supe...

Page 10: ...Point droit 50 51 Point de matelassage d apparence TABLE DES MATI RES fait la main 52 Mise en place de fermetures glissi re Passepoil Point zigzag Zigzag multi point R glage de la largeur et de la lon...

Page 11: ...rruptores de funcionamiento 42 43 Boton inicio parada 44 Interruptor aguja arriba abajo 45 Aplicacion de dos agujas Enhebrado de dos agujas Giro en esquinas con dos agujas 46 48 Gu a de referencia del...

Page 12: ...messages 40 41 Reverse operation button 42 43 Start stop button 44 Needle up down switch 45 Twin needle button Threading the twin needle Turning a corner with a twin needle 46 48 Pattern number refer...

Page 13: ...iuto 40 41 Tasto marcia indietro punto di rinforzo 42 43 Tasto start stop 44 Taso posizione ago alto basso 45 Tasto ago gemello 47 Infilare l ago gemello 47 Girare ad angolo di 45 con l ago gemello 48...

Page 14: ...nuel d instruction DESCRIPTION 12 14 13 11 15 16 17 18 19 1 DESCRIPTION DE LA MACHINE COUDRE 1 PRINCIPALES PARTES DE LA MAQUINA 2 1 3 4 5 6 7 8 10 9 IDENTIFICACI N DE LA M QUINA 1 Disco de tensi n de...

Page 15: ...o tensione filo superiore 2 Guidafilo 3 Selettore tensione filo superiore 4 Coperchio laterale 5 Taglia filo 6 Vano accessori Allunga base 7 Perno avvolgi bobina 8 Fermo filarello 9 Pannello riferimen...

Page 16: ...at n 13 Prensatelas de puntada invisible El prensatelas que viene con la m quina de coser se llama pie prensatelas universal y ser usado para la mayor a de sus costuras 1 Needles 2 Bobbins 3 Auxiliary...

Page 17: ...piar cualquier aceite sobrante del rea de la plancha de aguja antes de usar por primera vez la m quina Siempre desconecte la m quina de la fuente de alimentaci n r e t i r a n d o e l e n c h u f e d...

Page 18: ...m quina se debe desconectar de los suministros principales Your machine will not operate until the power light switch is turned on The same switch controls both the power and the light When servicing...

Page 19: ...th hands and pull it off to the left as shown To replace slide the extension table back into place until it clicks Per estrarre il piano estraibile porta accessori tenere lo stesso con entrambe le man...

Page 20: ...ol cap to ensure smooth fl w of thread If the thread spool has a thread retaining slit it should be placed to the right Tirare il supporto porta rocchetto in alto e verso s Posizionarci dentro il rocc...

Page 21: ...TRANSPARENTE Utilisez la plaque de reprisage lorsque vous devez contr ler vous m me l entra nement du tissu pour coudre des boutons pour le piquage mouvement libre et pour effectuer du reprisage par...

Page 22: ...marche La canette va se remplir Tirer sur le bout de fil qui va se couper D s que la canette est pleine elle s arr tera de tourner Arr ter la machine Pousser l ensemble axe canette vers la gauche pou...

Page 23: ...o 15J TOGLIERE LA SPOLINA DALLA CAPSULA Aprire lo sportellino porta spolina tirandolo verso il basso Afferrare con indice e pollice la linguetta della capsula ed estrarre la spolina come mostrato in f...

Page 24: ...Cuando est en su sitio se sentir un golpe seco INSERCION DE LA BOBINA EN LA CAPSULA BOBINA 1 Hold the bobbin in your right hand with the thread running clockwise 2 Insert the bobbin into the case with...

Page 25: ...alloggio B del crochet 1 Tenez le loquet ouvert en vous assurant que la tige de localisation du bo tier de la canette pointe vers le haut 2 Faites glisser le bo tier de la canette sur la tige centrale...

Page 26: ...e abaisser le pied presseur et tirez de nouveau le fil vers l arri re de la machine Cette fois vous devriez sentir une forte r sistance Si vous ne sentez pas de r sistance le fil a t mal enfil et vous...

Page 27: ...ld detect only a slight resistance and little or no defle tion of the needle 2 Now lower the presser foot and again pull the thread towards the back of the machine This time you should detect a consid...

Page 28: ...o de aguja se recomienda colocar el selector de la m quina en puntada recta UTILISATION DE L ENFILEUR DE CHAS D AIGUILLE Amenez l aiguille en position haute en tournant le volant vers vous sens antiho...

Page 29: ...l dietro della macchina come mostrato in figura 4 Passare il filo sotto l uncino dell infila ago e tirarlo leggermente verso l alto come mostrato in figura 5 Rilasciare la leva infila ago facendola ru...

Page 30: ...deux fils sous le pied presseur vers l arri re en laissant d passer environ 15 cm 6 po de fi NOTA Una manera r pida de extraer el hilo de la bobina es con la puntada recta seleccionada pulse levement...

Page 31: ...oosely firs lowering the needle and continuing until the needle comes to its highest position 1 Alzare la leva alzapiedino come mostrato in figura 2 Tenere con la mano sinistra il filo superiore tra i...

Page 32: ...couture r ussie dans les tissus stretch utiliser une aiguille stretch Algod n del 60 100 Aguja para punto el stico Todos los materiales el sticos Algod n Sint tico Sada Algod n 60 80 Mercerizado 50 60...

Page 33: ...n piccolo pezzo di tessuto dello stesso tipo che sar in seguito usato per la cucitura Non utilizzare mai aghi piegati storti oppure spuntati Cotton 60 100 Synthetic Machine embroidery Cotone 60 100 Fi...

Page 34: ...guille sens antihoraire 3 Enlever l aiguille en la tirant vers le bas 4 Ins rez la nouvelle aiguille dans le serre aiguille le c t plat l arri re 5 Poussez l aiguille vers le haut jusqu la but e 6 Res...

Page 35: ...nuovo ago con la parte piatta rivolta verso dietro 5 Spingere l ago in alto fino a quando arriva a toccare l apposito fermo 6 Stringere la vite del morsetto ago con il cacciavite Helpful Hint Placing...

Page 36: ...issu COSTURA RECTA COSTURA ZIG ZAG y DECORATIVA Para las funciones de costura zigzag y decorativa la tensi n de hilo debe ser menor que para costura de puntadas rectas Siempre deber obtener una costur...

Page 37: ...to STRAIGHT STITCHING CUCITURA DRITTA ZIG ZAG and DECORATIVE SEWING CUCITURA ZIGZAG E DECORATIVA For zigzag sewing and decorative stitch functions thread tension should be less than for straight stitc...

Page 38: ...mber Numero del punto crans ACL Pantalla LCD LCD display Schermo LCD Botones para elegir n mero de puntada Gu a de referencia del n mero de puntada Ajuste manual de botones para ancho de puntada posic...

Page 39: ...to pattern number reference guide Quando si accende la macchina lo schermo LCD seleziona automaticamente il punto dritto al centro e le relative regolazioni Per selezionari altri punti premere iI tast...

Page 40: ...le de largeur de point 13 posiciones de aguja disponibles para acolchados puntadas de revestimiento etc STRAIGHT STITCH NEEDLE POSITION REGOLAZIONE POSIZIONE AGO PUNTO DRITTO R GLAGE DE LA POSITION D...

Page 41: ...e el sujetador prensatelas se cierre de golpe en el prensatelas CHANGING PRESSER FOOT REMPLACEMENT DU PIED PRESSEUR CAMBIO DEL PIE PRENSATELAS Alzar la palanca del pie prensatelas 1 Push presser foot...

Page 42: ...ssata oppure alzata Abbassare la leva dell asola automatica per eseguire un asola Alazare la leva dell asola automatica per eseguire tutti gli altri punti Le rh ostat se d branche lorsque vous l utili...

Page 43: ...ion el ojalador La Puntada de Hilvanado o de seguridad se hace autom ticamente despu s de que se termina el ojal No es necesario oprimir el bot n Machine is locked up due to thread entangled with bobb...

Page 44: ...machine coud en marche arri re d s que le bouton est enclench REMARQUE cette fonction est tr s utile pour terminer le motif de couture et pour viter l effilochage au d but et la fin de la couture INT...

Page 45: ...gue 4 piccoli punti di rinforzo su tutti i motivi ad eccezione del punto dritto dello zigzag e delle asole Il punto di rinforzo coincider nel punto esatto in cui viene premuto l apposito tasto NOTE Th...

Page 46: ...ta attraverso il cursore di controllo della velocit BOUTON START STOP Lorsque vous cousez avec la p dale d connect e la machine commence doucement lorsque vous appuyez sur le bouton start stop Lorsque...

Page 47: ...ior Vuelva a pulsar o active el pedal y la aguja volver a subir NEEDLE UP DOWN SWITCH 60 80 100 STITCH MODEL ONLY Your machine is electronically controlled so that the needle will always rise to the u...

Page 48: ...Passer ces trois fils sous le pied presseur et laisser d passer l arri re de celui ci 15 cm NOTE L enfileur automatique ne peut pas tre utilis pour enfiler l aiguille double APLICACION DE DOS AGUJAS S...

Page 49: ...verso il dietro e sotto il piedino premistoffa lasciando circa 15 cm di filo come mostrato in figura NOTE Needle threader cannot be used to thread the twin needle NOTE quando montato l ago gemello l i...

Page 50: ...t and continue sewing GIRARE AD ANGOLO DI 45 CON L AGO GEMELLO 1 Fermare la macchina girare il volantino e piantare l ago sinistro il pi lungo dei due aghi appena dentro il tessuto Alzare la leva alza...

Page 51: ...LLO RIFERIMENTO PUNTI GUIDEDER F RENCEDESMOTIFS GU A DE REFERENCIA DEL N MERO DE PUNTADA Mod le 100 points Modelo 100 puntadas 100 stitch model 100 punti Modello 596 Mod le 40 points Modelo 40 puntada...

Page 52: ...ta se usa m s frecuentemente para coser todo tipos de costura Comencemos siguiendo los pasos abajo NOTA De acuerdo con el peso del tejido puede ser necesario ajustar ligeramente la tensi n A Control t...

Page 53: ...the fabric 5 Start the machine Guide the fabric gently with your hands When reaching the edge of the material stop the sewing machine 2 Portare entrambi i fili verso il dietro e sotto il piedino premi...

Page 54: ...qu droite ou aussi au plus pr s du cordonnet Utilizar el prensatelas de cierres que permite coser a la derecha o la izquierda de la cremallera o cerca del cord n vivo INS REZ UNE FERMETURE GLISSI RE...

Page 55: ...aci n de arrugas reduzca ligeramente la tensi n con el control de tensi n de hilo 100 stitch model 40 stitch model 07 07 ZIGZAG MULTI POINT ZIG ZAG DE TRES PUNTADAS SETTINGS Presser foot General Purpo...

Page 56: ...GO PUNTADA STITCH LENGTH LUNGHEZZA PUNTO LARGEUR DU POINT ANCHO PUNTADA STITCH WIDTH LARGHEZZA PUNTO mm 0 0 5 1 0 1 5 2 0 2 5 3 0 3 5 4 0 4 5 5 0 5 5 6 0 0 0 3 0 5 0 8 1 0 1 3 1 5 1 8 2 0 2 5 3 0 100...

Page 57: ...is grooved to permit dense stitching to pass under it easily This is a closely spaced stitch for appliqu bar tacking etc Slightly loosen the top thread tension and manually adjust the stitch length be...

Page 58: ...tihoraire jusqu ce que l aiguille se d place compl tement vers la gauche Elle ne devrait percer que le repli du tissu REMARQUE en plus des ajustements possibles sur le pied le contr le de la largeur d...

Page 59: ...re anche attraverso la regola zione della larghezza punto che stabilisce il punto in cui l ago andr a pizzicare il tessuto quando si sposta verso sinistra 1 With matching thread finish the raw edge On...

Page 60: ...renstaleas Baje el prensatelas Gire el volante para asegurarse de que la aguja entra correctamente en ambos agujeros del bot n correctamente Ajuste la anchura si es necesario Cosa diez puntadas Presse...

Page 61: ...stitch model 40 stitch model 10 10 100 stitch model 40 stitch model POINT DROIT EXTENSIBLE PUNTADA RECTA TRIPLE STRAIGHT STRETCH STITCH PUNTO DRITTO TRIPLO POINT NID D ABEILLE PUNTADA PANAL HONEYCOMB...

Page 62: ...UBLE PUNTADA OVERLOCK DOBLE DOUBLE OVERLOCK STITCH PUNTO DOPPIO SOPRAGGITTO POINT ENTRECROIS PUNTADA ENTRECRUZ CRISS CROSS STITCH PUNTO INCROCIATO 15 15 100 stitch model 40 stitch model 16 16 100 stit...

Page 63: ...PUNTO SPILLA 18 100 stitch model 40 stitch model 17 18 17 18 100 stitch model 40 stitch model POINT DE LANGUETTE PUNTADA DE RIBETE BLANKET STITCH PUNTO APPLICAZIONE 21 22 21 100 stitch model 40 stitch...

Page 64: ...5 26 22 POINT CROIS PUNTADA CRUZADA CROSSED STITCH PUNTO CROCE 28 23 100 stitch model 40 stitch model POINT GREC PUNTADA LLAVE GRIEGA GREEK KEY STITCH PUNTO A GRECA 30 100 stitch model 40 stitch model...

Page 65: ...SOBRE BORDE REFORZADO REINFORCED OVEREDGE STITCH PUNTO ORLO RINFORZATO 76 100 stitch model 40 stitch model POINT D ASSEMBLAGE DES REBORDS PUNTADA UNE ORILLAS EDGE JOINING STITCH PUNTO GIUNTURA 80 100...

Page 66: ...64 POINT SORCIER PUNTADA MAGO WIZARD STITCH PUNTO MAGO 72 100 stitch model 40 stitch model...

Page 67: ...sible sur le dessus de votre tissu si tel est le cas il sera n cessaire de l g rement diminuerlatensionsup rieure Consejo pr ctico El hilo de la canilla no debe de aparecer en la parte superior del ma...

Page 68: ...s 5 Alinee la marca en el tejido con la marca en el prenstaelas de ojales y entonces baje el prensatelas de ojales 6 Mientras sujeta el hilo superior ponga en marcha la m quina CONFECTION DES BOUTONN...

Page 69: ...the buttonhole mark on the fabric with the mark on the buttonhole foot and then lower the buttonhole foot 6 While holding the top thread start the machine REALIZZAZIONE ASOLE 1 Rimuovere il piedino e...

Page 70: ...ra se terminar autom ticamente en el siguiente orden 7 Use a buttonhole opener seam ripper to open up the fabric in the center of the buttonhole Be careful not to cut any of the stitching 7 Terminata...

Page 71: ...forward under the foot and tie off the cord as shown to make strong buttonhole Piegare in 2 circa 20 cm di filo a cordoncino Posizionare il punto di piegatura del cordoncino in modo tale da farlo agg...

Page 72: ...aire de garder les pi ces essentielles toujours propres D b r a n c h e z t o u j o u r s l a machine de l alimentation lectrique en retirant la fiche de la prise murale NETTOYAGE DES GRIFFES ET AUTOU...

Page 73: ...rtabobina Bobbin case Capsula spolina Cache Coursi re Cubierta del carril de lanzadera Shuttle race cover Ferma crochet Crochet Lanzadera Shuttle Crochet Taquets Soporte de lanzadera Shuttle keeper Pe...

Page 74: ...Dopo ogni utilizzo pulire la macchina per cucire ed il reostato con un panno morbi do e asciutto al fine di rimuovere polvere e lanugine NOTE Use dry rags to avoid electrical shock NOTE utilizzare sol...

Page 75: ...e D come mostrato in figura sotto Pour fi er la machine relevez pied de support du grand plateau de rallonge et faites le glisser en positionnant les tiges A B C et D comme indiqu Para colocarla en l...

Page 76: ...r le fil et le tissu voir page 30 31 La machine n est pas enfil e orrectement voir page 24 25 La tension sup rieure est trop l che voir page 34 35 Le tissu est tir ou pouss dans le sens inverse des gr...

Page 77: ...a vea p gina 34 35 El material est tirado o empujado contra la acci n de alimentaci n Guiarlo suavemente La bobina no se ha devanado de un modo igual Volver a devanar la bobina La aguja se rompe El ma...

Page 78: ...p thread tension is too loose see page 34 35 Fabric is being pulled or pushed against machine feeding action Guide it gently Bobbin has not been wound evenly Rewind bobbin Needle breaks Fabric is bein...

Page 79: ...o nel senso contrario rispetto alla griffa trasporto guidare il tessuto lentamente sotto la griffa La spolina avvolta in modo non uniforme riavvolgere la spolina L ago si rompe Il tessuto viene tirato...

Page 80: ...15 F 4 FRAN AIS ESPA OL ENGLISH ITALIANO 19511 19511...

Reviews: