background image

29

Calling

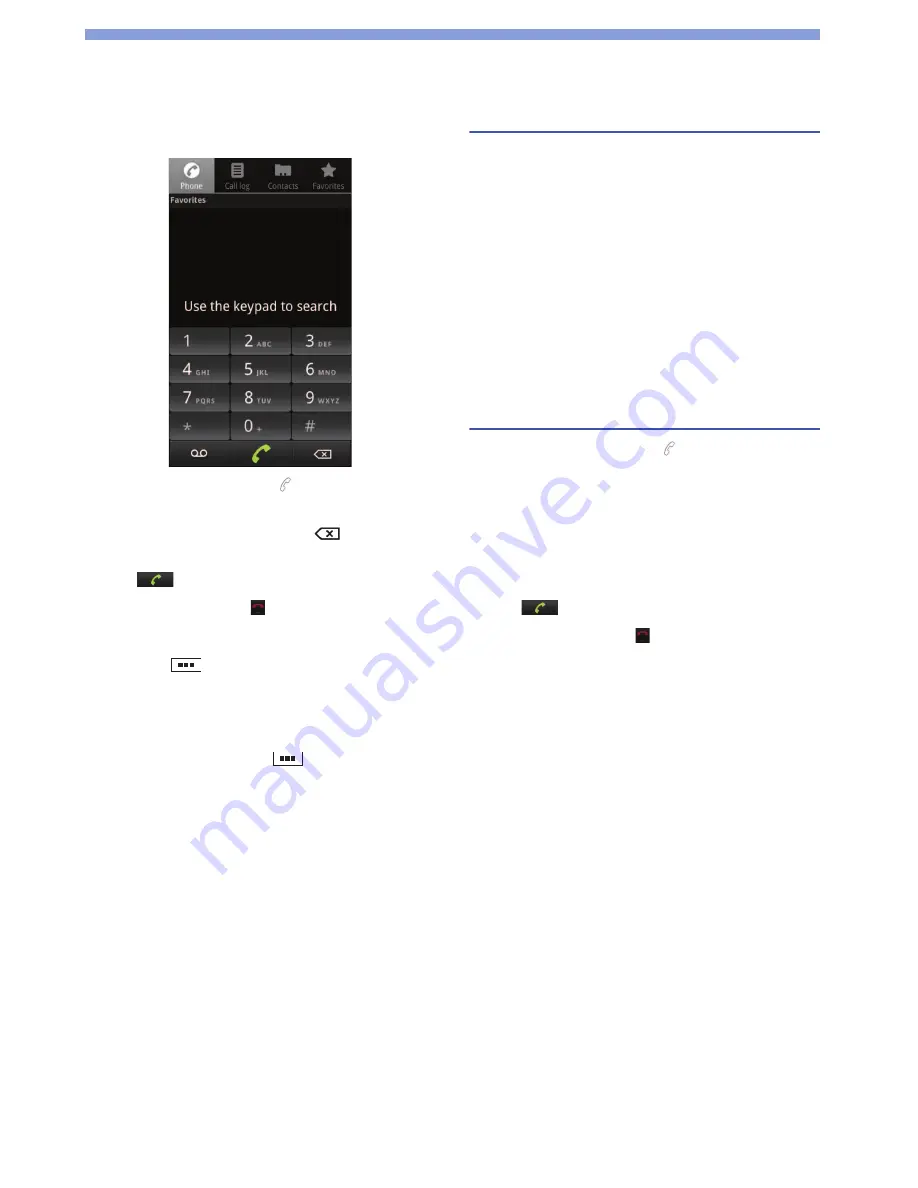
Making a Call

1

From the Idle screen, tap 

.

2

Enter the phone number.

If yo

u

 enter a wrong n

u

mber, tap 

 to delete the 

n

u

mber.

3

Tap 

 to start the call.

4

To finish the call, tap 

.

Entering a push tone (pause)

In 

s

tep 2, tap 


`

 "Add 2-

s

ec pa

us

e" / "Add wait".

Using the Speed dial

Yo

u

 can regi

s

ter a phone n

u

mber to find ea

s

ily from the 

s

peed dial li

s

t.

From the "Phone" 

s

creen, tap 


`

 "Speed dial li

s

t" 

`


s

elect the regi

s

tered phone n

u

mber. To regi

s

ter a 

n

u

mber in the li

s

t, tap "Speed dial i

s

 not 

s

et" 

`


s

elect a 

contact.

Note

• If you have set PIN1 code entry and Airplane mode, you need 

to enter the PIN1 code to make an emergency call.
For information about PIN1 code, see P.53.

Operations during a call

Adjusting the call volume

Pre

ss

 the + / - (vol

u

me) key

s

.

Putting the other party on the speaker

Tap "Speaker".

Muting your voice to the other party

Tap "M

u

te".

Using the Bluetooth function

Tap "Bl

u

etooth" when connected to a Bl

u

etooth device 

compatible with yo

u

r head

s

et, etc.

Making an international call

1

From the Idle screen, tap 

.

2

Touch and hold "0" to enter "+".

3

Enter the country / region code 

`

 area code (city 

code) 

`

 recipient's phone number.

If the area code begin

s

 with "0", omit "0". However, 

"0" may be req

u

ired for calling 

s

ome co

u

ntrie

s

 or 

area

s

su

ch a

s

 Italy.

4

Tap .

5

To finish the call, tap 

.

Summary of Contents for MEDIAS NEC-101T

Page 1: ...NEC 101T User Guide ...

Page 2: ...2 Thank you for purchasing of this product Before using this product read this manual ...

Page 3: ...e use inside an airplane such as using a non emission setting follow the instructions of the airplane before using Make sure to hold this product at a safe distance from your ear when you talk with the speaker on or when the ring tone sounds Also when you play games or music with an earphone microphone etc connected to the product adjust the volume properly When viewing the display maintain a prop...

Page 4: ...g period Unplug the AC charger from the power outlet before cleaning it The ambient temperature of the room should be 5 C to 35 C Precautions for the battery pack Check the orientation of the battery pack before attaching If you have difficulty attaching to this product do not put excessive pressure on the battery pack Do not place metal items such as wires in contact with the charging terminals A...

Page 5: ...y be imposed for holding a mobile phone while driving However exceptions are made in case of emergency such as to safeguard injured persons or to maintain public safety Please check the law and regulations of the area for using a mobile phone and follow them Please do not place this product near the air bag of a car When the air bag operates it may be injured by this product Disposing the battery ...

Page 6: ...frame Aluminum Alumite painting Back cover Outer side PC resin UV coating Water stop Silicone Silicon coating Cap microUSB connector Outer side PC resin UV coating Water stop Silicone Silicon coating microUSB connector Stainless alloy Machine screw Stainless alloy Battery pack recess Recess surface Side Nylon resin Bottom Polyester film Label Stainless alloy Metal Part Epoxy resin Substrate SIM sl...

Page 7: ...ll pointed pen pin etc on the touch panel Reception may be affected if you use this product near a land line phone television or radio in use Use this product away from such devices Ensure this product does not come near a fire such as a stove or fall from a tabletop the product may slide when it vibrates When connecting an external device to the microUSB connector earphone microphone terminal do ...

Page 8: ...e IC card reader or writer Always keep the IC part clean Wipe with a soft dry cloth such as an eyeglass cleaning cloth for cleaning Keep a separate record of the information you have registered in your SIM card NEC de México S A de C V bears no obligation or responsibility in the event that data is altered or lost Do not damage scratch unnecessarily touch or short circuit the IC part Do not drop t...

Page 9: ...ngs 22 Connecting with Wi Fi easy settings 22 Adding a Wi Fi network manually 22 Disconnecting a connected Wi Fi network 22 Optional settings for Wi Fi 22 Setting an Email Account 23 Setting a Google or other account 23 Idle Screen 23 Adding an application shortcut 23 Creating an application folder 24 Setting the wallpaper 24 Status Bar 24 Status icons 24 Notification icons 25 Applications List Sc...

Page 10: ...h 51 Connecting to a Bluetooth device 52 Connecting to a VPN 52 Adding a VPN 52 Connecting to a VPN 52 Security Code 53 PIN1 code PIN2 code 53 Enabling the SIM s PIN 53 PIN unblocking key PUK 53 File Management 54 Bluetooth Communication 54 Sending 54 Receiving 54 Connecting a PC 54 Appendix 55 Troubleshooting 55 Error message 57 Warranty and After Sales Service 57 Warranty 57 After sales service ...

Page 11: ...notice Setting the phone to silences the ringtone and notification sounds However sound from video playback music etc is unaffected and will continue to be heard You can update the software P 59 Updates for product quality improvement and operating system OS upgrades may be applied Such updates or upgrades may cause applications you are using to be unusable or have unexpected errors When the memor...

Page 12: ...perating frequency or stop radio wave emission by turning off the power etc 3 If you have further questions contact General Inquiries on the last page of this manual Wireless LAN A wireless LAN Wi Fi uses radio waves for transmission and thereby has the benefit of allowing a LAN connection anywhere in an area reachable by those radio waves Conversely eavesdropping by a third party or wrongful intr...

Page 13: ...istance of approx 3 meters IPX7 The product retains phone functionality after slowly immersing in still room temperature tap water to a depth of 1 meter and leaving it there for 30 minutes before bringing it out of the water IP5X The product can be operated and the safety can be kept after keeping the product inside of the equipment including dust with a diameter of less than 75µm for 8 hours You ...

Page 14: ...ed to your skin directly from a faucet or shower head Doing so may cause malfunction though the product is waterproof to IPX5 standard Do not wash the product in a washing machine etc Accessories and options are not waterproof Do not put the product in hot water use it in a sauna or apply hot air flow to it Do not leave the product on the sand at a beach Sand might enter the mouthpiece or earpiece...

Page 15: ...ece or earpiece speaker Do not use a cotton swab etc to poke into any of the recesses 4 Thoroughly wipe off the product with a clean dry cloth Any water remaining in the product may leak out after wiping off When charging the battery pack Accessories and options are not waterproof dustproof Check the following before and after charging Make sure that the product is not wet before connecting the mi...

Page 16: ...he back cover into the slots slide it in the direction shown and push it down securely in the direction shown Securely push the areas illustrated by the dots and make sure that there is no space between the back cover and this product Notes When removing the back cover make sure that you remove water and wipe moisture off this product When attaching the back cover make sure that no dust or dirt ad...

Page 17: ... the SIM card is not inserted 1 Hold the tab to slide the tray 2 Place the SIM card on the tray with the IC surface gold colored facing up and seating correctly 3 Slide the tray to the end Inserting the microSD Card Insert the microSD card with the microSD logo side up into the microSD card slot until it is locked To remove the microSD card push it as shown ...

Page 18: ...the slots Opening Closing the microUSB Connector Cap To open the microUSB connector cap hook your finger in the slot and open the cap in the direction of the arrow To close the microUSB connector cap insert the tab on the back of the cap in direction 1 and then close the cap by pressing securely in direction 2 2 1 ...

Page 19: ... hold the microUSB plug straight against the connector without tilting it vertically or horizontally and insert it gently Charging with the PC connection 1 Open the microUSB connector cap 2 Connect the microUSB plug with the supplied microUSB cable with engraved side facing down 3 Connect the USB plug of the cable to your PC Basic Operation Using the front keys displays the menu available for the ...

Page 20: ...he instruction screens for operating an application appear Tap an application to see that instruction When these instruction screens are finished the Get started screen appears again Settings See Initial Settings To skip these screens tap Exit You can start from the language selecting screen again Tap Settings Wizard Turning power off 1 Press and hold the power switch for one second or longer 2 Ta...

Page 21: ...Settings and then select the item to set P 47 Access Point Settings The access points required for connecting to the Internet are preset You may add or change them as required 1 From the Idle screen tap Settings Wireless networks Mobile networks Access Point Names 2 Tap the radio button for the access point Adding an access point 1 From the Idle screen tap Settings Wireless networks Mobile network...

Page 22: ...ing a Wi Fi network manually For information on using an access point refer to the manual for the access point 1 From the Idle screen tap Settings Wireless networks Wi Fi settings 2 Check the box of Wi Fi 3 Tap Add Wi Fi network 4 Enter Network SSID and the Security type 5 Enter additional security information as required 6 Tap Save Disconnecting a connected Wi Fi network 1 From the Idle screen ta...

Page 23: ...t 3 Follow the screen prompts to configure the account Idle Screen The Idle screen is the starting screen for using applications Tap to open the screen You can slide the screen to move the Idle screen to a page on the right or left 1 Widgets 2 Application shortcuts 3 Dock 4 Launch Phone Call log and Contacts 5 Open the application list screen 6 Launch browser Adding an application shortcut 1 Touch...

Page 24: ...set For Gallery select the image to set as the wallpaper and then drag the trimming frame to where the wallpaper will be used Tap Save to set the wallpaper For Live wallpapers depending on the wallpaper Settings appears for changing the color etc Changing the lock screen Tap Settings Location security Custom Lock Screens select the screen type Select Status Bar Notification icons for new informati...

Page 25: ...lete Uninstalling an application You can uninstall the application only installed by Market 1 From the applications list screen tap Uninstall 2 Tap the application to uninstall OK OK 3 Tap Finished to complete Adding an application shortcut to the Idle screen From the applications list screen touch and hold the application to add The screen changes to the Idle screen with the application added Ico...

Page 26: ...LEAR to delete entered digits and operators or touch and hold to delete an entire formula Calendar P 46 Camera P 43 Clock P 46 Contacts P 31 Downloads Display a log of files downloaded from the browser Email P 33 File Manager You can display a list of files stored on the microSD card Gallery P 44 Gmail P 34 Google Search You can search for contacts applications or search web pages Google Register ...

Page 27: ...Clock digital Add a digital clock Clock world Display the local time and the time for a specified city Google Search Add a search box Google You can directly use a Google application Home screen tips Display the help for operating the Idle screen Latitude Display the location of friends registered at Latitude Market Display information for Android Market Music Display a music control panel My Conv...

Page 28: ...he on screen keyboard QWERTY keyboard This keyboard uses a PC keyboard layout 10 key keyboard Depending on the screen this appears to enter only numbers such as phone number Note For keyboard settings from the Idle screen tap Settings Language keyboard XT9 Text Input P 49 ...

Page 29: ... code entry and Airplane mode you need to enter the PIN1 code to make an emergency call For information about PIN1 code see P 53 Operations during a call Adjusting the call volume Press the volume keys Putting the other party on the speaker Tap Speaker Muting your voice to the other party Tap Mute Using the Bluetooth function Tap Bluetooth when connected to a Bluetooth device compatible with your ...

Page 30: ...der 1 From the Idle screen Settings Call settings Voicemail settings 2 Tap Voicemail number not set enter the Voicemail number OK OK For the Voicemail number contact your network operator or service provider When the product receives a call the call is connected to the Voicemail service center if not answered The caller records a message and you are notified that there is a message at the Voicemai...

Page 31: ...on list screen tap Contacts Searching a contact If a lot of contacts exist you can find a particular contact easily by key search From the Contacts screen tap Search enter for searching Setting the Contacts screen From the Contacts screen tap Display options Select the item to change To complete the setting tap Done Creating a contact 1 From the Contacts screen tap New contact 2 Select the account...

Page 32: ...e contact to send and then tap Send contact enter the address and message Send Merging duplicate contact information If the same contact information name etc is registered several times you can merge the contact information together Tap a contact Edit contact Join select a contact to join Done To separate the connected contacts tap Separate OK Favorites On the Phone screen a list of contacts set a...

Page 33: ...g email Tap Delete To delete all received email from the Inbox screen tap Select All Delete Creating and sending email 1 From the Inbox screen tap Compose 2 Enter each item To add a Cc or Bcc tap Add Cc Bcc To add an attachment tap More Add attachment 3 Tap Send Opening mailboxes From the Inbox screen tap Folders Changing email settings 1 From the Inbox screen tap More Account settings 2 Tap the i...

Page 34: ...layed Note In Gmail email is displayed grouped into a message thread according to reply If newly arrived emails are replies to an existing email they will be grouped into the same message thread A new thread is created for newly created email and changes of subject name Creating and sending Gmail 1 From the Inbox screen tap Compose 2 Enter each item To add a Cc or Bcc tap Add Cc Bcc To add an atta...

Page 35: ...message thread to display You can send Message from this screen Deleting all messages of the thread Touch and hold the thread to delete Delete Delete Displaying the folder list From the message screen tap Folder view Creating a new folder From the message screen in folder view tap New folder enter the name for the new folder OK Moving Message 1 From the message screen tap the folder Move 2 Check t...

Page 36: ...ist of candidates If you tap More More actions you can select a following item for an action Set as homepage Page info Share page Select an application to share by Enter fullscreen Find on page Enter the search text tap Using the voice search Instead of step 3 tap and clearly speak the search words into the microphone Opening a new browser window Tap New window Switching between windows If more th...

Page 37: ...ookmarks screen You can also add a bookmark from the Most visited or History list Tap Most visited or History of the item to add Displaying web pages added to bookmarks From the web page tap Bookmarks a bookmarked page to display You can also change the view of bookmarks to the list by tapping List view Deleting all bookmarks From the Bookmarks screen tap Delete all bookmarks OK Changing browser s...

Page 38: ... charged for it You may obtain only one refund for each application If you have previously requested and obtained a refund for a purchased application you cannot obtain another refund for that same application after you purchase it again For information on payment methods and refund terms from the market screen tap Help Note For an initial purchase by credit card you must enter information about t...

Page 39: ...sement or tunnel underground or underwater In a bag or box In a built up or residential area In or under thick trees Near a high voltage cable Inside cars or trains In heavy rain snow or other bad weather When there are obstructions people or objects near the product When the GPS antenna section is covered by a hand etc Enabling the Location Service To use the Location Service you must enable the ...

Page 40: ...place later by tapping My Places List of Starred Places appears You can also display a recently searched location by tapping Recent Viewing Street View Touch and hold a point to view Street view Some regions are not supported for Street View Displaying layers Tap the item to display information such as traffic conditions overlaid on a map or switch to an aerial photograph Traffic conditions and ra...

Page 41: ...setting the voice guidance To display the route information tap Route Info Exiting navigation Tap Exit Navigation Notes You can use the voice guidance Tap Install follow the screen prompts to install the application when the messge appears On the navigation screen following icons appears shows a list of routes appears after selecting a route Tap this icon to switch the screen to street view appear...

Page 42: ... must first join Latitude and then invite friends to provide their locations or accept invitations from friends to share your location For more information about Latitude tap from the Latitude screen Help 1 From the application list screen tap Latitude 2 Tap Share location with family or friends Agree Continue 3 Tap a member to display the location If there is no member add a member Tap Add friend...

Page 43: ... Focus frame 7 Number of remaining shots Antishake icon Location information acquisition status 8 Photo video 9 Zoom 10 Shutter 11 Brightness 12 Gallery Depending on the Size setting this may not be activated 1 From the application list screen tap Camera 2 Focus the camera on the subject 3 Tap to shoot Hiding icons Tap Hide icons Shooting videos 1 Other Settings Configures the settings for light i...

Page 44: ...thumbnail list screen of Gallery touch and hold Check boxes are displayed for each file Check the boxes to delete tap Delete Confirm Delete Arranging the photos by shooting period From the thumbnail list screen of Gallery tap Music Player You can play music files saved on the microSD card 1 Album cover image 2 Song details You can touch and hold to search related information for each application 3...

Page 45: ...ap Playlists touch and hold the playlist to rename Rename enter a playlist name Save Deleting a playlist From the category lists screen tap Playlists touch and hold the playlist to delete Delete OK You cannot delete playlists from Recently added Deleting a song from a playlist From the category lists screen tap Playlists a playlist touch and hold the song to delete Remove from playlist For using t...

Page 46: ... Snooze duration Volume Calendar You can manage your schedule by synchronizing with an online calendar provided by Google or other service You must configure a Google account beforehand P 23 From the application list screen Calendar The Calendar screen appears Switching the calendar display Tap Day Week or Month Creating a schedule 1 From the Calendar screen touch and hold the date New event 2 Set...

Page 47: ...ore PCs or other devices Portable Wi Fi hotspot settings Help VPN settings P 52 Mobile networks P 51 Data enabled To ensure immediate data connection after checking the box of Data enabled restart this product Data roaming P 51 Network Mode P 51 Access Point Names P 21 P 51 Network operators P 51 Fixed Dialing Numbers When checking the box of FDN activation you can call only numbers registered on ...

Page 48: ...out five seconds after the backlight turns off you can tap to turn it on again eco mode If you set AUTO eco mode turns on automatically according to the battery level set with Auto setting eco mode option settings When you set eco mode to ON or AUTO you can set the below items Brightness Screen timeout Turn off Bluetooth Turn off Wi Fi Unuse GPS satellites Stop sync Stop live wallpapers Auto setti...

Page 49: ...s carry out data communication automatically Auto sync Applications synchronize data automatically Back up my data Set to restore the backed up settings and data when reinstalling an application Automatic restore Running applications appears Touch and hold the application to stop running Master reset Reset all settings The default password is 1234 Factory data reset Delete all data and return to t...

Page 50: ... own settings Default Engine Install voice data Speech rate Configure the text reading out speed Language Pico TTS Configure the installed voice synthesis engine Accessibility Set the accessibility functions Power button ends call Set to end a call by pressing the power switch However in sleep mode this does not end a call and instead cancels sleep mode Automatic The time is adjusted automatically...

Page 51: ... Bluetooth device You may be unable to establish connection if this product and the device are located on opposite sides of walls containing metal rods such as on upper and lower stairs or in adjoining rooms especially in a building made of reinforced concrete Also note that the above connection distances are not guaranteed Connect this product distanced from other devices electric product AV equi...

Page 52: ...Discoverable to let this product be recognizable by the partner Bluetooth device 4 Tap the Bluetooth device to communicate with Connection may be established with this procedure depending on the Bluetooth device 5 Tap Pair or enter the passkey PIN OK Canceling the connection Tap the Bluetooth device to disconnect OK Canceling the pairing Touch and hold the Bluetooth device to disconnect Disconnect...

Page 53: ... required when using the user certificate such as when requesting issue Note If you enter the incorrect PIN1 PIN2 code 5 times in succession the PIN1 PIN2 code is locked Unlock using PUK code Enabling the SIM s PIN Set to require entry of the PIN1 code when the power is turned on 1 From the Settings screen tap Location security Set up SIM card lock 2 Check the box of Lock SIM card enter the PIN1 c...

Page 54: ...us bar 2 Open the Notifications panel and tap the notification for the received Bluetooth file Accept Connecting a PC You can read and write data on a microSD card from the connected PC 1 Connect to a PC using the microUSB cable P 19 2 Open the Notifications panel tap USB Connection USB Mass Storage OK OK Disconnecting the microUSB cable from the PC Open the Notifications panel tap Turn off USB st...

Page 55: ...ut of the network service area for a long time As this product searches for radio waves in order to enable communication when out of the network service area more electricity is consumed than usual The battery pack usage time varies depending on the usage conditions and the degradation level The battery pack is a consumable The available usage time shortens every time the battery pack is recharged...

Page 56: ...ves are it may be difficult to establish a connection in crowded places due to a congestion of calls and emails The display is dim Has the time set with Screen timeout elapsed P 48 Is the product in eco mode P 48 Has Brightness setting changed P 48 Is battery level low P 48 During a voice call the other party s voice is difficult to hear or is too loud Has the call volume been changed P 29 Photos ...

Page 57: ...During the warranty period This product is repaired at no charge under the conditions of the warranty Make sure to bring the warranty for repair You will be charged even during the warranty period if malfunction is caused by the use of devices and consumables other than those specified Repair may not be possible in the following cases When a repair counter judges the cause of malfunction is exposu...

Page 58: ...a result of malfunction repair or other handling of the product In this case make the settings again When the repair is executed MAC address of Wi Fi Bluetooth address in the product may be changed regardless of repaired part Magnetic components are used in parts of this product as described below Do not allow credit cards or other devices that are vulnerable to magnetism to come into contact with...

Page 59: ...n installed Do not start any other applications during an installation of the software update All operations are disabled during an installation of the software update Also you cannot stop updating Note You can update software while still retaining data such as contacts camera images email downloaded data etc on this product Note however that such data may not be protected depending on the state o...

Page 60: ... the update information automatically and check whether you can upgrade the version For the latest software information refer to the manufacturer s site 1 From the Idle screen tap Settings About phone Software update 2 Check the box of Auto update Notes Auto update is not set by default The product cannot automatically check the update information when the Auto update is not set during data commun...

Page 61: ... temperature 5 C to 40 C 5 C to 35 C while charging Relative humidity 45 to 85 Dimensions Approx 128 mm height 65 mm width 8 2 mm thickness Weight 1 g Approx 117 g with the battery pack Memory ROM 2048 MB RAM 512 MB Display Type TFT 16 777 216 colors Size Approx 4 0 inches Pixels 409 920 pixels 480 854 dots Image pickup device Type CMOS Size 1 4 0 inch Effective pixels Approx 5 0 million pixels Ca...

Page 62: ...liant with Bluetooth standards designated by Bluetooth SIG and they are authenticated However procedures may differ or data transfer may not be possible depending on the device s characteristics or specifications 7 The available connection distance may be much shorter depending on the ambient environment wall furniture etc or building structure Bluetooth Operating frequency range Transmission and ...

Page 63: ...g at its highest certified power level in all tested frequency bands Although the SAR is determined at the highest certified power level the actual SAR level of the phone while operating can be well below the maximum value This is because the phone is designed to operate at multiple power levels so as to use only the power required to reach the network In general the closer you are to a wireless b...

Page 64: ...may cause undesired operation This mobile phone has been tested and found to comply with the limits for a Class B digital device pursuant to Part 15 of the FCC Rules These limits are designed to provide reasonable protection against harmful interference in a residential installation This product generates uses and can radiate radio frequency energy and if not installed and used in accordance with ...

Page 65: ... levels so as to use only the power required to reach the network In general the closer you are to a base station antenna the lower the power output Intellectual Property Right Copyright and portrait rights You have no right to copy modify or distribute contents such as text images music or software downloaded from websites on the Internet or images captured by the camera of this product without p...

Page 66: ...are those of their respective owners Notational conventions for Windows The abbreviations of operating systems below are used in this manual Windows 7 stands for Microsoft Windows 7 Starter Home Basic Home Premium Professional Enterprise and Ultimate Windows Vista stands for Windows Vista Home Basic Home Premium Business Enterprise and Ultimate Windows XP indicates the Microsoft Windows XP Profess...

Reviews: