background image

TG110DL User’s Manual 

15 | 

P a g e  

NDT Systems, Inc.


5542

 Buckingham Drive

Huntington Beach, CA 92649

PH: 714-893-2438


9. PREPARATIONFOR USE 

The TG110DL comes with two AA-size alkaline batteries installed in its battery chamber. To check for satisfactory 
battery life, press the ON/OFF touch command to turn power on. A Battery Icon appears on the left side of the LCD 
display indicating the current battery charge level. Approximately 150 hours of typical use remains from a fresh set 
of batteries. If the display readout fails to register more than 20% scale then the batteries need replacement. 
When charge level becomes marginal, the Power-Guard Marginal Cutoff feature automatically turns the power off 
until the batteries are replaced.


Battery Replacement:

 Loosen (counterclockwise) the battery cover on the bottom of the gauge with a small coin 

or screwdriver. Remove the discharged batteries and replace them with two new AA-size alkaline or NiMH 
rechargeable batteries. Install them with proper polarity, negative side to be in contact with the battery cover. 
Replace the battery cover into the gauge and tighten by turning clockwise. Re-establish the gauge calibration 
settings whenever the batteries are completely discharged, removed, or replaced. 

Probe Selection:

 A variety of probes are available to optimize performance for the broad spectrum of gaging 

applications that may be encountered. The TG-506 Transducer should be used for most applications and surface 
temperatures up to about 225ºF. 

There are also the TG-556, TG-790, and TG-208 transducers designed for intermittent contact of surface 
temperatures up to 600ºF (316 C). 

An Ultrahigh-temperature probe having a fused quartz delay line, like the TQ-506, should be used on surface 
temperatures between 600 to 1000ºF (316-538 C). 

Smaller sized Mini-Probes like the TG-502 and TG-702 transducers are available for use on smaller surface radii or 
for gaging in confined locations. 

Refer to the probe list in the Accessories section to select the best probe suited for your application. For best 
results, use probes manufactured by NDT Systems, Inc whenever possible. 

Probe Attachment:

 All transducers except the 

“Mini

-

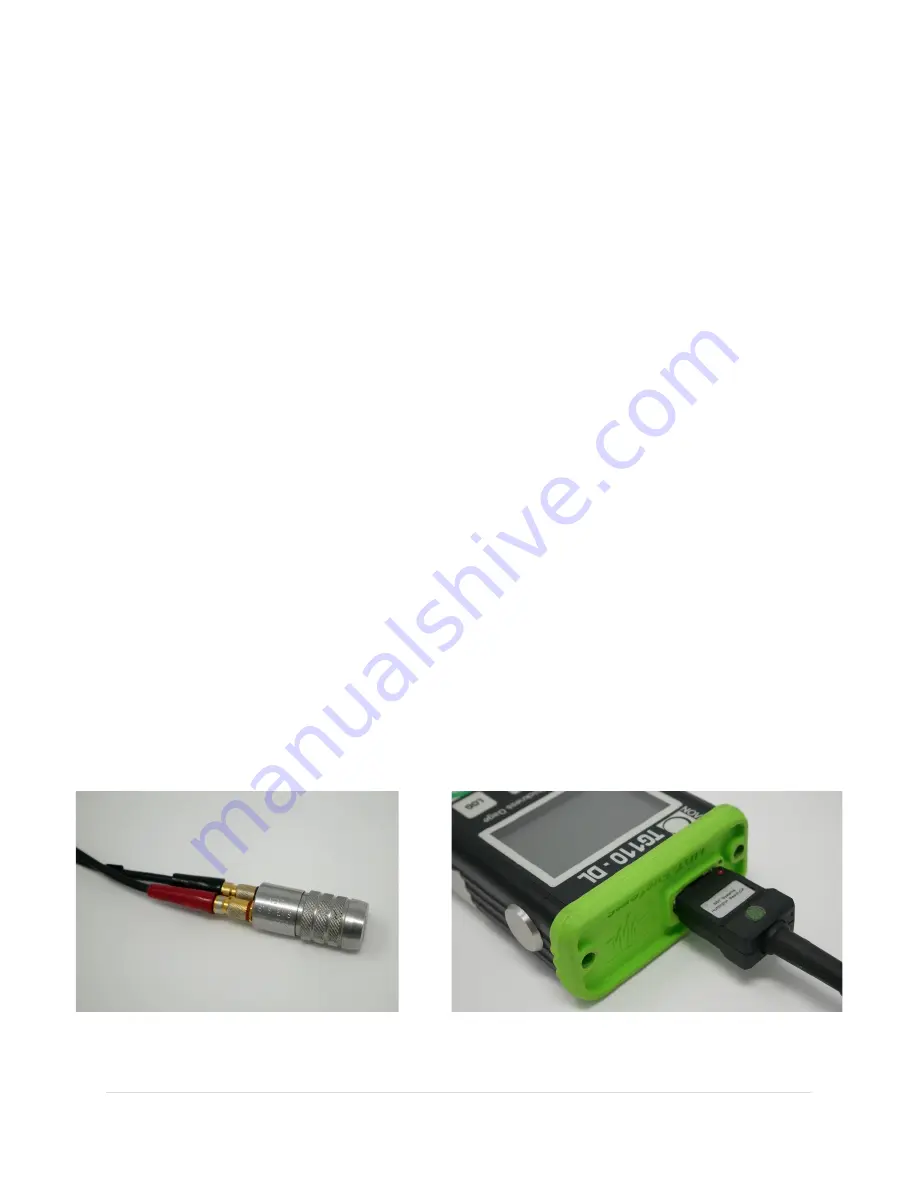
Probes” have a detachable dual cable for connecting to the 

TG110DL. Connect the dual cable (LMD1) to the probe using the cable end with the smaller red-sleeved and black-
sleeved Microdot screw-on connectors (certain transducers may require attaching the red-sleeved and black-
sleeved connectors to the correspondingly marked polarized connectors). Connect the other end of the dual cable 
with the larger push-on/pull-off LEMO connector to the corresponding connectors located on top of the gauge. Be 
certain to connect the red-dot marked connector to the gauge connector with the adjacent red dot. 


Summary of Contents for TG110DL

Page 1: ...NDT Systems Inc TG110DL User s Manual ...

Page 2: ...LICATION 3 3 PRINCIPAL OF OPERATION 4 4 DEVICE REFERENCE 5 5 BUTTON AND INDICATOR DESCRIPTIONS 6 6 MAIN MENU FEATURES 8 7 DATA LOGGER 12 8 SCROLLING B SCAN 14 9 PREPARATION FOR USE 15 10 CALIBRATION PROCEDURES 18 11 GAGING TIPS TECHNIQUES 19 12 GAGING PRECAUTIONS 21 13 ACCESSORIES 22 14 TROUBLESHOOTING 24 15 WARRANTY 25 APPENDIX Table of Common Material Sound Velocities 26 ...

Page 3: ...ded Aluminum Case delivers ultra portability Microprocessor based design offers unparalleled performance for numerous thickness gaging applications Exclusive adjustable Scan Bar feature permits a simple bar graph metered display of thickness for easy rapid view of thickness trend Scrolling time encoded B Scan Industry First on a handheld Automatic Probe Recognition Legacy Probe Selection via Menu ...

Page 4: ... withstand the rigors of heavier industrial environments while its accuracy makes it suitable for use in less rugged conditions A major application for the TG110DL is assessing wall thinning due to corrosion and erosion including many types of pitting action at normal and elevated material temperatures Example subjects of evaluation Airframes Aircraft windows Bulkheads Axles Wheels Rails Casings B...

Page 5: ...es for the sound wave to travel from the transmitter to the back wall of the test material and then to the receiver is called the round trip time or Time of Flight ToF The thickness of a test material is determined by halving the round trip time and multiplying the result by the material s characteristic sound velocity Characteristic sound velocity differs in various materials and may even differ ...

Page 6: ...on 5 Right Arrow B Scan Start Button 6 Enter Button 7 Menu Button 8 Zero Button 9 Log Access Button 10 Auto Zero Reference Disc 11 Receiver Input Connector 12 Pulser Output Connector 13 Data Transfer Port 14 Battery Cover Top of Gauge Bottom of Gauge Measurement Screen 1 Battery Level Meter 2 Scan Bar Scale 3 Scan Bar 4 Coupling Indicator 5 Thickness Reading in mm 6 Current Probe Profile 7 Alarm I...

Page 7: ...ral seconds it appreciably increases Release the scroll command pushbutton to stop the scrolling action The change in scroll rate allows 1 coarse large numerical display changes in a short period of time by continuous command depression or 2 fine small numerical display changes as small as one unit by quick momentary depression bumping of the command LEFT ARROW MODE BUTTON In menus the LEFT ARROW ...

Page 8: ... 2 00 NOTE The Scan Bar is a visual representation of the measured thickness only Setting the Scan Bar Scale maximum or minimum values too high or too low will not affect the measured thickness COUPLING ICON The Coupling Icon automatically changes states to help indicate the quality of the thickness reading A coupled state is indicated by the cylinder making contact with the thin bar beneath indic...

Page 9: ...f expected thickness to be measured For instance if the material under test is never expected to exceed 0 500 in thickness then a good maximum scale value would be 0 550 This will give the greatest amount of visual motion within the range of thickness If on the other hand the max thickness were still 0 500 and the scale were set to 5 00 then the range of motion would be a very small proportion of ...

Page 10: ...CT PROBE menu is a library list of legacy NOVA Series transducers These transducers were originally provided with the NDT Systems Inc Nova 100D which has been available for many years The items on this list allow you to use your existing investments in Nova series transducers In time this list will be increased to support other transducers as well These notifications will be available on the NDT S...

Page 11: ...ifference between the measured thickness and a user defined thickness value To define a thickness value use the UP and DOWN arrow buttons to adjust the small number below the primary thickness reading and press the ENTER button The primary thickness will now display a reading in inches that is greater or less than the user defined thickness value A quick way to set the defined thickness value whil...

Page 12: ...h Velocity gaging capability will have a V at the end of the version number e g v1 56V To use this mode make sure the probe is zeroed then select VELOCITY from the Thickness Mode menu Use the UP and DOWN arrow buttons to set a nominal thickness and couple the probe to a material of that same thickness The main numerical display will show the corresponding velocity value Press ENTER to save the gau...

Page 13: ...ed rows columns The user will be prompted to set the number of rows and columns for the data log Edit Name When Edit Name is selected from the NEW LOG FILE menu the user is presented with an alphanumeric screen and a flashing cursor The data log file is named by moving this cursor through the alphanumeric field and pressing ENTER on each desired character If no name is defined the TG110DL will ass...

Page 14: ...rase the data log The current data log name will be identified at the top of the screen NOTE All readings stored displayed in the log will be the actual thickness measured You may choose to view the thickness in differential mode however the actual thickness will be logged when pressing enter Review Select Review to access saved data logs Use the UP arrow or DOWN arrow buttons and press ENTER to n...

Page 15: ...to be inspected As the probe slides across the surface a cross section view of the part is drawn The scrolling mode continues until ENTER is pressed which pauses the scan and allows review of the information acquired While in the B SCAN mode pressing the up arrow key will eliminate the small digital thickness display just above the scrolling graphic area The result is a scan mode which runs approx...

Page 16: ...obes are available to optimize performance for the broad spectrum of gaging applications that may be encountered The TG 506 Transducer should be used for most applications and surface temperatures up to about 225ºF There are also the TG 556 TG 790 and TG 208 transducers designed for intermittent contact of surface temperatures up to 600ºF 316 C An Ultrahigh temperature probe having a fused quartz ...

Page 17: ...quired tolerances as the actual material product The material or product itself is often used with a micrometer to accurately measure an accessible representative thickness When gaging thin materials that approach the lower performance limits of the gauge probe combination experiment with reference samples to determine the actual lower limit Do not gauge materials thinner than this limit See Gagin...

Page 18: ...est object AUTO SHUTOFF The TG110DL automatically turns itself off approximately three minutes after non use thereby eliminating the need to use the OFF switch To reset the turnoff timer take a thickness reading or press the ENTER key All TOUCH COMMAND settings calibration settings plus Touch Codes are retained in memory even when the gauge turns its power off KEYPAD LOCK Use the keypad lock funct...

Page 19: ... will appear instructing you to press the ENTER key to confirm ZERO request 6 Calibrate thickness readings by Thickness Scrolling Couple the probe to an accurately known thickness of the material reference sample to be gauged while scrolling UP or DOWN until the display precisely reads the reference thickness Velocity Scrolling If the ultrasonic velocity of the test material is known depress the U...

Page 20: ...use the GAIN control located in the MAIN menu Decrease the GAIN until the undesirable effect disappears while assuring proper thickness can still be obtained within the desired expected MIN MAX thickness range 4 Use a lower frequency probe if gaging thick materials or materials with large grain structures 5 Gaging Cylindrical Sections When gaging cylindrical shapes such as pipe tubing tanks etc it...

Page 21: ...t is always good practice to re calibrate when a noticeable change in ambient temperature occurs the effect can normally be ignored for modest changes in ambient temperature The situation becomes more complex when the material temperature is considerably different than ambient One solution is to calibrate on a reference sample at the same temperature as the material Another solution is to calibrat...

Page 22: ...ay even go undetected especially isolated single pits When pitting is either detected or suspected the area should be very carefully scanned while changing the orientation of the probe s cross talk barrier to enhance delectability of the thinnest pitted spot s When positive results cannot be obtained particularly on critical structures use NDT Systems NovaScope or an ultrasonic flaw detector such ...

Page 23: ...ches thickness range 5 MHz 0 375 inch diameter element 0 60 inch diameter by 1 30 inch long case Requires LMD1 cable not included TG 556 EXTENDED TEMP STANDARD PROBE 15 600 F Dual element top mounted microdot connectors 0 040 to 20 00 inches thickness range 5 MHz 0 375 inch diameter element 0 60 inch diameter by 1 30 inch long case Requires LMD1 cable not included TG 505 MINI PROBE Dual element no...

Page 24: ... PROBE Dual element intermittent operating temperature to approximately 600 F 316 C top mounted microdot connectors 0 200 inch to 50 00 inches thickness range 2 MHz 0 60 inch diameter element 0 90 inch diameter by 1 50 inch long case Requires LMD1 cable not included TG 101HR Dual element top mounted microdot connectors 0 022 to 2 000 inches thickness range 10 MHz 0 25 inch diameter element 0 31 in...

Page 25: ...issue not included on the guide above a factory reset may be recommended To perform a factory reset start with the gauge turned off Hold the ENTER key and press the ON OFF key A menu will appear titled Clear Data Three options will appear Clear Setup Clear Log and Setup and Log Select Setup and Log and the system will restart with factory settings NOTE If none of the above actions fix the issues w...

Page 26: ... e NDT Systems Inc 5542 Buckingham Drive Huntington Beach CA 92649 PH 714 893 2438 15 WARRANTY NDT Systems Inc Standard Terms Conditions including its Warranty Terms can be found at https www ndtsystems com standard terms conditions ...

Page 27: ...TG110DL User s Manual 26 P a g e NDT Systems Inc 5542 Buckingham Drive Huntington Beach CA 92649 PH 714 893 2438 APPENDIX ...

Page 28: ...TG110 DTPW USERS MANUAL Version 2 0 7 TG110 Data Transfer Program for Windows NDT Systems Inc 5542 Buckingham Dr Huntington Beach Ca 92649 Ph 714 893 2438 Fax 714 897 3840 www ndtsystems com ...

Page 29: ... 2 Computer Polling Automatic Method 5 0 3 Down Loading Log Files From Your Gage 6 0 Working With The Data 6 0 1 Clearing Data 6 0 2 Editing a Cell 6 0 3 Copying Data to the Clipboard 6 0 4 Saving Your Readings to a File 6 0 5 Opening a File you have Saved 6 0 6 Printing a Report 6 0 7 Importing Data into a Spread Sheet Program 7 0 System Requirements Contact Information 7 0 1 Hardware 7 0 2 File ...

Page 30: ...er program 2 0 INSTALLING NOVA DTPW 2 0 1 USB Driver Installation The USB drivers MUST be installed BEFORE connecting your instrument to your computer Install the USB drivers using the USB Addendum in the USB setup instructions included with this software 2 0 2 TG110 DTPW data transfer program installation TG110 DTPW is installed by simply placing the disk into your CD drive and from the Start men...

Page 31: ...uter as it continuously logs each reading in a continuous flow Download Log Files from gage This method will transfer Log Files from your gage to your computer 4 0 2 Specifications These fields may be used to store valuable data about your test setup Grid Size These fields are filled in automatically when down loading Log Files from your gage When using your computer to log readings you will need ...

Page 32: ... you want the reading to be placed Next click the Log button This will take the current reading and log it into the cell that you have selected Each time you click the Log button it will log a reading into the selected cell To end this process click the End Acquisition button 5 0 2 Computer Polling Automatic Method Before starting set up your Grid Size To begin click the Begin Acquisition button Y...

Page 33: ...yboard while clicking the items to copy This allows you to choose individual lines to copy Click the Down Load Selected Files button to begin loading the files Click Exit to exit with out downloading any files After down loading your Log Files you can view them by choosing the one you would like to view from the list below the grid labeled Downloaded Log Files ...

Page 34: ...if you were acquiring data at the time this button was selected 6 0 3 Copying Data to the Clipboard This feature allows you to copy your grid or specifications data onto the clipboard so you may paste them into another application directly To do this highlight with your mouse the items you want to copy Selecting the grid will copy the entire grid Click the Copy icon Once copied to the clipboard yo...

Page 35: ...lename you wish to use and then click OK NOTE this saves the data currently displayed in the grid and specifications ONLY If you have downloaded multiple Log Files you will need to select each one you want to save from your Downloaded Log Files list and save each one To exit with out saving click Cancel 6 0 5 Opening a File you have Saved To open a file you have saved simply click on the open file...

Page 36: ...ings on the menu bar then click Company Setup Then enter the information you would like to be printed on the header of your report Any field left empty will not be printed To save your entries click Save To exit with out saving click exit To print your report using your default Windows printer simply click the Printer icon on the tool bar To be able to choose your printer number of copies and set ...

Page 37: ... Then select your file to load After selecting your file you need to setup the format for your spread sheet The file type is comma delimited With that in mind your file needs to be setup as Delimited At this point you can also choose which line to begin the import on For example if you are not interested in any of your Settings or Specifications information you can begin the import at line 13 and ...

Page 38: ... select the delimiter type Select Comma only The Text Qualifier is Quotes Next if you choose you can set the data type for the columns in your spread sheet The default is General Click on Finish to complete your Import ...

Page 39: ... Transducer Line 5 Part Number Line 6 Inspector Line 7 Company Line 8 Notes Line 9 Notes Line 10 units Line 11 Columns Line 12 Rows Line 13 and beyond Data When saving your spread sheet file change the Save as Type to Microsoft Excel Workbook to avoid saving your spread sheet file as the same name extension as your Nova Data Transfer file ...

Page 40: ...e 6 Inspector Line 7 Company Line 8 Notes Line 9 Notes Line 10 units Line 11 Columns Line 12 Rows Line 13 and beyond Data 7 0 3 Contact Information NDT Systems Inc 5542 Buckingham Dr Huntington Beach CA 92649 To see the latest products and services from NDT Systems inc log on to www NDTSystems com or simply click on the NDT Systems Inc logo and your default web browser will be launched and take yo...

Page 41: ...ncluding but not limited to warranties or merchantability and fitness for a specified purpose d Limitation of Damages As part of the bargain in entering into this agreement NDT will not be liable for any consequential incidental or special damages arising out of or in any way related to use of TG 110 DTPW Consequential incidental and special damages include but are not limited to loss of profits l...

Page 42: ...USB Setup Addendum 5542 Buckingham Dr Huntington Beach CA 92649 714 893 2438 FAX 714 897 3840 ...

Page 43: ...NDT SYSTEMS Inc NOVA DTPW USERS MANUAL VER 105 i Table of Contents 1 Introduction 2 2 WIN98 SE Compatibility 3 3 Windows XP Setup 4 3 1 Setup 4 3 2 Changing Port Number 13 4 Windows Vista 7 Setup 16 ...

Page 44: ...tion package is needed for our full line of products The automated installation process minimizes the user interaction required but may not be allowed to function fully depending on the security settings in place and user account privileges granted If the installation does not take place automatically upon insertion of the disk the following sections will guide you through running the installation...

Page 45: ... 3 WIN98 SE Compatibility Windows 98 and 2000 are no longer supported by the drivers included on your CD However if you require the application to run on these platforms email info ndtsystems com for help acquiring a legacy version of our software ...

Page 46: ...ions of NDT Systems Inc drivers are on the computer the above dialog will appear Click Yes for the removal and installation to proceed Keep in mind that if you update drivers for other products without obtaining the corresponding updates to the respective DTPW applications the legacy applications may not work with the new drivers Once the installation is complete you can plug in your gage and Wind...

Page 47: ... by Step When you connect your NDT Systems instrument it will bring up the Found New Hardware wizard If not you will need to bring up the Device Manager Open Start menu then choose Run Type devmgmt msc and then click OK Look under USB Controllers or under Ports to find your device it may have a yellow exclamation then Right click on it and choose Update Driver Do not allow the wizard to search for...

Page 48: ...elect Install from a list or specific location Select include this location in the search Then click the browse button In the browse for folder box select your CD drive that has the driver disc in it Find the drivers directory and select the USB drivers directory Click the OK button ...

Page 49: ...S Inc NOVA DTPW USERS MANUAL VER 105 7 The path to the drivers folder should now be seen to the left of the browse button If it is correct Click the Next button The computer will begin reading in the driver files ...

Page 50: ...rd finishes the driver installation it will display this screen Click the Finish button When it has finished the above message will show on the tool bar To confirm installation and determine the ComPort assignment for your instrument follow the next series of steps ...

Page 51: ...NDT SYSTEMS Inc NOVA DTPW USERS MANUAL VER 105 9 Bring up the Systems Properties dialog by clicking on the System Icon in the Control Panel area Next select the Hardware tab ...

Page 52: ...NDT SYSTEMS Inc NOVA DTPW USERS MANUAL VER 105 10 When the hardware tab is up click on the Device Manager button ...

Page 53: ...NDT SYSTEMS Inc NOVA DTPW USERS MANUAL VER 105 11 The Device Manager lists all the available devices attached to your computer ...

Page 54: ...NOVA DTPW USERS MANUAL VER 105 12 Click the plus symbol next to the listing for Ports COM LPT This will list all the Ports currently recognized on your computer It also shows which COM or LPT port they are attached to ...

Page 55: ... NOVA DTPW USERS MANUAL VER 105 13 Changing Port Number Click on the NDT Systems instrument listing to bring up its properties If it is necessary to change the COM Port it is assigned to click on the Port Settings tab ...

Page 56: ...NDT SYSTEMS Inc NOVA DTPW USERS MANUAL VER 105 14 Click on the Advanced Button In the lower left is a box that shows the COM Port click the down arrow to show the available COM Ports ...

Page 57: ...ERS MANUAL VER 105 15 Select an available COM Port in the range of COM1 COM15 Then click the OK button Click OK at each level backing out Make sure to note the COM port assignment made as you may need this in the DTPW application ...

Page 58: ...n After accepting any UAC prompts proceed as specified above for Windows XP Automatic Installation If older versions of drivers are installed upgrading is necessary to ensure continued functionality If the above dialog appears after installation you can safely choose Cancel or close the window ...

Page 59: ...lled then the Found New Hardware wizard will take you through loading the drivers Step by Step If you see the above dialog you will need to open the Device Manager to start driver installation From the Run prompt type devmgmt msc then OK In Device Manager locate the entry for your instrument it may have yellow triangle with an exclamation as shown Right click on the entry and choose Update Driver ...

Page 60: ...MS Inc NOVA DTPW USERS MANUAL VER 105 18 Choose Browse my computer for driver software Type the drive letter of your CD drive i e D or browse to select it Make sure Include subfolders is checked then click Next ...

Page 61: ...Windows should find the drivers on the disk and automatically proceed with installation Once installation is complete you can close the window Take note of the COM port your instrument has been assigned to as this will be needed in the DTPW application ...

Reviews: