


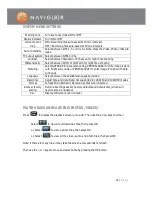

15 |
P a g e
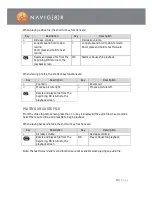
AV OUTPUT
From the preview mode, connect the camera to a display device (like a TV) using the supplied
AV cables. During playback all camera functions can be used normally.
HDMI OUTPUT
From the preview mode, connect the camera to a HDMI compatible display device (like a HD TV
or monitor) using the supplied HDMI cable. During playback all camera functions can be used
normally.
USB MODE
Connect the camera via Mini USB to either charge the camera battery or transfer data (if
connected to a PC). Once connected successfully, a USB icon will appear on the device screen
and the green indicator lamp will blink slowly.
Note: After cable connection, the camera might need to be restarted.
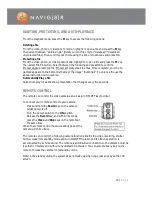
LASER POINTER HELPER
Press and hold the Record button for three seconds to turn the laser pointer ON or OFF (during
any operation).
TURNING ON/OFF THE LCD SCREEN
Press and hold the photo button for three seconds to turn the LCD Screen ON or OFF.
Note: The photo button on the remote does not support this function.
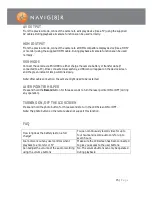
FAQ
How long does the battery last on a full
charge?
You can continuously record video for up to
four hours and record audio only for up to
seven hours.
I cannot work out any user controls when I
playback to a monitor or TV
Make sure the LCD screen has been connected
to give you access to the user buttons.
Can I adjust the volume of the audio recording
using the volume buttons
No. The volume buttons can only be operated
during playback.


