![Preview for 1 page of Navig[8]r Navcam-HD User Manual](http://thumbs.mh-extra.com/thumbs/navig-8-r/navcam-hd/navcam-hd_user-manual_3570958-01.webp)
![Preview for 2 page of Navig[8]r Navcam-HD User Manual](http://thumbs.mh-extra.com/thumbs/navig-8-r/navcam-hd/navcam-hd_user-manual_3570958-02.webp)
![Preview for 3 page of Navig[8]r Navcam-HD User Manual](http://thumbs.mh-extra.com/thumbs/navig-8-r/navcam-hd/navcam-hd_user-manual_3570958-03.webp)
![Preview for 4 page of Navig[8]r Navcam-HD User Manual](http://thumbs.mh-extra.com/thumbs/navig-8-r/navcam-hd/navcam-hd_user-manual_3570958-04.webp)
![Preview for 5 page of Navig[8]r Navcam-HD User Manual](http://thumbs.mh-extra.com/thumbs/navig-8-r/navcam-hd/navcam-hd_user-manual_3570958-05.webp)
![Preview for 6 page of Navig[8]r Navcam-HD User Manual](http://thumbs.mh-extra.com/thumbs/navig-8-r/navcam-hd/navcam-hd_user-manual_3570958-06.webp)
![Preview for 7 page of Navig[8]r Navcam-HD User Manual](http://thumbs.mh-extra.com/thumbs/navig-8-r/navcam-hd/navcam-hd_user-manual_3570958-07.webp)
![Preview for 8 page of Navig[8]r Navcam-HD User Manual](http://thumbs.mh-extra.com/thumbs/navig-8-r/navcam-hd/navcam-hd_user-manual_3570958-08.webp)
![Preview for 9 page of Navig[8]r Navcam-HD User Manual](http://thumbs.mh-extra.com/thumbs/navig-8-r/navcam-hd/navcam-hd_user-manual_3570958-09.webp)
![Preview for 10 page of Navig[8]r Navcam-HD User Manual](http://thumbs.mh-extra.com/thumbs/navig-8-r/navcam-hd/navcam-hd_user-manual_3570958-10.webp)
![Preview for 11 page of Navig[8]r Navcam-HD User Manual](http://thumbs.mh-extra.com/thumbs/navig-8-r/navcam-hd/navcam-hd_user-manual_3570958-11.webp)
![Preview for 12 page of Navig[8]r Navcam-HD User Manual](http://thumbs.mh-extra.com/thumbs/navig-8-r/navcam-hd/navcam-hd_user-manual_3570958-12.webp)
![Preview for 13 page of Navig[8]r Navcam-HD User Manual](http://thumbs.mh-extra.com/thumbs/navig-8-r/navcam-hd/navcam-hd_user-manual_3570958-13.webp)
NAVCAM-HD
USER MANUAL
6
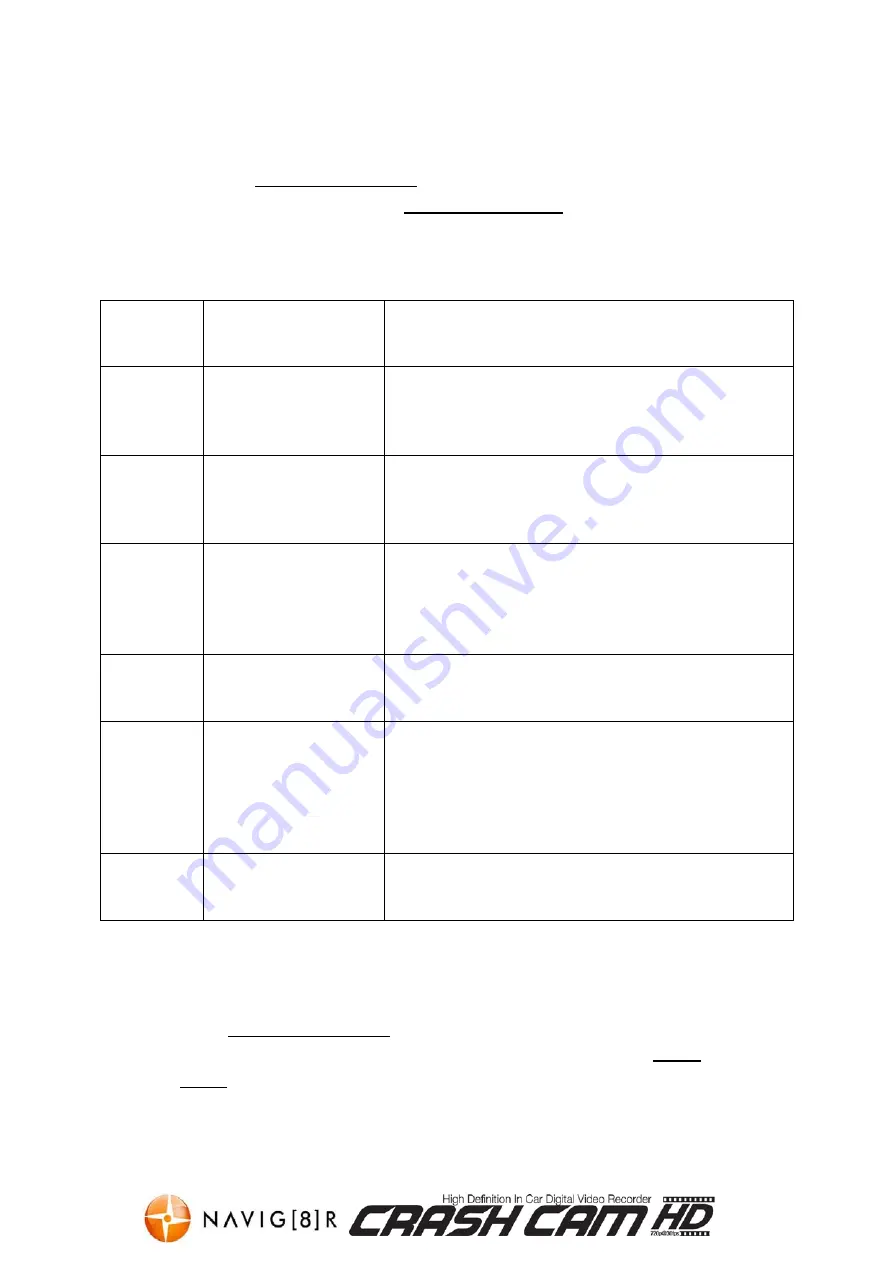
Video Mode Setting (on screen menu options)
Turn on the NAVCAM-HD and press the “OK” button to stop recording. Press the
MODE
button until the Orange Movie camera icon appears in the top left of the LCD display.
Press the
MENU
button to enter the VIDEO MODE settings menu. Press the
▲
/
▼
buttons to select one of the setting options and press then OK to select that option.
Available Options:
Menu
Option
Selection Options
Option Description
Image Size:
Select [HD 1280x720
VGA 640x480]
HD
1280x720 gives higher image quality, less record
time
VGA
640x480 gives longer record time, less image
quality
Time
stamp:
Select [On / Off ]
Records the current date and time onto the video file
(date/time is set in the setup options)
Motion
detect:
Select [On / Off]
When set to “On”, the Navcam-HD will begin
recording when it senses movement. For example; if
the Navcam-HD is left on, the camera will begin
recording if the image is disrupted (like a person
walking by)
Audio
record:
Select [On / Off ]
Turns the built in microphone on or off. For privacy
this can be turned off so that no audio is recorded.
Record
time:
Select [2 or 5 or 15
Minute]
Select the recording increment length to determine
the size of each video file / time of each increment.
For example, a 4GB Micro SD card recording at 720p
resolution will fit 40 minutes of footage which
equates to 20 x 2 minute files or 8 x 5 minute files or
2 x 15 minute files.
Night
Mode:
Select [Cancel / Auto] If set to “auto” the IR LED’s around the camera lens
will assist the lens in capturing video in low light.
Setup Mode Setting (on screen menu options)
Turn on the NAVCAM-HD and press the “OK” button to stop recording. Press the
MODE
button until the Orange Movie camera icon appears in the top left of the LCD display. Press
the
MENU
button to enter the VIDEO MODE settings menu then press the
MODE
button to
enter the SETUP menu. Press the
▲
/
▼
buttons to select one of the setup options and press
then OK to select that option. (pressing the MODE button again takes you back to the Video
mode setting)


