![Preview for 1 page of Navig[8]r Navcam-HD User Manual](http://thumbs.mh-extra.com/thumbs/navig-8-r/navcam-hd/navcam-hd_user-manual_3570958-01.webp)
![Preview for 2 page of Navig[8]r Navcam-HD User Manual](http://thumbs.mh-extra.com/thumbs/navig-8-r/navcam-hd/navcam-hd_user-manual_3570958-02.webp)
![Preview for 3 page of Navig[8]r Navcam-HD User Manual](http://thumbs.mh-extra.com/thumbs/navig-8-r/navcam-hd/navcam-hd_user-manual_3570958-03.webp)
![Preview for 4 page of Navig[8]r Navcam-HD User Manual](http://thumbs.mh-extra.com/thumbs/navig-8-r/navcam-hd/navcam-hd_user-manual_3570958-04.webp)
![Preview for 5 page of Navig[8]r Navcam-HD User Manual](http://thumbs.mh-extra.com/thumbs/navig-8-r/navcam-hd/navcam-hd_user-manual_3570958-05.webp)
![Preview for 6 page of Navig[8]r Navcam-HD User Manual](http://thumbs.mh-extra.com/thumbs/navig-8-r/navcam-hd/navcam-hd_user-manual_3570958-06.webp)
![Preview for 7 page of Navig[8]r Navcam-HD User Manual](http://thumbs.mh-extra.com/thumbs/navig-8-r/navcam-hd/navcam-hd_user-manual_3570958-07.webp)
![Preview for 8 page of Navig[8]r Navcam-HD User Manual](http://thumbs.mh-extra.com/thumbs/navig-8-r/navcam-hd/navcam-hd_user-manual_3570958-08.webp)
![Preview for 9 page of Navig[8]r Navcam-HD User Manual](http://thumbs.mh-extra.com/thumbs/navig-8-r/navcam-hd/navcam-hd_user-manual_3570958-09.webp)
![Preview for 10 page of Navig[8]r Navcam-HD User Manual](http://thumbs.mh-extra.com/thumbs/navig-8-r/navcam-hd/navcam-hd_user-manual_3570958-10.webp)
![Preview for 11 page of Navig[8]r Navcam-HD User Manual](http://thumbs.mh-extra.com/thumbs/navig-8-r/navcam-hd/navcam-hd_user-manual_3570958-11.webp)
![Preview for 12 page of Navig[8]r Navcam-HD User Manual](http://thumbs.mh-extra.com/thumbs/navig-8-r/navcam-hd/navcam-hd_user-manual_3570958-12.webp)
![Preview for 13 page of Navig[8]r Navcam-HD User Manual](http://thumbs.mh-extra.com/thumbs/navig-8-r/navcam-hd/navcam-hd_user-manual_3570958-13.webp)
NAVCAM-HD
USER MANUAL
10
3M (2048*1536)
6000
photos
12000
photos
24000
photos
48000
photos
96000
photos
5M (2560*1920)
3500
photos
7000
photos
14000
photos
28000
photos
56000
photos
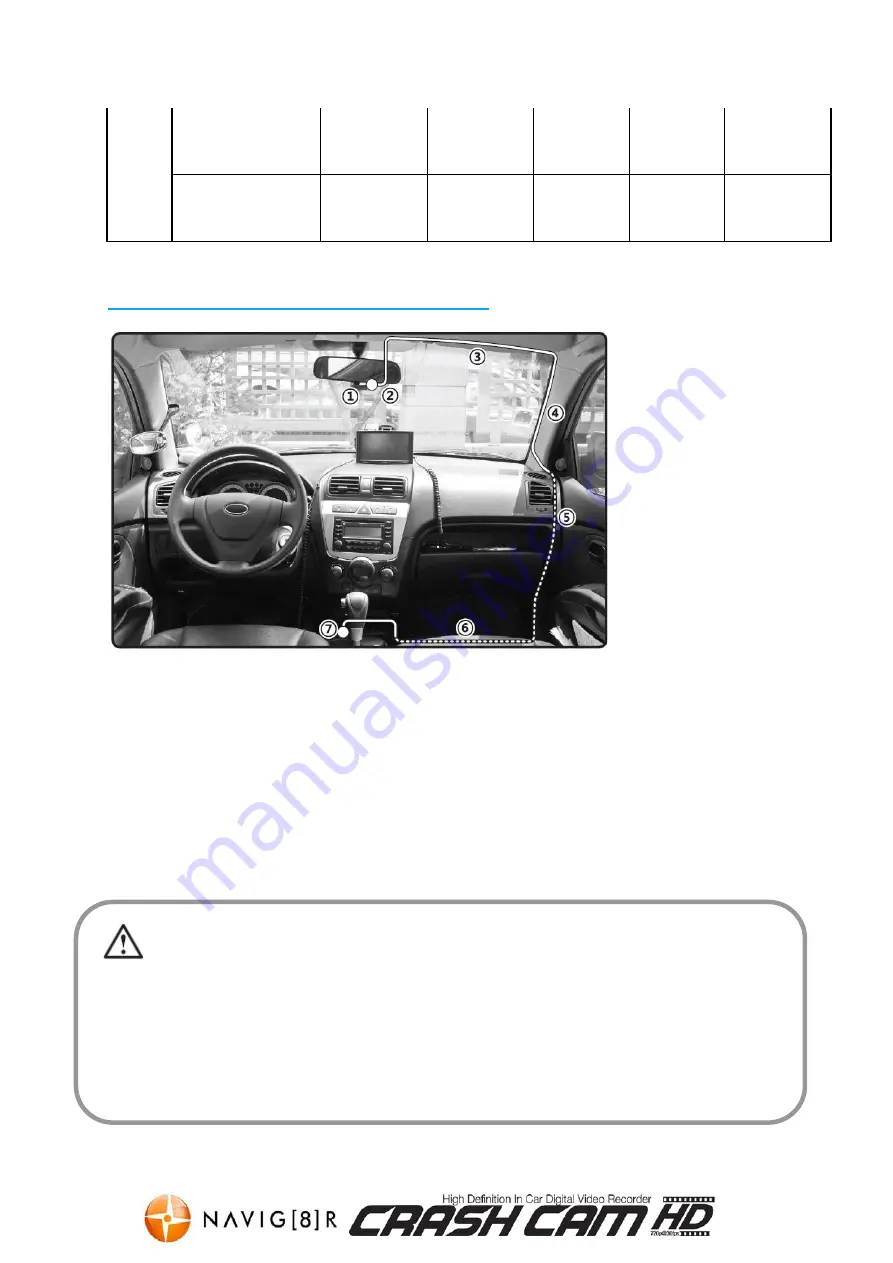
Connecting the NAVCAM-HD in the Car
•
The above wiring diagram shows a left hand drive vehicle. Wiring path is
only a suggestion.
1. Crashcam-HD device mounted behind the rear vision mirror.
2. 12v DC cable routed behind rear vision mirror
3. Cable hidden behind roof headlining
4. Cable hidden behind “A” pillar – beware of airbag equipped cars
5. Cable is routed beside the dashboard / near the door hinges
6. Cable is passed under the passenger carpet (or under the dashboard)
7. 12v DC plug is connected to the car’s 12v “cigarette socket”.
Once the wiring and installation of the Navcam-HD have been completed, please check the following:
- With the car’s ignition on (or engine started), the red LED indicator on the Navcam-HD will light up and the
LCD screen should turn on. Recording should start automatically. This will indicate a successful installation –
- When the car’s ignition is turned off, the device should turn off within 20 seconds and a “Goodbye” message
will appear on the LCD screen. If this doesn’t happen then power is still being supplied to the car’s 12v socket
and the device will need to be switched off manually.


