1-26
|
ni.com
Chapter 1
Getting Started with the cDAQ Controller
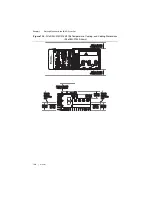
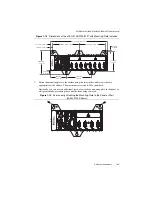
Figure 1-18.
Dimensions of the cDAQ-9133/9135/9137 with Desktop Mounting Kit Installed
Mounting the cDAQ Controller on a DIN Rail
Use the DIN rail mounting method if you already have a DIN rail configuration or if you need
to be able to remove the controller quickly. You can use the NI DIN rail mount kit to mount the
controller on a DIN rail. You need one clip for mounting the controller on a standard 35 mm DIN
rail. Refer to the
section for the accessory part number for your cDAQ
controller. Complete the following steps to mount the controller on a DIN rail.
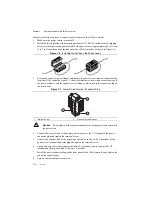
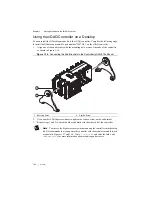
1.
Fasten the DIN rail clip to the controller using a number 2 Phillips screwdriver and M4 × 10
screws
1
. National Instruments provides these screws with the DIN rail mount kit. Tighten
the screws to a maximum torque of 1.3 N ·
m (11.5 lb ·
in.). Make sure the DIN rail kit is
installed as shown in Figure 1-19, with the larger lip of the DIN clip positioned up. When
the DIN rail kit is properly installed, the cDAQ controller is centered on the DIN rail.
1
The NI cDAQ-9132/9134/9136 controller DIN rail clip requires two screws.
The NI cDAQ-9133/9135/9137 controller DIN rail clip requires three screws.
3
9.12 mm
(1.540 in.)
3
61.71 mm (14.241 in.)
2X 17.2
3
mm
(0.67
8
in.)
127.2
3
mm
(5.009 in.)
1
3
2.
8
2 mm
(5.229 in.)
NI cD
A
Q
-9135
NI CompactD
A
Q
46


