© National Instruments
|
1-11
NI cDAQ-9132/9133/9134/9135/9136/9137 User Manual
5.
Power on the host computer.
6.
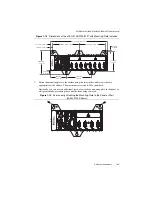
(Optional) Mount the cDAQ controller to a panel, wall, rack, or DIN rail, or attach the
desktop mounting kit, as described in the
section.
7.
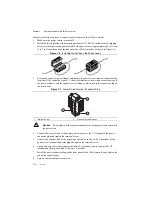
Attach a ring lug to a 1.31 mm
2
(16 AWG) or larger wire. Remove the ground screw from
the ground terminal on the front panel. Attach the ring lug to the ground terminal and
tighten the grounding screw to 0.5 N · m (4.4 lb · in.) of torque. Attach the other end of the
wire to chassis safety ground using a method appropriate for the application, as shown in
Figure 1-3. Refer to the
section for more information about earth
ground.
Note
If you use shielded cabling to connect to a C Series module with a plastic
connector, you must attach the cable shield to the chassis grounding terminal using
1.31 mm
2
(16 AWG) or larger wire. Use shorter wire for better EMC performance.
Note
Make sure that no I/O-side power is connected to the module. If the controller
is in a nonhazardous location, the controller power can be on when you install
modules.
8.
Align the module with a cDAQ controller slot.
9.
Squeeze the latches and insert the module into the module slot, and press firmly on the
connector side of the module until the latches lock the module into place.
Repeat Steps 8 and 9 to install additional modules.
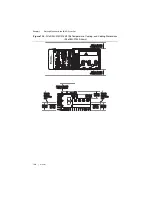
10. Wire your external power source and install the remaining ferrite as outlined in the
section. The cDAQ controller requires an external power
supply that meets the specifications listed in the specifications document for your cDAQ
controller.
11. Turn on the external power supply.
When the cDAQ controller powers on, the POWER LED lights and the controller runs a
power-on self test (POST). When the POST is complete, the operating system is loaded.
12. Use a USB A-to-B cable (included in the shipping kit) to connect the USB device port of
the cDAQ controller to a USB port on the host computer.
Caution
National Instruments requires a locking USB cable, such as part number
157788-01, in order to meet the shock and vibration specifications of this product.
Note
Alternatively, you can connect the cDAQ controller to the host computer
using RJ-45 Ethernet port 1. Refer to the
Connecting to the Network through the
section for more information.
13. Wire the C Series module as indicated in the C Series module documentation.


