V'·
�.:,,
�,.
•
I
Smart-Jet MAX
BLUETOOTH TIJ INKJET PRINTER
Bluetooth Technology,
1
"
T
all Sea
m
less Print
A
rea
S
••
rn a rt -
J
et
-------�
��
Page 1: ...V I Smart Jet MAX BLUETOOTH TIJ INKJET PRINTER Bluetooth Technology 1 Tall Seamless Print Area S rnart Jet...
Page 2: ...INSTALLATION PROCEDURES 12 GETTING STARTED 12 EXTERNAL DEVICES CONNECTIONS 12 EXTERNAL SENSOR 12 ENCODER 13 COMBINE EXTERNAL SENSOR AND ENCODER 14 ALARM 15 INPUT AND OUTPUT 16 QUICK START UP 16 REQUI...
Page 3: ...Update logo 34 Update font Latin 35 Update font Chinese 35 Machine default 35...
Page 4: ...oid ink fling in the air Do not cover the ventilation Do not expose to excessive heat sources sunshine fire or the like For indoor use only The apparatus shall not be exposed to moisture The socket ou...
Page 5: ...ding date This limited warranty does not apply to spare parts authorized inks or cartridges or to housings and circuit boards that experience problems resulting from misuse tampering or improper stora...
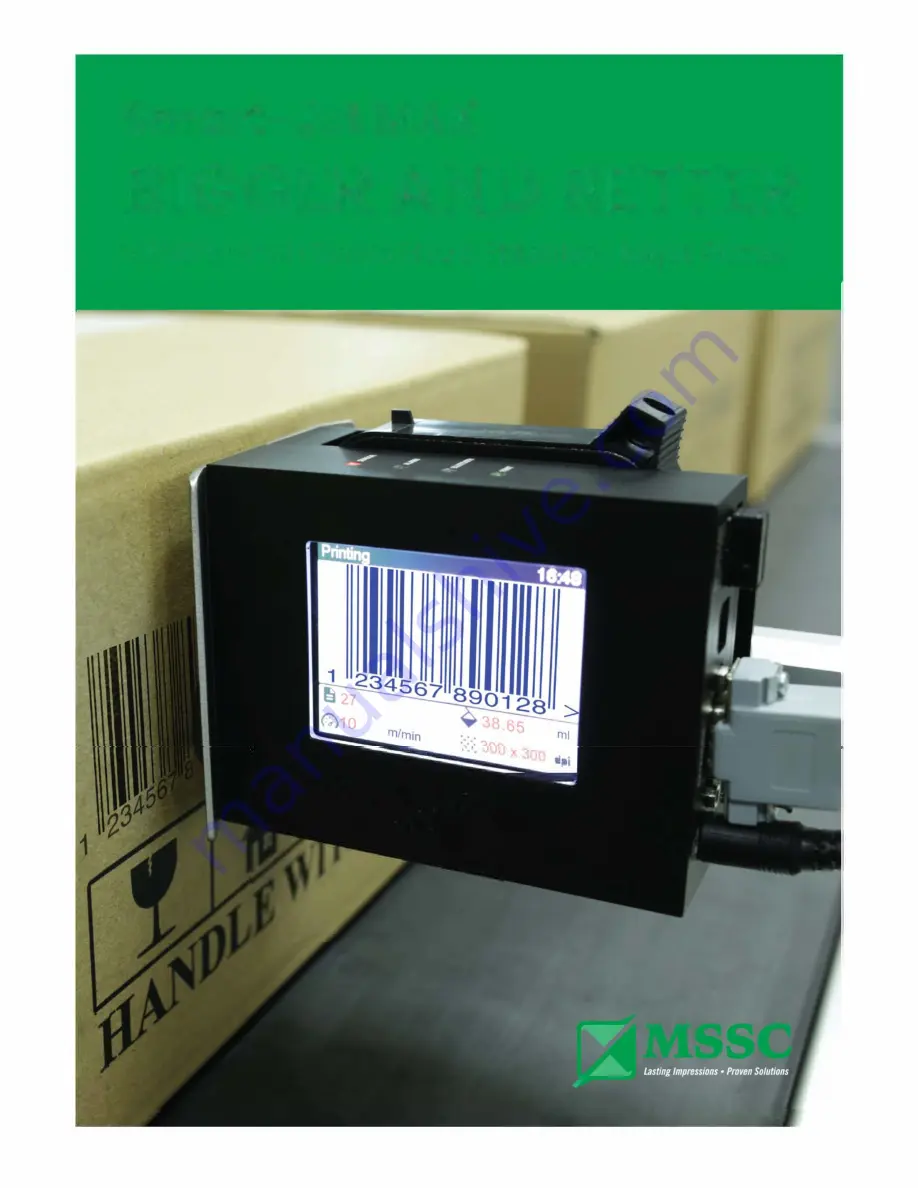
Page 6: ...ting applications powered by Thermal Inkjet Technology This machine produces crisp text logos variable data and barcodes on porous and non porous media by automatically recognizing aqueous and solvent...
Page 7: ...ensity 5 levels 10 Operation selection Wireless keyboard 11 Message memory 100 messages 12 Ink solution Aqueous and Solvent 13 Menu language Multiple selectable 14 Printable characters Windows true fo...
Page 8: ...Default does not recognize black conveyor Internal sensor Red light External sensor Green light Sensor light is activated when it receives a signal 2 ALARM Remains ON to indicate error 3 BLUETOOTH PC...
Page 9: ...Backspace Delete your message from the left 8 Tab Move your cursor faster 9 Home End Move your cursor to Home End 10 Caps lock Uppercase font 11 F4 Insert suomi symbol Operation menu on machine Main...
Page 10: ...ss Operation MENU DESCRIPTION Start Stop Start or Stop printing job Combine and press CTRL SHIFT ENTER on keyboard to fast Start Stop print Purge All of nozzles on the cartridge will push out ink Afte...
Page 11: ...k Rotate Select your screen modes Auto rotate or Lock rotate Password Set to authorize different level of users or to protect the machine from unauthorized users Default is 1234567890 Default Reset ma...
Page 12: ...hine Insert keyboard receiver to keyboard port turn on wireless keyboard EXTERNAL DEVICES CONNECTIONS NOTES Machine is able to operate with External Sensor Encoder or Alarm at any time Consult your su...
Page 13: ...ENCODER An encoder is recommended to ensure the best print quality if a conveyor has any speed variations To calculate wheel diameter D depend on resolution R is D R x 600 inches Example Encoder has...
Page 14: ...r and encoder to get perfect printing results but the machine only has one extended port Please connect per the following instructions to make external sensor and encoder work together with machine Se...
Page 15: ...e error 3 Invalid cartridge error 4 Out of ink 9 PRINT_LED_OUT 0V PRINT STATUS GREEN LED User selects the Start print menu The printer is in printing mode without any issue 12 12V 13 GND 15 ALARM_LED_...
Page 16: ...NPUT AND OUTPUT Input Start Stop feature Accept NPN or dry contact Output NPN signal Active each time a print is made QUICK START UP REQUIRED COMPONENTS No Basic Components With keyboard Optional 1 Ma...
Page 17: ...From the main screen of machine use arrow keys to move the cursor to Settings and begin implementing initial setups for the machine Press Enter to save and apply settings otherwise press the ESC key S...
Page 18: ...Press ESC to exit Select Save and input name to save your messages Select Normal Custom font Input ni Press 1 5 to select Press Insert to insert more data variable barcode logo FIRMWARE INTRODUCTION...
Page 19: ...es Font 25 4 mm 1 12 7 mm 2 8 00 mm 3 5 92 mm 4 3 89 mm 6 2 54 mm 8 Input message by using the following keys Arrow keys move the cursor Enter go to the next line Backspace delete characters ESC escap...
Page 20: ...counter into the message There are Single and Box Lot In the input section press Insert and use or arrow keys to move the cursor to Counter and press Enter Select your desired object and press Enter...
Page 21: ...unt step Repeat Repeat count of counter Up Down increase or decrease Fill zero add 0 before each number Add counter here insert counter Start start number Current current number Reset end number Step...
Page 22: ...rmat Press Enter to insert into message Format Select your desired format below to input into the Format section Otherwise date will not be displayed in the message Day d or dd Month M MM or MMM Year...
Page 23: ...cond s ss Minute m mm Hour h hh format 12h H HH format 24h AM or PM tt String Insert a string of data as entered in Settings From the input section of new message move the cursor to the position where...
Page 24: ...t your desired barcode Code 39 Code 2 5 Code 128 Code 93 UPC A EAN13 Codabar and Code 11 Width Input width for Barcode value varies from 1 to 4 Height Input height for Barcode value varies from 1 to 3...
Page 25: ...it Delete Use select existing message to print Edit select existing message to edit see Create New Delete select message to delete Press ESC to go back to the main screen Confirm Yes and input name fo...
Page 26: ...arrow keys to move the cursor to your desired setting press Enter to select and begin editing NOTES Press Enter to save Press ESC to go to main menu and apply new settings Speed Set print speed by se...
Page 27: ...Resolution and Density Density Resolution 1 2 3 4 5 300x300 76 38 25 19 15 300x150 152 76 50 38 30 300x100 228 114 76 57 45 Delay Delay before print and Delay after print mm Delay before print set th...
Page 28: ...r Select your desired logo 1 2 3 20 and press Enter to begin updating Be sure you name the files correctly Example LOGO1 on your USB will replace LOGO1 on the machine memory Update logo via smart phon...
Page 29: ...to Print Mode and press Enter Select Mode and press Enter to select Sensor or Continue mode Sensor mode Machine is triggered by a sensor to print Go to Mode and press Enter to select Sensor mode and...
Page 30: ...place FONT1 on the machine memory Machine accepts font sizes with hex format only All font sizes must be named as showed below NOTES Fonts being updated will replace the existing ones on the machine m...
Page 31: ...w keys to go to Password and press Enter Then go to Active and select Enable to set password Enter old password 1234567890 then enter your new password and retype to confirm Maximum characters allowed...
Page 32: ...00SC txt Index update Open and edit this file content to 08 this means the Index update will become Korean 08SC txt Save and closed this file Step 3 Insert USB flash into the machine Go to the Setting...
Page 33: ...n printer Message Logo Settings Custom string will import from files on the usb From the Settings menu select Restore Please insert usb flash before choosing Restore NOTES The backup file only restore...
Page 34: ...e the arrow keys to go to Settings About Update Firmware Yes This process will take 3 minutes When update is complete use the arrow keys to go to Settings Default Yes After default complete go to the...
Page 35: ...Messages works well Update font Chinese This Process will take 100 120 minutes Goto Settings Update Font Chinese Update Font Font 12 7 mm Update Font Font 8 00 mm Update Font Font 5 92 mm Update Font...