background image

MPC Computers, LLC 


NetFRAME 1420 

2.  When the following message appears briefly at the bottom of the screen during the POST 

(Power On Self-Test), press the [Delete] key to activate the Main Setup Menu. 


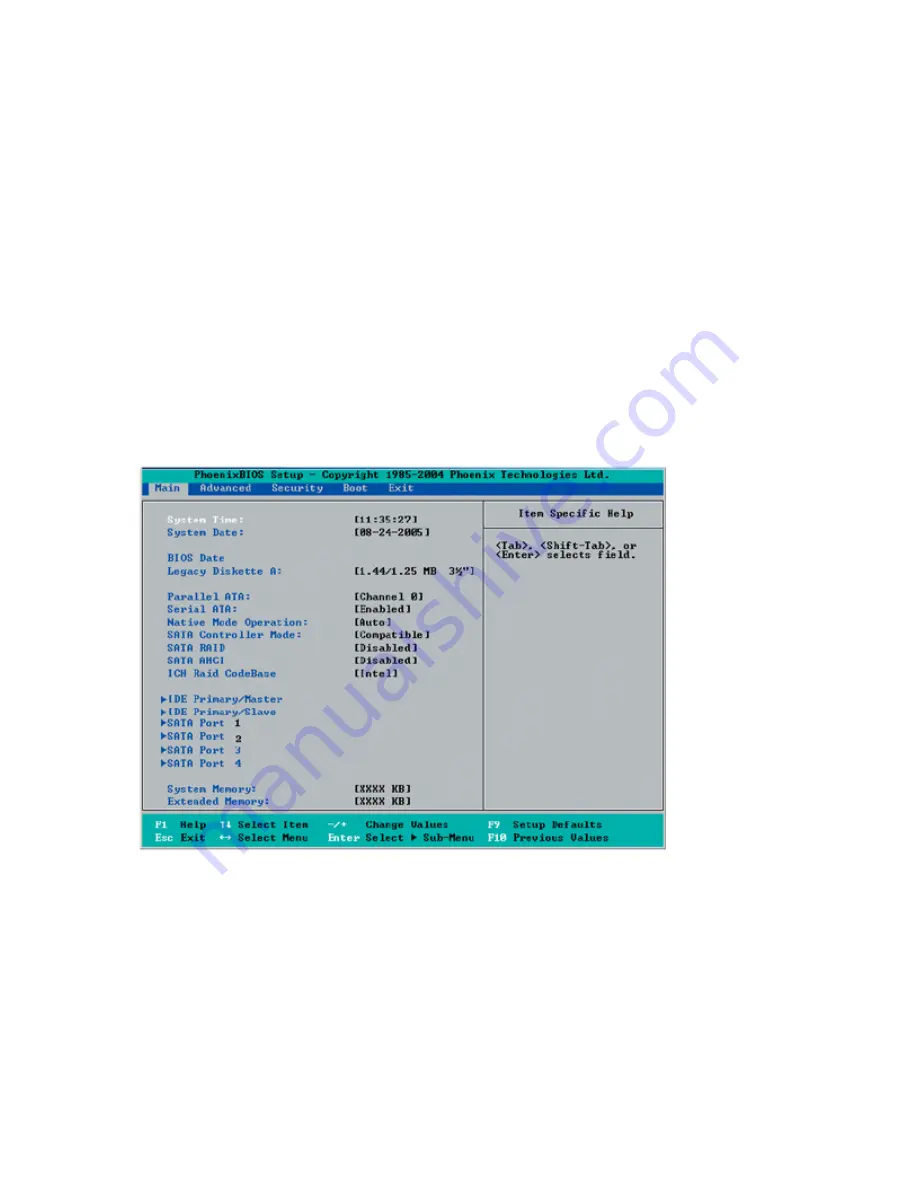
Main Setup 

All Main setup options are described in this section.  

Use the [Up] [Down] arrow keys or the [Tab] key to move among the different settings in the 
above menu.  

Press the [Esc] key to exit the 

CMOS Setup

 Menu and use the [Left] [Right] arrow keys to enter 

the other categories of BIOS settings.  

Main Menu 

The 

Main

 menu is used to report processor and memory information and to configure the system 

date, system time, and Setup languages. 

Main Menu 


System Time 

To set the system date and time, key in the correct information in the appropriate fields. Then 
press the [Enter] key to save the data. 

System Date 

Using the arrow keys, highlight the month, day and year fields and enter the correct data. Press 
the [Enter] key to save the data. 

BIOS Date 

This feature allows BIOS to automatically display the BIOS date. 


Summary of Contents for NetFRAME 1420

Page 1: ...1 ...

Page 2: ...hassis Views 15 Server Installation 18 Unpacking the System 18 Preparing for Setup 19 Server Precautions 19 Rack Installation 20 Safety and Preparation 30 Access Panel 31 Preparation 33 PCI Riser Card 34 System Fans 34 Drive Bays 35 Power Supply 37 Memory 39 Processor and Heatsink 41 System Board Features and Specifications 46 PC Health Monitoring 48 Jumper Settings 49 Power Configuration Settings...

Page 3: ...blems 77 BIOS POST Messages 78 Diagnostic Testing Preparation 84 Initial System Startup Problems 84 New Application Software Problems 85 Problems After the System Has Been Running 85 FAQs 86 Specific Problems 86 Service and Support 90 MPC Technical Support 90 Regulatory Information 91 Product Regulatory Compliance 91 Index 93 ...

Page 4: ...ed reproduced or translated to another language without the prior written consent of MPC Computers LLC 906 E Karcher Road Nampa Idaho 83687 Trademark Notice Windows Windows 2000 MS DOS and Microsoft are registered trademarks of Microsoft Corporation Pentium and MMX are trademarks or registered trademarks of Intel Corporation Other product names mentioned herein are used for identification purposes...

Page 5: ...mmended that you read all documentation in addition to this manual related to any software or hardware supplied with your storage solution For More Information For the latest information about your storage solution and about MPC services please visit the MPC Web site at www mpccorp com Manual Comments If you would like to comment or ask questions about the manual please contact us at manuals mpcco...

Page 6: ...lure to heed these warnings could negate the user warranty Special Text The text in this guide is formatted to highlight unique information or instructions Review the following examples of special text used throughout this manual Screen window names functions or anything that appears on the screen is formatted in bold For example Click OK the Standards screen the Edit menu Keyboard strokes are ind...

Page 7: ...t the entire manual complete the following steps 1 Click the book titled NetFRAME 1420 Technical Reference Manual located at the top of the Contents tab 2 Click the Print button located on the menu bar 3 When the Print Topics dialog box appears select Print the selected heading and all subtopics 4 Click OK 5 When the Print dialog box appears make the appropriate selections and print the manual Not...

Page 8: ...ort mpccorp com Please note that not all of the manual updates will be applicable to your system Complete the following steps to search for manual updates 1 Go to the MPC Support Web site at http support mpccorp com 2 Click the Platforms link 3 Click the Components link 4 Click the Manuals link 5 Search for the following part number EMA001076 XX If the manual has been updated the XX number will be...

Page 9: ...east 125 of the electrical current rating of this product Plug the Power cord s into a socket that is properly grounded before turning on the power Be aware of the locations of the power on off switch on the chassis as well as the room s emergency power off switch disconnection switch or electrical outlet If an electrical accident occurs you can then quickly remove power from the system Do not wor...

Page 10: ...t on the power cord Do not place this product where people might walk on the cord If you use an extension cord with this product make sure that the total amperage rating of all equipment plugged into it does not exceed the amperage rating of the extension cord Ensure that all the products plugged into the main AC power outlet do not exceed 15 amps Unplug the product from the main electrical AC pow...

Page 11: ...uscles keep your back straight and bend your knees when lifting the system After removing the components or chassis covers from the system place them on a table for safeguard Be sure to remove any jewelry or metal objects before working on the chassis to avoid short circuits should these objects come into contact with power circuits After accessing the interior of the chassis be sure to close the ...

Page 12: ... grounding purposes make sure your computer chassis provides excellent conductivity between the power supply the case the mounting fasteners and the system board Operating Environment Temperature Concerns The system specifications ensure the server will operate in ambient room temperatures up to 95 F 35 C It is important to keep your server out of direct sunlight and away from other heat sources s...

Page 13: ... or surges install a high quality power surge protector between the wall outlet and all of the system s connected components If even one component is not connected to the surge protector the entire system could be at risk You should note that some power strips are not surge protectors but simply extension cords If your local area is subject to frequent electric power failures MPC recommends attach...

Page 14: ...Single Intel Celeron D or Intel Pentium 4 or Intel Pentium D Processor LGA 775 Socket Memory Four DIMM sockets supporting up to 8GB ECC DDR2 SDRAM Chipset Intel E7230 chipset Expansion Slots One universal PCI X 133 MHz PCI Express x8 slot and one 32 bit 33 MHz 5V PCI slot The PCI X 133 MHz slot is available for use with the riser card included with the system the PCI Express x8 slot is available f...

Page 15: ...ve Bays One 1 floppy drive One 1 slim CD ROM drive Chassis Dimensions and Weight Form Factor 1U rackmount Dimensions WxHxD 16 8 x 1 7 x 22 6 in 426 x 43 x 574 mm Weight Approximately 45lbs shipping weight Server Chassis Views The following sections will help you locate and identify the components and connectors on your server Front Panel Views Back Panel View Control Panel Buttons and LEDs ...

Page 16: ...ront Panel I O Definitions Letter Definition A 1 Hot swap SATA Drive Bay 2 B Slim CDROM 1 C Floppy 1 D Front Control Panel Back Panel View The figure below illustrates the connectors on the back panel of your NetFRAME 1420 server chassis Note The appearance location and existence of the components mentioned may vary by model Back Panel View Back Panel Definitions Letter Definition A Power Supply M...

Page 17: ...tivity hard disk drive activity and overheat fan fail conditions The control panel also includes a main power button and a system reset button Control Panel Buttons and LEDs LED Button Definitions Letter Description D Power Button This is the main power switch which is used to apply or turn off the main system power Turning off system power with this button removes the main power but keeps standby...

Page 18: ...ature being too warm Check the routing of the cables and make sure all fans are present and operating normally You should also check to make sure that the chassis covers are installed Finally verify that the heatsinks are installed properly This LED will remain flashing or on as long as the indicated condition exists LED Control Panel LED Button Descriptions Server Installation This section provid...

Page 19: ...install the rails Install the heaviest server components on the bottom of the rack first and then work up Use a regulating uninterruptible power supply UPS to protect the server from power surges voltage spikes and to keep your system operating in case of a power failure Allow the power supply units to cool before touching them Always keep the rack s front door and all panels and components on the...

Page 20: ...rgy levels are present inside the power supply There are no user serviceable parts inside the power supply servicing should be performed by technically qualified personnel Caution For proper cooling and airflow always install the access panel before turning the server on Operating the server without the access panel in place can damage system parts Rack Installation This section provides informati...

Page 21: ...f the power system for the equipment rack is installed on a branch circuit with more than 20 amperes of protection you must provide supplemental protection for the server If more than one server is installed in the rack the power source for each server must be from a separate branch circuit Temperature The operating temperature of the server when installed in an equipment rack must not go below 10...

Page 22: ...ck must provide sufficient airflow to the front of the server to maintain proper cooling Rack Mounting Considerations Ambient Operating Temperature If installed in a closed or multi unit rack assembly the ambient operating temperature of the rack environment may be greater than the ambient temperature of the room Therefore consideration should be given to installing the equipment in an environment...

Page 23: ...ress the locking tab to release the inner rail from its locking position and pull out the inner rail from the rail assembly The inner rails are to be attached to the chassis and the outer rails are to be installed in the rack Identifying the Sections of the Rack Rails 2 Locate the five holes on each side of the chassis and locate the five corresponding holes on each of the inner rail ...

Page 24: ... racks with the depth of 28 to 33 1 In the package locate a pair of front short and rear long brackets Please note that the brackets are marked with Up Front Arrows front and Up Rear arrows rear 2 Secure the front short bracket marked with the Up Front arrows to the outer rail with two Type G screws 3 Attach the rear long bracket to the other end of the outer rail and secure the rear long bracket ...

Page 25: ...low The system may not slide into the rack smoothly or easily when installed the first time However some adjustment to the slide assemblies might be needed for easy installation 8 You will need to release the safety taps on both sides of the chassis in order to completely remove the chassis out of the rack ...

Page 26: ...ails of rail assemblies to the rack The rails are designed to fit in the racks with the depth of 28 to 33 1 In the package locate a pair of front short and rear long brackets Please note that the brackets are marked with Up Front Arrows front and Up Rear arrows rear 2 Secure the front short bracket marked with the Up Front arrows to the outer rail with two Type G screws as shown below ...

Page 27: ... of the rack and secure it to the rack with two Type H screws and Type I washers as shown below 4 Attach the rear long bracket to the rear end of the rack and secure it to the rack with two Type H screws and Type I washers as shown below Repeat the same steps to install the other outer rail to the other side of rack ...

Page 28: ... Rails to Open Rack 5 Measure the depth of your rack and adjust the length of the rails accordingly Then secure the rails to the chassis with Type G screws 6 Slide the inner rails which are attached to the chassis into the outer rails on the rack ...

Page 29: ...MPC Computers LLC NetFRAME 1420 Slide System into Rack ...

Page 30: ...ging unplugging the keyboard or mouse Otherwise the system may automatically power up when adding the component This could also damage the system board or the component you are adding and is not covered under warranty Safety and Preparation To avoid personal injury and property damage please carefully follow all the safety steps listed below Electrostatic Discharge ESD Cautions Leave the module in...

Page 31: ...nal injury or equipment damage can result Warning Hazardous voltage current and energy levels are present inside the power supply There are no user serviceable parts inside the power supply servicing should be performed by technically qualified personnel Caution For proper cooling and airflow always install the access panel before turning the server on Operating the server without the access panel...

Page 32: ...crews and fasteners for later use If necessary label these screws or fasteners for easy identification 7 Press the release tabs to release the cover from its locking position 1 Removing the Access Panel 8 Once the top cover is released from its locking position push the cover toward the rear side and slide it out from the chassis ...

Page 33: ... it from the system Caution The system board conforms to the PCI 2 2 specification This requires 3 3v standby for all PCI slots DIMM banks and PS 2 outputs KB PS 2 Mouse Always remember to unplug the AC power cord before adding any PCI cards memory or plugging unplugging the keyboard or mouse Otherwise the system may automatically power up when adding the component This could also damage the syste...

Page 34: ...timize airflow Note It is very important that the chassis top cover is properly installed for the airflow to circulate properly through the chassis and cool the components System Fan Failure If a fan fails the remaining fans will ramp up to full speed and the overheat fan fail LED on the control panel will blink on and off Replace any failed fan at your earliest convenience with the same type and ...

Page 35: ... you will need to gain access to the inside of the system by removing the top cover of the chassis Note Only a slim CD ROM drive will fit into this system Serial ATA Drive Installation 1 Mounting a Serial ATA drive in a drive carrier The Serial ATA drives are mounted in drive carriers to simplify their installation and removal from the chassis These carriers also help promote proper airflow for th...

Page 36: ...ve carriers must remain in the drive bays to maintain proper airflow Serial ATA Power Cables Serial ATA power cables should be routed so that they do not block the airflow through the chassis Serial ATA Backplane The Serial ATA drives plug into a backplane that provides power drive ID and bus termination A RAID controller can be used with the backplane to provide data security The operating system...

Page 37: ...server accommodates has a single 300 watt power supply This power supply has the capability of operating at 100 240 input volts Depress the main power button on the front of the chassis and then unplug the AC power cord to completely remove power from the system before removing the power supply Warning Depress the main power button on the front of the chassis and then unplug the AC power cord to c...

Page 38: ...MPC Computers LLC NetFRAME 1420 38 Removing Screws 4 Lift the power supply out of the chassis 2 Removing the Power Supply ...

Page 39: ...emory are supported so you may populate any number of DIMM slots Populating DIMM 1A DIMM 1B and or DIMM 2A DIMM 2B with memory modules of the same size and of the same type will result in dual channel two way interleaved memory which is faster than the single channel non interleaved memory When ECC memory is used it may take 25 40 seconds for the VGA to display Notes 1 Due to chipset limitation 8G...

Page 40: ...to the notch along the bottom of the module to prevent inserting it incorrectly 3 Gently press down on the DIMM module until it snaps into place in the slot Side View of DDR Module Installation into Slot Removing Memory Modules The information below describes how to remove a memory module Use your thumbs to gently push each release tab outward to free the DIMM from the slot Top View of DDR Slot ...

Page 41: ...ents Make sure that you install the processor into the CPU socket before you install the CPU heatsink Caution Avoid placing direct pressure to the top of the processor package Always remove the power cord first before adding removing or changing any hardware components Installing the Processor The information below describes how to install a processor 1 Press the socket lever to release the load p...

Page 42: ...r thumb and your index finger to hold the CPU at the North Center Edge and the South Center Edge of the CPU 5 Align Pin 1 of the CPU with Pin 1 of the socket Once aligned carefully lower the CPU straight down and into the socket Do not drop the CPU on the socket Do not move the CPU horizontally or vertically Do not rub the CPU against the surface of the socket or against any pins of the socket whi...

Page 43: ...o make sure that the CPU is properly installed 7 Use your thumb to gently push the lever down and lock it in the hook 8 If the CPU is properly installed into the socket the plastic cap will be automatically released from the load plate when the lever is pushed into the hook Remove the plastic cap from the system board ...

Page 44: ...quired amount has already been applied 2 Place the heatsink on top of the CPU so that the four mounting holes are aligned with those on the retention mechanism 3 Screw in two diagonal screws eg the 1 and the 2 screws until just snug do not fully tighten the screws which may damage the CPU 4 Finish the installation by fully tightening all four screws ...

Page 45: ...rews 3 Hold and gently wriggle the heatsink to loosen it from the CPU Do not use excessive force when loosening the heatsink 4 Once the heatsink is loosened remove it from the CPU socket 5 Clean the surfaces of the CPU and the heatsink to remove the old thermal grease Reapply the proper amount of thermal grease on the surface before re installing the heatsink ...

Page 46: ...ttings the I O chip and the installation of your system board Features and Specifications PC Health Monitoring Jumper Settings Power Configuration Settings System Board Installation Software Installation System Board Features and Specifications The following is a general outline of the system board features and specifications System Board Layout not drawn to scale ...

Page 47: ...6 in 305 x 244 mm PC Health Monitoring Onboard voltage monitors for CPU cores Chipset Voltage Memory Voltage 3 3V 5V 5V Standby 12V and 12V CPU 4 phase switching voltage regulator Status monitor for fan speed System OH Fan Fail LED Control Pulse Width Modulation Fan Control Low noise fan speed control Environmental temperature monitoring via BIOS PWR Up from AC PWR loss ACPI Features Slow blinking...

Page 48: ...oring This section describes the PC health monitoring features of the NF1420 The system board has an onboard System Hardware Monitor chip that supports PC health monitoring Fan Status Monitor with Firmware Speed Control The PC health monitor can check the RPM status of the cooling fans The onboard fans are controlled by Thermal Management via BIOS CPU Overheat Fan Fail LED and Control This feature...

Page 49: ...ard s jumpers and the table explains the settings for the configuration jumpers Caution Some jumpers have a small tab on top that you can grip with your fingertips forceps or with a pair of fine needle nosed pliers If your jumpers do not have such a tab take care when using needle nosed pliers to remove or install a jumper grip the narrow sides of the jumper with the pliers never grip the wide sid...

Page 50: ...Clear JBT1 is used to clear CMOS Instead of pins this jumper consists of contact pads to prevent the accidental clearing of CMOS To clear CMOS 1 First power down the system and unplug the power cord s 2 With the power disconnected short the CMOS pads with a metal object such as a small screwdriver 3 Remove the screwdriver or shorting device 4 Reconnect the power cord s and power on the system Note...

Page 51: ... speaker place a jumper on pins 3 4 of J9 If you wish to use an external speaker connect the speaker header to all four pins of J9 Speaker Jumper Pin Definitions JLAN1 Enable Disable Change the setting of jumper JPL1 to enable or disable the JLAN1 Ethernet port on the motherboard The default setting is enabled ...

Page 52: ...tFRAME 1420 52 System Board Jumpers JPL1 and JPL2 JLAN1 Jumper Settings JLAN2 Enable Disable Change the setting of jumper JPL2 to enable or disable the JLAN2 Ethernet port on the motherboard The default setting is enabled ...

Page 53: ...JLAN2 Jumper Settings I2 C Bus to PCI Jumpers JI2 C1 and JI2 C2 allow you to connect the PCI PCI X slots to the System Management I2 C Bus The default setting is Open to disable the connection Both jumpers must be set to the same setting I2 C Bus to PCI Jumper Settings ...

Page 54: ...mper JPF allows you to enable or disable the Force Power On function If enabled system power will always stay on If disabled the normal setting the user needs to press the power button to power on the system Power Force On Jumper Power Force On Jumper Settings ...

Page 55: ...s the Watch Dog function Watch Dog is a system monitor that can reboot the system when a software application is hung up Pins 1 2 will cause WD to reset the system if an application is hung up Pins 2 3 will generate a non maskable interrupt signal for the application that is hung up Watch Dog must also be enabled in BIOS When enabled the user needs to write their own application software in order ...

Page 56: ...in on BIOS Support for USB Keyboard If the USB keyboard is the only keyboard in the system it keyboard will function like a normal keyboard during system boot up Main Switch Override Mechanism When an electrically compliant ATX power supply is used the power button can function as a system suspend button When the user depresses the power button the system will enter a SoftOff state The monitor wil...

Page 57: ...up on a nonconductive static free surface to prevent shorting out the battery leads If you place the system board on a conductive surface the battery leads may short out If they do this will result in a loss of CMOS data and will drain the battery Do NOT slide the system board over any surface Touch a grounded metal object before removing the board from the antistatic bag Handle the board by its e...

Page 58: ...e J27 6 Connecting Power Cables This system has a 24 pin primary power supply connector JPW1 for connection to the electrically compliant ATX power supply In addition there is an 8 pin secondary power connector JPW2 that also must be connected to your power supply 7 Connecting the Control Panel JF1 contains header pins for various front control panel connectors All JF1 wires have been bundled into...

Page 59: ...Matrix Storage The Intel Matrix Storage supported by the ICH7R allows the user to create RAID1 set by using only two identical hard disk drives The Intel Matrix Storage Technology creates two partitions on each hard disk drive and generates a virtual RAID0 and RAID1 sets It also allows you to change the HDD partition size without any data Configuring BIOS settings for SATA RAID Functions Native Mo...

Page 60: ...ility the system will automatically reboot The following screen appears after Power On Self Test RAID Volumes Screen 2 When you see the above screen press the Ctrl and the I keys simultaneously to have the main menu of the SATA RAID Utility appear Creating a RAID 1 Volume 1 Select Create RAID Volume from the main menu and press the Enter key The following screen will appear ...

Page 61: ...reate Volume item is highlighted A warning message displays 6 When asked Are you sure you want to create this volume Y N press Y to create the RAID volume or type N to go back to the Create Volume menu Deleting RAID Volume Warning Be sure to back up your data before deleting a RAID set You will lose all data on the disk drives when deleting a RAID set 1 From the main menu select item 2 Delete RAID...

Page 62: ... stored in the BIOS ROM by the system BIOS which gains control at boot up Starting Setup Normally the only visible POST Power On Self Test routine is the memory test As the memory is being tested press the Delete key to enter the main menu of the BIOS Setup utility From the main menu you can access the other setup screens such as the Chipset and Power menus Main BIOS Setup gives detailed descripti...

Page 63: ...tup Menu and use the Left Right arrow keys to enter the other categories of BIOS settings Main Menu The Main menu is used to report processor and memory information and to configure the system date system time and Setup languages Main Menu System Time To set the system date and time key in the correct information in the appropriate fields Then press the Enter key to save the data System Date Using...

Page 64: ... ATA SATA RAID Select Enable to enable Serial ATA RAID Functions For the Windows OS environment use the RAID driver if this feature is set to Enabled If set to Disabled use the Non RAID driver When this feature SATA RAID is set to Enabled the next item SATA AHCI Enable will not be available The options are Enabled and Disabled Default If this feature is set to Enhanced the following feature will b...

Page 65: ...termined HDD type Select CDROM if a CDROM drive is installed Select ATAPI if a removable disk drive is installed CHS Format The following items will be displayed by the BIOS TYPE This item displays the type of CPU Cylinders This item indicates the status of Cylinders Headers This item indicates the number of headers Sectors This item displays the number of sectors Maximum Capacity This item displa...

Page 66: ... the user to select the Ultra DMA Mode The options are Disabled Mode 0 Mode 1 Mode 2 Mode 3 Mode 4 and Mode 5 System Memory This display informs you how much system memory is detected in the system Extended Memory This display informs you how much extended memory is detected in the system Advanced Setup Choose Advanced from the Setup Utility main menu with the arrow keys You should see the followi...

Page 67: ...options are On and Off Power Loss Control This setting allows you to choose how the system will react when power returns after an unexpected loss of power The options are Last State Stay off and Power On Watch Dog If enabled this option will automatically reset the system if the system is not active for more than 5 minutes The options are Enabled and Disabled Summary Screen This setting allows you...

Page 68: ...without writing data to the System Memory for fast CPU data processing and operation The options are Uncached Write Through Write Protect and Write Back Cache Extended Memory If enabled this feature will allow the data stored in the extended memory area to be cached written into a buffer a storage area in the L1 L2 L3 cache inside the CPU to speed up CPU operations Select Uncached to disable this ...

Page 69: ...set Control Access the submenu to make changes to the following settings Clock Spectrum Feature If Enabled BIOS will monitor the level of Electromagnetic Interference caused by the components and will attempt to decrease the interference whenever needed The options are Enabled and Disabled ECC Conditions This setting specifies the ECC Error conditions that will be treated as ECC Error Events by th...

Page 70: ...are Disabled and Enabled Thermal Management 2 Available when supported by the CPU If enabled this feature allows you to select between Thermal Manager 1 and Thermal Manager 2 Set to Disable to activate the function of TM1 allowing the CPU to regulate its power consumption based upon the modulation of the CPU Internal clock when the CPU temperature reaches a pre defined overheat threshold Set to En...

Page 71: ...u to decide how Serial Port A is controlled The options are Enabled user defined Disabled and Auto BIOS or OS controlled Base I O Address Select the base I O address for Serial Port A The options are 3F8 2F8 3E8 and 2E8 Interrupt Set the Interrupt for Serial Port A The options are IRQ3 and IRQ4 Serial Port B This setting allows you to decide how Serial Port B is controlled The options are Enabled ...

Page 72: ...r to view the contents of the event log Event Logging This setting allows you to Enable or Disable event logging ECC Event Logging This setting allows you to Enable or Disable ECC event logging Mark DMI Events as Read Highlight this item and press Enter to mark the DMI events as read Clear All DMI Event Logs Select Yes and press Enter to clear all DMI event logs The options are Yes and No Console ...

Page 73: ...e feature of Auto Fan Control is enabled the BIOS will automatically display the status of the fans indicated in this item Fan Speed Control Modes This feature allows the user to decide how the system controls the speeds of the onboard fans If the option is set to 3 pin fan the fan speed is controlled based upon the CPU die temperature When the CPU die temperature is higher the fan speed will be h...

Page 74: ...tem Clear means such a password has not been used and Set means a supervisor password has been entered for the system User Password Is This displays whether a user password has been entered for the system Clear means such a password has not been used and Set means a user password has been entered for the system Set Supervisor Password When the item Set Supervisor Password is highlighted press the ...

Page 75: ...and press Enter Note Depending on your system s configuration and BIOS revision your system s defaults may be different from the defaults in the table below Also certain values or options shown in the table may not be present in your system s BIOS This BIOS section is for reference only Boot Menu Boot Priority Order Excluded from Boot Order Use the Up and Down Arrow Keys to select a device Use and...

Page 76: ...ly Exit Menu Exit Saving Changes Highlight this item and press Enter to save any changes you made and to exit the BIOS Setup utility Exit Discarding Changes Highlight this item and press Enter to exit the BIOS Setup utility without saving any changes you may have made Load Setup Defaults Highlight this item and press Enter to load the default settings for all items in the BIOS Setup These are the ...

Page 77: ...LE1 is not lit Note If LE1 is on it indicates that Standby PWR is on Be sure to turn off the power supply before installing or removing the components 2 Make sure the 8 pin 12v power connector at JPW2 is connected 3 Make sure that no short circuits exist between the system board and chassis 4 Disconnect all ribbon wire cables from the system board including those for the keyboard and mouse 5 Remov...

Page 78: ...o use a high quality power supply A poor quality power supply may cause the system to lose the CMOS setup information 2 The battery on your system board may be old Check to verify that it still supplies 3VDC If it does not replace it with a new one 3 If the above steps do not fix the Setup Configuration problem contact your vendor for repairs BIOS POST Messages During the Power On Self Test POST t...

Page 79: ...tial POST values 0Eh Initialize I O component 0Fh Initialize the local bus IDE 10h Initialize Power Management 11h Load alternate registers with initial POST values 12h Restore CPU control word during warm boot 13h Initialize PCI Bus Mastering devices 14h Initialize keyboard controller 16h 1 2 2 3 BIOS ROM checksum 17h Initialize cache before memory Auto size 18h 8254 timer initialization 1Ah 8237...

Page 80: ...stem 4Bh QuietBoot start optional 4Ch Shadow video BIOS ROM 4Eh Display BIOS copyright notice 4Fh Initialize MultiBoot 50h Display CPU type and speed 51h Initialize EISA board 52h Test keyboard 54h Set key click if enabled 55h Enable USB devices 58h 2 2 3 1 Test for unexpected interrupts 59h Initialize POST display service 5Ah Display prompt Press F2 to enter SETUP 5Bh Disable CPU cache 5Ch Test R...

Page 81: ...87h Configure Motherboard Configurable Devices optional 88h Initialize BIOS Data Area 89h Enable Non Maskable Interrupts NMIs 8Ah Initialize Extended BIOS Data Area 8Bh Test and initialize PS 2 mouse 8Ch Initialize floppy controller 8Fh Determine number of ATA drives optional 90h Initialize hard disk controllers 91h Initialize local bus hard disk controllers 92h Jump to UserPatch2 93h Build MPTABL...

Page 82: ... Display MultiBoot menu BEh Clear screen optional BFh Check virus and backup reminders C0h Try to boot with INT 19 C1h Initialize POST Error Manager PEM C2h Initialize error logging C3h Initialize error display function C4h Initialize system error handler C5h PnPnd dual CMOS optional C6h Initialize note dock optional C7h Initialize note dock late C8h Force check optional C9h Extended checksum opti...

Page 83: ...ze interrupt vectors F1h Initialize Run Time Clock F2h Initialize video F3h Initialize System Management Manager F4h Output one beep F5h Clear Huge Segment F6h Boot to Mini DOS F7h Boot to Full DOS If the BIOS detects error 2C 2E or 30 base 512K RAM error it displays an additional word bitmap xxxx indicating the address line or bits that failed For example 2C 0002 means address line 1 bit one set ...

Page 84: ...al system startup are usually caused by incorrect installation or configuration Hardware failure is a less frequent cause Checklist Are the power supplies turned on Check the switches on the back of the chassis Are all cables correctly connected and secured Are the processors fully seated in their slots on the server board Are all add in PCI boards fully seated in their slots on the server board A...

Page 85: ...easy to correct however can also cause such problems Checklist If you are running the software from a diskette try a new copy of the software If you are running the software from a CD ROM disk try a different disk to see if the problem occurs on all disks If you are running the software from a hard disk drive try running it from a diskette If the software runs correctly there may be a problem with...

Page 86: ...his section provides a more detailed approach to specific problems you may encounter The following information is covered in this section Power Light Problems Overheat Problems Screen Character Problems Cooling Fan Rotation Problems Server Connection Problems Network Problems Application Software Problems Undetected Bootable CD ROM Power Light Problems If the power light does not light check the f...

Page 87: ...ller board is fully seated in the server board connector 2 Reboot the system for changes to take effect 3 If there are still no characters on the screen after you reboot the system and POST emits a beep code write down the beep code you hear This information is useful for your service representative 4 If you do not receive a beep code and characters do not appear the video display monitor or video...

Page 88: ...ocumentation for more information on crossover cables Check the network controller LEDs that are visible through an opening at the system back panel Network Problems The following table describes some possible network problems and possible solutions Network Problems Problem Action The server hangs when the drivers are loaded Change the PCI BIOS interrupt settings Diagnostics pass but the connectio...

Page 89: ...etting up and using the software Try a different copy of the software to see if the problem is with the copy you are using Make sure all cables are installed correctly Verify that the server board jumpers are set correctly If other software runs correctly on the system contact your vendor about the failing software Undetected Bootable CD ROM If the bootable CD ROM is not detected check the followi...

Page 90: ...you call will help solve your problem faster You might be asked to check the system s current BIOS configuration Refer to BIOS Setup to familiarize yourself with the different settings Make sure your system is plugged into a grounded power outlet Place the system as close to a telephone as possible preferably close enough so that you can simultaneously talk with the technical support representativ...

Page 91: ...ons FCC Class B EN 55022 Class B EN 61000 3 2 3 3 CISPR 22 Class B Electromagnetic Immunity EN 55024 CISPR 24 EN 61000 4 2 EN 61000 4 3 EN 61000 4 4 EN 61000 4 5 EN 61000 4 6 EN 61000 4 8 EN 61000 4 11 Safety EN 60950 IEC 60950 Compliant UL Listed USA CUL Listed Canada TUV Certified Germany CE Marking Europe ...

Page 92: ......

Page 93: ...4 10h Initialize Power Management 78 115 2K 66 115V 230V 77 11h Load 78 12 MHz 66 128 lines 66 12h Restore CPU 78 12V 14 48 66 12V ATX 37 13h Initialize PCI Bus Mastering 78 14h Initialize 78 16h 1 2 2 3 BIOS ROM 78 16MHz 66 17h Initialize 78 18h 8254 78 19 2K 66 1Ah 8237 DMA 78 1Ch Reset Programmable Interrupt Controller 78 2 2 88MB 3 5 63 20h 1 3 1 1 Test DRAM 78 22h 1 3 1 3 Test 8742 Keyboard C...

Page 94: ...2 1 2 3 Check ROM 78 47h Initialize I20 78 48h Check 78 49h Initialize PCI 78 4Ah Initialize 78 4Bh QuietBoot 78 4Ch Shadow 78 4 cm 34 4Eh Display BIOS 78 4Fh Initialize MultiBoot 78 4GB 66 4 pin 66 4 post 20 4 sec set 66 4 sec 66 5 50h Display CPU 78 512K RAM 78 512K 640K 66 51h Initialize EISA 78 52h Test 78 54h Set key 78 55h Enable USB 78 57 6K 66 58h 2 2 3 1 Test 78 59h Initialize POST 78 5Ah...

Page 95: ...8 87h Configure Motherboard Configurable Devices 78 88h Initialize BIOS Data Area 78 89 336 EEC 91 89h Enable Non Maskable Interrupts 78 8Ah Initialize Extended BIOS Data Area 78 8Bh Test 78 8Ch Initialize 78 8Fh Determine 78 8GB Memory 39 8Mb Firmware Hub Phoenix BIOS 14 8MHz 66 8 pin 12v 77 9 90C 66 90h Initialize 78 91h Initialize 78 92h Jump UserPatch2 78 92h Jump 78 93h Build MPTABLE multi pr...

Page 96: ...MB 78 address 78 Adjacent Cache Line Prefetch 66 Advanced changing 66 Advanced 66 Advanced Chipset Control 66 Advanced Configuration 66 Advanced Menu 66 Advanced Processor Options 66 Advanced Setup 66 AEh Clear Boot 78 Alarm 17 Align Pin 41 All Advanced BIOS Setup 66 All Main 63 allow BIOS 66 CD ROM 89 CPU 66 allow 66 89 Altitude Operational Levels 12 Ambient Operating Temperature 21 and or 4 6 84...

Page 97: ...6 BBh Initialize PnP Option ROMs 78 BCh Clear 78 BDh Display MultiBoot menu 78 Before Power On 77 Before You Call 90 BEh Clear 78 BFh Check 78 Bi Directional 66 BIOS access 74 allow 66 Configuring 58 display 63 E7h Go 78 exit 58 BIOS 14 48 49 58 62 63 66 74 75 76 78 86 89 90 BIOS Date 63 BIOS POST Messages 78 BIOS ROM 66 78 BIOS Setup entering 62 exit 76 BIOS Setup 62 76 84 BIOS Setup Utility 58 B...

Page 98: ...66 Cache Video BIOS Area 66 CAh Redirect Int 15h 78 Canada 91 Canadian Department ICES 003 91 Canadian Department 91 Capacity item 58 Care 9 Carrier 35 CBh Redirect Int 13h Memory Technologies 78 CBh Redirect Int 13h 78 CCh Redirect Int 10h 78 CD Install 7 review 86 CD 7 86 CDh Re map I O 78 CD ROM access 35 allow 89 installing removing 35 removing 35 CDROM 63 CD ROM 9 13 17 35 85 89 CD ROM Floppy...

Page 99: ...ing 49 Clock 66 Clock Spectrum Feature 66 Closed 49 CMOS clearing 49 install 77 lose 77 type 77 CMOS 49 57 62 77 78 CMOS Clear 49 CMOS Setup Menu exit 63 CMOS Setup Menu 63 COM Port Address 66 Common Activity In 49 Communications 91 Components 8 Configuration Data Changing 62 Configuration Data 62 Configuring BIOS 58 Configuring 58 Conformity CE Declaration 91 Conformity 91 conforms PCI 2 2 33 con...

Page 100: ...48 56 63 66 78 CPU 4 phase switching 14 CPU and or damage 41 CPU and or 41 CPU Cores Onboard Voltage Monitors 48 CPU Cores 48 CPU heatsink install 41 CPU heatsink 41 CPU Internal 66 CPU Overheat Fan Fail LED 48 CPU Speed display 66 CPU Speed 66 CPU Temperature 66 CPU Temperature Threshold 66 Create Volume item 58 Create Volume menu back 58 Create Volume menu 58 Creating RAID 58 Creating 58 CSA 950...

Page 101: ...MM free 39 number 39 removing 39 DIMM 14 19 30 33 39 77 84 DIMM 1A DIMM 1B Populating 39 DIMM 1A DIMM 1B 39 DIMM 2B 39 Direct 66 Disable ECC 66 Disable Jumper JPF 49 Disabled Power Force On 49 Set 63 66 VGA Connector 49 Disabled 49 63 66 74 Discard Changes 76 disconnect AC 77 disconnect 77 Discrete MTRR Allocation 66 display BIOS 63 CPU Speed 66 Diagnostic Screen 66 POST 78 display 63 66 78 DMA 78...

Page 102: ...o BIOS 78 E7h Go 78 E8h Set Huge Segment 78 E9h Initialize Multi Processor 78 EAh Initialize OEM 78 EBh Initialize PIC 78 ECC result 66 ECC 39 66 86 ECC Conditions 66 ECC DDR II 677 533 400 77 ECC Error 66 ECC Error Events 66 ECC Error Handler 66 ECC Event Logging 66 ECC Unbuffered GB 14 ECC Unbuffered 14 ECC unbuffered DDR II 667 533 400 SDRAM 39 ECh Initialize Memory 78 ECP 66 EDh Initialize Mem...

Page 103: ...ire Manual Printing 7 Entire Manual 7 Environment Operating 12 Environment 12 EPP 66 Equipment Rack Precautions 20 ES 78 Esc 58 63 ESCD 66 ESD 9 30 33 57 ESD damaged 9 30 33 ESD safe wear 19 30 ESD safe 19 30 Ethernet 1 5A 37 Ethernet 37 Europe 91 European Union 91 Event Log Capacity 66 Event Log Validity 66 Event Logging 66 exceed Class 91 exceed 91 Excluded 75 Execute Disable Bit function 66 Exe...

Page 104: ...Modes 66 Fan Status Monitor 48 FAQs 86 Fast PIO1 63 Fast PIO2 63 Fast PIO3 63 Fast PIO4 63 Fast UART 16550 14 FCC 91 FCC Class 91 FCC Rules Part 15 91 FCC Rules 91 Features 14 feature SATA RAID 63 Firmware Speed Control 48 fix Setup Configuration 77 fix 77 Fixed Disk Boot Sector 74 Flash ROM 78 Flicker 91 Floppy Disk Controller 66 Floppy Drive 35 Flow Control 66 Fluctuation 91 following electromag...

Page 105: ...58 HDD 17 58 63 HDD Activity 17 Heatsink grease 41 Installing 41 loosening 41 Once 41 Place 41 re installing 41 Removing 41 Heatsink 41 help MPC 6 help 6 high throughout 66 Hit Enter 63 hotswap enable 35 hotswap 35 Hot swap SCA Drive Bay 16 hot swappable 35 HT 14 Humidity Concerns 12 Humidity Operational Levels 12 Hyper Threading 14 I I O provides 58 I O 19 30 46 58 66 78 I O Configuration 16 I O ...

Page 106: ...talling removing 35 Instant Off set 66 Instant Off 66 INT 19 78 Intel Corporation 4 Intel E7230 14 Intel ICH7R 14 Intel ICH7R SATA Controller 14 Intel ICH7R SATA RAID Utility use 58 Intel ICH7R SATA RAID Utility 58 Intel ICH7R SATA RAID Utility Program 58 Intel ICH7R Serial RAID 58 Intel Matrix Storage 58 Intel Matrix Storage Technology 58 Intel PXH 14 Intel RAID Configuration Utility run 58 Intel...

Page 107: ...y Timer 66 LBA 63 LBA Format 63 LBA Mode Control 63 LE 14 le Ministre Canadian des Communications 91 LE1 77 LED Button Definitions 17 LED Indicator 14 LEDs blinking 14 LEDs 14 17 34 35 56 77 84 86 88 Left Right 74 75 76 Legacy Diskette 63 Legacy Mode 63 Legacy USB support 66 Legacy USB 66 Legacy USB Support 66 level Electromagnetic Interference 66 level 66 LGA 14 Liability 4 Life Support 4 Lifting...

Page 108: ...e 62 Main Setup Menu 62 Main Support Site 5 90 Main Switch Override Mechanism 56 Make 86 Manual Comments 5 Manual Conventions 6 Manual Number 6 Manual Updates 8 Manuals Parts 7 Printing 7 Manuals 7 8 manufacturer s See 87 manufacturer s 21 87 mark DMI 66 mark 66 Mark DMI Events 66 Maximum Capacity 63 MB 14 Mechanical Loading 21 Memory 39 Memory Cache 66 Memory Errors 77 Memory Module Errors 78 Mem...

Page 109: ...essor 78 Multi Sector Transfer 63 Mylar 57 N Nampa 4 Native 58 Native IDE Mode 63 Native Mode 58 Native Mode Operation 63 NEMA 5 15R 84 NEMA 6 15R 84 NET CFG file 88 NetFRAME 1420 Drivers 7 NetFRAME 1420 6 14 16 20 NetFRAME 1420 Technical Reference Manual 7 NetFRAME1420 pdf 7 Network Interface Card 56 Network Problems 88 New Application Software Problems 85 New Fan Installing 34 New Fan 34 New Pow...

Page 110: ...ine 7 Online Help 7 ONLY 9 30 33 Open 49 Open Rack 26 Open Rack Installation 26 Operating Environment 12 Precaution 9 Operating 9 12 Operating Systems 66 Optimized Default Settings 58 Optimized Server w 3 pin 66 Optimized Server w 4 pin 66 option 63 Option ROM Scan 66 Options 66 OS 66 Other 66 Other Environmental Concerns 12 Outer Rails Installing 24 Outer Rails 24 Output Only 66 Overall SATA 58 o...

Page 111: ...2 bit Slot 66 PCI 33 MHz 66 PCI 66 MHz 66 PCI BIOS Change 88 PCI BIOS 88 PCI Cards 34 PCI Configuration 66 PCI Expansion Slot 16 PCI E Gigabit Ethernet Controller 14 PCI E x8 14 PCI Express x8 34 PCIX 66 PCI X 1 0 ACPI 1 0 14 PCI X 100 MHz 66 PCI X 133 MHz 34 66 PCI X 64 Bit 133 MHz 14 PCI X 66 MHz 66 PCMCIA 78 PDF 7 8 PEM 78 Pentium 4 14 Phillips 31 PhoenixBIOS 78 Pin 41 Placing CPU 41 heatsink 4...

Page 112: ...st 58 Power On Self Test During 78 Power On Self Test 78 Precaution Operating 9 Precaution 9 preconfigured 35 Preparation 30 33 Preparing Setup 19 Preparing 19 Press Reset Button 17 Press 17 31 Press Ctrl 58 Press F2 78 Primary 66 Primary IDE Master Device access 63 Primary IDE Master Device 63 Primary IDE Master Slave 63 Print button 7 Print dialog 7 Print Topics dialog 7 Printing Entire Manual 7...

Page 113: ... deleting 58 select 58 support 14 use 63 RAID 14 35 58 63 RAID Configurations 58 RAID Level 58 RAID Volume Deleting 58 RAID Volume 58 RAID Volumes Screen 58 RAID0 58 RAID1 58 RAID1sets 58 Rail Installing 26 screws 26 Rail 26 Rail Holes Locating 23 Rail Holes 23 RAM 78 rate Bus Master 66 rate 66 Read 66 Recoverable POST Errors 78 Reduced Airflow 21 refer Intel s 66 refer 66 regarding hardware softw...

Page 114: ...rt 80h Cycles 66 RPM check 48 RPM 48 RS232 78 rub CPU 41 rub 41 run Intel RAID Configuration Utility 58 Setup 62 run 58 62 S Safety 30 SATA 17 58 63 SATA AHCI 63 SATA Control Mode 58 SATA Controller Mode 63 SATA Port 63 SATA Port 2 SATA Port 63 SATA RAID 58 SATA RAID Enabled 58 SATA RAID Functions 58 SATA RAID Utility 58 Save Changes 76 scaleable 1U rackmount 14 SCI 66 Screen Character Problems 87...

Page 115: ...rface function 63 Serial ATA Advanced Host Interface 63 Serial ATA Backplane 35 Serial ATA Drive Installation 35 Serial ATA Drives 35 Serial ATA Power Cables 35 Serial ATA RAID Functions 63 Serial Port 66 Server 19 Server Connection Problems 88 Server Precautions 19 Service 90 Set 4 sec 66 CPU 66 Disabled 63 66 Enabled 63 66 Instant Off 66 Interrupt 66 Write Protect 74 Yes 66 Set 63 66 74 Set Supe...

Page 116: ...ge 58 South Center Edge CPU 41 South Center Edge 41 South Key 41 Speaker LED 48 Special Text 6 Specific Problems 86 Specification 2 02 37 Specifications 14 Speed 1066 MHz 800 MHz 533 MHz 14 ATA100 66 86 Speed 14 66 86 SSI 37 Standards 6 63 Standby PWR 77 Standby PWR LED 77 States 66 Static DRM 66 Stay 66 Step skip 58 Step 58 submenu Access 66 submenu 66 Summary Screen 66 Super I O 14 Supervisor Pa...

Page 117: ...guration Losing 77 System s Setup Configuration 77 T Take Caution 66 Taking Apart Your System 30 Taking 30 taskbar check 7 taskbar 7 Technical Reference Manual 7 telecommunication 19 30 Temperature Concerns 12 Terminal POST Errors 78 THE IMPLIED WARRANTY OF MERCHANTABILITY AND THE IMPLIED WARRANTY OF FITNESS FOR PARTICULAR PURPOSE ARE HEREBY DISCLAIMED 4 THE IMPLIED WARRANTY OF MERCHANTABILITY AND...

Page 118: ... 13 uninterruptible 13 19 Universal Serial Bus 14 Unix 66 Unpacking System 18 Unpacking 18 unplug AC 19 30 37 unplug 19 30 37 Up Use 75 Up Front 24 26 Up Front Arrows 24 26 Up Rear 24 26 UPS 13 19 US Canada 91 USA 91 USA FCC 91 USB enable 66 USB 14 56 66 USB Function 66 USB item value 66 USB item 66 USB Keyboard BIOS Support 56 USB Keyboard 56 use Intel ICH7R SATA RAID Utility 58 PW_ON 49 RAID 63 ...

Page 119: ...per Settings 49 WD 49 wear ESD safe 19 30 wear 19 30 Welcome 5 When RAID Level item 58 WHETHER EXPRESS OR IMPLIED 4 WILL APPLY AFTER THE LIMITED WARRANTY PERIOD HAS EXPIRED 4 Winbond 83627 HF 14 Windows 2000 Advanced Server 39 Windows 2000 OS 63 Windows Operating System install 58 Windows Operating System 58 Windows OS Intel s ICH RAID Controller 63 Windows OS 63 Windows Server 2003 Enterprise Edi...

Page 120: ...MPC Computers LLC NetFRAME 1420 120 set 74 Write Protect 66 74 Write Through 66 www ssiforum org 37 X X14 66 X15 66 X16 66 x8 14 XP 66 XX 8 xxxx 78 Y Y N 58 Yes set 66 Yes 66 ...

Reviews: