


Get Started
off, swipe up
>
Settings
>
Stylus
>
When device is locked
>
Don’t open anything
.
»
Customize stylus shortcuts:
The stylus shortcuts show by default when
the stylus is removed from unlocked screen. To add, delete, or change
the order of the shortcuts, swipe up
>
Settings
>
Stylus
>
When
device is unlocked
.
Tip:
For more, see
.
»
Set a removal reminder:
Set a reminder when the stylus is out for a
period of time without use. Swipe up
>
Settings
>
Stylus
, then
tap
the switch next to
Removal reminder
to turn it on. To change when
your phone sends the notification, tap
Removal reminder
.
»
Record time and location of the last removal:
To record when and
where you last removed the stylus, swipe up
>
Settings
>
Stylus
,
then tap the switch next to
Record last removal
to turn it on.
Tip:
Tap the recorded coordinates to view the location in
»
Vibrate when inserted:
To feel a quick vibration when the stylus is
in place,
swipe up
>
Settings
>
Stylus
, then tap
Vibrate when
inserted
to turn it on.
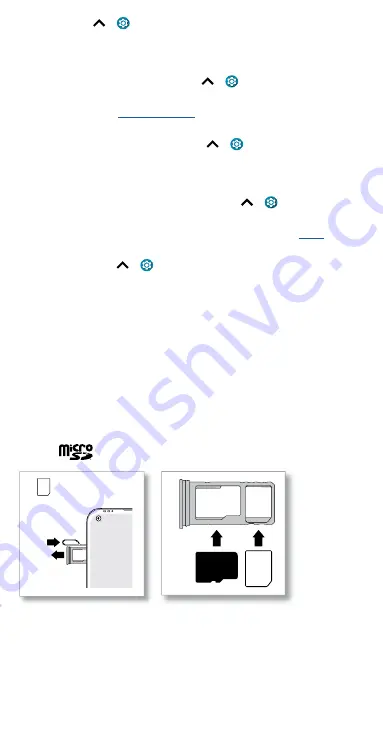
Insert the SIM and microSD cards
To activate phone service, you might need to insert a SIM card, or this
may have been done for you. You can also add a microSD card, which is
optional and sold separately.
Make sure you use the correct size SIM card and don’t cut the SIM card.
1
Insert the SIM tool into the SIM tray hole to pop out the tray.
Tip:
Refer to the diagram below for tray and hole location.
2
Insert the SIM card with the gold contacts down, then gently push the
tray into the slot. Add a microSD card for additional storage.
Note:
microSD card is optional, sold separately.
SIM card insert graphic. After the battery is removed, the SIM card is inserted in the slot on the left with the clipped corner to the upper left. The SDcard is inserted in the right slot.
Nano SIM
SIM
Summary of Contents for moto g stylus 5G
Page 1: ...User Guide ...


