background image

Phone Functions

Phone

 Funct

ion

s

33

Phone Functions

!

The Phone mode is only operational in areas where the network/service is 
available.

Making a Phone Call

A

[The Motorola 

A6188

 is having a large number of adress book functionality and is 

able to record the last 20 calls (including missed calls, outgoing calls and received 
calls). It is suggested that you make use of this function to increase the efficiency of 
your communications. Please note that you may also use the pad of your touch screen 
to dial a phone number.
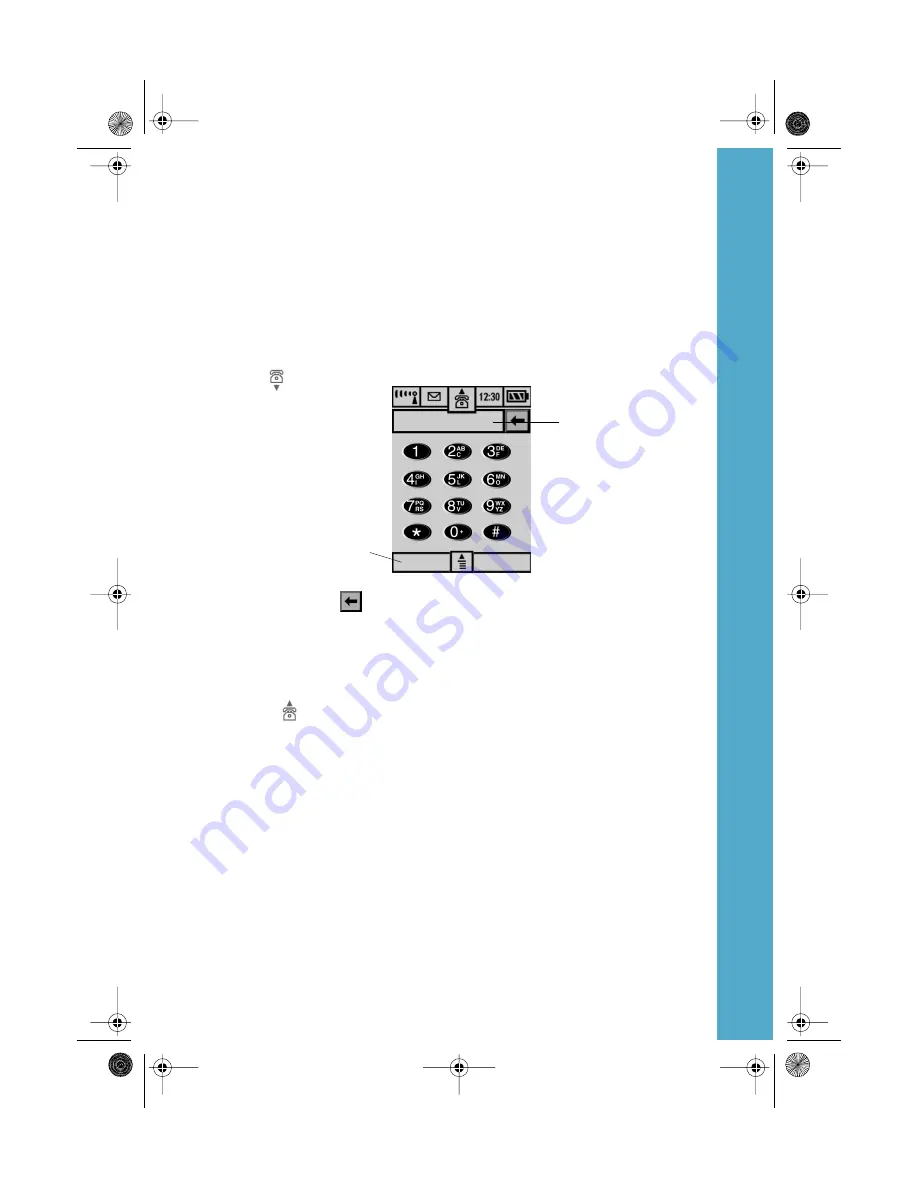
1

Press 

 at the main menu and your screen will appear as follows:

2

Press the number that you wish to call and the number will appear at the Number 
Display Panel. Press 

 if you wish to delete the last digit. Press 

Clear

 to clear the entire 

phone number at the display panel.

3

Press 

Send 

to make a phone call by dialing the number at the display panel. Press 

End


to end a call or just close the phone flip to hang up the phone.

A

To make International Direct Dial (IDD) calls or call direct extensions, see the In-Call 
Menu functions.

A

Press 

 or press 

 button to return to the main menu.

A

If there is no number in the Number Display Panel, press "Redial" to redial the last 
dialed number.

A

To make phone calls from the Adress Book, see "Using the Address Book to Call and 
Send Messages." 
To dial a number from a SMS message, see "Retrieving a Phone Number from a 
Message". 

GSM Emergency Phone Call

The worldwide GSM standard provides a single, uniform number, 112, to dial in cases of an 
emergency. You will be able to make an emergency call provided your phone is in an area 
covered by the GSM network.

Receiving a Phone Call

To receive a phone call, your phone must be switched on.  You must also be in an area where 
there is network coverage and your All Call Diversion and Call Barring settings should not be set 
to divert or bar incoming calls.

01065642361

Clear

Send

Number Display 
Panel

when no 

Exit

numbers keyed

Displays

06_phone_functions.fm  Page 33  Friday, April 7, 2000  5:25 PM

Summary of Contents for Accompli A6188

Page 1: ...y features so as to enable you to use the product safely and efficiently Usage Overview gives an outline on the usage of the various features and the basic operation methodsan introductory on the handset capabilities Phone Capabilities shows the full capabilities of the Motorola A6188 as a superior mobile phone in its class Information Capabilities helps you to better manage your wide ranging info...

Page 2: ...Introduction Introduction 2 this is blankt 01_Intro fm Page 2 Friday April 7 2000 5 20 PM ...

Page 3: ...contact details and other information Messages 53 How to send short messages e mails and other messaging services Surfing the Internet 65 Details the way to access the internet through the phones WAP capabilities Call Registers 71 Records missed calls and keeps the details of all the calls and messages making sure that you will not miss out on any single communications or information PDA Capabilit...

Page 4: ...Contents Contents 4 Games 117 Five in a Row Hua Rong Dao Memory Data Synchronization with PC 121 To transfer data between the handset and PC 02_Contents fm Page 4 Friday April 7 2000 5 56 PM ...

Page 5: ...e capabilities while in dialing or idle mode Making an International Direct Dial IDD phone call Inserting pauses into phone numbers extension or voicemail system Phone capabilities while connecting after dialing In Call menu Hold current call and make new call Switch calls Divert call Conference call Adding new conference call member Separating selected conference member from the call Accepting a ...

Page 6: ...message folder Empty trash folder Making phone calls or sending messages from address book Surfing the Internet 78 WAP setting WAP browser Initiating WAP surfing capabilities Browsing information and using surfing capabilities Making a selection Keying in the words Making phone call or receiving phone call while surfing the internet Tips on Internet services To end the internet surfing Surfing the...

Page 7: ...fety Security features Handset memory usage situation Initial settings Handset settings Ringing tone and volume Show settings Network settings Current management Accessory settings Sim Took Kit Services 134 Games 137 Data Synchronization with PC 138 Synchronization software Using data synchronization capabilities Check data synchronization records Reference 140 This user guide uses italic fonts in...

Page 8: ...Detailed Contents Detailed Contents 8 03_Contents detailed fm Page 8 Friday April 7 2000 5 57 PM ...

Page 9: ...velop the updated ANSI standard The design of your phone complies with these standards when used normally Antenna Care Use only the supplied or an approved replacement antenna Unauthorized antennas modifications or attachments could damage the phone and may violate local agency regulations Phone Operation Normal Position Hold the phone as you would any other telephone with the antenna pointed up a...

Page 10: ...ld not carry the phone in a breast pocket should use the ear opposite the pacemaker to minimize the potential for interference should turn the phone OFF immediately if you have any reason to suspect that interference is taking place Hearing Aids Some digital wireless phones may interfere with some hearing aids In the event of such interference you may want to consult your hearing aid manufacturer ...

Page 11: ... even death Areas with a potentially explosive atmosphere are often but not always clearly marked They include fueling areas such as gasoline stations below deck on boats fuel or chemical transfer or storage facilities areas where fuel odors are present for example if a gas propane leak occurs in a car or home areas where the air contains chemicals or particles such as grain dust or metal powders ...

Page 12: ...ons of Conformance with the requirements are located at Motorola Ltd European Cellular Subscriber Division Midpoint Alençon Link Basingstoke Hampshire RG21 7PL United Kingdom APPROVED for connection to telecommunications systems specified in the instructions for use subject to the conditions set out in them S 1357 4 V 04_Safety fm Page 12 Friday April 7 2000 5 48 PM ...

Page 13: ... the device Voice record button Touch screen pen pull downwards to release Touch Screen inside flip cover Press the bottom to scroll down the screen Charger Socket Motorola Quick Access Button no matter which screen you are at press to return to the main screen press and hold to turn on the backlight When backlight is on press and hold to turn off the backlight Turns the phone on and off Press the...

Page 14: ... Pressing the button inwards The Smart Button to answer a phone call upon opening the flip to answer a phone call upon connecting to an ear piece Last number redial in new edition selection functions Rolling the button downwards To decrease the volume To Move Backwards to decrease the ear piece volume during a phone call in the main menu screen Move Backwards to select the various functional symbo...

Page 15: ...ore inserting or removing the SIM card Failure to do so may damage the memory of your SIM card Follow the steps below while changing the battery or inserting the SIM card for first time use you can skip the step on battery removal 1 Press the release catch on the battery compartment and lift off the cover by sliding off the bottom of the phone 2 Push the battery towards the bottom of the phone and...

Page 16: ...ch to slow or medium see Network Setup menu If left unused a fully charged battery will discharge itself in approximately one month When not in use store your battery uncharged in a cool dark and dry place Important Battery Information Always treat your batteries with care See the Safety Information on batteries Never leave your batteries in extremely high temperatures over 60 degrees Celsius for ...

Page 17: ...top right hand corner of the screen shows indicating that the charging is completed Switching The Phone On Due to the superior functions of the Motorola A6188 it possesses many different options to turn on the phone Under normal situations in the case of a new phone or without changing the default phone settings please refer to the phone mode When you require the diary memo pad or calculator etc p...

Page 18: ... operation in the dialogue box 3 Select ON to turn on the phone mode under this mode you can make phone calls and send messages Then press OK to confirm your selection ANote The above 2 methods will only work if you have not pre set the phone PIN and the SIM card PIN Please refer to the Complete Process of Turning On the Phone PDA Mode 1 Flip open the flap then press and hold the button for about ...

Page 19: ...on and get into the phone mode If the PIN is incorrect the screen will show Wrong Pin You can either Select PDA and get into the PDA mode Select Retry to key in the PIN again AThe SIM card will be automatically locked upon 3 consecutive keying of the wrong PIN Please refer to the Systems Setup to unlock the SIM card or contact your service provider If you have set up the phone number lock refer to...

Page 20: ... go through the entire process to turn on the phone Selecting the Handset Operation Mode After turning on the phone the top left hand corner of the screen will show the icon Phone mode or icon PDA mode prompting you to select the operation mode Select Phone Mode ON and press OK to confirm your selection to go to the Phone Mode Select Phone Mode OFF and press OK to confirm your selection to go to t...

Page 21: ...ons show various information on the phone including Phone Mode Function Shows that Line 1 is active icon2 shown that Line 2 is active The icons indicate when the device is in phone mode and also and the status of the lines You can get into the phone mode by pressing on the icons to make a call name Function Icon Phone Book Messages Current Operation Display Call Register Diary WAP browser SIM card...

Page 22: ...g this icon allows you to adjust the local and regional time s Function Displays The Function display icons include the following Vibration Ring Alert Rings when there is a call message Vibrates when there is a call message Vibrates and then ring when there is a call message Service Provider s service trademark Shows Phone Mode OFF when the phone mode is not turned on Shows Emergency Call when the...

Page 23: ...ne and a PDA In fact its way of operation is similar to that of a PDA as well the LCD screen displays all the function icons and you can use the stylus provided to touch the screen and select the required functions writing notes drawing pictures and keying in information It s made so simple that effectively what you see on the screen is what you get The screen will change in accordance to the diff...

Page 24: ...u may press to dismiss the function dialogue box Title Uses words or pictures to describe the functions Certain displays only show the titles e g the narrow LCD display of a traditional analogue phone when making a phone call Key in Area You can use a stylus to key in words figures or store pictures in the Key in Area there is a line at the bottom of the display to distinguish the key in area Miss...

Page 25: ...croll bar between the Scroll Box and the Scroll Up or Scroll Down keys to move either up or down by one screen to move a bigger area at one time 3 Press and drag the Scroll Box to any position that you wish You may also use the scroll up and scroll down keys at the handset keypad to scroll the screen With these keys you can scroll up or down one screen at a time You may also use the scroll keys lo...

Page 26: ... by many buttons and icons usually at the last row of the screen display Dialogue Box The screen will display a box that includes title buttons selection boxes etc to give user information as well as to seek instructions from user and execute these instructions Exit Add Press this button to select Eng Fiona Frank Gary George Grace List of Contacts Hilary List of Contacts Fang Hua Feng Ming Ming Ga...

Page 27: ...creen cannot display all the relevant information the scroll bar will appear to facilitate the scrolling up and down of information Missing Please refer to the Scroll Bar section in User Guide Cancel Recipients Fang Hua Gao Ying Hu Hong Xing Edward Hanson Ham Hook Send Display Screen Display Highlighted selection Feng Ming Min 05_using_phone fm Page 27 Friday April 7 2000 5 25 PM ...

Page 28: ...Using the Phone Using the Phone 28 05_using_phone fm Page 28 Friday April 7 2000 5 25 PM ...

Page 29: ...te some words Before keying in any information select and press Chinese ABC abc or 123 to choose the type of information you wish to key in Use the stylus to note down the information in the Handwritten Area When you have finished writing and or pause it will automatically recognize the most similar character and place it at the cursor position If the incorrect word is given you can change it by s...

Page 30: ...orward and backward keys to scroll through the Panel to show more Similar Characters Then press and select the desired character to place it at the cursor position If you need to key in punctuation marks press the Commonly Used Punctuation Marks button and the following screen will become Cancel OK New Information Name Pin Yin Keyboard Zhu Yin Keyboard English Keyboard Handwriting Menu Bar Cancel ...

Page 31: ... input punctuations press so that the numeric keypad screen will change into punctuation screen Press 123 again to return to numeric keypad screen Terms Used In this Guide Touch or Press Use the stylus or finger to Press a certain position of the screen e g Button Function Icon Pull Down Selection Box Single Selection Box Multiple Selections Box etc to execute a corresponding function that the ico...

Page 32: ... text has been selected the color will be inverted that is the character or icon will be in white and the background will be black to show the highlighting Select Character When reading a Short message you can use your Stylus to press on a particular words keep contact with the screen and slide The words at the sliding path will then be having an inverted color You may release the Stylus from the ...

Page 33: ...l or just close the phone flip to hang up the phone ATo make International Direct Dial IDD calls or call direct extensions see the In Call Menu functions APress or press button to return to the main menu AIf there is no number in the Number Display Panel press Redial to redial the last dialed number ATo make phone calls from the Adress Book see Using the Address Book to Call and Send Messages To d...

Page 34: ...to answer the call AWhen in the Phone mode the Function status will change according to the current call state Not dialing or not during a phone call Dialing or in use Call Waiting Call on hold APress and the Function Display Box will appear see diagram below You can choose the function by pressing the desired function in the box The functions will change in accordance with the current call state ...

Page 35: ...g string is an exception When the pause is reached the phone will wait until the call is answered This is used for example if after the phone number 765 4321 you wish to insert a pause then dial 7227 so that you will be transferred directly to the extension 7227 of the phone number 765 4321 Pause A Working Example If you have a tone based voicemail system on 555 8888 with a mailbox number of 1111 ...

Page 36: ...anel 3 Press Send to make a phone call by dialing the number at the display panel If the new call is successful you are currently having two active calls Press End to return to the original call and to cancel the dialing of the second phone Switch Call AThis service will only be available provided that you have subscribed it from your Cellular Service Provider and if the Cellular Service Provider ...

Page 37: ... end your call The earlier call which you have previously put on hold is now active Making a Conference Call AThis service will only be available provided that you have subscribed it from your Cellular Service Provider and if the Cellular Service Provider is having this service This option joins the active call with a hold call With conference call you can have a conference with up to five other t...

Page 38: ...ephone numbers or names whom you wish to separate from the Conference Call by scrolling down the selection box 3 Press OK to confirm splitting the selected member from the Conference Call 4 Press Cancel to cancel the split call At this point the selected call will be separated from the main Conference Call and private conversation between you and the selected member is possible To re join all the ...

Page 39: ...ll on Hold to be dropped 2 Press Drop Call to pick up the incoming call and drop the selected line 3 Press Busy to reject the incoming call with a busy tone Current Call Incoming Call 765 4321 Call on Hold Drop a call to Ans Drop Call Busy 06_phone_functions fm Page 39 Friday April 7 2000 5 25 PM ...

Page 40: ...Phone Functions Phone Functions 40 06_phone_functions fm Page 40 Friday April 7 2000 5 25 PM ...

Page 41: ...st of telephone numbers See Call Barring Under Systems Setup AThis option will only be available provided that you have subscribed it from your Cellular Service Provider Unfiled Contacts that are not classified at the moment Default category setting for all new contacts In addition to the above categories you can also add in your own categories to allow you to manage your information efficiently a...

Page 42: ...an be SIM Card Personal Unfiled Owner or some other self defined categories See Adding or Editing Categories If you do not select any category All Contacts information will be listed If you select SIM Card selected contacts information will be saved in the SIM card while the contacts information under the rest of the categorys will be stored in the device Exit New All Contacts Cancel OK New Contac...

Page 43: ...Number 2 Work Fax Home Number Hm Fax Mobile Number Pager Number SMS Service Centre Number E mail address 1 E mail address 2 And non numeric information including The following items are information stored under the Business Contacts Title Company Work Address Country Province City Address Postal Code Home Address The following items are information stored under Personal Contacts Country Province C...

Page 44: ...l and the information that you have just added in will NOT be saved Search Edit Contact Information 1 Press at the main menu to enter into the Address Book menu 2 You can select a Categories which can be Personal SIM Card Unfiled or some other self defined categories from the single selection box Press OK to confirm your choice Press Cancel and the screen will show the list of All Contacts 3 Use t...

Page 45: ...s Press OK to confirm At the Address Book menu the surnames are then re arranged according to your selection of the arrangement mode Search Contact Information 1 Press at the main menu to enter the Address Book menu Then press at the Address Book menu 2 Press Find Contact and the FindBy Box will appear as follows Back Edit Gan Sin Sin Cancel OK Edit Gan Sin Sin Catg Unfiled Work 1 Work 2 _________...

Page 46: ...o return to the previous menu If there are no matches to the search criteria the screen will show No Matche Found Delete Contact Information 1 Press at the main menu to get into the Address Book menu Search for the name that you wish to delete and enter the screen to show the chosen contact information 2 At the Contact Information press and the screen will show Cancel OK Find By Name Number Text B...

Page 47: ...o the Address Book menu At the Addresses menu press 2 Select New Category and the screen will show 3 At the key in area of category key in the name of the new category that you wish to create 4 Press OK to confirm the creation of the new Category Deleting Self Defined Categorys 1 Press at the main menu to get into the Address Book menu At the Address Book menu press Cancel OK Gan Sin Sin Delete th...

Page 48: ...d the selected category will NOT be deleted Creating Groups Setting Up Groups 1 Press at the main menu to get into the Address Book menu At the Addresses menu press 2 Press Add Grouping New Group and the following screen will appear 3 Press the Category Selection Box to select the category of the grouping Cancel OK Delete Category Friends self defined Business Personal Cancel OK Delete Category Ca...

Page 49: ...en Adding Group Recipients 1 Press at the main menu to get to the Address Book menu Scroll and select the desired grouping which you want to display more information about 2 Press and select the Recipients to go to the Recipients Selection menu 3 Select all the contacts names that you wish to add to the grouping and press OK 4 Press OK at the Group Information menu See Create Grouping and Search G...

Page 50: ... SIM and the following selection box will appear Select Mobile from the single selection box Normally a SIM Card memory can only store one contact number under one name 4 Press OK to save the selected information to the SIM Card Press Cancel to return to the Contacts information menu and do NOT save any contacts information to the SIM Card Copying Contact Information from a SIM Card to a Phone You...

Page 51: ...from the single selection box to be the destination of the SIM card number being copied 4 Press OK to save the selected contacts information to the phone Press Cancel to return to the Contacts information menu and do NOT copy the contacts information to the phone Cancel OK Selection Type Work 1 Work 1 Work Fax Home Phone 07_Address ph bk menu fm Page 51 Friday April 7 2000 5 26 PM ...

Page 52: ...Addresses Menu Addresses Menu 52 07_Address ph bk menu fm Page 52 Friday April 7 2000 5 26 PM ...

Page 53: ...be automatically directed to the voicemail number to enable the other party to leave you a voicemail which you can retrieve later Voicemail requires the Cellular Service Provider to support the service and that you have already subscribed the service Text Msgs Send and Receive messages New Messages unread message Old Messages ASMSmessaging requires the Cellular Service Provider to support the serv...

Page 54: ...r device setup configuration is correct Please see Message Setup Sending Messages This option allows you to send messages to other cellular phones that support SMS service APlease ensure that the device setup configuration is set correctly see Message Setup 1 At the Main menu Display press to enter the Message Center Display 2 At the Message Center Display press Compose to enter New Message Displa...

Page 55: ...ormation by writing on the screen or by other ways of input see Addresses Menu AWhen the record of the recipient is not available in the Phonebook you can press in the Send To display and then press New Contact to record the relevant information of the recipient into the Addresses for further reference Then after that it will be available to be chosen see Adding New Contact Information under Addre...

Page 56: ...ss New to add your own words or phrases into the existing library and then press OK to save Press to restore the Quick text Library to the default factory setup configuration AAt the New Message display press and then press save to draft to save the message in the Draft Folder without sending You can still retrieve the message later 5 At the New Message display press Send to send the message 6 Pre...

Page 57: ... scheduled time period Messaging Setup Before you can send any messages you must setup the device properly At the Main Menu display press to enter the Message Center display At the Message Center display press and then press setup to enter the Messaging Setup display or press the System Menu at the main menu and then press messaging setup to enter the Message setup display A list of settings will ...

Page 58: ... Service Provider Upon subscription you will receive the service center number Press Text Message To edit or input the Text message service center number storage location and deletion criteria of incoming message 1 Press Service Ctr Info to enter the Service Ctr Info Display Press the line below Service Ctr Numbr to enter the numeric pad display in which you can enter the service center number see...

Page 59: ...rmined time defined in the number of days in the Delete After field do not remove Number customized deletion and keep the last number of items defined in Keep Last field do not remove Press Info Service to see the setup configuration AYou may need to subscribe to Cell Broadcast Service through your Cellular Service Provider Upon subscription you will receive the relevant information on different c...

Page 60: ...ng message you will still see and flashing at the top left corner Press to read the message AIf you device is off the service center will sent the message to the device as soon as it is turn on Checking Messages 1 Press to enter the Message Centre 2 Scroll and select the folders that you want to enter 3 In the particular folder display press and press View By and the View By display Cancel OK xxx ...

Page 61: ...ead hear to see more details Press File and the Save to Folder display below will appear You have a choice to save the message to any folders Select Folder Press OK to save to selected folder AUsing different folders you can efficiently manage the messages e g friends email companies document draft and deleted See Add New Folder Press back to return to previous screen Cancel OK View by xxx xxx xxx...

Page 62: ...al option is selected Or Select Msg Type display will appear if the Store option is selected 3 Select the desire type of phone number and press OK Refer Look at the S Chinese Manual Using Cell Broadcast Info Service 1 At the Main Menu display press to enter the Message Center display 2 Press Info Service to enter the display which will provide various channels to choose from APress and press Messa...

Page 63: ...lect the category The routing allows the messages within the folder to be send to predetermined recipients Press routing and the recipients information display will appear Select and press OK the selected recipients information will be saved Remove Based On enables automatic management of folders according to your wishes Press Remove Based On criteria and the few selections below will appear Remov...

Page 64: ...o clear the messages in the deleted folder The messages deleted cannot be restored Making Phone Calls or Sending Messages Through Address Book The Motorola A6188 provides a much simplified way of operation by standardizing dialing and messaging functions 1 Press at Main Menu 2 Search for the call recipient or message recipient 3 Once located press the name and the particulars of this recipient wil...

Page 65: ...ess connects your phone to Internet while the DNS address relays all incoming data and outgoing request thus allows you to surf the Internet You need to know the following This information should be obtained from ISP upon your initial subscription Types of DNS address DNS address provides the link from phone to Internet Types of service areas can be differentiated into data routing and dual short ...

Page 66: ...t details adding contact details The Motorola A6188 can input up to 3 DNS addresses In this way whenever a DNS address is down the next DNS address in line will be used so as not to interrupt the Internet connection The DNS address is arranged from the most preferred to the least preferred order and it could be setup separately Setup of WAP procedures are as follows 1 On the Main Menu press to ent...

Page 67: ...e selected DNS address as top priority Delete DNS Address delete the selected DNS address 5 After entering the correct information press OK and you will return to the Browser setup display 6 Select the DNS address setup to enter the ISP dialing display 7 Press OK after you have entered all the correct information You will then return to the Browser setup display Press OK again Configuration xxx xx...

Page 68: ...P information Menu However your ISP will determine the information and function Similar to browsing the Internet on PC you can use the scroll bar arrow keys back and forward icon etc to browse the various websites You will get to browse the vast Internet contents You can also select the function keys to perform the respective tasks Or press to select the functions offered by your phone set Return ...

Page 69: ...page press and then press exit to disconnect from the Internet Visit MyMotorola com On the Main Menu press to enter the WAP function display Press and select My Motorola to get into MyMotorola com website You can also visit this website by using any PC at this address http www mymotorola com MyMotorola com website is your source of free resources provided by Motorola At this website you can Regist...

Page 70: ...Surfing The Internet Surfing The Internet 70 09_Surf_internet fm Page 70 Friday April 7 2000 5 26 PM ...

Page 71: ...ast 20 Answered and last 20 called The indicates that you have incoming messages faxes or emails The number beside the Icon indicates the numbers of new messages If there is only one new message you can read the message simply by selecting it If there are many messages you will enter the inbox display where the messages will be arranged according to the received time You can then highlight any one...

Page 72: ...rch for a particular number Pressing clear all will erase all numbers 3 Highlight and select any numbers to retrieve details of the call 4 Press Callback to dial the selected number Press back to return to the previous display APress and then press store number to store this selected number in the Address Book See Address Book Call record Last 20 missed calls xxx Last 20 answered calls Last 20 mad...

Page 73: ... an event reaches the scheduled time in the diary the device will flash a message in a dialog box to remind you Press Dismiss To close the dialogue box Press Read To read the details of the event yyyy Dismis Read 10_Call_reg fm Page 73 Friday April 7 2000 5 27 PM ...

Page 74: ...Call Registers Recent Call Call Registers Recent Call 74 10_Call_reg fm Page 74 Friday April 7 2000 5 27 PM ...

Page 75: ... display press DayView to bring up the DayView display Use the scrollbar to browse through the days appointments press appointment to bring up the New Edit Event appointment display The details of the appointment will be displayed for editing Press or to flip to the next or the previous DayView Press calendar MthView to return to the Monthly Calendar display Press exit to return to the Main Menu A...

Page 76: ...the year month and date Press OK to enter the DayView display to view the appointment for that day Press Cancel to return previous display New Edit Event In the MthView or DayView display press and then press New Event to enter the display as shown below Press Title to bring up the Title editor display Enter the Title for the new event See Handwriting Board Location Press the line beside Location ...

Page 77: ...r and 1 day in Taichi Press the Repeat Event pull down box to select the frequency of repetition of the alarm The selections are Never The event is performed only once Daily Weekly Monthly Yearly After selecting the Repeat option press the Set End Date pull down box and set the t date to determine when the repeating event will cease Set it by pressing No End Date and choose Set End Date then press...

Page 78: ... return to the DayView display with no changes Delete Event In the New Edit Event display press and select Delete Event The Delete Event dialogue box appears Press OK to delete event Press Cancel to return to the New Edit Event display with no changes World Time World Time lets you set the local time and the time for major cities around the world In the Main Menu touch the digital clock that resid...

Page 79: ...want Highlight the city name to select it Press OK to return to the World Time display and fill in the city name to the Local pull down box Press back to return to the World Time screen with no changes Select Time In the World Time display press to bring up the Select Time dialogue box Touch or the number will increase or decrease by 1 to set the hour and minute and also the setting for AM or PM f...

Page 80: ...to return to the World Time display with no changes Follow the above steps to adjust the Time and Date of other cities from the World pull down box in the World Time display ASelect 24 Hrs or 12 Hrs from the pull down box to set the time display format Mark the Daylight Saving checkbox to set the Daylight Saving time When the World Time setting is completed press Done to return to the Main Menu to...

Page 81: ...start the recording The display as shown below Press the record button on the right side of the phone again to stop the recording You may also press Stop Recording on the display to end the recording At the end of the recording the phone will automatically combine the start time and the date to form the Heading to store the Voice Notes display Replaying and Searching At the main menu press the ico...

Page 82: ...o stop playing while pressing the icon pauses playing Press to show the previous recording Press the Title key in area and use the stylus to change the title of the recording Press OK to save the new title and return to the Voice notes menu Press Cancel to return to the previous menu without saving the changes APress the icon at the Voice Notes menu and select Remaining Time to find out the amount...

Page 83: ... Press Time Date or Duration in Taichi Note Pad English Menu in P 98 and T Chinese Menu in P 96 You can use the Note Pad to store written information and send the stored information as SMS messages directly Recording Words 1 Press the icon at the main menu and select Note Pad at the selection box Record New Voice Notes Title Time Date Duration Cancel Cancel Voice Notes Memo Pad Ink Pad New Note Pa...

Page 84: ...d Editing a Note 1 Press the icon at the main menu and select Note Pad at the selection box 2 The memos are arranged in a chronological order starting from the most recent memo to the oldest memo Use the scroll bar to scroll up or down the screen to search for the title of the note that you want OK Note Pad Title Text Gifts ascending Cancel OK Edit Text Text Screen to be Cancel changed as in CCD N...

Page 85: ...Display menu press and then select Delete All The screen will appear as shown below Press OK to delete all memos At the Note displaying screen press and then select Delete to delete the current Note The below dialogue box will be shown Sending a Note Press at the Note displaying screen and then press Send note The phone will then show you to add in new messages select recipients etc and you can se...

Page 86: ... Ink Pad menu will show as follows 2 Press New and go to the Ink Pad menu as follows 3 Press the key in area for the Title to key in the Title Press OK after you keyed in the title 4 Press the sketch area under the title to enter the Edit Image menu You can now draw Cancel Voice Notes Memo Pad Ink Pad New Ink Pad Hello Appointment Venue Inspirational Sketch Bus Route ascending New Flat Layout 11 N...

Page 87: ... Switch to Eraser to change the tip of the stylus to to eraser the default setting of the stylus tip is pencil which can be used to erase graphics To change the stylus tip back to pencil simply press xxx and then select Switch to pencil 5 When you are done with the title and the sketch press OK to save the image Searching and Editing Images 1 Press the icon at the main menu and select Ink Pad at t...

Page 88: ...o make changes to the image or the title just click on the image or the Title to make changes to the image or the Title Also doesn t have EDIT button in Taichi 5 Press Cancel and then press Exit to go back to the main menu Deleting Images Press at the Ink Pad Display menu then select Delete All to delete all the images MISS Press OK can delete all Sketches A dialogue box will be shown as follows N...

Page 89: ...nary The dictionary of the Motorola A6188 possesses the capability of translating words and terms from English Chinese and Chinese English 1 Press at the main menu to enter the Dictionary menu 2 Key in or write the words in the handwritten script board can be English Chinese characters or terms If English word is written the dictionary will check for the corresponding Chinese translation and vice ...

Page 90: ...h Press Back to return to the previous menu 7 Press and then select Other tenses shows the other tense of the word term whether it is a noun verb etc Previous Word shows the word before the searched word in the dictionary Next Word shows the word after the searched word in the dictionary Exit Dictionary Exits from the dictionary and returns to the main menu Taichi also have Synonym and Antonym in ...

Page 91: ...ss and then press Memory To add the number in the number display to the number stored in the memory Memory To subtract the number in the number display from the number in the memory Memory Clear to clear the number in the memory the number in the memory becomes 0 and the M in the left corner of the number display will be dismissed Memory Recall to show the number in the memory in the number displa...

Page 92: ...Event Recording Functions Event Recording Functions 92 12_Event fm Page 92 Friday April 7 2000 5 40 PM ...

Page 93: ... and input the various setup value See Systems Setup Setup Selections and Setup Value at the later part of this section These different settings control the function of a phone In addition some setup selections are also related to the various functions of a phone They do not come under Systems Setup but are included in the related functions e g Messaging Setup Refer to Short Message Function Daily...

Page 94: ...re using it The PIN is a 4 digit number The default manufacturer s setting for PIN is 1234 but you can change the PIN for security purposes Lock Phone Now Press Lock Phone Now and you can lock the phone immediately preventing it from being used The phone can only be unlock by keying in the right phone unlock code After pressing this selection the screen will appear as follows Key in the Unlock cod...

Page 95: ...ined list of telephone numbers of if you wish to a list of country codes area codes or other prefixes of your choice AThe availability of the Fixed Dialing function depends on the type of SIM Card When the Security Features menu shows that Fixed Dialing is ON or Fixed Dialing is OFF press Fixed Dialing key in your SIM PIN and press OK When the PIN is correct you can change the Fixed Dialing to OFF...

Page 96: ...en selected this option will bar incoming calls when you are roaming between networks All Calls When selected this option will bar all incoming calls Off When selected this option will disable all call barring for incoming calls ARoaming between the networks refers to roaming between the different GSM networks not necessarily in terms of roaming in different regions or countries For example regard...

Page 97: ...Invalid PIN code 1 last try If the PIN number is entered incorrectly 3 times in a row your SIM card will automatically lock up and the Blocked message will be displayed If your SIM card is lock up and you receive the Blocked message you will need to enter a PIN Unblock PUK code and key sequence before you can use the phone You will need to contact your service provider SingTel Mobile M1 etc for th...

Page 98: ...ber pad to enter the PIN code Press to delete the last digit Press OK If the PIN code and the earlier PIN are entered correctly the SIM card will be unlocked Device Memory Usage Status Various device functions like address book messages Center activities planner Date Book Note Pad Ink Pad etc use the main memory of the device while the SIM Card phone book and short message folder use the memory of...

Page 99: ...the initial setup to set the clock date language details of the phone owner and other basic information Press at the main menu to go to the Systems Setup display then select Initial Setup to enter the following display You can use the scroll bar to scroll up or down the screen to check the various setup selections and the setup value Press Done and return to the Systems Setup display Daylight Savi...

Page 100: ...rrent Location At the Initial Setup screen press the Current Location selection box and a dialogue box will appear prompting you to select a city Personalization At the Initial Setup screen press personalization to go to the NewPerson Edit Owner display to search and edit various information about the phone owner See Search Edit Contacts Information under the Address Book APress icon at the main m...

Page 101: ...e Auto Redial You can select to turn this option on or off If your call attempt does not succeed After few seconds will automatic redial the phone number when it shows Auto Redial On select Auto Redial to turn it Off when it shows Auto Redial Off select Auto Redial to turn it On Flip Answer when it shows Flip Answer On select Flip Answer to turn it Off when it shows Flip Answer Off select Flip Ans...

Page 102: ...ar as follows Press Cancel All Diverts to cancel the diversion of incoming calls Press Voice Calls Fax Calls or Data Calls After registering with the network you can select the various diverting options For example in the case of diverting Voice Calls Divert All Voice Calls At Call Diverting title press All Voice Calls This option has two settings On or Off If you change the setting to On and pres...

Page 103: ...e time per call cost per call Total cost Call Cost Setup AThis option requires network support provided by the service operators At the Phone Setup menu select Call Charges Settings The screen will prompt you to enter a PIN2 If the correct PIN is entered you will go to the Call Charges settings to do the following settings Total Call Charges Two setting under this option On or Off to determine whe...

Page 104: ...ne APress at the Call Meters screen then select Reset Call Timer A dialogue box will appear press OK to confirm your selection and the Call Timers and Call Charges Meters will be reset to zero The Lifetime Timer cannot be reset as it records the lifetime of your phone upto here is from amended source fm HK Ringing Tone and Volume Sounds Alert In the Main Menu press to enter the System Setting disp...

Page 105: ...setup press on OK to return to the Sounds Alerts display to save the changes Touch Tone setting the display tone In the Ring and Tone setting display press on Touch Tone to bring up the display Press on or to lower or increase the volume In the Tone Type Setting you can select the different type of tones Dial Tone Single Tone Silent After you have finished the setup press on OK to return to the So...

Page 106: ...rease the brightness In the Display Setup display press the Backlight delay pull down box to set the elapsed time interval before the background light goes off during period of inactivity 10 second 20 second 30 second 60 second In the Display Setup display press the Sleep mode pull down box to set the elapsed time interval before the screen goes into sleep mode which will resume on any activity 1 ...

Page 107: ...egister and use The phone will follow this sequence in registering a network The network that is incorporated into the SIM card The preferred network list The network that is above specific service strength The stronger network The phone will not search for a network that is barred by the SIM card In the Main Menu press to enter the System Setting display and then press on Network Setup to enter t...

Page 108: ...preferred network band A change of the network band might cause a failure in network search Please use a suitable network band See In the Network Search Setup display select the Band pull down box to select between 900 MHz 1800 MHz or 900 1800 MHz band Network Type Lets you specify the ways the phone search and register a network In the Network Search Setup display select the Type pull down box to...

Page 109: ...ce again Search Speed This function decides when the network registration is unsuccessful how much time should lapse before it tries to register again In the Network Search Setup display select the Speed pull down box to select Slow Medium Fast or Continuous AFast and Continuous Search Speed drain the battery power Available Networks Show the networks that are present in the area which it can atte...

Page 110: ...the preferred network list Press on Back to return to the Network Setup display Press on Add to bring up the Add Network display Select Available Netwrk or Known Network and it will be appended to the Preferred Network list In addition you may choose to Enter Network ID to append the network to the Preferred Network list Press on OK to begin adding If Enter Network ID is selected press on OK to en...

Page 111: ...ter Now is selected Searching will appear If the network is found Registering will appear If the registration is successful the network will be used If Change Priority is selected the following display will appear Select Priority on the display to enter the nominal position of the network For example press on 1 and OK to position the network at the top of the preferred network list and the rest of...

Page 112: ... select Auto Pick Up automatically pick up incoming calls Auto Hands Fee automatically switch to hands free function Silent Car Stereo cars stereo volume automatically goes off on any incoming calls Automatically goes on again when call is over When the phone is attached to the car phone accessory set select Auto Shutdown Delay to set the elapsed time interval to automatically shutdown the phone w...

Page 113: ...messages associated with the SIM Toolkit services In the Main menu press to enter the SIM Card Services display Press on Back to return to the Main Menu Use the scroll bar to view the list of services provided and select the Service name to see more options The display and various options might be in the following format Next Level List of Options Select the option to go to the next level of choic...

Page 114: ... service prompts you to enter a message Press on OK when done Connect to Service When dialing a service Press on Finish to return to previous display Press on Continue to dial this service See Phone Feature Back Option1 SubOption1 SubOption2 SubOption3 SubOption4 SubOption5 SubOption6 OK Edit Message Message Screen to be Cancel changed as in CCD Continue Dialing Finish ...

Page 115: ...M Toolkit Services 115 Sending a Short Message In the course of sending or receiving message you can press Cancel to terminate the process After a message is sent you may receive a message transmitted by the network provider ...

Page 116: ...SIM Toolkit Services SIM Toolkit Services 116 ...

Page 117: ...or play against the processor on the phone At international competition the game has numerous rules The international competition rules of play are available at the website http games chinaroad cn net wuziqi The Motorola A6188 does not follow entirely all the competition rules of play but only uses a simplified set of rules in order to regulate the first move player If any rule is contravened the ...

Page 118: ...ine which player goes first Press OK to select Difficulty Level In the Opponent dialogue box Select Novice Intermediate or Expert by pressing respective radio button and press OK to continue Instructions In the Instructions screen you see text instructions about playing the Wu Zi Qi game Press scroll bar to read it fully Press on Exit to return to the Wu Zi Qi game screen In the Wu Zi Qi game scre...

Page 119: ...e pressed square will become highlighed Just press on the desired space and the square will move into that direction Every move on the board is counted one by the counter Press Exit to end the game and return to the Game Menu Memory At the main menu press to enter the games menu Press Memory to begin the memory game Press New Game to start a new game at any time At the start of the game you will s...

Page 120: ... select modes for single or double players Instructions Press to open the instructions display Scroll down to read the text If you choose double player mode the display show as below On the top of the display there is a counter that gives the score of the active player The player with a higher score on the counter will be the winner The appears beside the score to indicate which player is active T...

Page 121: ... to install the software Performing Data Synchronization If a cable is used for the connection between the PC and the phone please plug in the cable before the PC is power on 1 Run the TrueSync software 2 In the Main Menu press icon to enter the PC Synchronize display or press on System Setting and then press on PC Sync to enter the display 3 If cable is used Press Data Cable If infrared connectio...

Page 122: ...the PC Sync display If the battery is low or if the infrared connection is broken or if the PC system hangs PC Sync will terminate and the message PC Sync Failure will appear or the message PC Sync Error Check Record will appear Checking the Data Synchronization Record In the Main Menu press icon to enter the PC Synchronize display or press on System Setting and then press on PC Sync to enter the ...

Page 123: ...References References 123 References 17_Reff fm Page 123 Friday April 7 2000 5 41 PM ...

Page 124: ...References References 124 17_Reff fm Page 124 Friday April 7 2000 5 41 PM ...

Page 125: ... Setup Radio Frequency Pacemaker Hearing Aid Airbag Vibrate Vibrate and then ring Smart Card Battery Cover Network Coverage Re charging Dialogue Box Screen Set Busy Tone Mute Restrict My Number Phone Book Messages Drafts Sent Messages Saved Messages Trash Retrieving Voicemail Delete Cancel OK Touchscreen Dial up Port Inactive Time Return Add Glossary fm Page 1 Friday April 7 2000 5 41 PM ...

Page 126: ... World Time Phone Setup Show Settings Network Selection Autoroam between networks Unlock Auto redial Flap Open Answer Call Duration Call Meter Call Charge Setting Lifetime Timer Preferred Networks Glossary fm Page 2 Friday April 7 2000 5 41 PM ...

Reviews: