background image

Form 801689 

Page Number - 7

professional. Always follow the vehicle manu-
facturer’s directions when bleeding the brake 
system.

1.  Ensure the vehicle is properly positioned 

for safe, convenient access to the master 
cylinder and the brake bleed screw located 
on each wheel brake cylinder. Set the park-
ing brake, turn off the engine, and open and 
secure the hood.

2.  Locate the brake or clutch master cylinder 

and remove the cap.

3.  Extract as much used hydraulic fluid from 

the master cylinder reservoir as possible, 
and refill it with new fluid.

4.  Select the appropriate master cylinder pres-

sure bleed adapter and install it securely 
onto the master cylinder reservoir.

5.  Hang the fluid transfer bottle assembly in 

a safe, secure location within reach of the 
master cylinder reservoir.

6.  Perform the following procedure before add-

ing any fluid to the fluid transfer bottle:


a. Connect the fluid hose to the male quick-
connect coupler on the master cylinder 
pressure bleed adapter. Ensure the coupler 
sleeve snaps forward to lock the connec-
tion.


b. Consult the vehicle manufacturer’s guide-
lines for the proper bleeding pressure.


c. Connect a Mityvac hand pressure pump 
w/ pressure gauge to the inlet hose extend-
ing from the side of the fluid transfer bottle.


d. Ensure the shutoff valve on the fluid hose 
assembly is open, and operate the manual 
pump to pressurize the system to the rec-
ommended pressure.


e. Watch the pressure gauge to ensure there 
are no leaks. If the pressure drops, relieve 
the remaining pressure in the system by ac-
tivating the pressure relief lever on the hand 
pump. Remove and retighten the cap from 
the fluid transfer bottle and the adapter on 
the master cylinder reservoir, and recheck 
the system for leaks.


WarninG:

 Serious injury and/or equipment 

damage can occur if the lid is removed from 
the fluid transfer bottle or the adapter from 
the master cylinder, without first relieving 
the system pressure.

7.  Once all connections are proven secure and 

the master cylinder adapter does not leak, 
remove the cap from the fluid transfer bottle 
and add up to 1 liter (1 quart ) of the vehicle 
manufacturer’s recommended new hydraulic 
fluid from a sealed container.

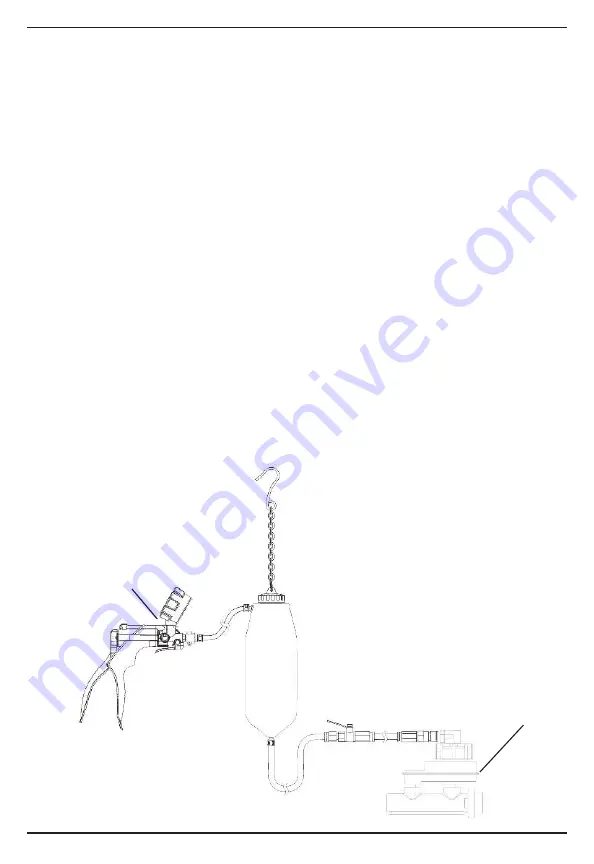
Hand pump 
(sold separately)

Brake 
master 
cylinder

TYPICAL PRESSURE BLEED APPLICATION

Summary of Contents for Mi6010

Page 1: ...an ais Franz sisch 20 German Alem n Allemand Deutsch 30 December 2010 Form 801689 it is the responsibility of the user of this equipment to read this user s manual entirely and understand the safe and...

Page 2: ...ge Number 2 Form 801689 table of Contents Service Parts Accessories 3 Principle of Operation 4 Precautions 4 Assembly 4 Instructions for Use 5 Spanish 10 French 20 German 30 Declaration of Conformity...

Page 3: ...824823 824824 MVA570 MVA7210 824461 1 Cap with Chain 1 pc 2 Cap Seal 1 pc 1 pc 3 8 Inlet Hose 1 pc 4 Clamp 3 pcs 5 Bottle 1 pc 6 Fluid Hose Assembly 1 pc 7 Dispensing Wand 1 pc 8 Tube Connectors 2 pc...

Page 4: ...cedures documented in this manual are to serve as guidelines for the use of this equip ment In addition to these guidelines always follow the manufacturer s recommended proce dures when servicing each...

Page 5: ...intain fluid flow Fluid will continue to flow as long as there is pres sure in the reservoir and the shutoff valve is open 8 Once the proper amount of fluid has been dispensed close the shutoff valve...

Page 6: ...oticeable change is felt Continue to pump the pedal a few additional times This should eliminate most system pressure 3 Open fluid reservoir or brake lines carefully Top off reservoir fluid and reconn...

Page 7: ...connec tion b Consult the vehicle manufacturer s guide lines for the proper bleeding pressure c Connect a Mityvac hand pressure pump w pressure gauge to the inlet hose extend ing from the side of the...

Page 8: ...inder and the brake bleed screw located on each wheel brake cylinder Set the park ing brake turn off the engine and open and secure the hood note Make certain the master cylinder reservoir is filled a...

Page 9: ...side of the fluid transfer bottle 5 Depending on the application select the ap propriate ATF refill adapter and perform one of the following series of steps Connect the ATF refill adapter to the tran...

Page 10: ...el usuario en su totalidad y entender el uso seguro y apropiado y la aplicaci n de este equipo especificaciones Capacidad del dep sito 1 litro 1 cuarto de gal n Presi n m xima 1 4 bares 140 kPa 20 psi...

Page 11: ...Formulario 801689 N mero de p gina 11 ndice Piezas y accesorios de servicio 12 Principio de la operaci n 13 Precauciones 13 Montaje 13 Instrucciones de empleo 14...

Page 12: ...escripci n n de PieZa JueGo 824820 824821 824822 824823 824824 MVA570 MVA7210 824461 1 Tapa con cadena 1 pieza 2 Sello de tapa 1 pieza 1 pieza 3 Manguera de entrada de 8 pies 1 pieza 4 Abrazadera 3 pi...

Page 13: ...po en una aplicaci n para la que no est dise ado Los procedimientos documentados en este manual deben servir como gu as para el uso de este equipo Adem s de estas gu as siga siempre los procedimientos...

Page 14: ...r el paso de fluido nota No es necesario hacer funcionar la bomba de forma continua para mantener el caudal de fluido El fluido continuar circulan do siempre que haya presi n en el dep sito y la v lvu...

Page 15: ...use fluido de frenos de silicona en veh culos equipados con frenos antibloqueo Consulte siempre el manual de reparaci n ap ropiado para encontrar informaci n adicional sobre los sistemas de freno ant...

Page 16: ...o consulte con un pro fesional capacitado Siga siempre las instruc ciones del fabricante del veh culo al purgar el sistema de frenos 1 Aseg rese de que el veh culo est bien colocado para poder dispone...

Page 17: ...o del fabricante 13 Realice el mismo procedimiento en todos los tornillos de purga restantes Haga funcionar la bomba de presi n seg n sea necesario para mantener la presi n adecuada nota No deje que s...

Page 18: ...succi n de la bomba Una vez eliminado todo el aire del sistema estas burbujas diminutas no pondr n en peligro de ninguna manera la operaci n de purga ya que est n presentes s lo en la conexi n y no en...

Page 19: ...o por el fabricante se podr a llenar la transmisi n de forma insuficiente o excesiva causando da os importantes en la transmisi n No es necesario aliviar la presi n en la botella de transferencia de f...

Page 20: ...anz sisch 20 German Alem n Allemand Deutsch 30 D cembre 2010 FormULAire 801689 l utilisateur de cet appareil est responsable de lire le pr sent manuel d utilisation dans son in t gralit et de comprend...

Page 21: ...Formulaire 801689 Page N 21 table des mati res Pi ces et accessoires pour l entretien 22 Principe de fonctionnement 23 Pr cautions 23 Montage 23 Instructions d utilisation 24...

Page 22: ...sion Pi Ces de reCHanGe Kits Pour l entretien re p re n description r f renCes des Pi Ces Kits 824820 824821 824822 824823 824824 MVA570 MVA7210 824461 1 Bouchon avec cha nette 1 pc 2 Joint de bouchon...

Page 23: ...s indications relatives l utilisation de cet appareil En plus des indications en question respectez syst matiquement les proc dures pr conis es par le fabricant lors d interventions sur un v hicule L...

Page 24: ...couler tant qu il y a de la pression dans le r servoir et que le robinet est ouvert 8 Quand la quantit de fluide d sir e a t distribu e fermez le robinet et faites chuter la pression dans le circuit e...

Page 25: ...inage anti blocage Mise hors pression des circuits de frein age anti blocage Consultez syst matiquement le manuel du conducteur ou un manuel d entretien appropri pour des renseignements suppl mentaire...

Page 26: ...ez syst ma tiquement les indications du fabricant du v hi cule lors de la purge d un circuit de freinage 1 Assurez vous que le v hicule est correcte ment plac pour permettre un acc s com mode et en s...

Page 27: ...pour faire chuter la pression dans le circuit et rajoutez du liquide 14 Une fois la purge effectu e liminez la pres sion dans le circuit en actionnant la manette de d pressurisation sur la pompe main...

Page 28: ...t de vous assurer que l adaptateur reste en place sur la vis de purge et que l appareil est toujours en d pression pendant la fermeture de la vis de purge Ceci emp che l air d tre aspir dans le cylind...

Page 29: ...est d branch de l adaptateur Il n est pas n cessaire de pomper de mani re ininterrompue pour entretenir le d bit de liquide Le fluide continue de couler tant qu il y a de la pression dans le r servoir...

Page 30: ...Franc s Fran ais Franz sisch 20 German Alem n Allemand Deutsch 30 DeZember 2010 Formular 801689 der Benutzer ist daf r verantwortlich dieses Handbuch v llig zu lesen und den sicheren und vorschriftsm...

Page 31: ...Formular 801689 Seite 31 inhaltsangabe Wartungsteile Zubeh r 32 Betriebsprinzip 33 Vorsichtsma nahmen 33 Zusammenbau 33 Gebrauchsanweisungen 34 Garantie 39...

Page 32: ...MVA7210 824461 1 Kappe mit Kette 1 teil 2 Kappendichtung 1 teil 1 teil 3 8 Zoll Einlassschlauch 1 teil 4 Klemme 3 teil 5 Flasche 1 teil 6 Fl ssigkeitsschlauch einheit 1 teil 7 Ausgaberohr 1 teil 8 Roh...

Page 33: ...artung jedes einzelnen Fahrzeuges immer den vom Hersteller empfohlenen Verfahren folgen Bei Befolgen der Instruktionen ist die Verwend ung des Ger tes einfach und unkompliziert Man muss sich jedoch im...

Page 34: ...lter Druck besteht und das Absperrventil offen ist 8 Ist die richtige Fl ssigkeitsmenge ausgege ben so schlie t man das Absperrventil und entl sst den Druck im System durch Aktivierung des Druckent l...

Page 35: ...ies sollte den Gro teil des Systemdrucks eliminieren 3 Den Fl ssigkeitsbeh lter oder die Bremslei tungen vorsichtig ffnen Nach Beendigung der Arbeit den Beh lter auff llen und das Bremskabel wieder ve...

Page 36: ...e der Fl ssigkeits transferflasche verbinden d Sicherstellen dass das Absperrventil an der Fl ssigkeitsschlaucheinheit offen ist und die Handpumpe bet tigen um das System unter den empfohlenen Druck z...

Page 37: ...saubere Bremsfl ssigkeit der rich tigen Art zur Verf gung steht um den Be h lter aufzuf llen da der Fl ssigkeitsstand w hrend der Entl ftung sinkt Vor Beginn des Verfahrens sicherstellen dass alle En...

Page 38: ...Ma nahmen durchf hren Den ATF F lladapter mit dem Getriebef l lanschluss verbinden Dann den Fl ssig keitsschlauch vom Unterteil der FL ssigkeit stransferflasche mit dem anderen Ende des Adapters verb...

Page 39: ...nology Methodology EN 292 2 Safety of Machinery part 2 Technical Principles Specifications d claration de la conformit comme d finie par l annexe ii a de Machinery directive 98 37 eG Ce doit d clarer...

Page 40: ...Page Number 40 Form 801689...

Reviews: