REV 2.5
85
2.4. Cleaning
2.4.1. Screen front surface
Wipe with a lint free soft and dry cloth or with a damp cloth using water or alcohol. Do not use
solvents including acid/alkali ingredients or abrasive. Do not scrub hardly with a dry hard cloth.
2.4.2. Cabinet
Wipe with a lint free soft and dry cloth, or with a damp cloth if necessary. Then add a finish the
cleaning with a dry cloth.
Do not use solvents like thinner or benzene. It may cause degeneration or peeling off a coat.
2.4.3. Dust filter (for
F
F
r
r
o
o
n
n
t
t
)
2.4.3.1. Warning indication
F
F
r
r
o
o
n
n
t
t
shows a warning indication to induce filter cleaning. Clean the filter when the warning
indication appears on screen.
•
CHECK FILTER: It appears when a designated time passes over. The initial setting is 4,000
hours. When external AC fans are equipped (chapter 0, on page 19), check its correct
working as well as filter cleaning.
•
OVER TEMP (white): It appears when internal temperatures become higher due to filter
clogging or high ambient temperature. It is recommended to clean the filter. It can be erased
by press-and-hold [ESC] button.
•
OVER TEMP (red with flashing): It appears when the internal temperature is approaching
serious high limit. It is highly recommended to turn off the product immediately for cooling
down and to clean the filter.
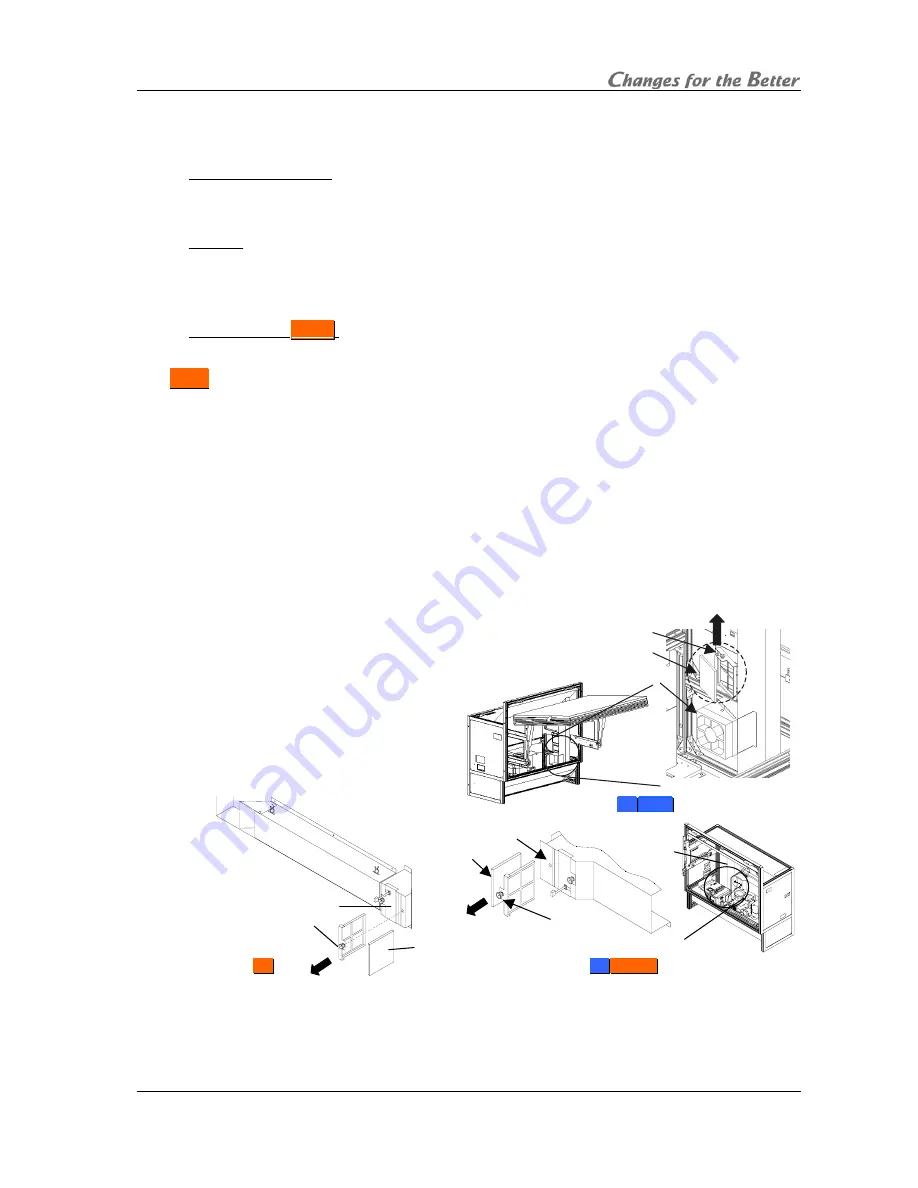
2.4.3.2. Cleaning procedure
1. Open the screen unit (chapter 1.2.7.1, on page 23).
2. Pull the latch to unlock and pull out the filter unit.
3. Vacuum the dust on the filter with a
dust brush adapter. Be careful not
to break the filter. Do not touch the
filter directly with a vacuum nozzle
without a dust brush, or do not use
a nozzle adapter to remove dust.
4. Put back the filter unit and close the screen unit (chapter 1.2.7.2, on page 24).
5. Reset the filter used hours with FILTER RESET menu.
Filter unit
(Cooling fan)
Latch
For
5
5
0
0
”
”
S
S
i
i
n
n
g
g
l
l
e
e
For
6
6
7
7
”
”
Filter unit
(Cooling fan)
Latch
(Cooling fan)
Filter unit
Latch
For
5
5
0
0
”
”
C
C
h
h
a
a
n
n
g
g
e
e
r
r
Summary of Contents for PH50 series
Page 122: ......


