Graphic Operation Terminal GOT-F900
Changeover of Display Screen (GT Designer) 21
21-5
21.4
Screen changeover by touch key
To change over the display screen using a touch key provided on the screen, two methods are
available. In fixed value method, the No. of a screen to be displayed next can be directly
entered. In upper hierarchy method, the previously displayed screen is displayed next.
•
Only one method (fixed value or upper hierarchy) can be assigned to one touch key. (A
function other than the screen changeover such as the bit ON/OFF function can be
assigned to a touch key to which either the fixed value method or the upper hierarchy
method has been assigned.)
•
Touch keys can be set for each screen.
21.4.1
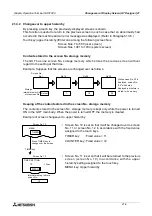
Changeover using a fixed value
When a touch key is pressed, the set screen is displayed.
Touch key (fixed value):Enter one among the following screen Nos.
Screen Nos. 1 to 500 (user screen)
Screen Nos. 1001 to 1030 (system screen): Refer to the appendix.
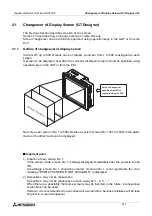
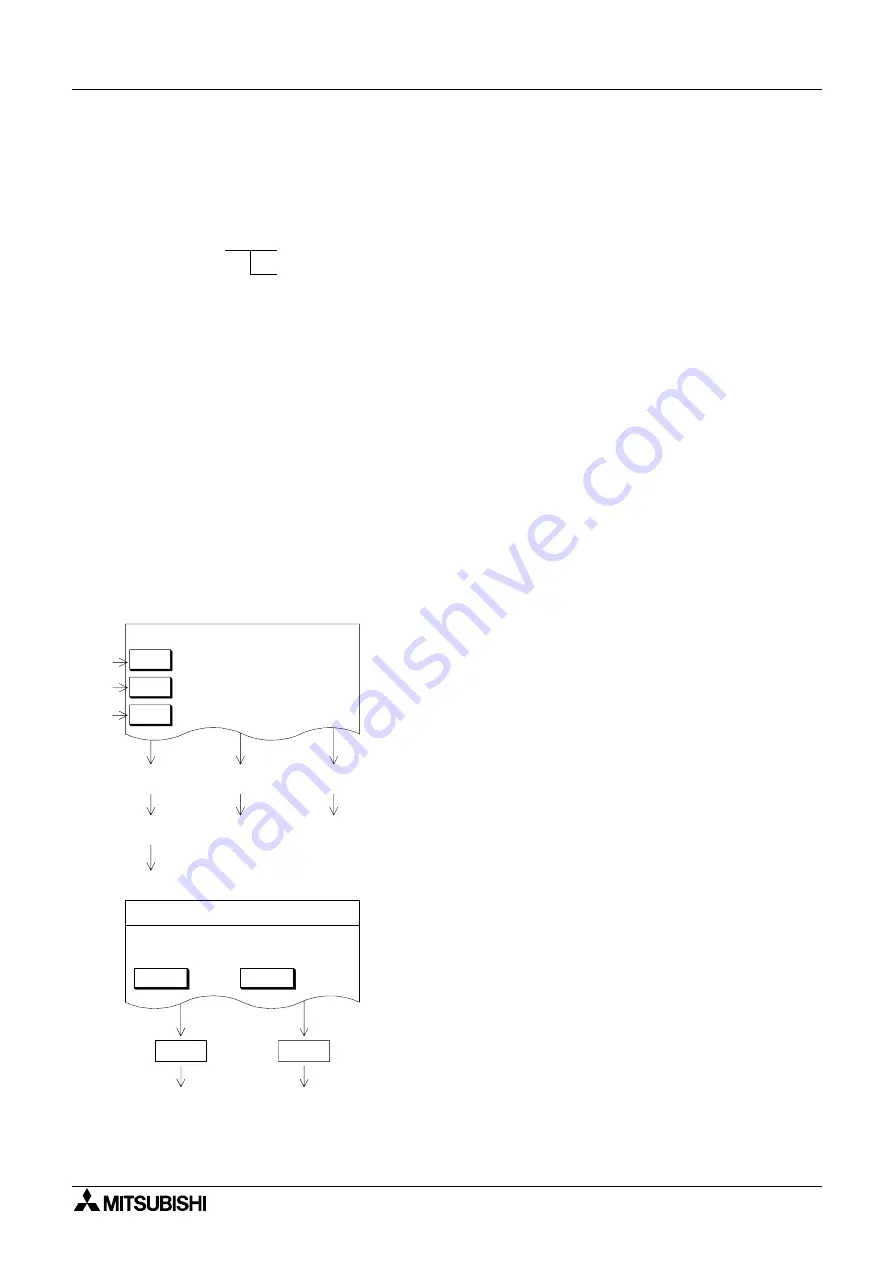
Example of screen changeover using touch keys
•
Screen No. 1 is created, and screen changeover is set
so that a corresponding screen is displayed when
either ST. 1 to ST. 3 are is pressed.
ST. 1 key :Fixed value = 2
ST. 2 key : Fixed value = 3
ST. 3 key : Fixed value = 4
* Characters "ST. 1" to "ST. 3" are set as touch keys
or "Text" objects.
•
When ST. 1 key is pressed, screen No. 2 is displayed
in accordance with the assigned fixed value.
NEXT key : Fixed value = 6
MENU key : Fixed value = 1
When the MENU key is pressed, screen No. 1 is
displayed in accordance with the assigned fixed value.
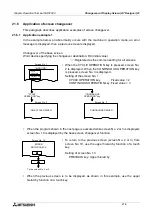
Or the previous screen is displayed in accordance with
the upper hierarchy specification described in the next
paragraph.
Touch key
Fixed value
:Allows to enter the No. of a screen to be displayed next.
Upper hierarchy :Returns to the previous screen.
ST. 1
To screen
No. 2
* SETTING MENU *
Screen No. 1
* STATION 1 (1/2) *
MENU
NEXT
Screen No. 1 : Menu screen
To screen
No.6
To screen
No.1
NEXT
100
NUMBER OF TARGETS
Touch
key
No.0
No.1
No.2
To screen
No. 3
To screen
No.4
ST. 1
ST. 2
ST. 3
NUMBER OF MANUFACTURE
PROCESSING TIME
SCREW TIGHTENING NUMBER
ST. 2
ST. 3
MENU
NEXT
Summary of Contents for F930GOT-BWD
Page 1: ...OPERATION MANUAL GOT F900 ...
Page 4: ...Graphic Operation Terminal GOT F900 ii ...
Page 6: ...Graphic Operation Terminal GOT F900 iv ...
Page 14: ...Graphic Operation Terminal GOT F900 Contents xii ...
Page 16: ...Graphic Operation Terminal GOT F900 Manual configuration and various data 2 MEMO ...
Page 30: ...Graphic Operation Terminal GOT F900 Introduction 1 1 14 MEMO ...
Page 34: ...Graphic Operation Terminal GOT F900 Outside dimensions 3 3 2 MEMO ...
Page 38: ...Graphic Operation Terminal GOT F900 Part names 4 4 4 MEMO ...
Page 42: ...Graphic Operation Terminal GOT F900 Installation 5 5 4 MEMO ...
Page 90: ...Graphic Operation Terminal GOT F900 Creation of Display Screens 8 8 32 MEMO ...
Page 154: ...Graphic Operation Terminal GOT F900 Alarm Mode 12 12 14 MEMO ...
Page 164: ...Graphic Operation Terminal GOT F900 Test Mode 13 13 10 MEMO ...
Page 174: ...Graphic Operation Terminal GOT F900 Connection to Bar Code Reader 15 15 2 MEMO ...
Page 180: ...Graphic Operation Terminal GOT F900 Screen Hard Copy Function 16 16 6 MEMO ...
Page 320: ...Graphic Operation Terminal GOT F900 Creation of Display Screen GT Designer 20 20 46 MEMO ...
Page 341: ......

