EN-54
Connection
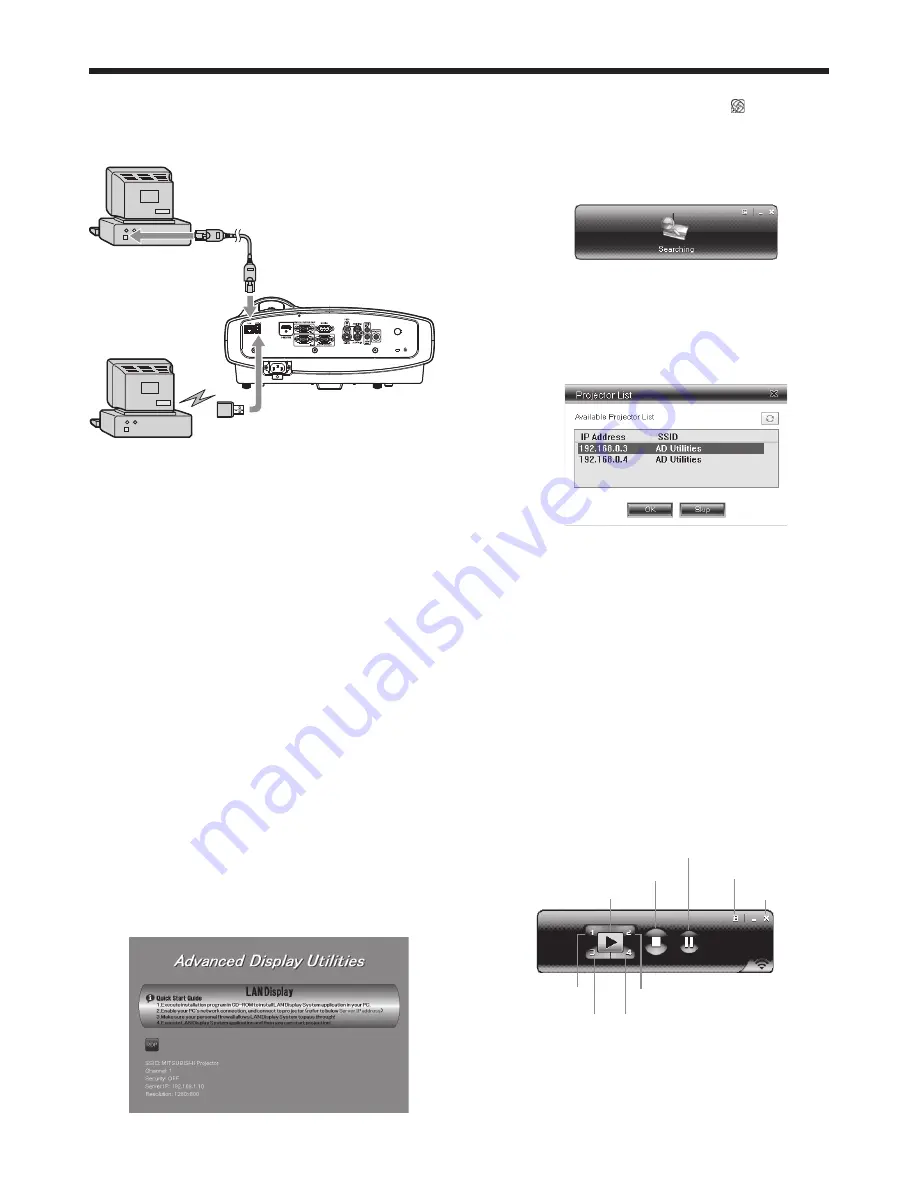
Connect the projector and the computer either by
using a commercially available LAN cable or USB
wireless LAN adapter.
LAN cable
(option)
Computer
Computer
USB wireless
LAN adapter
(option)
To LAN
terminal
To USB-A
terminal
Important:
• For wired LAN connection, use a category-5 LAN
cable. Both straight-through and crossover cables
can be used.
• The USB-A terminal on this projector is compatible
with USB 2.0.
• When using a USB hub, you are recommended to
use the one with external power supply.
• Some USB hubs cannot be used depending on the
specifi cations.
• Some USB wireless LAN adapters cannot be used
depending on the specifi cations.
• When connecting a USB wireless LAN adapter, do
not use a USB hub.
• IP address, subnet mask, default gateway values
are the same for both wired LAN and wireless LAN.
• Data are not fi ltered between wired LAN and
wireless LAN interface.
Projection
Selecting a LAN DISPLAY input
1. Press the LAN DISP. button on the remote control
or the SOURCE button on the projector, and select
LAN DISPLAY.
• When the LAN DISPLAY input is selected, the
splash screen for LAN DISPLAY appears on the
screen.
Starting the LAN Display System
2. Click the LAN Display System icon “
” to execute
the program.
• The program starts to search for projectors
automatically.
• During searching for projectors, Searching icon
is displayed.
• When a projector is found, the computer logs in
to the projector automatically and the computer
image is projected. The main user interface
appears on the computer screen.
• When multiple projectors are found, the
following window appears on the computer
screen.
Select a projector and click [OK]. The computer
logs in to the projector and the computer image
is projected.
Important:
• If the computer resolution is higher than 1280
x 800, a confi rmation dialog for changing the
computer resolution is displayed. When [OK] is
selected, the computer resolution will be changed
according to the projected image. When [Cancel]
is selected, the computer resolution will not
be changed and the projected image size will
be smaller than the screen size. The computer
resolution will be automatically recovered after the
LAN Display System is ended.
Operating the LAN Display System
3. Click the buttons on the main user interface to
operate the projection.
Exit button
Play button
Split 1 button
Split 3 button
Split 2 button
Split 4 button
Menu button
Freeze button
Stop button
• Play
button:
Projects the image in full screen.
• Split 1-4 buttons:
Click either of the buttons to project the image
on relevant split screen.
Advanced display utilities (continued)


