


8
Using The Smart Life App
1. Connect your smartphone or tablet to your Wi-Fi network. (The wireless network must be
2.4GHz. All Wi-Fi routers have a 2.4GHz band, however, some newer routers are dual band with
both 2.4GHz and 5GHz. When scanning your available networks, if you see a single network
belonging to you, then this will be the correct band. If you see two networks, the name of the
network should help you identify which band it belongs to, so a 2.4GHz network will have
24G, 2.4, 24 or something similar in the name, whilst the 5GHz network will have 5 or 5G in the
name).
2. Scan the QR code on the next page using your phone or tablet to download the Smart Life
app, or simply search ‘smart life’ in your app store. The icon for the app is displayed below.
3. If you don’t already have an account, set one up using either your phone number or email
address by clicking Register. Keep your password in a safe place.
4. Once you’re set up, click either “Add Device” in the centre of the screen, or the “+” icon in the
top right corner.
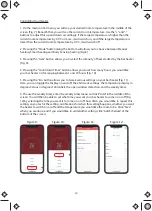
5. On the next screen, under the “Small Home Appliances” category on the left, scroll down
and select “Heater” in the “Life” subcategory (Fig. 1).
6. Next, the heater needs to placed in pairing mode – you can do this by quickly pressing the
on/off switch at the back of the panel 3-5 times until you see the LED light on the front of the
panel blink red and blue rapidly.
7. Now on the app, confirm that the light is blinking rapidly, and enter your Wi-Fi network
information (the name of the network and the password) (Fig. 2).
8. The app will now scan for the heater, and connect once it has paired.
9. If the panel light blinks red on and off slowly (once every 2 seconds), then you need to click
“Other Mode” in the top right corner of blinking indicator confirmation screen (Fig. 3), and
choose “AP Mode”. If your heater is already paired then you can skip the remaining steps.
10.Confirm on the next screen that the LED light is blinking slowly (Fig. 4).
11. Enter your Wi-Fi network details on the next screen (network name and password), before
connecting your phone to a new Wi-Fi network named “SmartLife_XXXX” where the “XXXX”
will be randomised numbers (Fig. 5).
12. Once you’re connected to “SmartLife_XXXX”, click the button that says “Confirm the hot
spot, next” (Fig. 6), and the app will begin attempts to connect to the wireless temperature
sensor.
13. Once connected, you will see “Device added successfully” on your screen, and you will see
the control menu on your screen (Fig. 7).


