


Installation Notes
This heater should be installed by a qualified electrician.
Before and during the installation, please ensure that the heater is disconnected from the
power, and that the heater has cooled down if it has been on.
The heater can be installed both horizontally and vertically.
The heater must be installed at a minimum height of 1.8m above the floor, OR at such a
height that it cannot be touched directly whilst on.
When installing on the wall, ensure that the heater is installed at an angle no more than 90o
in relation to the wall, and no less than 45
o
in relation to the wall.
When installing the heater on the ceiling, ensure that it is either facing directly downwards,
or at an angle no less than 45
o
in relation to the ceiling.
When installing the heater vertically, please ensure that the power cord is at the bottom of
the heater.
When the heater is on, the body of the heater will increase, so please ensure that the power
cord is tucked away safely and never comes into contact with the body of the heater.
Do not install the heater near any flammable materials.
Ensure that the heater is installed at a minimum of
150
mm away from ceilings and walls.
For outdoor installations, please use a weatherproof power socket suitable for outdoor use.
Before drilling into any walls for installation, please ensure there are no wires, water pipes or
gas pipes in the area where the heater is being installed.
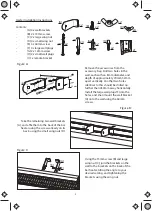
The heater must be installed using the mounting brackets provided with the heater from the
manufacturer.
4
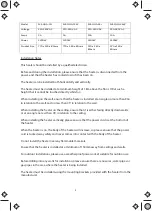
Model
MS-QHA-12J
MS-QHA-12W
MS-QHA-24J
MS-QHA-24W
Voltage
220-240V AC
220-240V AC
220-240V AC
220-240V AC
Amps
5A
5A
10A
10A
Power
1200W
1200W
2400W
2400W
Product Size
770 x 160 x 80mm
770 x 160 x 80mm
970 x 160 x
80mm
970 x 160 x
80mm


